Home>Articles>How To Make DIY Wood Beams To Add Farmhouse Style To A Basic Ceiling
Articles
How To Make DIY Wood Beams To Add Farmhouse Style To A Basic Ceiling
Modified: August 26, 2024
Learn how to make DIY wood beams to transform a regular ceiling into a charming farmhouse style. Get step-by-step instructions and tips in our articles!
(Many of the links in this article redirect to a specific reviewed product. Your purchase of these products through affiliate links helps to generate commission for Storables.com, at no extra cost. Learn more)
Introduction
Welcome to our step-by-step guide on how to make DIY wood beams to add farmhouse style to a basic ceiling. If you are looking to bring rustic charm and character to your home, wooden beams are the perfect addition. Not only do they create a cozy and inviting atmosphere, but they also add architectural interest to an otherwise plain ceiling.
Wood beams have been used in construction for centuries, and they continue to be a popular design element in contemporary farmhouse and rustic-inspired decor. By creating your own DIY wood beams, you can customize the size, finish, and placement according to your specific needs and design preferences.
In this article, we will walk you through the process of measuring, planning, purchasing the materials, and constructing your own wood beams. We will also share tips on how to properly sand, stain, and install the beams to achieve a professional and polished look. So, let’s get started and transform your ceiling into a stunning focal point!
Key Takeaways:
- Transform your space with DIY wood beams, adding rustic charm and architectural interest to a plain ceiling. From measuring and planning to sanding and staining, create a cozy and inviting atmosphere with farmhouse style.
- Elevate your home with custom wood beams, tailored to your design preferences. Follow step-by-step instructions for precise measuring, cutting, and installation, and add finishing touches for a stunning farmhouse focal point.
Read more: How To Make Beams For Ceiling
Materials and Tools Needed
Before you start your DIY wood beam project, gather the following materials and tools:
Materials:
- 1×6 or 2×6 construction-grade lumber: This will serve as the base for your wood beams. The amount will depend on the length and number of beams you plan to create.
- Wood stain or paint: Choose a finish that complements your home’s decor. Stains enhance the natural beauty of the wood, while paint allows for more color customization.
- Wood sealer or varnish: Applying a protective coat will help maintain the integrity of the wood over time.
- Construction adhesive: This will be used to secure the beams to the ceiling.
- Wood screws: Ensure they are long enough to secure the beams to the joists or support beams in your ceiling.
- Sandpaper: Use various grits for sanding the wood, starting with a coarse grit and finishing with a finer grit for a smooth surface.
- Clean cloth or brush: This is for applying the stain or paint.
- Tape measure: Essential for accurate measurements.
- Pencil: For marking measurements and cuts on the wood.
- Saw: A miter saw or circular saw will be needed to cut the wood to the desired length.
- Sander: An electric sander will speed up the sanding process.
- Ladder or scaffolding: Depending on the height of your ceiling, you may need a ladder or scaffolding to reach the installation area.
- Protective gear: Safety glasses, gloves, and a dust mask should be worn when sanding and working with wood.
Make sure to gather all the necessary materials and ensure you have the proper tools on hand before beginning your project. This will help ensure a smooth and efficient workflow.
Step 1: Measure and Plan
The first step in creating DIY wood beams is to accurately measure and plan the size and placement of your beams. Here’s how to do it:
- Measure the length and width of your ceiling: Use a tape measure to determine the dimensions of your ceiling. This will help you determine the number and size of beams needed. It’s essential to measure accurately to avoid any miscalculations during the construction process.
- Determine the desired spacing between the beams: Consider the overall aesthetic and style you want to achieve. Typical spacing for wood beams ranges from 2 to 4 feet apart, depending on the size of your ceiling and personal preference.
- Mark the placement of the beams: Using a pencil, mark the spots on the ceiling where the beams will be installed. Make sure to consider any obstructions or existing fixtures that may affect the positioning of the beams.
- Sketch out the design: This step is optional but can be helpful in visualizing the final result. Create a simple sketch or layout of the ceiling, indicating the placement of the beams and the dimensions for each individual beam.
Take your time during the measuring and planning phase to ensure accurate measurements and proper placement. This will help you create a cohesive and visually appealing design once the wood beams are installed.
Step 2: Purchase and Cut the Wood
Now that you have measured and planned your wood beam project, it’s time to purchase the necessary lumber and cut it to size. Follow these steps:
- Choose the right type of lumber: Select construction-grade lumber such as 1×6 or 2×6 boards. These are readily available at most home improvement stores and provide the strength and stability needed for supporting the weight of the beams.
- Calculate the length of the beams: Measure the distance between the marked spots on your ceiling to determine the length of each beam. If the beams span the entire width of the ceiling, make sure to account for any additional length needed for overhang or trim on the ends.
- Purchase the lumber: Based on your measurements, purchase enough lumber to create the desired number and length of beams. It’s a good idea to buy a few extra boards to account for any errors or imperfections in the wood.
- Prepare for cutting: Set up a safe and secure workspace, preferably outdoors or in a well-ventilated area. Use sawhorses or a sturdy workbench to support the boards during cutting.
- Measure and mark: Use a tape measure and pencil to measure and mark the length of each beam on the lumber boards. Double-check your measurements to ensure accuracy.
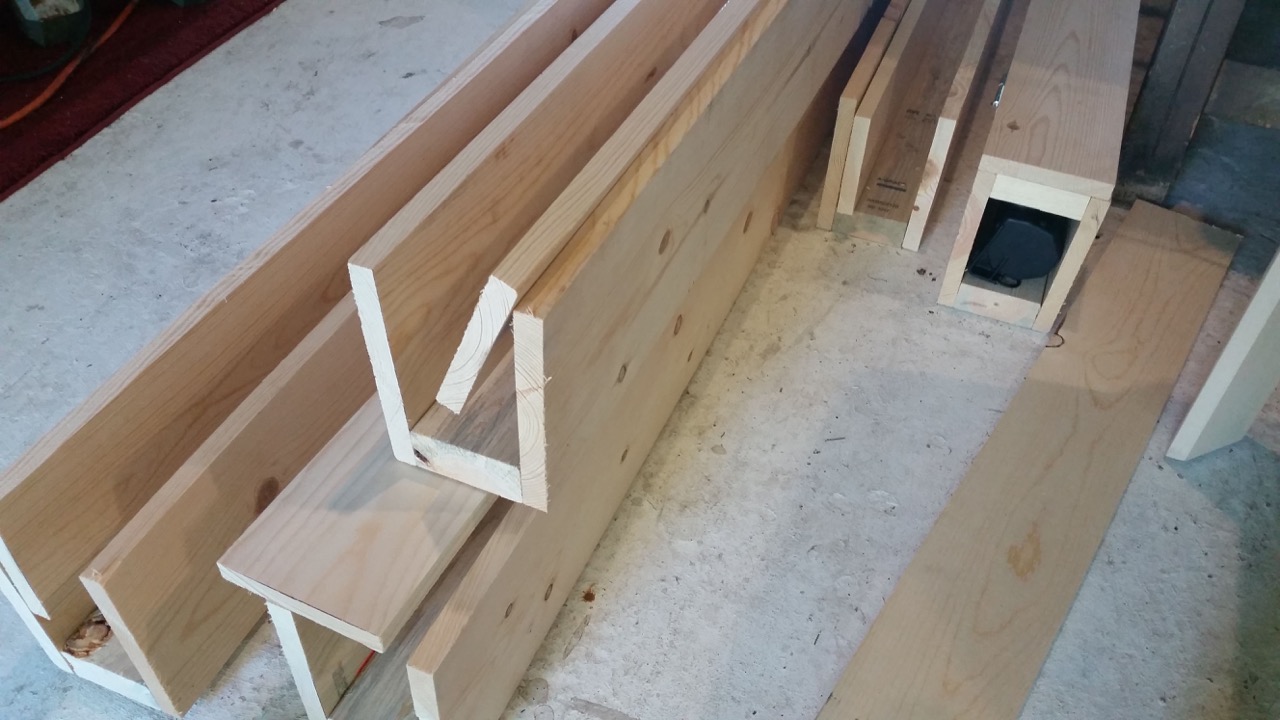
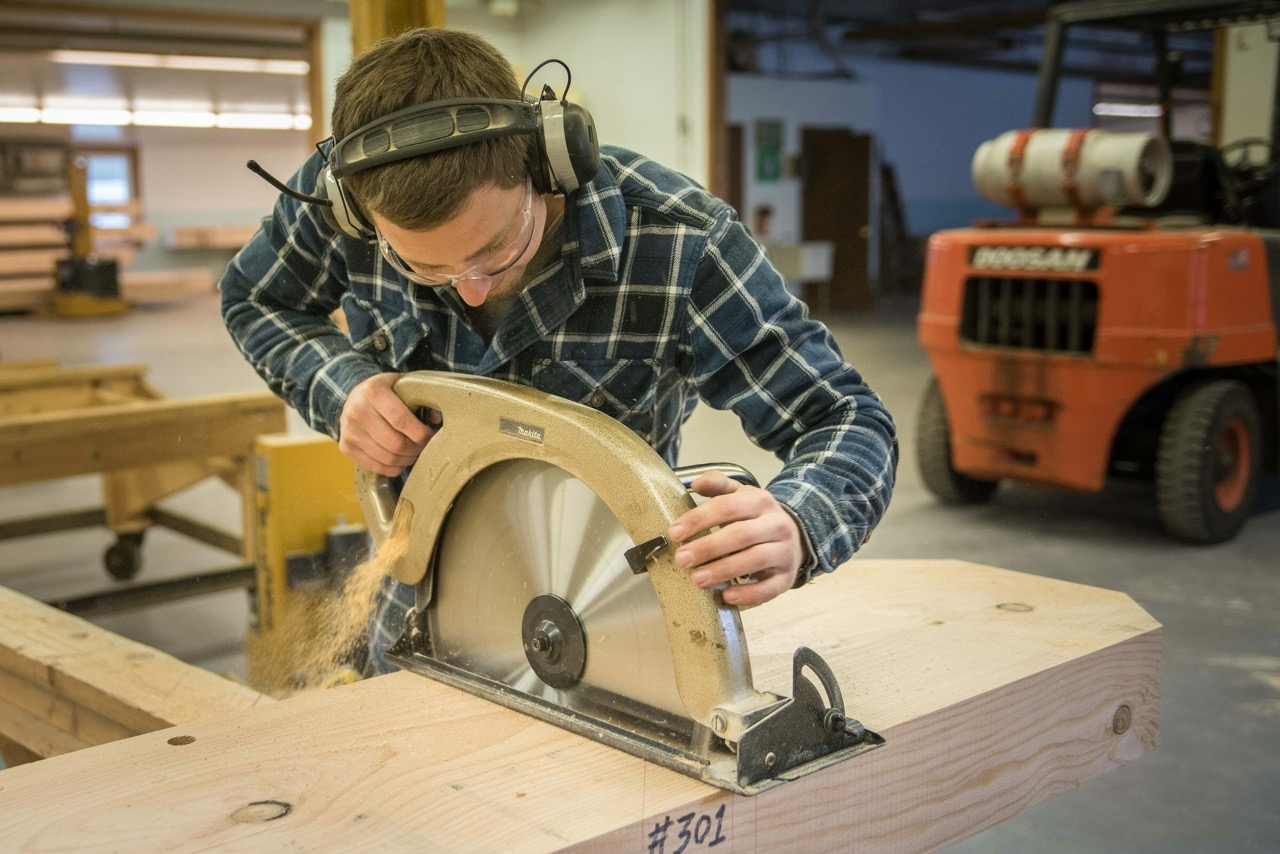
- Cut the wood: With the marked lines as your guide, use a miter saw or circular saw to cut the boards to the desired length. Take your time and use steady, controlled movements to ensure clean and precise cuts.
- Label the beams: To avoid confusion during installation, label each cut piece of wood with its corresponding placement location on the ceiling.
Remember to wear appropriate safety gear, such as safety glasses and gloves, when handling and cutting the wood. Take your time to ensure accurate cuts, as precise measurements and clean edges are crucial for a professional-looking finished project.
Read more: How To Hide Beam In The Ceiling
Step 3: Sand and Stain the Wood
Once you have cut the wood beams to the desired size, it’s time to sand and stain them to enhance their appearance and durability. Follow these steps:
- Sand the wood: Start by using a coarse-grit sandpaper to remove any rough edges, splinters, or imperfections on the surface of the wood. Then, gradually switch to a finer-grit sandpaper to achieve a smooth and even finish. Be sure to sand along the grain of the wood for the best results.
- Wipe off dust: Using a clean cloth or tack cloth, thoroughly wipe off any sanding dust from the surface of the wood. This will ensure a clean and smooth surface for applying the stain.
- Choose a stain: Select a wood stain color that matches your desired aesthetic. Whether you prefer a natural wood look or a darker hue, choose a stain that complements your overall design vision.
- Apply the stain: Stir the stain well to ensure an even consistency. Using a brush or clean cloth, apply the stain to the wood beams in long, smooth strokes, following the direction of the grain. Work in small sections, ensuring thorough coverage. Let the stain penetrate the wood for the recommended amount of time as per the stain manufacturer’s instructions.
- Wipe off excess stain: After the recommended time, use a clean cloth to wipe off any excess stain that has not been absorbed by the wood. This step is crucial for achieving an even and consistent color tone.
- Allow time to dry: Allow the stained wood beams to dry completely according to the stain manufacturer’s instructions. This usually takes 24 to 48 hours. Make sure the beams are placed in a well-ventilated area while they dry.
- Apply a protective finish: If desired, apply a wood sealer or varnish to protect the stained wood and enhance its longevity. Use a brush or clean cloth to carefully apply the finish following the instructions provided by the manufacturer.
By sanding and staining the wood beams, you not only bring out their natural beauty but also protect them from moisture and wear. This step adds depth and richness to the wood, enhancing the overall aesthetic of your DIY wood beam project.
When making DIY wood beams for a farmhouse-style ceiling, consider using reclaimed or distressed wood for an authentic look. Sand and stain the wood to match your desired aesthetic.
Step 4: Install the Wood Beams
Now that you’ve prepared the wood beams, it’s time to install them onto your ceiling. Follow these steps for a successful installation:
- Locate the ceiling joists: Use a stud finder or tap on the ceiling to locate the position of the joists. It’s important to secure the wood beams to the joists for proper support.
- Mark the placement: Using a pencil, mark the exact position on the ceiling where each wood beam will be installed. This will serve as a guide during the installation process.
- Apply construction adhesive: Apply a generous amount of construction adhesive along the backside of each wood beam. This will help secure the beams to the ceiling and ensure a strong bond.
- Position the wood beams: Carefully lift and position each wood beam onto the marked spots on the ceiling, ensuring they align with the joists. Press firmly to secure the beams in place.
- Secure the beams: Use wood screws to secure the wood beams to the joists. Drive the screws through the sides of the wood beams into the joists to ensure a strong and secure installation. Space the screws evenly along the length of the beams for added stability.
- Repeat for all beams: Follow the same process for each wood beam until all beams are securely installed on the ceiling.
- Double-check alignment and stability: Take a step back and visually inspect the wood beams to ensure they are aligned and securely attached. Make any necessary adjustments or tighten screws as needed.
It’s important to take your time during the installation process to ensure that the wood beams are properly aligned and securely fastened. Having a helping hand can also make the installation easier and safer. Once the beams are installed, you will immediately notice the transformation they bring to your space.
Step 5: Finishing Touches and Decoration
Now that the wood beams are securely installed, it’s time to add the finishing touches and decoration to complete the look. Follow these steps to enhance the overall aesthetic of your DIY wood beam project:
- Fill in any gaps: If there are any small gaps between the wood beams and the ceiling or walls, use a paintable caulk or wood filler to fill them in. This will create a seamless and polished appearance.
- Trim and molding: Consider adding trim or molding around the edges of the wood beams to give them a more refined look. This can be achieved with simple miter cuts and attaching the trim using construction adhesive or finishing nails.
- Decorate the beams: Add decorative elements to the wood beams to further enhance their visual appeal. This could include faux metal straps or brackets, decorative hardware, or hanging pendant lights. Be creative and choose elements that align with your desired style.
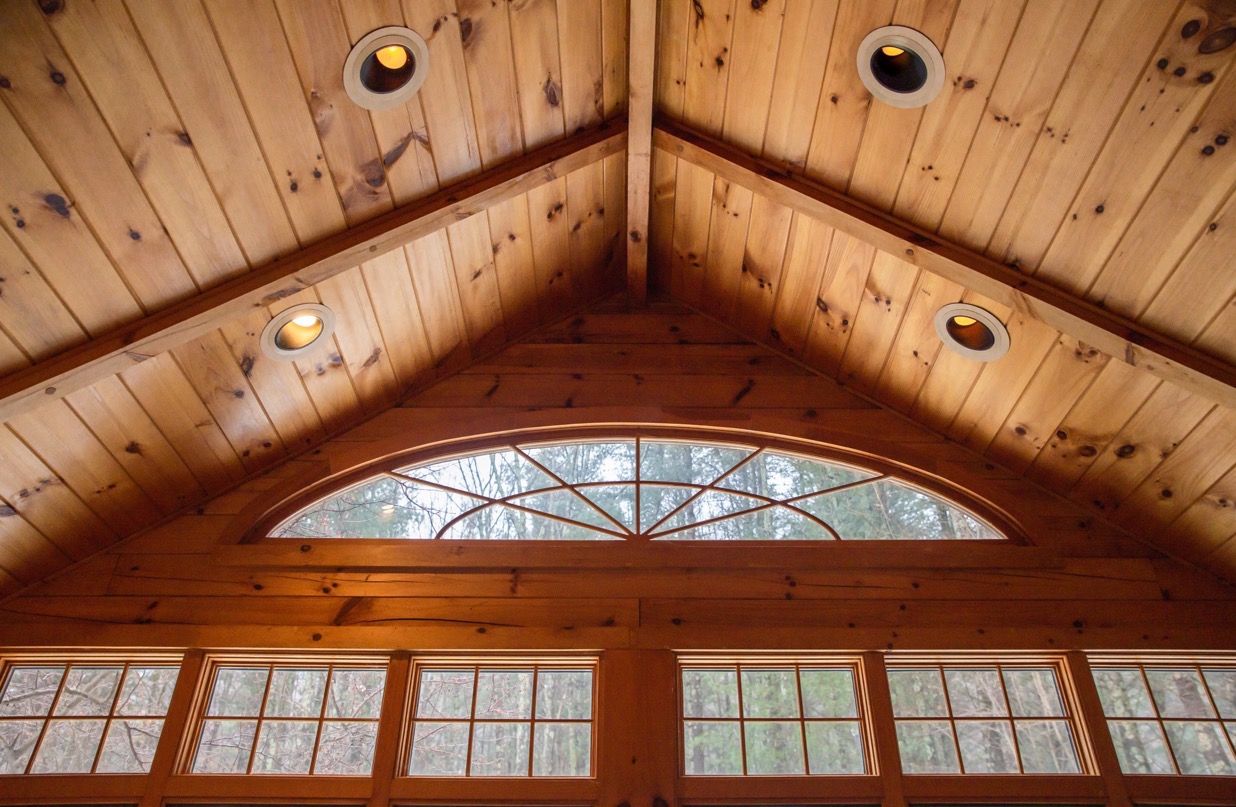
- Lighting fixtures: Install recessed or track lighting along the wood beams to create a warm and inviting ambiance. This will highlight the beauty of the beams and provide additional lighting to the space.
- Styling with accessories: Decorate the space below the wood beams with farmhouse-inspired accessories such as rustic signs, vintage lanterns, or potted plants. These additions will further enhance the farmhouse style and create a cohesive aesthetic.
- Final inspection: Take a step back and carefully inspect the completed project. Check for any loose screws, gaps, or imperfections that need attention. Make any necessary adjustments to ensure a flawless finished look.
Remember to let your personal style shine through during the finishing touches and decoration phase. Add elements that reflect your unique taste and make the space truly your own. The combination of the wood beams and thoughtful decoration will transform your ceiling into a stunning focal point with farmhouse charm.
Conclusion
Congratulations! You have successfully completed your DIY wood beam project, adding farmhouse style and character to your basic ceiling. By following the step-by-step guide outlined in this article, you have transformed your space into a cozy and inviting environment.
From measuring and planning to cutting and installing, each step was essential in creating the perfect wood beams for your ceiling. The careful sanding and staining process enhanced the natural beauty of the wood, while the installation added structural interest and architectural appeal.
Remember, attention to detail is crucial for achieving a professional and polished look. Take the time to properly measure, cut, and install the wood beams, ensuring they align with the joists and are securely fastened. Adding the finishing touches, such as trim, lighting fixtures, and accessories, further enhanced the overall aesthetic and turned your basic ceiling into a stunning farmhouse feature.
Now, sit back and enjoy the cozy and rustic atmosphere created by your DIY wood beams. Whether in your living room, kitchen, or bedroom, these beams have added a touch of warmth and charm to your home. Soak in the compliments from friends and family who will surely admire your craftsmanship.
Remember, you can use the knowledge and skills you gained from this project to tackle future DIY woodworking endeavors. The possibilities are endless, and your creativity can continue to shine through as you take on new projects and embrace the world of DIY.
Thank you for following along with our guide on how to make DIY wood beams to add farmhouse style to a basic ceiling. We hope you enjoy the beauty and character that these wood beams bring to your home.
Frequently Asked Questions about How To Make DIY Wood Beams To Add Farmhouse Style To A Basic Ceiling
Was this page helpful?
At Storables.com, we guarantee accurate and reliable information. Our content, validated by Expert Board Contributors, is crafted following stringent Editorial Policies. We're committed to providing you with well-researched, expert-backed insights for all your informational needs.


0 thoughts on “How To Make DIY Wood Beams To Add Farmhouse Style To A Basic Ceiling”