Home>Articles>How To Build An Outdoor Cooler Cabinet To Serve Drinks In Style
Articles
How To Build An Outdoor Cooler Cabinet To Serve Drinks In Style
Modified: October 28, 2024
Discover expert articles on how to build an outdoor cooler cabinet for serving drinks in style. Enhance your outdoor entertaining with these DIY tips and tricks.
(Many of the links in this article redirect to a specific reviewed product. Your purchase of these products through affiliate links helps to generate commission for Storables.com, at no extra cost. Learn more)
Introduction
Welcome to the ultimate guide on how to build an outdoor cooler cabinet to serve drinks in style! Having an outdoor space where you can entertain and enjoy the company of friends and family is a wonderful addition to any home. And what better way to elevate your outdoor gatherings than by having a stylish and functional cooler cabinet?
A cooler cabinet is not only a convenient way to keep your drinks cold, but it also adds a touch of elegance and sophistication to your outdoor space. Whether you’re hosting a summer BBQ, a pool party, or simply enjoying a relaxing evening on your patio, a well-designed cooler cabinet is sure to impress your guests and make your outdoor entertaining experience even better.
In this comprehensive guide, we will walk you through the step-by-step process of building your own outdoor cooler cabinet. We’ll cover everything from the planning and design phase to gathering the necessary materials, cutting and assembling the cabinet, adding insulation, and installing the cooler itself. We’ll even show you how to create a drainage system to ensure that your cabinet stays dry and functional.
So, if you’re ready to embark on a DIY project that combines functionality, aesthetics, and your love for outdoor entertaining, let’s dive in and get started on building your own outdoor cooler cabinet!
Key Takeaways:
- Elevate your outdoor entertaining with a stylish and functional cooler cabinet. From planning to finishing touches, this guide provides step-by-step instructions for creating a DIY masterpiece that impresses guests and enhances your outdoor space.
- Ensure your outdoor cooler cabinet is a success by prioritizing quality materials, proper insulation, and a secure drainage system. Add finishing touches to reflect your personal style and enjoy the convenience of serving cold drinks in style.
Read more: How To Build Outdoor Cabinets
Materials Needed
Before you begin building your outdoor cooler cabinet, it’s essential to gather all the necessary materials. Having everything prepared in advance will make the construction process smoother and more efficient. Here’s a list of the materials you’ll need:
- 1 sheet of plywood or medium-density fiberboard (MDF) for the cabinet structure
- 1 sheet of plywood or MDF for the cabinet doors
- 2×2 lumber for framing
- Cooler box or insert that fits your desired size
- Foam insulation
- Screws
- Hinges
- Handles or pulls for the cabinet doors
- Waterproof glue
- Exterior paint or stain
- Paintbrushes or rollers
- Sandpaper
- Drill
- Saw (circular saw or table saw)
- Measuring tape
Additionally, you may also need the following tools:
- Clamps
- Sanding block
- Level
- Square
- Safety goggles
- Gloves
It’s important to choose materials that are suitable for outdoor use and can withstand exposure to the elements. Opt for pressure-treated lumber or cedar if possible, as they are both durable and resistant to rot and decay.
Remember, the dimensions and quantities of materials may vary depending on the size and design of your cooler cabinet. Take accurate measurements of the space where you plan to install the cabinet and adjust the quantities accordingly.
Now that you’ve gathered all the necessary materials, you’re ready to move on to the planning and design phase of your outdoor cooler cabinet!
Step 1: Planning and Design
Before diving into the construction process, it’s crucial to spend some time carefully planning and designing your outdoor cooler cabinet. This step will ensure that you have a clear vision of what you want to build and help you avoid any costly mistakes.
Here are some important considerations to keep in mind during the planning and design phase:
- Size and Location: Determine the ideal size of your cooler cabinet based on the available space in your outdoor area. Measure the dimensions and take into account any restrictions or obstacles that may affect the placement of the cabinet.
- Functional Features: Consider how you plan to use the cabinet. Will it be a standalone unit or incorporated into an existing outdoor kitchen setup? Think about features such as storage space for drinks, utensils, or glasses, as well as a countertop for convenient serving.
- Aesthetics: Decide on the overall style and look of your cooler cabinet. Consider the architectural elements or theme of your outdoor space and choose materials and finishes that complement the existing design.
- Accessibility: Determine where the cooler box or insert will be placed within the cabinet and plan for easy access. You may want to consider adding a hinged lid or a sliding mechanism.
- Insulation: Evaluate the insulation requirements based on your climate. If you live in a hot area, it’s crucial to ensure proper insulation to keep your drinks cool for longer periods.
- Drainage System: Reflect on how you will handle the condensation and melting ice. Plan for a drainage system to prevent water accumulation inside the cabinet.
Take the time to sketch out your ideas and create a detailed plan with measurements and specifications. This will serve as your blueprint throughout the construction process.
By carefully planning and designing your outdoor cooler cabinet, you’ll set yourself up for success and create a functional and visually appealing addition to your outdoor space.
Once you’ve finalized your plans, it’s time to move on to the next step: gathering the materials needed for your project.
Step 2: Gathering Materials
Now that you have a clear plan and design for your outdoor cooler cabinet, it’s time to gather all the necessary materials. Ensuring you have everything in advance will save you time and frustration during the construction process.
Based on your design and plan, refer back to the materials list provided earlier in this guide and make a checklist. Double-check the list to ensure you haven’t missed any crucial components.
Here are some additional tips to keep in mind when gathering materials:
- Quality: Choose high-quality materials that are durable and suitable for outdoor use. Opt for pressure-treated lumber or cedar for the cabinet structure, as they are resilient and resistant to rot and decay.
- Cooler Box or Insert: Select a cooler box or insert that fits the dimensions and design of your cabinet. Consider the capacity and insulation properties of the cooler to ensure it meets your requirements for keeping drinks cold.
- Insulation: Purchase foam insulation that is designed for outdoor use and appropriate for your climate. Look for insulation with a high R-value to provide excellent thermal resistance.
- Hardware: Choose screws, hinges, and handles that are resistant to rust and corrosion. Stainless steel or galvanized hardware is ideal for outdoor applications.
- Paint or Stain: Select an exterior-grade paint or stain that suits your aesthetic preferences and complements the overall design of your outdoor space. Ensure the paint or stain is weather-resistant for long-lasting protection.
When gathering materials, it’s always a good idea to buy extra screws, paint, and other consumables. This will come in handy in case of any mistakes, and you’ll have some spare supplies for future touch-ups or repairs.
Once you have all the materials on your checklist, organize them in your workspace, and ensure you have all the necessary tools as well. Having everything readily available will make the construction process much smoother.
With the materials in hand, you’re now ready to move on to the next step: cutting and assembling the cabinet. Stay tuned for the next installment of this guide!
Step 3: Cutting and Assembling the Cabinet
With all the necessary materials gathered, it’s time to dive into the construction process of your outdoor cooler cabinet. In this step, we will cover cutting the components and assembling the cabinet structure.
Follow these steps to cut and assemble your cabinet:
- Measurements: Take your plan and carefully measure and mark the dimensions on the plywood or MDF sheets. Use a measuring tape and a square to ensure accurate measurements.
- Cutting: Use a circular saw or a table saw to cut out the different components of the cabinet according to your measurements. Take your time to make precise and clean cuts.
- Assembly: Start by assembling the frame of the cabinet using the 2×2 lumber. Use screws and a drill to secure the pieces together. Ensure the corners are square and the frame is level.
- Sides and Back: Attach the cut plywood or MDF pieces to the frame to form the sides and back of the cabinet. Use screws and a drill to secure the panels in place.
- Bottom and Top: Attach the remaining plywood or MDF pieces to form the bottom and top of the cabinet. Secure them with screws, ensuring they are flush with the sides and back.
- Doors: Cut the plywood or MDF to the desired dimensions for the cabinet doors. Attach hinges to the doors and then attach the doors to the cabinet using screws.
- Reinforcement: To add stability and strength, consider adding additional 2×2 lumber supports inside the cabinet. Screw them securely to the sides and bottom of the cabinet.
Throughout the assembly process, double-check the measurements and alignment to ensure everything fits together properly. Use clamps to hold pieces in place as you work, and make any necessary adjustments before moving on to the next step.
Once the cabinet is fully assembled, sand the edges and surfaces to create a smooth finish. Remove any rough patches or splinters using sandpaper or a sanding block.
Congratulations! You have successfully cut and assembled the structure of your outdoor cooler cabinet. In the next step, we will focus on adding insulation to keep your drinks cool and refreshing. Stay tuned!
When building an outdoor cooler cabinet, make sure to use weather-resistant materials such as cedar or teak to ensure durability and longevity.
Read more: How To Build An Outdoor Tv Cabinet
Step 4: Adding Insulation
With the cabinet structure assembled, it’s time to move on to an important step in building your outdoor cooler cabinet: adding insulation. Insulation is crucial for maintaining cold temperatures inside the cabinet and ensuring that your drinks stay chilled for extended periods.
Follow these steps to add insulation to your cooler cabinet:
- Prepare the Surface: Clean the interior surfaces of the cabinet to remove any dust or debris. This will ensure a secure bond between the insulation and the cabinet.
- Measure and Cut Insulation: Using the dimensions of the cabinet, measure and cut the foam insulation sheets to fit the walls, bottom, and top of the cabinet. Use a sharp utility knife to make clean and precise cuts.
- Apply Adhesive: Apply a layer of waterproof glue onto the surfaces where the insulation will be placed. Spread the glue evenly using a paintbrush or a roller.
- Attach Insulation: Press the cut insulation sheets firmly onto the glued surfaces, ensuring good adhesion. Repeat this step for each wall, the bottom, and the top of the cabinet.
- Seal Gaps: If there are any gaps or seams between the insulation pieces, use foam gap filler or caulking to seal them. This will prevent air leaks and enhance the insulation properties.
- Allow for Drying Time: Let the glue and sealant dry completely before moving on to the next step. Follow the manufacturer’s instructions for the recommended drying time.
Insulating your outdoor cooler cabinet will help create a barrier that minimizes heat transfer. This insulation layer will prevent warm air from entering the cabinet and cold air from escaping, ensuring that your drinks stay chilled for longer periods.
Once the insulation is set and dried, you’re ready to move on to the next step: installing the cooler itself. Stay tuned for step 5, where we will guide you through this exciting phase of your outdoor cooler cabinet construction!
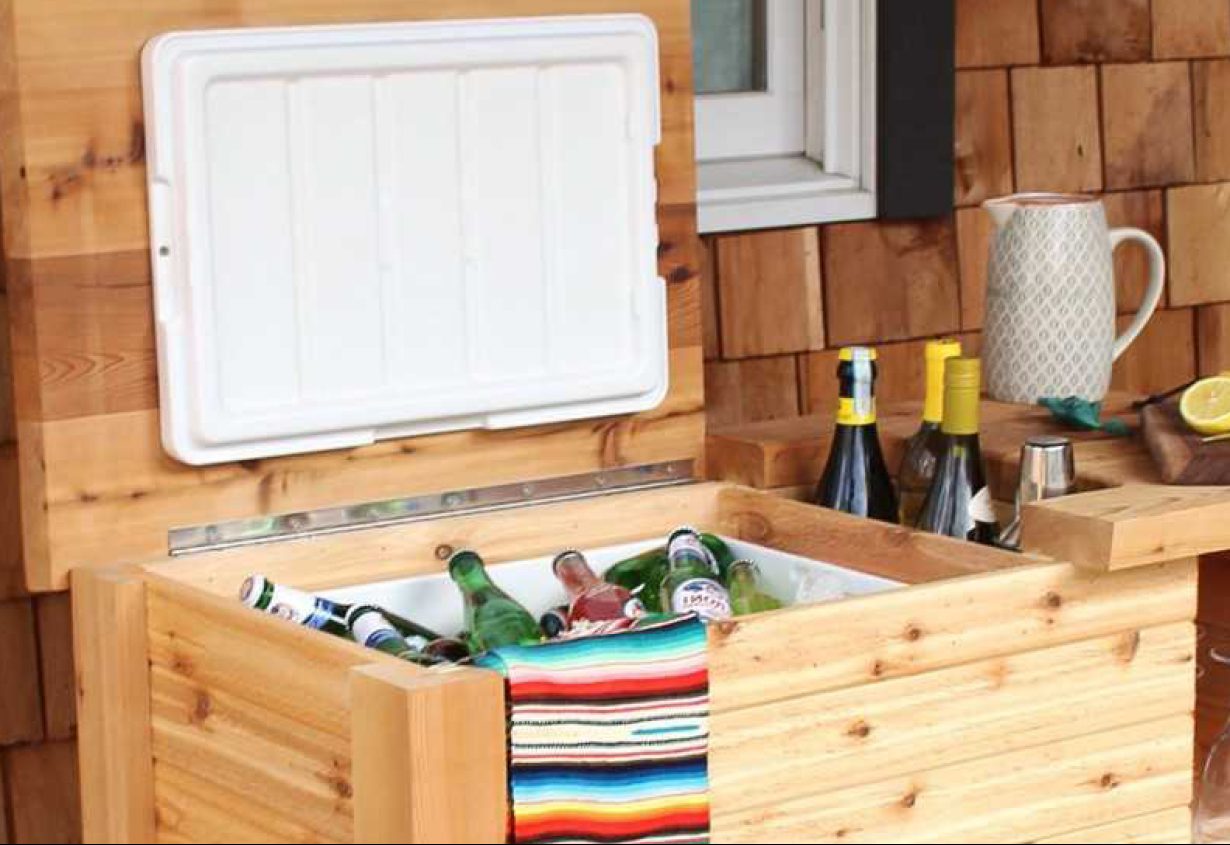
Step 5: Installing the Cooler
Now that you’ve added insulation to your outdoor cooler cabinet, it’s time to move on to the exciting step of installing the actual cooler. This is where your cabinet will come to life, providing the perfect storage space to keep your drinks cool and refreshing.
Follow these steps to install the cooler in your cabinet:
- Prepare the Cooler Box: If you’re using a separate cooler box or insert, ensure it is clean and free of any dirt or debris. Wipe it down with a damp cloth if necessary.
- Measure the Opening: Measure the dimensions of the cooler box opening in your cabinet. Ensure that the opening is slightly smaller than the outer dimensions of the cooler to provide a snug fit.
- Position the Cooler: Place the cooler box inside the opening, ensuring it fits securely. Make any necessary adjustments to the size of the opening if needed.
- Attach the Cooler: Depending on the design of your cooler box, you may need to attach it to the cabinet using screws or brackets. Follow the manufacturer’s instructions to secure the cooler in place.
- Check the Lid Alignment: Ensure that the lid of the cooler box can open and close properly within the cabinet. Adjust the positioning if necessary to allow for smooth operation.
- Test the Cooling Performance: Before moving on to the next step, test the cooling performance of the cooler to ensure it is functioning correctly. Add ice or cold drinks and monitor the temperature inside the cabinet.
By installing the cooler in your cabinet, you’ve transformed it into a functional and stylish place to keep your drinks chilled. Now, your outdoor entertaining experience will be even more enjoyable, as you can conveniently serve cold beverages to your guests.
With the cooler in place, we’re getting closer to the finish line. In the next step, we will guide you through the process of creating a drainage system to ensure that your cabinet stays dry and free of any unwanted moisture. Stay tuned!
Step 6: Adding a Drainage System
As you near the completion of your outdoor cooler cabinet, it’s important to address one final essential component: the drainage system. A well-designed drainage system will prevent any build-up of water or condensation inside the cabinet, ensuring that your drinks stay cool and your cabinet remains in good condition.
Follow these steps to add a drainage system to your cooler cabinet:
- Locate the Drainage Point: Identify the area or corner of your cabinet where you want the water to drain. This should be a low point where water naturally accumulates.
- Create a Drain Hole: Use a drill and an appropriately sized hole saw or drill bit to create a hole at the chosen drainage point. Ensure the hole is large enough to allow for efficient water flow.
- Add a Drainage Tube or Pipe: Insert a drainage tube or pipe into the hole, ensuring it extends to the exterior of the cabinet. The tube should be long enough to direct water away from the immediate area, preventing any water damage.
- Secure the Drainage Tube: Use waterproof sealant or adhesive to secure the drainage tube in place. Make sure the connection is watertight to prevent any leaks.
- Test the Drainage System: Pour a small amount of water into your cooler cabinet to test the functionality of the drainage system. Ensure that the water flows through the tube and exits the cabinet properly.
- Make Adjustments if Needed: If you encounter any issues during the testing phase, make necessary adjustments to the drainage system. This may involve repositioning the drainage tube or enlarging the drainage hole.
Adding a drainage system to your outdoor cooler cabinet will ensure that any melted ice or condensation is efficiently removed, preventing any water damage or unpleasant odors. It will also make maintenance and cleaning of the cabinet much easier.
With the drainage system in place, your outdoor cooler cabinet is now fully functional and prepared to serve drinks in style. In the final step, we will explore some finishing touches to enhance the aesthetics and durability of your cabinet. Stay tuned for step 7!
Step 7: Finishing Touches
Congratulations! You’re in the final stretch of building your outdoor cooler cabinet. In this last step, we will focus on adding some finishing touches to enhance the aesthetics and durability of your cabinet.
Follow these steps to add the finishing touches to your outdoor cooler cabinet:
- Paint or Stain: Apply a coat of exterior-grade paint or stain to protect the cabinet from the elements and enhance its appearance. Choose a color or finish that complements your outdoor décor.
- Seal the Wood: If you’re using unpainted or unstained wood, consider applying a clear wood sealer to protect it from moisture, sun damage, and pests.
- Add Handles or Pulls: Install handles or pulls on the cabinet doors for easy opening and closing. Choose hardware that matches the style of your cabinet and provides a comfortable grip.
- Accessorize: Consider adding additional features to enhance the functionality of your cabinet. This could include hooks for hanging towels or utensils, a bottle opener, or a small shelf for drink garnishes.
- Customize the Cabinet Doors: If you’re looking to add a personal touch, consider customizing the cabinet doors with decorative elements, such as etched glass, a monogram, or a stencil design.
- Apply a Final Coat: Once you’ve added all the desired finishing touches, apply a final coat of paint, stain, or sealer to protect the cabinet and ensure its longevity.
- Enjoy Your Outdoor Cooler Cabinet: Finally, step back and appreciate your hard work. Your outdoor cooler cabinet is now ready to serve drinks in style and elevate your outdoor entertaining experiences!
By adding these finishing touches, you will not only enhance the overall appearance of your outdoor cooler cabinet, but you will also ensure its longevity and functionality for years to come.
Now it’s time to sit back, relax, and enjoy your outdoor space while conveniently serving refreshing cold drinks from your newly built cooler cabinet.
Thank you for following this comprehensive guide on how to build an outdoor cooler cabinet to serve drinks in style. We hope this step-by-step process has provided valuable insights and guidance for your DIY project. Cheers!
Conclusion
Building an outdoor cooler cabinet to serve drinks in style is a rewarding and enjoyable DIY project that adds functionality and charm to your outdoor space. By following the steps outlined in this guide, you now have the knowledge and confidence to create a cooler cabinet that meets your needs and reflects your personal design taste.
Throughout the process, we covered essential aspects such as planning and design, gathering materials, cutting and assembling the cabinet, adding insulation, installing the cooler, adding a drainage system, and applying finishing touches. Each step was carefully explained to ensure a successful outcome.
Remember to prioritize quality materials that can withstand outdoor elements, employ proper insulation methods to maintain cool temperatures, and create a secure drainage system to prevent water damage. The finishing touches, such as paint or stain, handles or pulls, and personalized customization, will add the final touch of style and functionality to your cabinet.
Now, it’s time to enjoy the fruits of your labor. Invite friends and family over to admire your outdoor cooler cabinet and indulge in refreshing drinks. Create lasting memories in your outdoor space while providing a convenient and stylish way to serve cold beverages.
Thank you for embarking on this journey with us. We hope this guide has been informative and helpful in your DIY project. Cheers to your successful outdoor cooler cabinet!
Frequently Asked Questions about How To Build An Outdoor Cooler Cabinet To Serve Drinks In Style
Was this page helpful?
At Storables.com, we guarantee accurate and reliable information. Our content, validated by Expert Board Contributors, is crafted following stringent Editorial Policies. We're committed to providing you with well-researched, expert-backed insights for all your informational needs.

0 thoughts on “How To Build An Outdoor Cooler Cabinet To Serve Drinks In Style”