
Articles
How To Make Beams For Ceiling
Modified: February 29, 2024
Learn how to make beams for your ceiling with our informative articles. Transform your space with stylish and functional ceiling beams.
(Many of the links in this article redirect to a specific reviewed product. Your purchase of these products through affiliate links helps to generate commission for Storables.com, at no extra cost. Learn more)
Introduction
When it comes to home decor, ceilings often play an underrated role in creating a visually appealing space. One way to add character and charm to your ceilings is by installing beams. Beams not only add architectural interest but also provide a cozy, rustic ambiance to any room in your home. Whether you’re looking to give your living room a farmhouse feel or add a touch of elegance to your bedroom, making beams for your ceiling is a great DIY project that can transform the look and feel of your space.
In this article, we will guide you through the process of making and installing beams for your ceiling. We will cover the materials needed, step-by-step instructions, and helpful tips to ensure your project turns out beautifully. So, roll up your sleeves, gather your tools, and let’s get started on creating stunning ceiling beams that will elevate the style of your home.
Key Takeaways:
- Elevate your home’s aesthetic by making and installing ceiling beams. From planning and cutting to installation and finishing touches, this DIY project adds character and charm to any space.
- Choose from rustic, sleek, faux, or decorative beam styles to match your home’s aesthetic. With careful planning and precision, you can create a stunning focal point that reflects your personal taste and creativity.
Read more: How To Hide Beam In The Ceiling
Materials Needed
Before you begin making beams for your ceiling, it’s important to gather all the necessary materials. Here’s a list of what you’ll need:
- Wood boards: Choose high-quality boards that are straight and free from knots. The dimensions will depend on the size and design of the beams you want to create.
- Saw: A circular saw or miter saw will be needed to cut the wood boards to the desired length.
- Sandpaper: To smooth out any rough edges and create a polished finish on the beams.
- Wood stain or paint: This is optional but can add a beautiful touch to the beams. Pick a color that complements your existing decor.
- Paintbrushes: If you decide to stain or paint the beams, you’ll need brushes for the application.
- Measuring tape and pencil: Essential tools for accurately measuring and marking the positions for the beams on the ceiling.
- Ladder or scaffolding: For reaching the ceiling safely during the installation process.
- Screws or mounting brackets: Depending on the weight and length of the beams, you’ll need appropriate hardware for securely attaching them to the ceiling.
- Screwdriver or drill: To drive the screws into the ceiling or attach the mounting brackets.
- Level: To ensure the beams are installed straight and level.
Having all these materials on hand before you start will ensure a smooth and efficient process. Additionally, it’s a good idea to wear safety goggles and gloves when working with tools and wood to protect yourself from any potential hazards.
Step 1: Measuring and Planning
The first step in making beams for your ceiling is to measure the space where you want the beams to be installed and create a detailed plan. This will help you determine the number of beams you need and their placement.
Start by measuring the length and width of your ceiling. Consider the overall design and layout of the room to determine the optimal spacing between the beams. For example, if you have a large room, you might want to space the beams wider apart for a more open and airy feel. On the other hand, if you have a smaller room, closer spacing can create a cozy and intimate atmosphere.
Once you have the measurements, use a pencil and measuring tape to mark the desired positions of the beams on the ceiling. Take into account any existing light fixtures, vents, or other obstructions that may need to be worked around.
Next, decide on the size and dimensions of the beams. This will depend on your personal preference and the style you want to achieve. You can opt for thicker and chunkier beams for a more rustic look or thinner and sleeker beams for a modern twist. Consider the height of your ceiling and the scale of the room to ensure the proportions are visually appealing.
After determining the size and placement of the beams, it’s a good idea to create a mock-up or drawing of the layout. This will give you a better visual representation of how the beams will look and can help you make any necessary adjustments before proceeding.
This planning stage is crucial in ensuring that your beams complement the overall design of the room and create the desired aesthetic. Taking the time to measure accurately and plan thoughtfully will set the foundation for a successful beam installation.
Step 2: Choosing the Beam Style
Once you have measured and planned the layout for your ceiling beams, it’s time to choose the beam style that best suits your desired aesthetic. There are various styles to consider, each with its own unique charm and character. Here are a few popular beam styles:
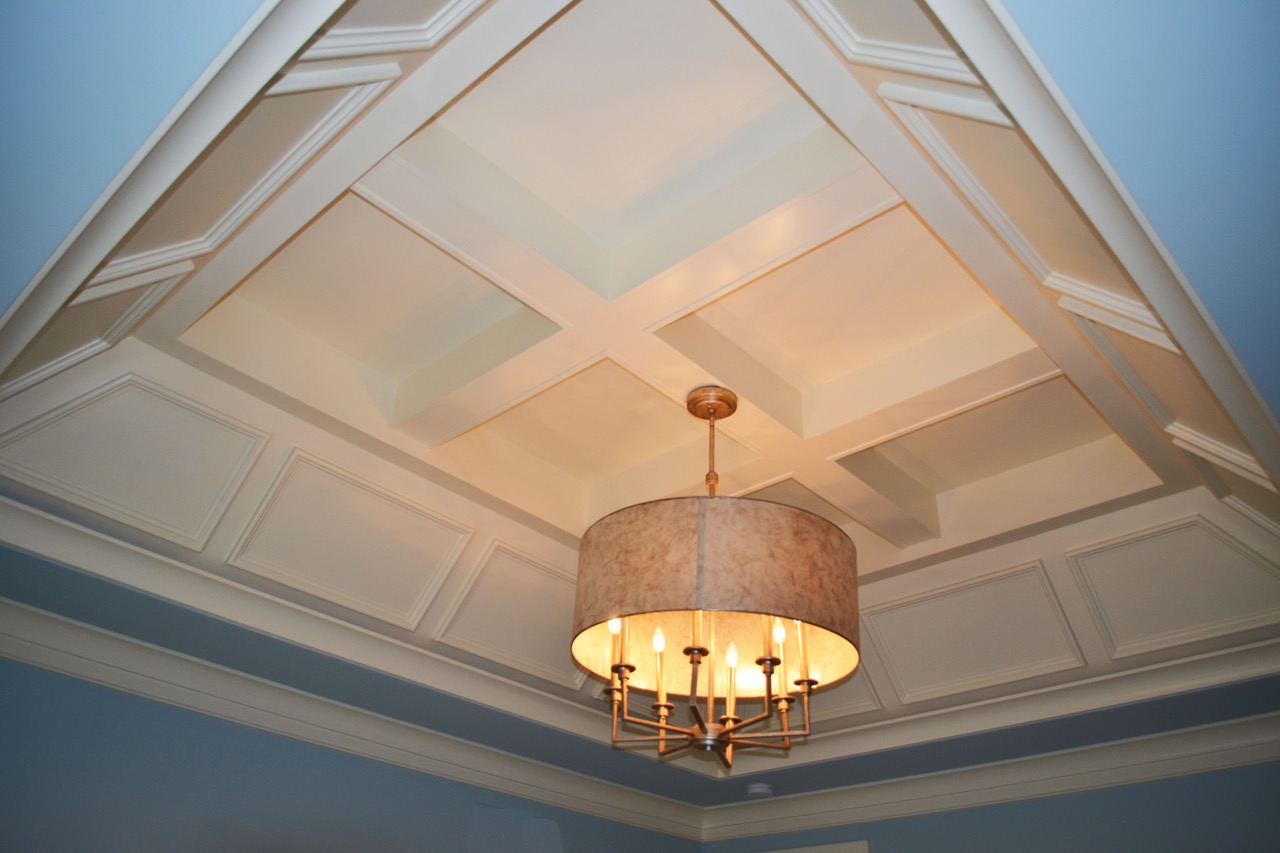
- Rustic Beams: If you’re looking to create a warm and cozy atmosphere, rustic beams are a great choice. These beams often have a rough, weathered texture and natural imperfections, giving them a vintage and organic look.
- Sleek Beams: For a more modern and streamlined appearance, sleek beams are a perfect fit. These beams are typically smooth and have clean lines, adding a touch of sophistication to any room.
- Faux Beams: If you love the look of beams but don’t want the weight and cost of real wood, faux beams are an excellent alternative. They are typically made of lightweight materials such as polyurethane foam, but they mimic the appearance of real wood beams convincingly.
- Decorative Beams: If you want to incorporate intricate designs and details into your ceiling beams, decorative beams are a fantastic choice. These beams often feature ornate carvings or patterns, adding a touch of elegance and sophistication to your space.
Consider the overall style of your home and the existing decor when choosing the beam style. You want the beams to harmonize with the overall aesthetic and enhance the visual appeal of the room.
In addition to the style, you also have the option of selecting the type of wood for your beams. Common choices include oak, pine, cedar, and reclaimed wood. Each type has its own unique characteristics and can contribute to the overall ambiance of the space.
Take your time to explore different beam styles, gather inspiration from home decor magazines or online resources, and choose a style that resonates with your personal taste and the overall design of your home.
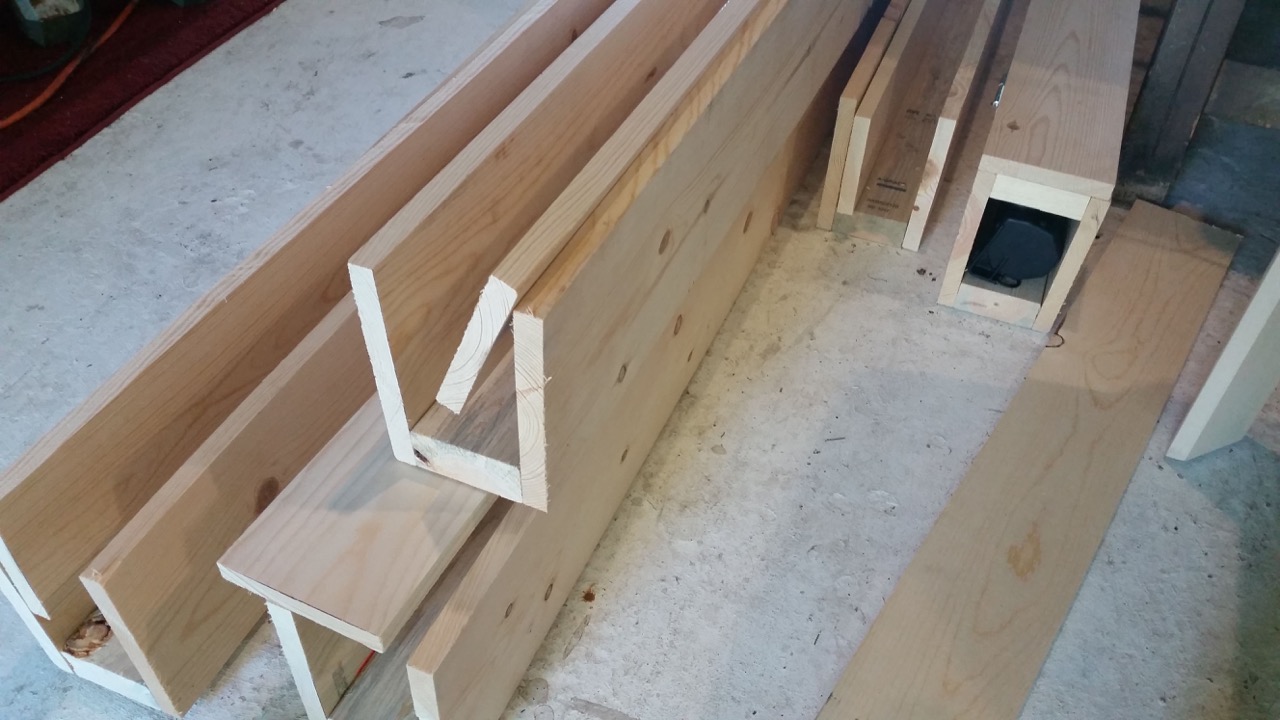
Step 3: Cutting the Beams
With your beam style chosen, it’s time to move on to the next step: cutting the beams to the desired length. This step requires careful precision and attention to detail to ensure that the beams fit perfectly in your space.
Start by measuring the length of the beams based on the marks you made in the planning stage. Use a measuring tape to accurately determine the required length for each beam. Transfer these measurements onto the wood boards, marking them with a pencil.
Before cutting, it’s important to wear safety goggles and gloves to protect yourself. Set up your circular saw or miter saw according to the instructions provided by the manufacturer. Ensure that the blade is suitable for cutting wood and is securely fastened.
Place the wood board on a stable surface, such as a workbench or sawhorses, to ensure stability during the cutting process. Double-check that the marks align with the position of the saw blade, and then carefully make the cuts. Take your time and maintain a steady hand to ensure clean and straight cuts.
Continue this process for each beam until you have successfully cut all the pieces to the required length.
Once the beams are cut, inspect the edges to make sure they are smooth. Use sandpaper to remove any splinters or rough spots, ensuring a polished finish. This step is crucial for both the visual appeal and safety of your ceiling beams.
Remember to work at your own pace and take breaks if needed. Rushing through the cutting process can lead to mistakes and compromised results. Take the time to ensure that each beam is cut accurately and to the correct length.
Now that the beams are cut and smoothed, you’re ready to move on to the next step: preparing the ceiling for installation.
When making beams for a ceiling, consider using lightweight materials such as foam or faux wood to reduce the load on the ceiling. This will make installation easier and minimize the risk of structural issues.
Step 4: Preparing the Ceiling
Before you can install the beams, it’s essential to prepare the ceiling for the installation process. This step involves several necessary preparations to ensure a smooth and secure attachment.
Start by clearing the area where the beams will be installed. Remove any furniture, light fixtures, or other obstructions that may hinder the installation process. This will help provide a clear workspace and prevent any accidents or damage to existing fixtures.
Next, inspect the ceiling for any cracks, holes, or uneven surfaces. Use spackling or putty to fill in any gaps or imperfections, and allow it to dry completely. Sand the patched areas afterward to create a smooth and level surface.
If your ceiling has a textured finish, consider sanding it down or removing it to create a clean and even surface for the beams. However, if you prefer to keep the texture, make sure it is reinforced and securely attached to the ceiling before installing the beams.
It’s also a good idea to locate the ceiling joists or studs using a stud finder. The beams should be attached to these sturdy structures to ensure stability and prevent sagging or falling.
Once you have identified the joists, mark their positions on the ceiling using a pencil or masking tape. This will serve as a guide when attaching the beams later.
Before proceeding, it’s essential to double-check the measurements and positions of the beams one final time. Ensure that they align with your original plan and that all the beams are cut to the correct length.
With the ceiling prepared and the beams ready, you’re now ready to move on to the next step: installing the beams and bringing your vision to life.
Step 5: Installing the Beams
With the ceiling prepared, it’s time to start installing the beams. This step requires precision and careful handling to ensure that the beams are securely attached and aligned properly.
Begin by placing one of the beams on the marked position and aligning it with the ceiling joist or stud. Use a level to make sure the beam is straight and adjust as necessary.
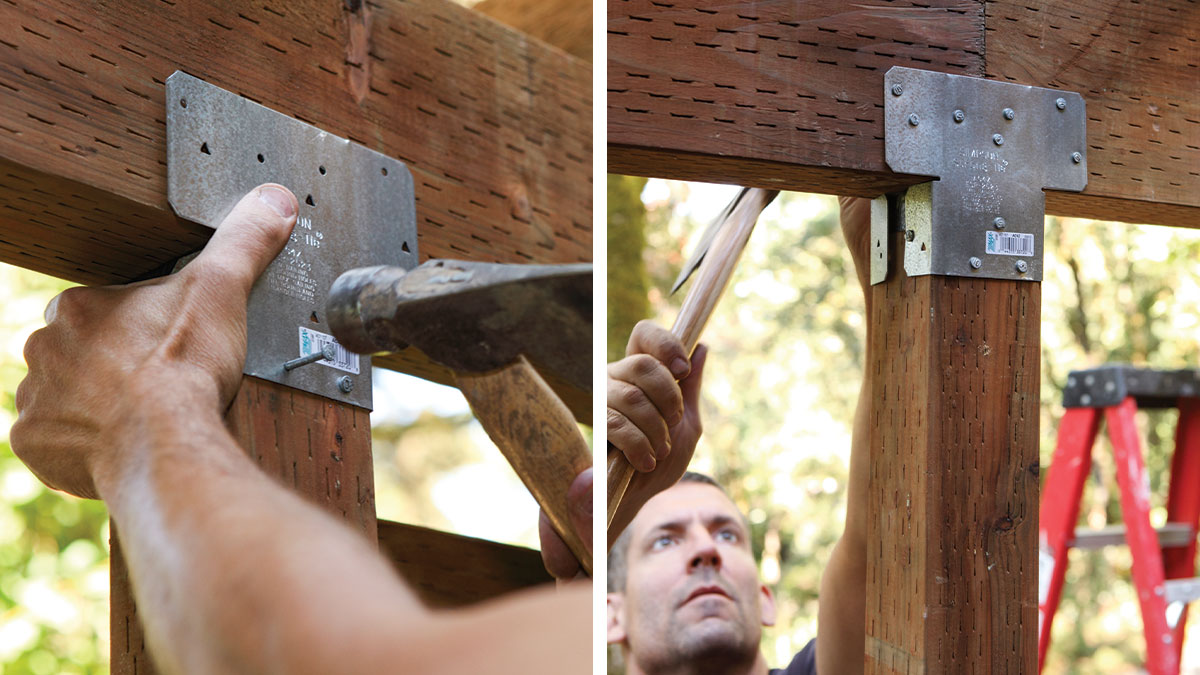
Once the beam is aligned, use a screwdriver or drill to drive screws through the beam and into the ceiling joist. Make sure to use screws that are long enough to provide a secure anchor but be careful not to overtighten and damage the wood. Alternatively, you can use mounting brackets designed for beams if you prefer not to use screws directly into the wood.
Continue this process for each beam, making sure to maintain consistent spacing and alignment. Take breaks as needed to check that everything is level and visually appealing.
If you have multiple beams in a row, make sure they are evenly spaced and aligned with each other. This will create a cohesive and balanced look.
Once all the beams are installed, take a step back and inspect your work. Make any necessary adjustments to ensure that all the beams are straight, securely attached, and visually pleasing. Use a level to double-check their alignment and make any necessary tweaks.
After the installation is complete, you can choose to leave the beams in their natural wood finish for a rustic touch or apply wood stain or paint for a more polished look. Follow the manufacturer’s instructions for applying the desired finish, and allow it to dry completely before moving on to the final step.
The installation of the beams has transformed the look of your ceiling, adding character and charm to the space. Now, it’s time to add those finishing touches to really make your beams shine.
Step 6: Finishing Touches
With the beams installed, it’s important to add some finishing touches to ensure that they blend seamlessly with the overall design and enhance the beauty of your space.
If you opted to stain or paint the beams, now is the time to apply any additional coats for a more vibrant and polished finish. Follow the manufacturer’s instructions and allow the stain or paint to dry completely between coats.
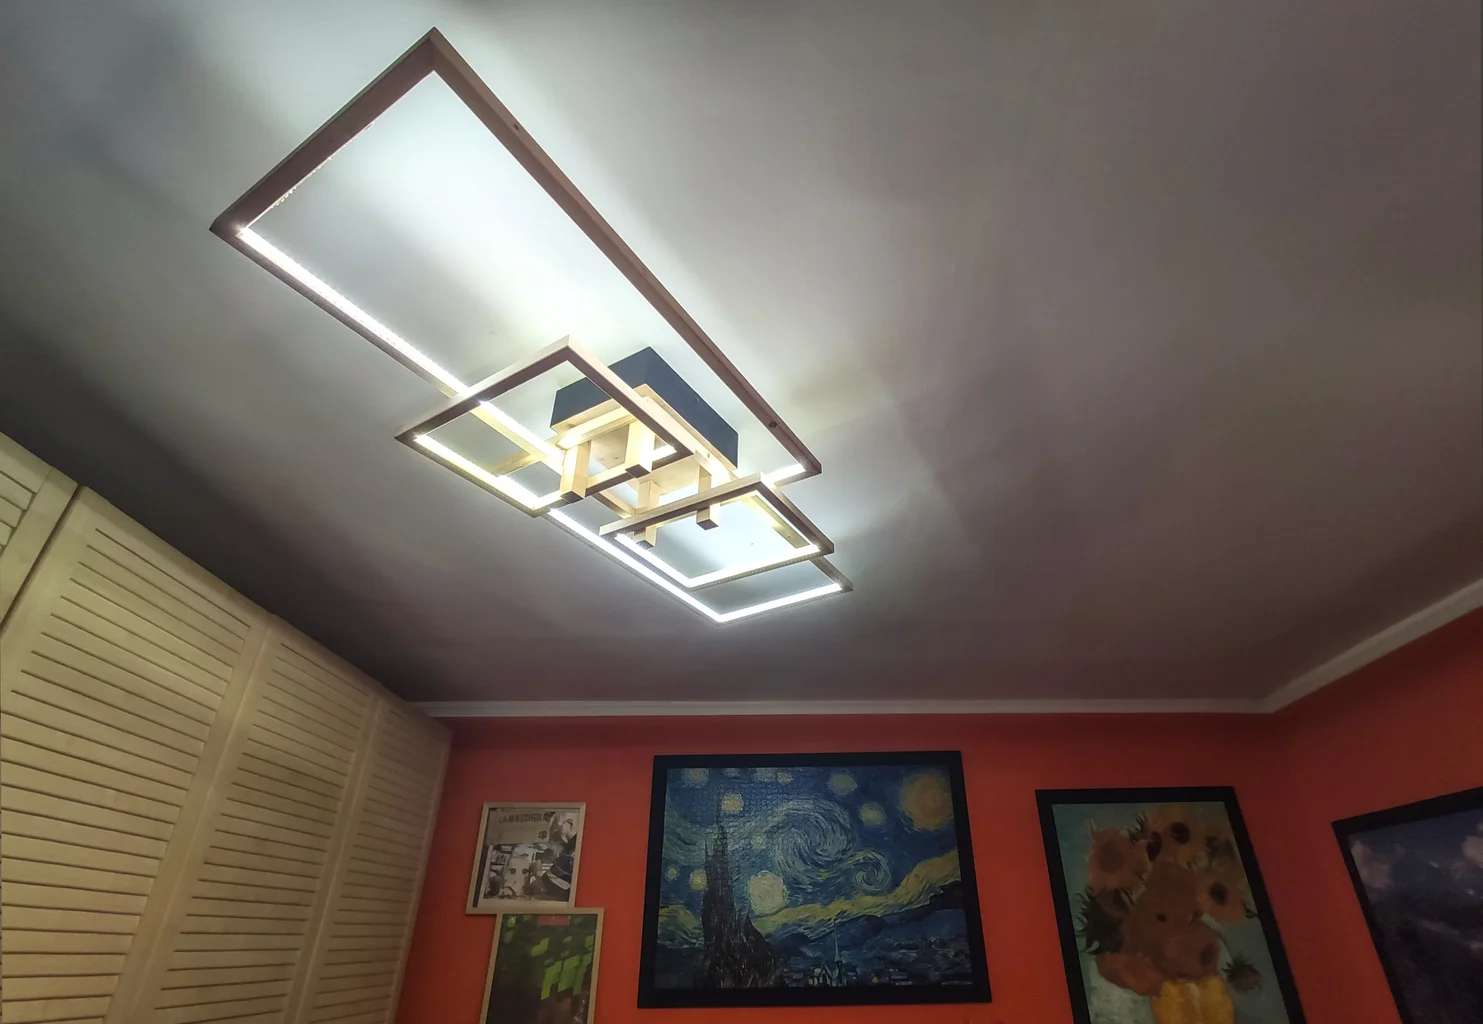
Consider adding decorative elements to the beams to further enhance their visual appeal. For example, you can attach faux metal brackets or straps to create a rustic and industrial look. Or, you can install recessed lighting within the beams to create a dramatic and cozy ambiance.
Additionally, consider how the beams will interact with the rest of your room’s decor. Integrate them with your lighting fixtures, ceiling fans, or other decorative elements to ensure a cohesive and balanced design.
Finally, take a step back and admire your transformed ceiling. Revel in the beauty and character that the beams have added to your space. Invite friends and family over to share in the excitement and enjoy the newly enhanced atmosphere.
Remember to regularly inspect and maintain the beams to ensure their longevity. Clean them with a soft cloth or feather duster to remove any dust or debris that may accumulate over time.
Celebrate your accomplishment and take pride in the fact that you have created a stunning focal point in your home through your DIY beam installation.
By following these steps and adding those finishing touches, you have successfully made and installed beams for your ceiling, elevating the style and adding a touch of architectural interest to your space.
Before concluding, take a moment to ensure that all the beams are securely attached and level. Admire the beautiful transformation you have achieved and enjoy the cozy and inviting atmosphere created by your newly installed ceiling beams.
Conclusion
Congratulations on completing the process of making and installing beams for your ceiling! By following the steps outlined in this article, you have added a touch of elegance, character, and charm to your home.
From the initial planning and measuring to the careful cutting and installation, you have created a stunning focal point that enhances the overall aesthetic of your space. The choice of beam style, the precision in cutting, and the careful attention to detail in the installation process have all contributed to the success of your project.
Not only do the beams provide visual appeal, but they also add warmth and a sense of coziness to your room. Whether you have achieved a rustic look with weathered beams or a sleek and modern style with smooth beams, the end result is a space that reflects your personal taste and creativity.
Remember to maintain and care for your beams regularly. Clean them periodically to remove dust and debris, and inspect them for any signs of wear or damage. With proper upkeep, your beams will continue to enhance the beauty of your ceiling for years to come.
We hope this article has provided you with the guidance and inspiration needed to embark on this exciting DIY project. Making and installing beams for your ceiling is a rewarding endeavor that can significantly transform the look and feel of your home.
So, enjoy the cozy ambiance, admire the craftsmanship, and revel in the sense of accomplishment that comes with creating something beautiful with your own hands. Your newly adorned ceiling is sure to impress and inspire all who enter your home.
Frequently Asked Questions about How To Make Beams For Ceiling
Was this page helpful?
At Storables.com, we guarantee accurate and reliable information. Our content, validated by Expert Board Contributors, is crafted following stringent Editorial Policies. We're committed to providing you with well-researched, expert-backed insights for all your informational needs.


0 thoughts on “How To Make Beams For Ceiling”