Articles
How To Manually Drain A Washer
Modified: February 28, 2024
Learn how to manually drain a washer in this informative article. Step-by-step instructions on how to safely empty the water from your washing machine.
(Many of the links in this article redirect to a specific reviewed product. Your purchase of these products through affiliate links helps to generate commission for Storables.com, at no extra cost. Learn more)
Introduction
When it comes to doing laundry, a washer is an essential appliance in any home. However, there may be instances where you need to manually drain the washer. Whether you’re experiencing a clog or need to perform maintenance, knowing how to drain a washer can be a useful skill.
In this guide, we’ll take you through the step-by-step process of manually draining a washer. But before we dive into the details, it’s crucial to prioritize safety and take the necessary precautions. Remember to always refer to your washer’s manual for specific instructions and safety guidelines.
With that said, let’s get started on how to safely and effectively drain your washer.
Key Takeaways:
- Prioritize safety by following precautions such as turning off the power, wearing protective gloves, and securing the washer. Gather necessary supplies and carefully position the drain hose for efficient water drainage.
- After draining the water, clean the filter to maintain washer efficiency. Reattach the drain hose securely and conduct a test to ensure proper functioning. Regular maintenance and cleaning can prevent future clogs and drainage issues.
Read more: How To Drain Dishwasher Manually
Safety Precautions
Before attempting to manually drain your washer, it’s essential to prioritize safety. Follow these precautions to ensure a safe and hassle-free experience:
- Turn off the power: Start by turning off the power to the washer. Unplugging the washer from the wall outlet is the safest way to ensure there is no electricity running to the appliance.
- Protect your hands: Wear protective gloves to prevent any potential injuries. This will also protect your hands from any sharp edges or debris that you may encounter during the process of draining the washer.
- Secure the washer: Make sure the washer is stable and won’t tip over during the draining process. If needed, place a wooden block or other supportive objects under the washer to keep it steady.
- Use caution with hot water: If you have recently used the washer, be mindful that the water inside the machine may be hot. Take caution when removing any components or draining the water to avoid burns or scalds.
- Be mindful of sharp edges: Many washers have sharp edges or metal components. Take care to avoid coming into contact with these areas to prevent any cuts or injuries.
- Follow manufacturer guidelines: Always refer to your washer’s specific manual for any additional safety precautions or guidelines. Manufacturers may have specific recommendations or warnings that are important to follow.
By following these safety precautions, you’ll ensure your own well-being and minimize the risk of any accidents or damage to your washer. Now that you’re aware of the necessary safety measures, let’s move on to the next steps in manually draining your washer.
Gather Supplies
Before you begin draining your washer, it’s important to gather all the necessary supplies. Having everything prepared beforehand will make the process smoother and more efficient. Here are the supplies you’ll need:
- Bucket or drain pan: You’ll need a suitable container to catch the water when you drain the washer. A large bucket or a specialized drain pan designed for appliances can work well.
- Pliers or adjustable wrench: These tools will come in handy when you need to remove the hose clamp or any other fittings from the drain hose.
- Gloves: Wear protective gloves to keep your hands safe and to maintain hygiene during the process.
- Towels or rags: Keep some towels or rags nearby to clean up any spills or drips that may occur during the draining process.
- Flashlight: A flashlight can be useful for inspecting hard-to-see areas of the washer and drain hose.
- Cleaning supplies: Depending on the condition of your washer, you may want to have some cleaning supplies on hand. This can include mild detergent, vinegar, or any recommended cleaning solution for your specific washer model.
By ensuring you have all these supplies ready, you’ll save time and avoid any interruptions during the draining process. Now that you have everything you need, let’s move on to the next step of unplugging the washer.
Unplug the Washer
The first step in manually draining your washer is to ensure it is safely disconnected from the power source. Follow these instructions to unplug the washer:
- Locate the power cord: Find the power cord connected to the back of the washer. It is usually located near the bottom of the machine.
- Unplug the power cord: Firmly grasp the plug and pull it out of the wall socket. Make sure to hold onto the plug itself rather than pulling on the cord to prevent any damage.
- Confirm the power is off: Once the washer is unplugged, double-check that there is no power by trying to turn it on. If the washer remains unresponsive, you can proceed with confidence.
By unplugging the washer, you eliminate the risk of electric shock and ensure a safe environment for the manual draining process. Now that you have disconnected the power, we can move on to locating the drain hose.
Locate the Drain Hose
The next step in manually draining your washer is to locate the drain hose. The drain hose is responsible for removing the water from the washer during the normal washing and draining cycles. Here’s how you can find it:
- Check the back of the washer: Look for a flexible hose attached to the back of the washer. It is usually located near the bottom or on the side of the machine. The drain hose is typically made of rubber or plastic and may have a ribbed texture.
- Find the drain hose outlet: Follow the drain hose to its outlet point. It is usually located near a floor drain, utility sink, or a designated drain pipe. Ensure that the outlet is accessible and that water can freely flow out.
- Inspect any hose extensions: In some cases, the drain hose may have extensions or additional pieces attached. Take note of these components as they may need to be disconnected or removed during the draining process.
- Note the height of the drain hose: Pay attention to the height of the drain hose and ensure that it remains lower than the water level inside the washer. This will allow gravity to assist in draining the water effectively.
Once you have located the drain hose and familiarized yourself with its outlet point, you’re ready to move on to the next step. We’ll discuss how to position the drain hose for efficient water drainage.
Read more: How To Drain A Washing Machine Manually
Position the Drain Hose
Properly positioning the drain hose is crucial for effective water drainage during the manual draining process. Here are the steps to follow:
- Elevate the drain hose: Ensure that the end of the drain hose is elevated. This can be achieved by placing it on a countertop, hanging it over the edge of a sink, or using a sturdy object to support it. By elevating the hose, you create a siphoning effect that helps the water flow efficiently.
- Avoid kinks or bends: Make sure the drain hose is not kinked or bent in any way. A straight and unobstructed path is necessary for proper water flow. If needed, gently straighten out any bends or loops in the hose.
- Secure the hose in place: Use a zip tie or a piece of string to secure the elevated position of the drain hose. This will prevent it from slipping or falling during the draining process.
- Position the hose outlet: Ensure that the end of the drain hose is positioned over the drain pan or bucket that you prepared earlier. This will catch the water as it drains from the washer.
- Verify the hose stability: Double-check that the drain hose is securely positioned and stable. You don’t want it to shift or disconnect during the draining process, as this can cause water spills and delays.
By properly positioning the drain hose, you ensure smooth and efficient water drainage from your washer. Now that the drain hose is in place, let’s move on to preparing the drain pan to catch the water.
Prepare a Drain Pan
Having a drain pan ready is essential to catch the water as it drains from the washer. Here’s how you can prepare a drain pan:
- Select a suitable drain pan: Choose a drain pan that is large enough to hold the amount of water that will be drained from your washer. It should have a high rim to prevent any potential spills or overflow.
- Place the drain pan beneath the drain hose outlet: Position the drain pan directly under the end of the drain hose where the water will flow out. Make sure it is situated securely to avoid any shifting or tipping.
- Check for leaks or cracks: Before using the drain pan, inspect it for any leaks or cracks. A damaged drain pan can potentially cause water damage or spills. If you notice any issues, consider using an alternative container or replacing the drain pan.
- Ensure proper stability: Double-check that the drain pan is stable and won’t tip over during the draining process. If needed, place a heavy object or support beneath the pan to keep it securely in place.
- Keep towels or rags nearby: Have some towels or rags readily available to clean up any minor spills or drips that may occur during the draining process. This will help keep the area clean and prevent any slips or accidents.
By preparing a drain pan, you create a designated space to catch the water being drained from your washer. This prevents any water damage or mess and allows for easier cleanup. Now that the drain pan is ready, let’s move on to the next step of removing the hose clamp.
Before manually draining a washer, unplug it to avoid electrical shock. Locate the drain hose and carefully remove any excess water using a bucket or towels. Be prepared for a significant amount of water to drain out.
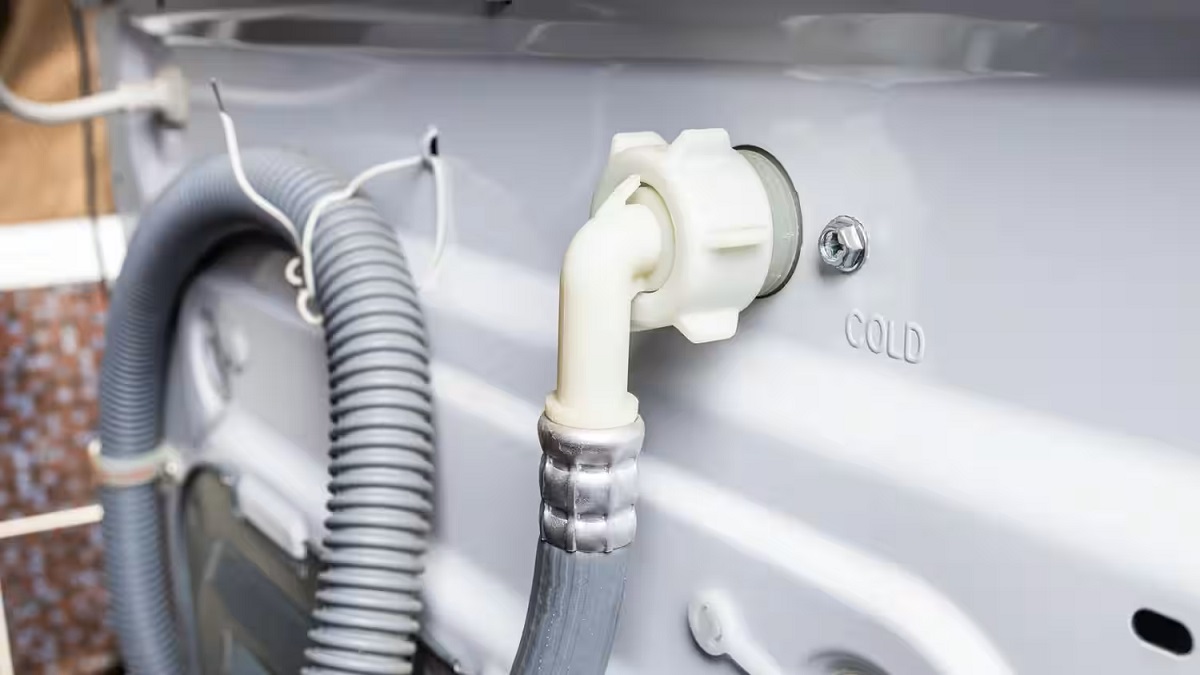
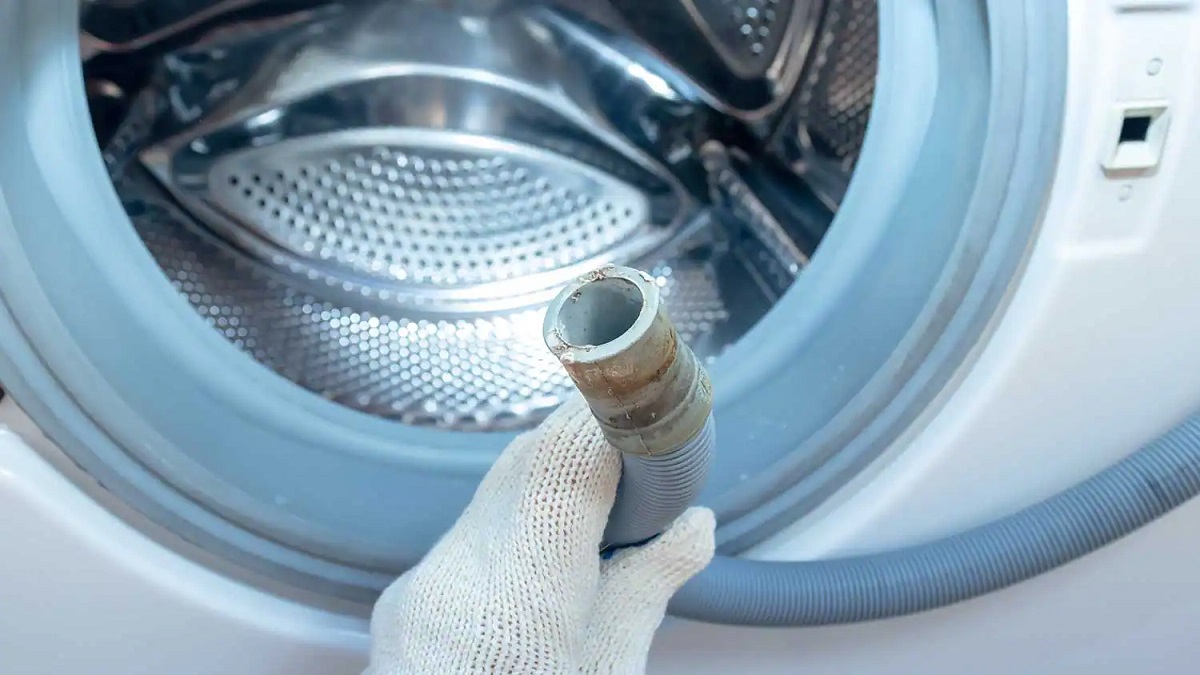
Remove the Hose Clamp
In order to drain the water from your washer, you will need to remove the hose clamp that secures the drain hose to the washer. Follow these steps to safely remove the hose clamp:
- Locate the hose clamp: Identify the hose clamp that is securing the drain hose to the washer. It is usually a metal or plastic clamp that encircles the hose and holds it in place.
- Use pliers or an adjustable wrench: Depending on the type of hose clamp, you’ll need to use pliers or an adjustable wrench to loosen and remove it. Grip the clamp firmly with the tool, ensuring a secure hold.
- Turn the clamp counterclockwise: With a firm grip, rotate the clamp counterclockwise to loosen it. Depending on the type of clamp, it may require multiple turns to loosen completely.
- Slide the clamp away from the hose: Once the clamp is sufficiently loosened, slide it away from the end of the hose. This will free the hose from the washer’s drainage port.
- Set the clamp aside: Keep the hose clamp in a safe place, as you’ll need it to reattach the drain hose later. You can also consider using a new hose clamp if the current one is worn or damaged.
By carefully removing the hose clamp, you’ll be able to disconnect the drain hose from the washer and proceed with the draining process. With the clamp safely removed, let’s move on to draining the water from the washer.
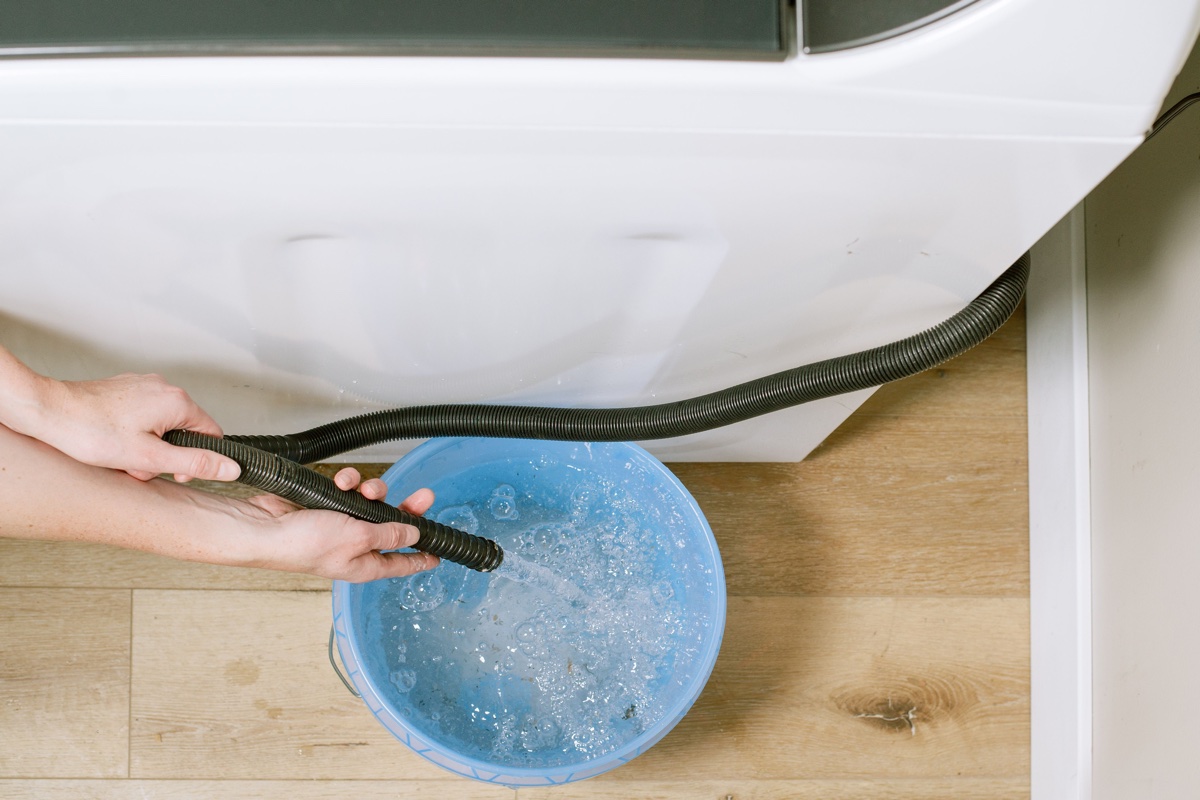
Drain the Water
Now that the drain hose is disconnected from the washer, it’s time to start draining the water from the machine. Follow these steps to effectively drain the water:
- Position the hose: Ensure that the free end of the drain hose is securely positioned over the drain pan or bucket you’ve prepared. Double-check that it is stable and won’t slip or move during the draining process.
- Open the washer lid or door: Depending on the type of washer you have, open the lid or door to access the inside of the machine. This will facilitate the draining process and allow you to monitor the water level.
- Allow the water to drain: With the drain hose and the washer ready, let gravity do its work and allow the water to start draining from the machine. Be patient as it may take some time, especially if there is a large amount of water to be drained.
- Monitor the draining process: Keep an eye on the water level inside the washer and ensure it continues to decrease. If you notice any obstructions or slow drainage, gently adjust the position of the drain hose to improve water flow.
- Continue until the water stops: Allow the water to drain until it stops flowing from the washer. This indicates that the majority of the water has been successfully drained.
Remember, it’s important to have the drain pan or bucket in place to catch the water as it drains. Additionally, keep towels or rags nearby to quickly clean up any spills or drips that may occur.
Now that the water has been drained from the washer, it’s time to move on to the next step, which involves cleaning the filter.
Read more: How To Drain Washer
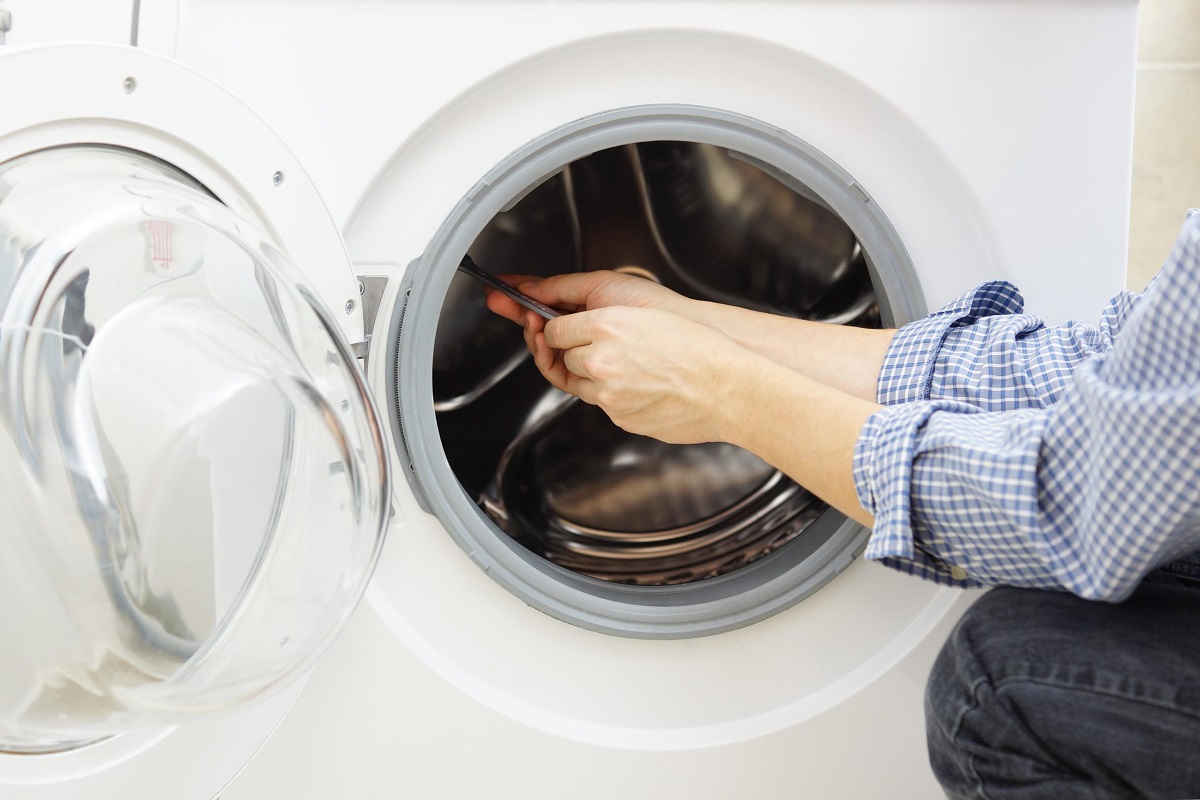
Clean the Filter
After draining the water from your washer, it’s essential to clean the filter to ensure proper functioning and prevent any future issues. The filter helps trap debris and lint, preventing it from clogging the drain hose or other components. Here’s how you can clean the filter:
- Locate the filter: Refer to your washer’s manual to find the location of the filter. In many washers, the filter is located near the bottom front of the machine. It may be behind a small access panel or a removable cover.
- Prepare a container for water: Place a shallow container or towel beneath the filter to catch any residual water that may come out when removing the filter.
- Remove the filter: Carefully remove the filter from its housing. Depending on the model, you may need to twist it or pull it out using a handle or tab.
- Clean the filter: Rinse the filter under running water to remove any trapped debris or lint. You can also use a soft-bristle brush to gently scrub away any stubborn dirt. Ensure that the filter is thoroughly cleaned before moving on to the next step.
- Inspect the filter housing: While the filter is removed, inspect the filter housing for any accumulated dirt or debris. Use a damp cloth to wipe away any buildup and ensure that the housing is clean and free from obstructions.
- Reinstall the filter: Once the filter and housing are clean, carefully reinsert the filter back into its original position. Make sure it is securely in place and properly aligned with the housing.
- Close the access panel or cover: If there was an access panel or cover that was removed to access the filter, securely close it to protect the filter and prevent any potential damage.
By regularly cleaning the filter, you help maintain the efficiency of your washer and prevent any drainage or performance issues. With the filter clean and reinstalled, you’re one step closer to completing the manual draining process.
Next, we’ll discuss how to reattach the drain hose to the washer and conduct a test to ensure everything is working properly.
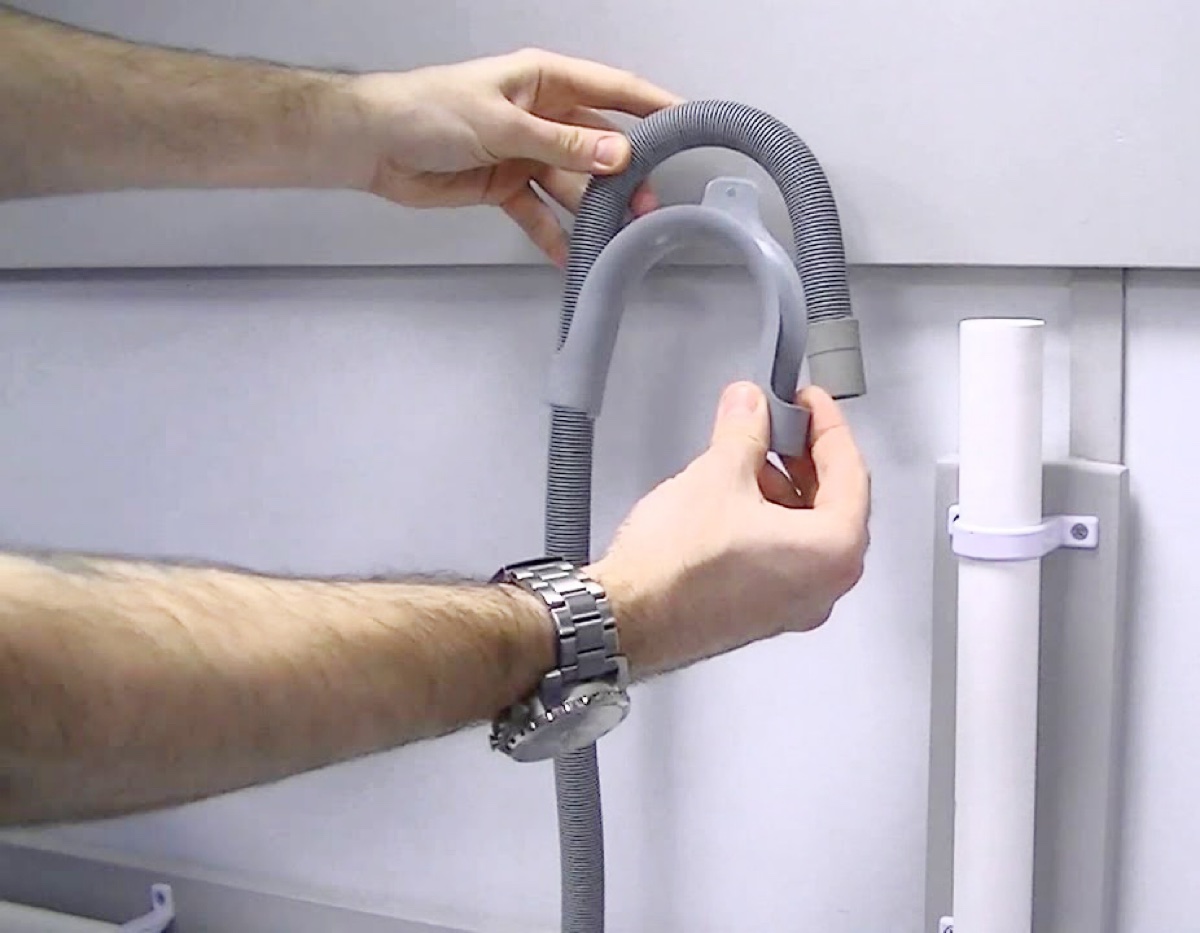
Reattach the Drain Hose
With the water drained and the filter clean, it’s time to reattach the drain hose to the washer. Here are the steps to follow:
- Position the drain hose: Ensure that the drain hose is in the correct position and ready to be reattached to the washer’s drainage port. Double-check that the hose is free from any kinks or obstructions.
- Slide the hose onto the drainage port: Gently slide the end of the drain hose back onto the drainage port on the washer. Make sure it fits securely and snugly, ensuring there are no gaps or leaks.
- Secure with the hose clamp: Retrieve the hose clamp that was previously removed and slide it back onto the drain hose, positioning it over the area where it connects to the washer’s drainage port. Use pliers or an adjustable wrench to tighten the clamp and secure the hose in place.
- Check for leaks: After reattaching the drain hose and securing it with the hose clamp, carefully inspect the connection point for any signs of leaking. Run a small amount of water into the washer and observe if there are any drips or leaks. If necessary, adjust the position of the hose or tighten the clamp further to eliminate any leaks.
By reattaching the drain hose securely, you ensure that the water will flow properly during future wash cycles. Once you’ve verified that the connection is leak-free and secure, it’s time to move on to the final step: testing the washer to ensure everything is functioning as expected.
Test the Washer
After completing the manual draining process and reattaching the drain hose, it’s crucial to test the washer to ensure that everything is working correctly. Follow these steps to conduct a simple test:
- Plug in the washer: Once you’re confident that the drain hose is securely attached and there are no leaks, plug the washer back into the power outlet.
- Turn on the washer: Start by turning on the power to the washer. Depending on the model, you may need to press a power button or turn a dial to begin a test cycle.
- Select a short cycle: Choose a short cycle option or a test cycle that doesn’t involve a large amount of water. This will allow you to monitor the operation of the washer without wasting water or detergent.
- Observe the drainage: Pay close attention to how the washer drains water during the test cycle. Ensure that the water is flowing freely through the drain hose and into the drain pan or bucket. Monitor for any signs of leaks or blockages.
- Check for proper functioning: Assess other aspects of the washer’s operation, such as filling, rinsing, and spinning. Make sure that each stage of the wash cycle is functioning as expected, and there are no unusual noises or malfunctions.
- Clean up any spills: If there are any minor spills or splashes during the test cycle, use towels or rags to clean them up promptly. This will help maintain a clean and safe working environment.
By testing the washer after manually draining it, you can ensure that the drainage system is working properly and that the washer is in good operating condition. If you notice any issues or abnormalities during the test, consult your washer’s manual or consider contacting a professional for further assistance.
Now that you have successfully completed the manual draining process, tested the washer, and confirmed everything is functioning as expected, you can proceed to use your washer as usual. Remember to perform regular maintenance and cleaning to prevent future buildup and drainage issues.
Happy washing!
Conclusion
Manually draining a washer can be a valuable skill to have when you encounter clogs or need to perform maintenance. By following the steps outlined in this guide, you can safely and effectively drain your washer. However, it’s important to remember that safety should always be the top priority. Be sure to refer to your washer’s manual for specific instructions and guidelines to ensure a safe and successful draining process.
We started by emphasizing the importance of safety precautions, including turning off the power and using protective gloves. We then discussed the supplies you’ll need, such as a drain pan, pliers, and gloves.
Next, we went through the step-by-step process of draining the water from your washer. This included locating and positioning the drain hose, preparing a drain pan to collect the water, removing the hose clamp, draining the water, cleaning the filter, and reattaching the drain hose.
Finally, we concluded with testing the washer to ensure proper functioning and cleanliness. By conducting a simple test, you can verify that the drainage system is working as expected and the washer is operating without any issues.
Remember, regular maintenance and cleaning of your washer can help prevent future clogs and drainage problems. Pay attention to any signs of trouble, such as slow draining or unusual noises, and address them promptly to keep your washer in optimal condition.
By following these guidelines, you can confidently and effectively manually drain your washer when needed. With proper care and maintenance, your washer will continue to serve you well for years to come.
Frequently Asked Questions about How To Manually Drain A Washer
Was this page helpful?
At Storables.com, we guarantee accurate and reliable information. Our content, validated by Expert Board Contributors, is crafted following stringent Editorial Policies. We're committed to providing you with well-researched, expert-backed insights for all your informational needs.


0 thoughts on “How To Manually Drain A Washer”