
Articles
How To Paint Range Hood
Modified: October 19, 2024
Discover helpful articles on how to paint your range hood and transform the look of your kitchen. Explore step-by-step guides, tips, and expert advice.
(Many of the links in this article redirect to a specific reviewed product. Your purchase of these products through affiliate links helps to generate commission for Storables.com, at no extra cost. Learn more)
Introduction
When it comes to transforming the look of your kitchen, sometimes all it takes is a fresh coat of paint. If you’re looking to update your range hood, painting it can be a cost-effective and easy way to give it a new lease on life. Whether you want to change the color of your range hood or simply refresh the existing paint, this step-by-step guide will walk you through the process.
Before you start, it’s important to note that not all range hoods can be painted. If your range hood is made of stainless steel or another material that is not paint-friendly, it’s best to consult the manufacturer’s guidelines or seek professional advice before proceeding. Assuming your range hood is suitable for painting, let’s dive into the steps for achieving a professional-looking finish.
First and foremost, preparation is key. Properly preparing the range hood surface will ensure that the paint adheres well and withstands the test of time. This involves removing any grease filters, cleaning the surface, and sanding it to create a smooth base for the paint.
Once the range hood is prepped, it’s time to apply a coat of primer. Primer not only helps the paint adhere better, but it also provides an extra layer of protection. Choosing the right paint is also crucial. Opt for a high-quality, oil-based or epoxy-based paint that is specifically formulated for metal surfaces. This will ensure durability and a smooth finish.
When it comes to painting the range hood, take your time and apply thin, even coats. Allow each coat to dry thoroughly before applying the next. Depending on the desired color and the coverage, multiple coats may be needed. Once the painting process is complete, reattach the grease filters and do a final clean up to admire your newly painted range hood.
By following these steps and taking the time to properly prepare and paint your range hood, you can achieve a fresh and updated look in your kitchen. So gather your supplies, put on your painting clothes, and let’s get started on transforming your range hood!
Key Takeaways:
- Transform your kitchen with a fresh look by painting your range hood. Follow step-by-step instructions for preparation, painting, and cleanup to achieve a professional finish and revitalize your space.
- Properly preparing and choosing the right paint are crucial for achieving a durable and beautiful finish. Take your time, apply thin coats, and enjoy the process of transforming your range hood.
Read more: What Is A Range Hood
Step 1: Preparing the Range Hood
Before diving into the painting process, it’s crucial to properly prepare your range hood. This step will ensure that the paint adheres well and provides a smooth and lasting finish. Follow these steps to get started:
- Gather your supplies: Before you begin, gather all the necessary supplies. You will need gloves, safety glasses, a drop cloth or newspaper to protect the surrounding area, a screwdriver (if needed to remove the grease filters), sandpaper or a sanding block, and a mild detergent or degreaser.
- Turn off the range hood: Make sure the range hood is turned off and completely cooled down before you start working on it. This will prevent any accidental injuries or damage.
- Remove the grease filters: If your range hood has removable grease filters, carefully detach them from the hood. Check the manufacturer’s instructions for guidance on how to remove the filters without causing any damage. Set them aside for cleaning and reattachment later.
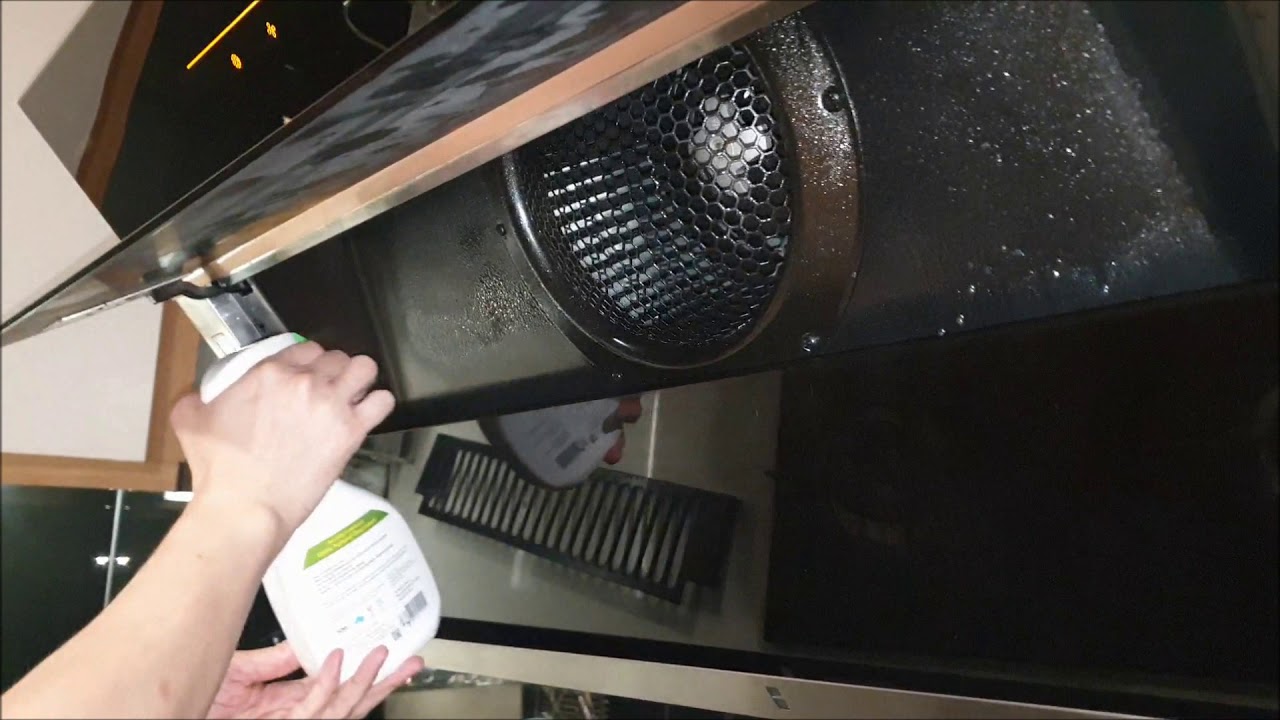
- Clean the range hood surface: Using a mild detergent or degreaser and a sponge or cloth, clean the surface of the range hood to remove any dirt, grease, or stains. Pay attention to the areas around the filters and any other hard-to-reach spots. Rinse the hood thoroughly and allow it to dry completely before moving on to the next step.
- Sand the range hood: To create a smooth surface for painting, lightly sand the range hood using sandpaper or a sanding block. Focus on areas that have existing paint or rough spots, gently sanding in a circular motion. Be careful not to apply too much pressure, as you don’t want to damage the surface. Once you’ve sanded the entire hood, wipe away any dust with a clean, dry cloth.
- Mask off any areas: If there are any parts of the range hood, such as knobs or buttons, that you don’t want to paint, use painter’s tape to mask them off. This will ensure clean lines and prevent any accidental paint splatters.
By following these steps, you’ll be well on your way to preparing your range hood for painting. Taking the time to properly clean and sand the surface will result in a professional-looking finish and ensure that the paint adheres well to the hood. Once you have completed these preparations, you’re ready to move on to the next step: applying primer.
Step 2: Removing the Grease Filters
One of the first tasks in preparing your range hood for painting is to remove the grease filters. Grease filters are essential components of the range hood, responsible for trapping grease and preventing it from circulating in your kitchen. Here’s how you can safely remove them:
- Check the manufacturer’s instructions: Different range hoods have different types of grease filters and methods for removal. It’s recommended to consult the manufacturer’s instructions specific to your range hood model to ensure safe removal.
- Disconnect the range hood: Before removing the grease filters, it’s essential to turn off the range hood and disconnect it from the power source. This will eliminate any chance of electrical shock while working on the filters.
- Locate the grease filters: Grease filters are typically located underneath or behind the range hood. They are designed to catch grease particles that accumulate during cooking. Identify the location of your filters before proceeding.
- Remove the filters: Depending on your range hood, the filters may either slide out or require unscrewing. Carefully follow the instructions provided by the manufacturer to detach the filters. If they slide out, gently pull them towards you. If they require unscrewing, use a screwdriver to loosen and remove them.
- Inspect the filters: While your filters are removed, take the opportunity to inspect them for any signs of damage or excessive buildup of grease. If the filters are torn or heavily clogged, it’s advisable to replace them with new ones for optimal performance and air circulation.
- Set the filters aside: Once the filters are removed and inspected, set them aside in a safe and clean location. You may want to place them in a sink or tub filled with warm, soapy water for thorough cleaning later on.
By properly removing the grease filters, you can ensure that they are not damaged during the painting process. Remember to consult the manufacturer’s instructions for your specific range hood to avoid any potential complications. With the filters safely removed, you’re ready to proceed to the next step: cleaning the range hood surface.
Step 3: Cleaning the Range Hood Surface
Now that you have removed the grease filters, it’s time to focus on cleaning the surface of your range hood. Over time, grease, dust, and other debris can accumulate on the hood, making it difficult for paint to adhere properly. Here are the steps to ensure a clean canvas for your paint:
- Gather your cleaning supplies: Before you start cleaning, gather the necessary supplies. You’ll need a mild detergent or degreaser, warm water, a sponge or cloth, and a non-abrasive scrub brush or toothbrush for hard-to-reach areas.
- Prep the area: Place a drop cloth or newspaper beneath the range hood to catch any drips or spills. This will protect your countertops or floors from any accidental damage.
- Mix the cleaning solution: In a bucket or sink, combine warm water with a few drops of mild detergent or degreaser. Avoid using harsh chemicals or abrasive cleaners, as they can damage the hood’s surface.
- Wet the sponge or cloth: Dip a sponge or cloth into the cleaning solution, ensuring it’s thoroughly wet but not dripping. Excess moisture can seep into electrical components and cause damage, so wring out any excess water.
- Clean the range hood: Starting from the top, gently scrub the surface of the hood using the sponge or cloth. Pay close attention to areas with built-up grease or stubborn stains. For difficult spots, use a non-abrasive scrub brush or toothbrush to scrub away grime. Be gentle to avoid scratching the surface.
- Rinse and dry: Rinse the sponge or cloth under clean water and wipe away any residual cleaning solution. Use a clean, dry cloth to dry the range hood surface thoroughly.
- Inspect for any remaining residue: After cleaning, inspect the range hood surface for any remaining residue or stubborn stains. If necessary, repeat the cleaning process or use a targeted cleaner specifically designed for removing grease or tough stains.
- Allow it to dry completely: Give the range hood ample time to air dry before moving on to the next step. Avoid applying paint or primer to a damp surface to ensure optimal adhesion.
By thoroughly cleaning the range hood surface, you’ll remove any dirt, grease, or contaminants that can hinder the paint’s ability to adhere properly. Taking the time to clean the range hood ensures that you have a smooth and clean canvas to work with, resulting in a more professional-looking finish. Once the surface is dry, you’re ready to proceed to the next step: sanding the range hood.
Step 4: Sanding the Range Hood
After cleaning the range hood surface, the next step in preparing your range hood for painting is sanding. Sanding the range hood helps to create a smooth and even surface for the paint to adhere to. Here’s how you can effectively sand your range hood:
- Gather your supplies: Before you start sanding, gather the necessary supplies. You’ll need sandpaper or a sanding block, preferably in a medium-grit such as 120 or 150.
- Protect yourself: Wear gloves and safety glasses to protect your hands and eyes during the sanding process. Additionally, work in a well-ventilated area or consider wearing a mask to avoid inhaling dust particles.
- Start at the top: Begin sanding at the top of the range hood, working your way down. Use smooth, even strokes in a circular or back-and-forth motion. Avoid applying too much pressure, as you don’t want to damage the surface. The goal is to remove any existing paint or smooth out rough spots.
- Focus on problem areas: Pay extra attention to areas that have chipped or peeling paint, as well as any uneven surfaces. These areas may require more sanding to achieve a smooth finish.
- Check your progress: Periodically check your progress by running your hand over the sanded surface. It should feel smooth and free of any roughness. If there are still rough areas, continue sanding until the entire surface is smooth to the touch.
- Remove dust: After you’ve finished sanding, use a clean, dry cloth or a vacuum with a brush attachment to remove any dust particles from the surface. Ensuring a clean surface will help the paint adhere better.
Sanding the range hood is an important step in creating a smooth and even surface for the paint. By taking the time to sand away rough spots and old paint, you’ll create the optimal foundation for your new paint job. Once you have completed the sanding process, you’re ready to move on to the next step: applying primer.
Read more: How To Build A Range Hood
Step 5: Applying Primer
After preparing the range hood surface through cleaning and sanding, the next important step in the painting process is applying primer. Primer acts as a base coat that helps the paint adhere better to the surface, ensures better coverage, and provides additional protection. Here’s how you can effectively apply primer to your range hood:
- Gather your supplies: Before you begin, gather all the necessary supplies. You’ll need a high-quality metal primer that is suitable for your range hood material, a paintbrush or paint roller, a paint tray or container, and painter’s tape (if necessary).
- Protect surrounding areas: Use painter’s tape to mask off any areas surrounding the range hood that you don’t want to get primer on, such as walls or cabinets. This will ensure clean lines and prevent any accidental splatters or drips.
- Mix the primer: If the primer needs to be mixed, follow the manufacturer’s instructions to ensure proper consistency. Use a paint stirrer to thoroughly mix the primer in the container before applying it to the range hood.
- Start with edges and corners: Begin by applying primer to the edges and corners of the range hood using a paintbrush. This will help ensure that these areas are adequately covered and provide a smooth transition between the primer and the rest of the hood.
- Move to the larger areas: Once you’ve covered the edges and corners, use a paintbrush or paint roller to apply primer to the larger areas of the range hood. Apply the primer in thin, even coats, working in small sections at a time. Smooth out any drips or uneven areas as you go.
- Allow the primer to dry: Follow the manufacturer’s instructions for drying time. Depending on the type of primer you’re using, it may take anywhere from a few hours to overnight to dry completely. Avoid touching the primer until it’s fully dry to prevent any smudges or marks.
- Inspect the primer: Once the primer is dry, inspect the surface for any areas that may require a second coat. If necessary, gently sand any rough spots or imperfections before applying an additional coat of primer.
Applying primer is a crucial step in achieving a professional and long-lasting paint job for your range hood. The primer provides a smooth base for the paint, enhances adhesion, and ensures better coverage. Once you’ve applied the primer and allowed it to dry, you’re ready to move on to the next step: choosing the right paint for your range hood.
When painting a range hood, be sure to clean and degrease the surface thoroughly before applying a high-quality metal primer. This will ensure better adhesion and a longer-lasting finish.
Step 6: Choosing the Right Paint
Choosing the right paint for your range hood is essential to ensure a durable and beautiful finish. Since the range hood is regularly exposed to heat, steam, and cooking grease, it’s important to select a paint that can withstand these conditions. Follow these guidelines to choose the perfect paint for your range hood:
- Consider the hood material: Different range hood materials may require different types of paint. For example, if your range hood is made of metal, look for a high-quality, oil-based or epoxy-based paint specifically formulated for metal surfaces. If your range hood is made of wood or another material, choose a paint suitable for that particular material.
- Look for heat-resistant properties: Since the range hood is exposed to heat, it’s important to choose a paint that is heat-resistant. Look for paints labeled as heat-resistant or specifically designed for kitchen appliances, which can withstand high temperatures without discoloration or peeling.
- Consider the finish: Decide on the desired finish for your range hood. Options typically include matte, satin, or glossy finishes. Keep in mind that matte finishes tend to be more forgiving of imperfections, while glossy finishes provide a sleek and modern look.
- Quality matters: Choose a high-quality paint to ensure longevity and a professional finish. While it may be tempting to opt for cheaper options, investing in a high-quality paint will yield better results and make your painted range hood more resistant to wear and tear.
- Consider color: Select a color that complements your kitchen decor and personal taste. Whether you want to match the existing color scheme or make a bold statement with a new color, the choice is yours. Just make sure the paint you choose is suitable for the material and finish of your range hood.
- Read customer reviews: Before making a final decision, read customer reviews or seek recommendations from reputable sources. Hearing about others’ experiences with a particular paint brand can provide valuable insights and help you make an informed decision.
- Ask for professional advice: If you’re unsure about the best paint choice for your range hood, don’t hesitate to ask for professional advice. Consult with a paint specialist at your local home improvement store or seek guidance from a professional painter who can recommend the most suitable paint for your specific needs.
By carefully considering the material, heat resistance, finish, quality, and color of the paint, you can ensure that you select the right paint for your range hood. Taking the time to choose the appropriate paint will result in a beautiful and durable finish that will stand up to the demands of your kitchen. Once you’ve chosen the paint, you’re ready to move on to the exciting part: painting the range hood!
Step 7: Painting the Range Hood
Now comes the fun part – it’s time to paint your range hood! With the right paint and tools in hand, you can transform the appearance of your range hood and give your kitchen a fresh new look. Follow these steps to achieve a smooth and professional finish:
- Gather your supplies: Before you begin, make sure you have all the necessary supplies. You’ll need the chosen paint for your range hood, a paintbrush or paint roller, a paint tray or container, and painter’s tape (if needed).
- Prepare the area: Protect the surrounding surfaces with a drop cloth or newspaper to prevent any accidental spills or splatters. Use painter’s tape to mask off any areas on the range hood that you want to avoid painting, such as knobs or buttons.
- Stir the paint: Open the paint can and use a paint stirrer to thoroughly mix the paint. This will ensure an even distribution of color and consistency of the paint.
- Choose your application method: Decide whether you’ll be using a paintbrush or a paint roller to apply the paint. A paintbrush is great for smaller details and corners, while a paint roller is efficient for larger, flat surfaces.
- Start painting: Begin applying the paint to your range hood, starting with the edges and corners using a paintbrush. Use smooth, even strokes and try to maintain a consistent thickness of paint. If you’re using a paint roller, use it to cover the larger areas of the range hood, working in sections.
- Keep the coats thin and even: Apply the paint in thin, even coats rather than trying to achieve full coverage in one go. This will help prevent drips and ensure a smooth finish. Allow each coat to dry before applying the next, following the manufacturer’s recommended drying time.
- Smooth out any drips or imperfections: As you paint, keep an eye out for any drips or imperfections. If you notice any, use a brush to gently smooth them out or remove excess paint. This will help maintain a professional-looking finish.
- Apply multiple coats if necessary: Depending on the color and coverage you desire, you may need to apply multiple coats of paint. Allow each coat to dry fully before applying the next. Be patient and take your time to achieve the desired result.
- Inspect the final result: Once you have applied the desired number of coats, step back and inspect the range hood from various angles. Look for any areas that may need touch-ups or additional coats of paint. Make sure the paint has dried completely before proceeding to the next step.
By carefully following these steps, you’ll be able to paint your range hood and achieve a beautiful, smooth finish. Remember to take your time, apply thin coats, and ensure each coat is fully dry before moving on. Once you’re satisfied with the paint job, it’s time to move on to the next step: applying multiple coats for a seamless finish!
Step 8: Applying Multiple Coats
Applying multiple coats of paint to your range hood is key to achieving a flawless and durable finish. Multiple coats ensure even coverage, enhance the color richness, and provide extra protection. Follow these steps to apply multiple coats effectively:
- Assess the coverage: After the initial coat of paint has dried, assess the coverage. Check for any areas that may still show the original surface or appear uneven. This will help you determine how many additional coats are needed.
- Lightly sand between coats: Before applying another coat of paint, lightly sand the surface using fine-grit sandpaper. This will help smooth out any imperfections and create a better surface for the next coat of paint to adhere to. Wipe away any dust with a clean, dry cloth.
- Apply subsequent coats: Using the same technique as before, apply another thin and even coat of paint. Work in small sections and be mindful of any drips or pooling. Allow each coat to dry fully before applying the next one, following the manufacturer’s recommended drying time.
- Watch for color richness: As you apply subsequent coats, pay attention to the color richness. Depending on the paint and the desired look, you may need three or more coats to achieve the desired depth and vibrancy. It’s better to apply additional thin coats than to apply one thick coat, as this helps prevent drips and ensures better adhesion.
- Avoid overworking the paint: While it’s important to ensure even coverage, be mindful not to overwork the paint. Overbrushing or overrolling can lead to streaks or uneven texture. Use smooth, confident strokes and avoid excessive blending.
- Inspect the final result: Once you have applied the recommended number of coats, step back and inspect the range hood from various angles. Look for any areas that may need touch-ups or additional coats. Ensure that the paint has dried completely before moving on to the next step.
By applying multiple coats of paint to your range hood, you will achieve a seamless and professional finish. Take your time, follow the recommended drying times, and maintain a steady hand. Remember, the key is to build up the color and coverage gradually, ensuring a smooth and durable result. Once you’re satisfied with the paint job, it’s time to proceed to the next step: reattaching the grease filters!
Read more: How To Replace A Range Hood
Step 9: Reattaching the Grease Filters
After completing the painting process, it’s time to reattach the grease filters to your range hood. Grease filters play a vital role in trapping grease and preventing it from circulating in your kitchen. Follow these steps to safely and correctly reattach the grease filters:
- Clean the grease filters: Before reattaching the filters, give them a thorough cleaning. Fill a sink or tub with warm, soapy water and submerge the filters. Use a sponge or a soft brush to gently scrub away any grease or dirt. Rinse the filters thoroughly and allow them to dry completely before proceeding.
- Ensure proper alignment: Take a moment to inspect your range hood and identify the correct location for the grease filters. Refer to your manufacturer’s instructions for guidance, as the positions may vary depending on the model.
- Align the filters: Carefully align the grease filters with the designated slots or brackets, ensuring they fit snugly into place. Be gentle while handling the filters to avoid bending or damaging them.
- Secure the filters: Once the filters are correctly aligned, secure them according to the instructions provided by the manufacturer. This typically involves sliding or screwing the filters into place. Use a screwdriver if necessary, making sure not to overtighten.
- Double-check the attachment: Once the filters are secured, give them a gentle tug to ensure they are properly attached and won’t come loose during use. This step is crucial for safety and optimal performance.
- Test the range hood: After reattaching the filters, turn on your range hood to test its functionality. Ensure that it operates smoothly and that the filters are adequately capturing grease and other particles during operation.
By following these steps, you’ll be able to reattach the grease filters to your range hood without any hassle. Properly cleaned and securely attached filters will not only enhance the functionality of your range hood but also help maintain a clean and healthy kitchen environment. With the filters back in place, you’re almost done!
Step 10: Cleaning Up
After successfully completing the painting and reattachment of the grease filters, it’s time to give your workspace a final cleanup. This step ensures a tidy finish and prevents any lingering mess from dampening the satisfaction of your newly painted range hood. Follow these guidelines to accomplish a thorough cleaning:
- Dispose of painting supplies: Start by properly disposing of any used paint cans, brushes, or rollers. Check with your local waste management guidelines to ensure you follow the correct disposal methods for any leftover paint or related materials.
- Clean your painting tools: If you plan to reuse your paintbrush or roller, clean them immediately after use. Rinse your paintbrush with warm water and mild soap until the water runs clear. For rollers, rinse them under running water until all paint residue is removed. Allow the tools to dry completely before storing them.
- Remove protective coverings: Safely remove any drop cloths, newspapers, or plastic coverings that protected the surrounding area during the painting process. Dispose of any debris and wipe down the cleaned surfaces.
- Inspect the range hood: Take a few moments to inspect your freshly painted range hood. Look for any paint drips or smudges and gently remove them with a clean, damp cloth. Ensure that the paint has dried completely before touching or handling your range hood.
- Dispose of hazardous waste: If you have any leftover paint or cleaning products classified as hazardous waste, such as paint thinner or solvents, follow the proper disposal guidelines in your area. Contact your local waste management facility for guidance on the safe and responsible disposal of these materials.
- Clean your work area: thoroughly clean the area where you worked, removing any dust, paint chips, or other debris. Sweep or vacuum the floors, wipe down surfaces, and return any furniture or appliances to their original positions.
- Admire your work: Finally, step back and admire the transformation you’ve achieved with your freshly painted range hood. Take pride in your hard work, and enjoy the refreshed look it brings to your kitchen.
By diligently cleaning up after completing the painting process, you’ll leave your workspace neat and tidy, ready to be enjoyed without any reminders of the painting project. This final step ensures that you can fully appreciate your newly painted range hood and the improved ambiance it brings to your kitchen.
Congratulations! You have successfully completed all the necessary steps to paint and revitalize your range hood. A fresh coat of paint can make a significant difference, transforming the look and feel of your kitchen space. Embrace the renewed aesthetic and enjoy the sense of accomplishment that comes with your DIY project.
Conclusion
Transforming the look of your kitchen doesn’t always require a full renovation. Painting your range hood can provide a cost-effective and impactful update that breathes new life into your space. By following these step-by-step instructions, you can achieve a professional and long-lasting finish on your range hood.
Starting with the preparation phase, you learned how to properly clean and sand the range hood surface, creating a smooth canvas for the paint. Applying primer ensured better adhesion and increased durability. Choosing the right paint, considering factors like material, heat resistance, and finish, ensured optimal results.
The actual painting process involved applying thin and even coats, allowing each coat to dry fully before proceeding. By applying multiple coats, you achieved better coverage and depth of color. Finally, reattaching the grease filters and performing a thorough cleanup left your kitchen looking fresh and tidy.
Through each step, attention to detail and careful execution were key. By investing time and effort into properly preparing and painting your range hood, you have created a stunning focal point in your kitchen. The renewed appearance of your range hood will complement your overall kitchen decor and bring a sense of vibrancy to the space.
Remember to consult the manufacturer’s guidelines and safety precautions specific to your range hood model before beginning the painting process. While painting your range hood is a satisfying DIY project, it’s important to use the appropriate materials and techniques to achieve the best results.
So why wait? Take the plunge and transform your range hood with a fresh coat of paint. With these step-by-step instructions as your guide, you can confidently embark on this project, knowing that you have the knowledge and skills to achieve a professional-looking finish. Enjoy the process and revel in the renewed beauty that your painted range hood will bring to your kitchen.
Frequently Asked Questions about How To Paint Range Hood
Was this page helpful?
At Storables.com, we guarantee accurate and reliable information. Our content, validated by Expert Board Contributors, is crafted following stringent Editorial Policies. We're committed to providing you with well-researched, expert-backed insights for all your informational needs.


0 thoughts on “How To Paint Range Hood”