Articles
How To Remove Purple Plumbing Primer
Modified: December 7, 2023
Learn how to remove purple plumbing primer with our informative articles. Easily eliminate stains and prepare your plumbing for a fresh start.
(Many of the links in this article redirect to a specific reviewed product. Your purchase of these products through affiliate links helps to generate commission for Storables.com, at no extra cost. Learn more)
Introduction
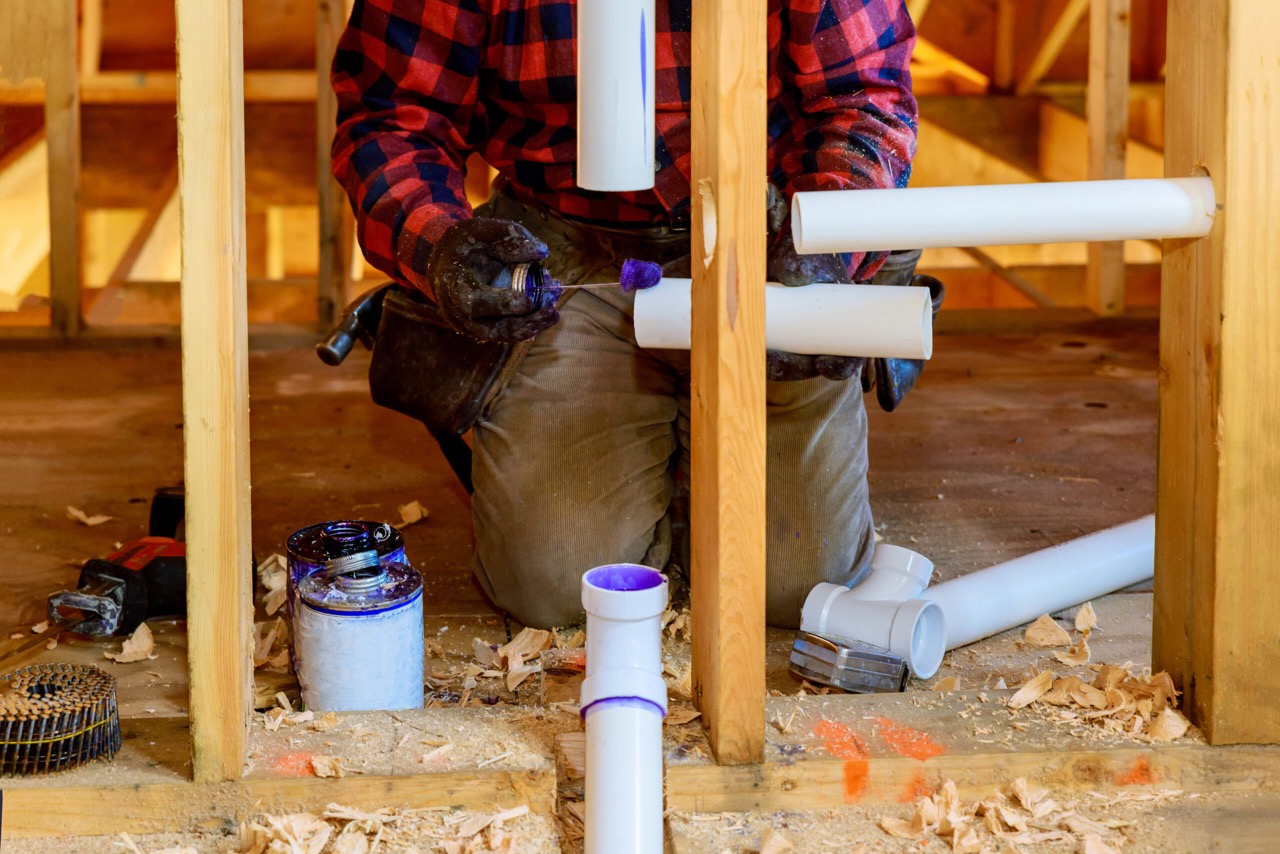
When it comes to plumbing projects, one of the common tasks is to apply plumbing primer to ensure a secure and reliable connection between pipes and fittings. However, if you have ever used purple plumbing primer, you may have encountered the challenge of removing it once the project is complete.
Purple plumbing primer, also known as PVC primer, is a solvent-based solution that is used in conjunction with PVC cement to prepare the surfaces of PVC pipes and fittings before joining them together. It helps to clean and soften the surfaces, allowing for better adhesion of the cement.
Removing purple plumbing primer is necessary in situations where you need to make adjustments or repairs to your plumbing system. It is important to ensure that any leftover primer or residues are properly removed before applying new cement or making any modifications to the pipes and fittings.
In this article, we will guide you through the process of removing purple plumbing primer effectively, ensuring a clean and tidy work area. We will also discuss the safety precautions you should take and the tools and materials you will need for the task. So let’s dive in and learn how to remove purple plumbing primer like a pro!
Key Takeaways:
- Properly removing purple plumbing primer is crucial for maintaining a clean and reliable plumbing system, ensuring optimal adhesion for future repairs, and preventing potential leaks. Safety and thoroughness are key!
- By following the step-by-step guide and prioritizing safety, you can confidently tackle the removal of purple plumbing primer, creating a well-prepared PVC surface for your plumbing projects. Happy plumbing!
What is purple plumbing primer?
Purple plumbing primer is a type of solvent-based solution that is specifically designed for use in plumbing projects involving PVC (polyvinyl chloride) pipes and fittings. It is commonly used in conjunction with PVC cement to prepare the surfaces for a strong and durable connection.
The purple color of the primer is not purely for aesthetics; it serves a practical purpose. The purple hue helps to visually distinguish the primer from the PVC cement, which is typically a clear or light-colored adhesive. This differentiation ensures that both the primer and the cement are applied accurately and in the correct order.
Purple plumbing primer is formulated with powerful solvents that effectively remove any dirt, grease, or other contaminants from the surfaces of PVC pipes and fittings. It also softens the plastic material, allowing the PVC cement to penetrate and bond with the PVC surfaces more effectively.
It is important to note that purple plumbing primer should not be used on other types of pipes or materials, such as copper or steel. Each type of plumbing material requires specific types of primer and cement that are tailored to their compatibility.
When using purple plumbing primer, it is essential to follow the manufacturer’s instructions carefully. This includes applying the primer using a brush or applicator, allowing it to dry for the recommended amount of time, and ensuring that the surfaces are clean and dry before applying PVC cement.
Now that we understand what purple plumbing primer is and its purpose, let’s explore why it is necessary to remove it and the potential hazards of leaving it on the surfaces of PVC pipes and fittings.
Why is it necessary to remove purple plumbing primer?
While purple plumbing primer is essential for ensuring a strong and durable connection between PVC pipes and fittings, it is equally important to remove it after completing the plumbing project. Here are a few reasons why it is necessary:
- Cleanliness and aesthetics: Removing purple plumbing primer helps to maintain a clean and visually appealing plumbing system. Leaving excess primer on the surfaces of PVC pipes and fittings can result in a messy and unsightly appearance.
- Adhesion of new cement: If you need to make repairs or modifications to your plumbing system, removing the primer is crucial. Any leftover primer can interfere with the adhesion of new PVC cement, making it difficult to achieve a secure and reliable connection.
- Leak prevention: Properly removing the primer ensures that there are no residual materials that could compromise the integrity of the pipe joints. Excess primer can create gaps or weak spots, leading to potential leaks or failures in the plumbing system.
- Easier future modifications: In the event that you need to make additional changes or adjustments to your plumbing system, removing the primer makes the process much more manageable. It allows for better access to the surfaces and ensures that any new connections are made on a clean and properly prepared base.
- Compatibility with other materials: Leaving purple plumbing primer on PVC surfaces can cause complications if you plan to connect PVC pipes to other types of materials, such as copper or steel. The primer may not be compatible with those materials, leading to poor adhesion and potential leaks.
By taking the time to remove purple plumbing primer, you can ensure the long-term performance and reliability of your plumbing system. It is a simple step that should not be overlooked, as it can save you from costly repairs or issues down the line.
Now that we understand the importance of removing purple plumbing primer, let’s move on to the safety precautions that should be followed during the removal process.
Safety Precautions
When removing purple plumbing primer, it is important to prioritize safety. Follow these safety precautions to protect yourself and maintain a hazard-free work environment:
- Protective gear: Wear protective gear such as gloves, safety goggles, and a dust mask to shield your hands, eyes, and respiratory system from any potential hazards. This will help prevent skin irritation, eye injuries, and inhalation of fumes.
- Ventilation: Ensure that the work area is well-ventilated. Open windows or use fans to create a steady flow of fresh air, especially if you are working indoors. The solvents in the primer can produce fumes that may be harmful when inhaled in high concentrations.
- Work in a well-lit area: Adequate lighting is essential to perform the removal process effectively and reduce the risk of accidents. Make sure you have sufficient light to see the surfaces and any potential hazards clearly.
- Avoid open flames or sparks: Purple plumbing primer contains flammable solvents. Keep away from open flames, sparks, or any potential sources of ignition during the removal process. This will help prevent accidents and fire hazards.
- Follow manufacturer’s instructions: Always read and follow the instructions provided by the manufacturer of the primer and any other products you are using. This includes information on proper application, drying times, and disposal of waste materials.
- Dispose of waste properly: Dispose of any waste materials, such as used rags or containers, in accordance with local regulations. Some solvents and chemicals can be hazardous to the environment if not handled and disposed of correctly.
By adhering to these safety precautions, you can ensure a safe and controlled environment while removing purple plumbing primer. Remember, safety should always be a top priority in any home improvement or plumbing project.
Now that we have covered the safety precautions, let’s move on to the tools and materials you will need for removing purple plumbing primer.
Tools and Materials Needed
To effectively remove purple plumbing primer, you will need the following tools and materials:
- Protective gear: Wear chemical-resistant gloves, safety goggles, and a dust mask to protect yourself from potential hazards and irritants.
- Utility knife: A sharp utility knife will come in handy for scraping and removing excess primer from the PVC surfaces.
- PVC cleaner: Purchase a PVC cleaner designed specifically for removing primer and cleaning PVC surfaces. Look for a cleaner that is compatible with your plumbing materials.
- Clean cloth or rag: Have a clean cloth or rag available to wipe away excess primer and to clean the PVC surfaces.
- Applicator or brush: Depending on the type of PVC cleaner you choose, you may need an applicator or brush to apply the cleaner evenly on the surfaces.
- Container for waste: Prepare a suitable container to collect and dispose of any waste materials, such as used rags or excess primer.
- Isopropyl alcohol (optional): Isopropyl alcohol can be used to further clean the PVC surfaces and remove any leftover residues or adhesive.
Make sure to gather all the necessary tools and materials before starting the removal process. Having everything readily available will help you work efficiently and complete the task effectively. Now, let’s dive into the step-by-step process of removing purple plumbing primer.
Step 1: Gathering the necessary supplies
Before you begin removing the purple plumbing primer, it’s important to gather all the necessary supplies. This will ensure that you have everything you need within reach, making the process smoother and more efficient. Here’s what you’ll need:
- Protective gear: Put on chemical-resistant gloves, safety goggles, and a dust mask to protect yourself from any potential hazards.
- Utility knife: Keep a sharp utility knife on hand for scraping and removing excess primer from the PVC surfaces.
- PVC cleaner: Choose a PVC cleaner specifically formulated for removing primer and cleaning PVC surfaces. Ensure that it is compatible with the PVC materials you are working with.
- Clean cloth or rag: Have a clean cloth or rag handy to wipe away excess primer and to clean the PVC surfaces.
- Applicator or brush: Depending on the type of PVC cleaner you are using, you may need an applicator or brush to apply the cleaner evenly on the surfaces.
- Container for waste: Prepare a suitable container to collect and dispose of any waste materials, such as used rags or excess primer.
- Isopropyl alcohol (optional): If needed, have isopropyl alcohol available to further clean the PVC surfaces and remove any leftover residues or adhesive.
Make sure to double-check that you have all the necessary supplies before proceeding. This will save you time and prevent any interruptions during the removal process.
Once you’ve gathered everything, you’re ready to move on to preparing the work area. This step is crucial for ensuring a clean and organized space for the removal process. Let’s continue to the next step.
To remove purple plumbing primer, use a solvent like acetone or lacquer thinner. Apply the solvent to a cloth and gently rub the primer until it comes off. Be sure to wear gloves and work in a well-ventilated area.
Step 2: Preparing the work area
Before you start removing the purple plumbing primer, it’s important to prepare your work area to ensure efficiency and cleanliness throughout the process. Here’s how to prepare the work area:
- Clean the surfaces: Begin by cleaning the PVC surfaces that have been primed. Use a clean, damp cloth to wipe away any dust or debris. This will ensure that the primer removal process is more effective.
- Protect surrounding areas: Cover any nearby surfaces or objects that you want to protect from the PVC cleaner or primer residues. Use plastic sheeting or drop cloths to prevent any accidental spills or splatters.
- Ventilate the area: Ensure proper ventilation in the work area to minimize the buildup of fumes from the PVC cleaner. Open windows, doors, or turn on fans to promote fresh air circulation.
- Organize your tools and materials: Arrange your tools and materials within easy reach. This will save you time and effort during the removal process.
- Work on a stable and flat surface: Find a stable and flat surface to work on. This will ensure stability and help prevent accidents or spills during the removal process.
By taking the time to prepare your work area, you can ensure a smooth and organized process. Now that your work area is ready, you can move on to the next step: removing the excess purple plumbing primer. This step will help to eliminate any leftover primer from the PVC surfaces. Let’s proceed to step 3.
Step 3: Removing the excess primer
Now that you have prepared your work area, it’s time to remove the excess purple plumbing primer from the PVC surfaces. Follow these steps:
- Put on protective gear: Before you begin, make sure you are wearing chemical-resistant gloves, safety goggles, and a dust mask to protect yourself from any potential hazards.
- Inspect the primed surfaces: Examine the PVC surfaces that have been primed. Look for any areas where the primer may be excessive or uneven.
- Use a utility knife: Take a sharp utility knife and carefully scrape off the excess primer from the PVC surfaces. Apply gentle pressure and make sure not to damage or scratch the PVC material.
- Continue scraping: Continue scraping the excess primer until you have removed as much of it as possible. It’s okay if there are small traces left, as these will be addressed in the next steps.
- Dispose of waste properly: Collect the scraped-off primer in a suitable container, following local regulations for the disposal of hazardous waste materials.
By removing the excess primer, you are creating a clean surface for the next steps in the removal process. Once you have scraped off as much primer as possible, you can move on to the next step: applying PVC cleaner to further clean the PVC surfaces. Let’s proceed to step 4.
Step 4: Applying PVC cleaner
After removing the excess purple plumbing primer, the next step is to apply PVC cleaner to further clean the PVC surfaces. Follow these steps:
- Put on protective gear: Before you begin, ensure you are still wearing chemical-resistant gloves, safety goggles, and a dust mask for your safety.
- Read the instructions: Read the manufacturer’s instructions on the PVC cleaner bottle to understand the proper application method and any specific requirements.
- Apply the PVC cleaner: Using an applicator or brush suitable for the type of PVC cleaner you have, apply the cleaner evenly to the primed PVC surfaces. Make sure to cover all areas where the primer was previously present.
- Allow the cleaner to sit: Follow the manufacturer’s instructions regarding the recommended waiting time for the PVC cleaner to work on the surfaces. This will typically be a few minutes.
- Scrub if necessary: If there are any stubborn primer residues or stains, use a soft brush or cloth to gently scrub the surfaces while the cleaner is still applied. Be careful not to scratch the PVC material.
- Wipe away the cleaner: After the recommended waiting time, use a clean cloth or rag to wipe away the PVC cleaner from the surfaces. Make sure to remove all traces of the cleaner.
Applying PVC cleaner is an important step in the removal process as it helps to break down and remove any remaining primer residues. Once you have wiped away the cleaner, the next step is to address any primer residue that may still be present. Let’s move on to step 5: removing the primer residue.
Step 5: Removing the primer residue
After applying the PVC cleaner and wiping away the excess, it’s time to focus on removing any remaining primer residue from the PVC surfaces. Follow these steps:
- Put on protective gear: Before you begin, ensure you are still wearing chemical-resistant gloves, safety goggles, and a dust mask for your safety.
- Inspect the surfaces: Carefully examine the PVC surfaces for any remaining primer residue or stains.
- Use isopropyl alcohol (optional): If there are stubborn residue spots, you can dampen a clean cloth with isopropyl alcohol and gently rub the affected areas. The alcohol helps to dissolve any residual adhesive and lift it from the PVC surface.
- Scrub gently: If necessary, use a soft brush or cloth to gently scrub the areas with primer residue. Apply light pressure to avoid scratching the PVC material.
- Wipe away the residue: As you work on removing the residue, use a clean cloth or rag to wipe away any dissolved primer or leftover debris. Continue until the surfaces are clean and free of residue.
- Inspect and repeat if necessary: After the first pass, inspect the surfaces again to ensure that all primer residue has been removed. If any remnants are found, repeat the cleaning process until the surfaces are completely clean.
Removing the primer residue is crucial for achieving a clean and well-prepared PVC surface. Once you have successfully removed any remaining residue, it’s time to focus on cleaning up the work area before concluding the removal process. Let’s proceed to step 6.
Step 6: Cleaning up the work area
After removing the primer residue from the PVC surfaces, the final step is to clean up the work area to ensure a tidy and organized space. Follow these steps:
- Dispose of waste materials: Properly dispose of any waste materials, such as used rags and the container holding the scraped-off primer. Follow local regulations for the disposal of hazardous waste.
- Wipe down surrounding surfaces: Use a clean cloth or rag to wipe down any surrounding surfaces that may have come into contact with the primer or cleaner. This will remove any residues or spills from the work area.
- Store tools and materials: Clean and store your tools and materials properly. Ensure that they are organized and stored in a safe place for future use or disposal.
- Ventilate the area: After completing the cleanup, leave the work area well-ventilated to allow any remaining fumes or odors to dissipate. Open windows or use fans to promote air circulation.
- Inspect the PVC surfaces: Take a final look at the PVC surfaces to ensure they are clean, free of residue, and ready for the next phase of your plumbing project.
By cleaning up the work area, you maintain a safe and organized environment. This not only contributes to your own peace of mind but also sets the groundwork for a successful and efficient plumbing project.
Congratulations! You have successfully removed the purple plumbing primer and cleaned up the work area. By following these steps, you have ensured a clean and well-prepared PVC surface for your plumbing project. Remember, safety should always be a priority throughout the entire process. Now you can confidently proceed with your plumbing repairs, modifications, or other necessary tasks.
If you have any further questions or concerns, don’t hesitate to consult with a professional for guidance. Happy plumbing!
Conclusion
Removing purple plumbing primer from PVC surfaces is an essential step in maintaining a clean and reliable plumbing system. By properly removing the primer, you ensure optimal adhesion for future repairs or modifications, prevent potential leaks, and maintain the overall aesthetics of the plumbing system.
In this article, we discussed the importance of removing purple plumbing primer, the potential hazards of leaving it on PVC surfaces, and the necessary safety precautions to take during the removal process.
We also provided a step-by-step guide on how to effectively remove the primer, starting with gathering the necessary supplies, preparing the work area, and scraping off the excess primer. We then discussed the application of PVC cleaner to further clean the surfaces and the best practices for removing any remaining primer residue.
Finally, we emphasized the importance of cleaning up the work area and properly disposing of waste materials, ensuring a safe and organized environment.
Remember, when working with plumbing projects, always prioritize safety, follow manufacturer instructions, and seek professional assistance if needed. By doing so, you can confidently tackle any plumbing project and ensure the long-term performance and reliability of your system.
Now that you have the knowledge and understanding of how to remove purple plumbing primer, you are ready to tackle your plumbing tasks with confidence. Good luck, and happy plumbing!
Frequently Asked Questions about How To Remove Purple Plumbing Primer
Was this page helpful?
At Storables.com, we guarantee accurate and reliable information. Our content, validated by Expert Board Contributors, is crafted following stringent Editorial Policies. We're committed to providing you with well-researched, expert-backed insights for all your informational needs.


0 thoughts on “How To Remove Purple Plumbing Primer”