Articles
How To Store IPhone Photos On PC
Modified: December 7, 2023
Learn how to store your iPhone photos on your PC easily with our step-by-step guide. Read our informative articles and free up space on your device today!
(Many of the links in this article redirect to a specific reviewed product. Your purchase of these products through affiliate links helps to generate commission for Storables.com, at no extra cost. Learn more)
Introduction
In the age of smartphones, capturing moments through photos has become an integral part of our lives. Whether it’s a stunning landscape, a cherished memory with friends, or a milestone achievement, our iPhones serve as portable cameras that help us capture these precious moments with ease. However, as our photo collections grow, it becomes essential to find an efficient way to store and backup these photos.
One option is to store iPhone photos on a PC. This allows you to free up space on your device while keeping your cherished memories safe and accessible. In this article, we will explore various methods to store iPhone photos on a PC, providing you with step-by-step instructions on how to do it.
While there are multiple methods to accomplish this, it’s important to choose the one that suits your needs and preferences. Whether you prefer using official apps like iCloud for Windows or iTunes, or you lean towards third-party apps, we’ve got you covered. Let’s dive into the different methods to store iPhone photos on a PC.
Key Takeaways:
- Storing iPhone photos on a PC can be done using iCloud for Windows, iTunes, Windows File Explorer, or third-party apps like Google Photos and Dropbox. Choose the method that suits your preferences and backup your cherished memories with ease.
- Whether you prefer seamless syncing with iCloud, straightforward photo transfer with iTunes, direct control using Windows File Explorer, or the flexibility of third-party apps, there’s a method to store iPhone photos on your PC that fits your needs and workflow.
Read more: How To Store IPhone Photos
Method 1: Using iCloud for Windows
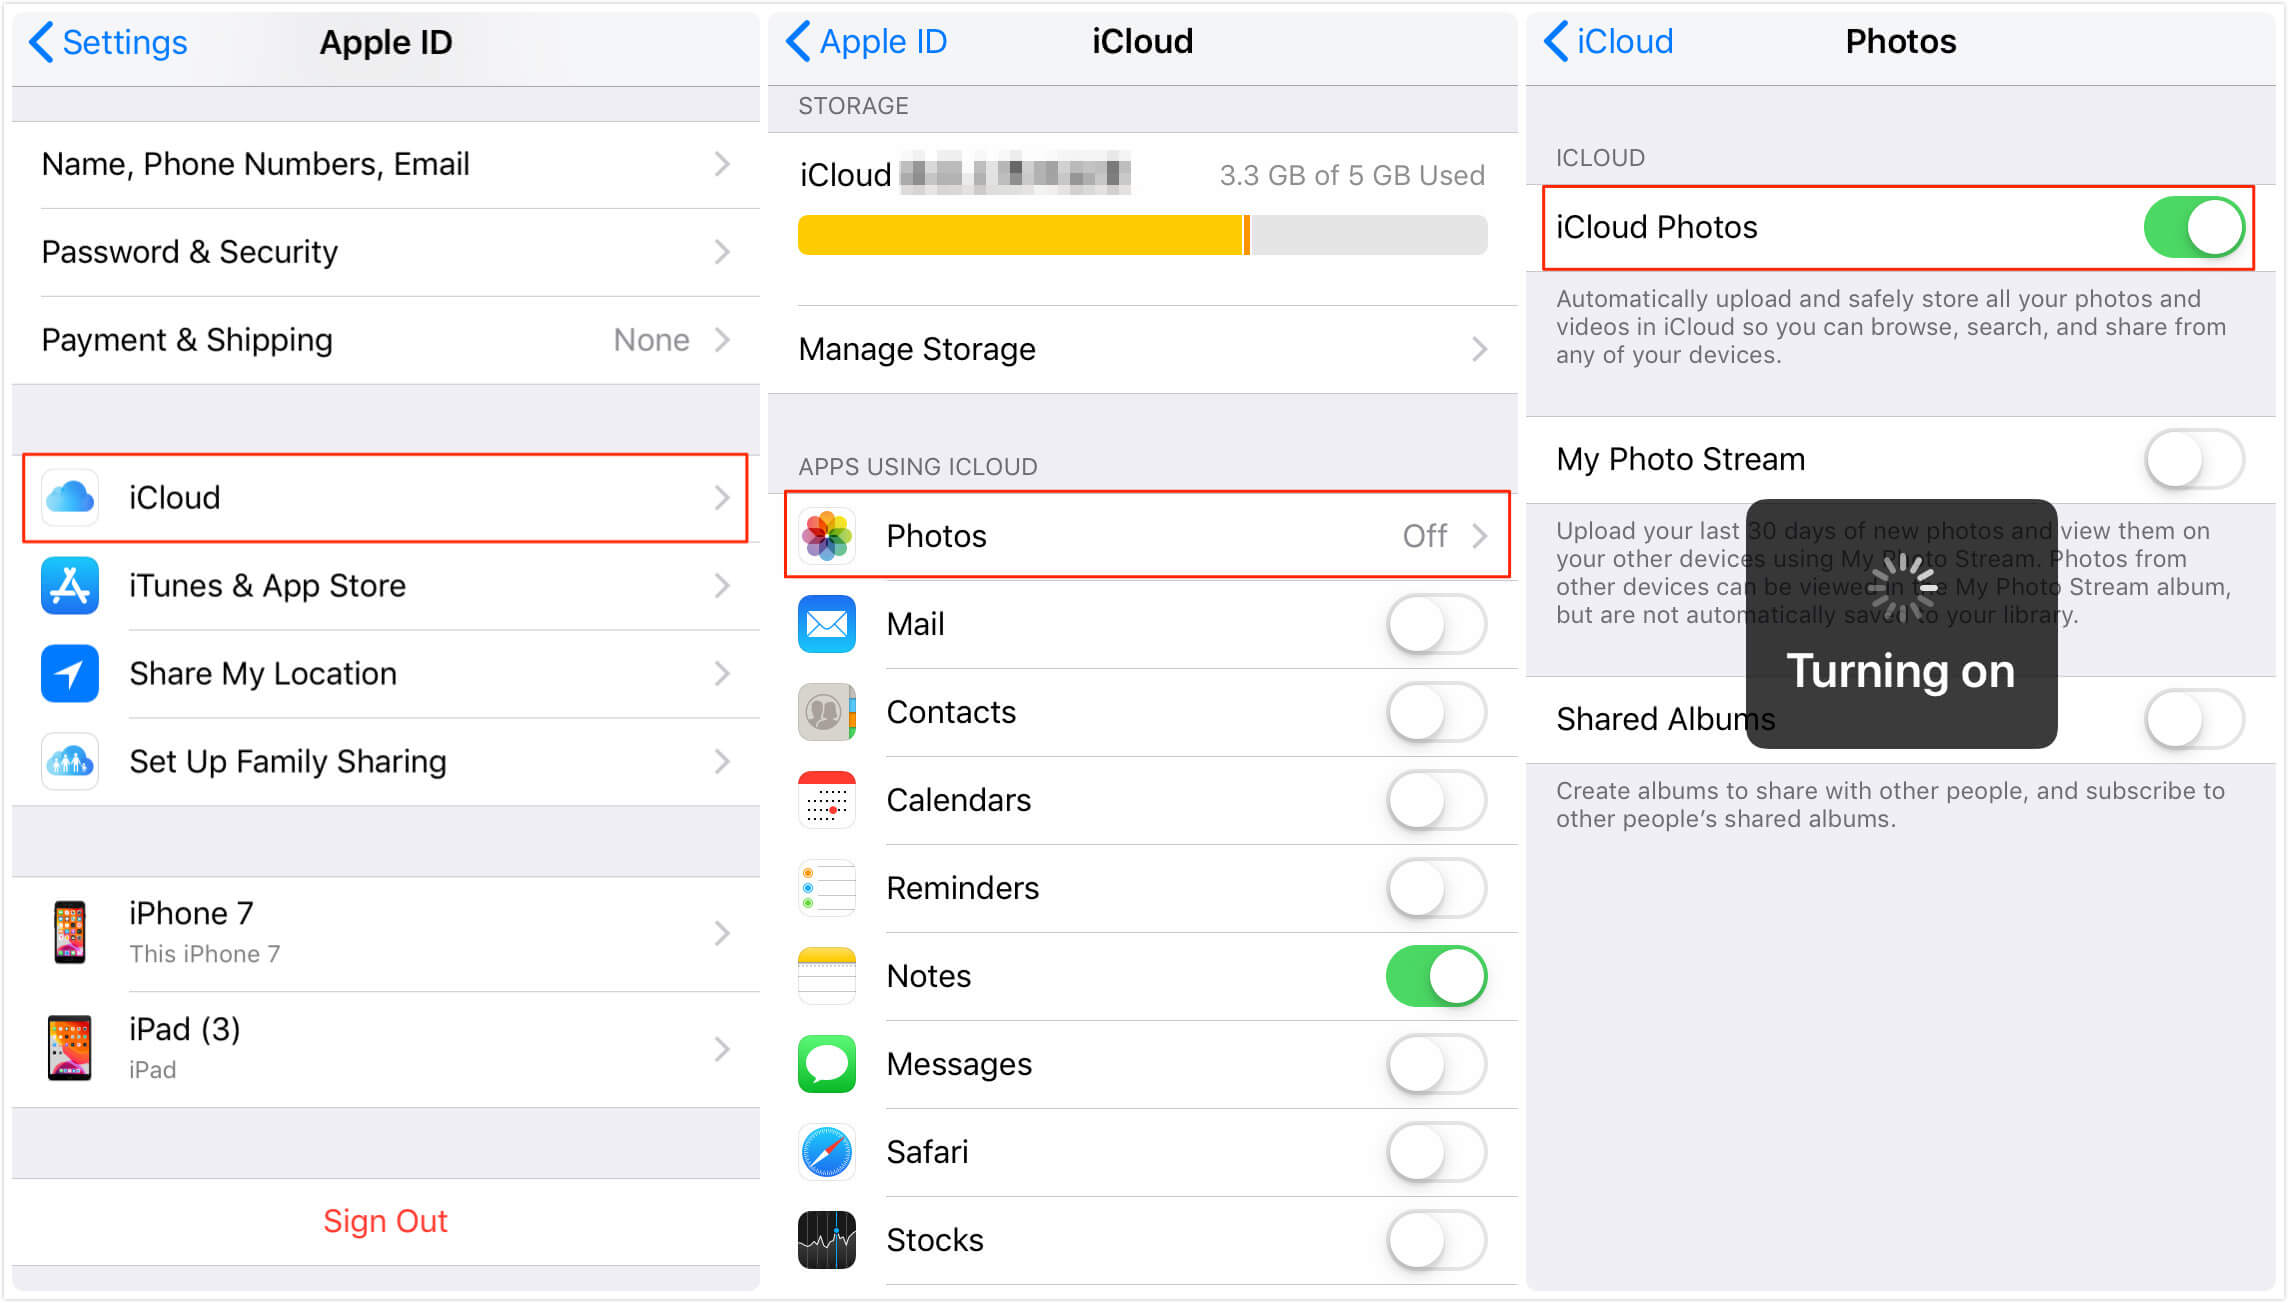
If you’re already using iCloud to sync your iPhone’s photos with your other Apple devices, using iCloud for Windows is a convenient option to store your iPhone photos on your PC. It allows you to access your entire iCloud photo library and download your photos directly to your PC.
Here’s how you can use iCloud for Windows to store your iPhone photos:
- Download and Install iCloud for Windows: Start by downloading iCloud for Windows from the official Apple website (https://www.apple.com/icloud/windows/). Once downloaded, run the installer and follow the on-screen instructions to install the app on your PC.
- Sign in to iCloud: Launch iCloud for Windows and sign in with your Apple ID and password.
- Choose Photos: In the iCloud for Windows app, you will see several options for syncing content. Make sure the “Photos” option is selected.
- Customize Settings: Click on the “Options” button next to “Photos” to customize your photo settings. Here, you can choose to optimize storage on your PC, sync all your photos, or selectively sync specific albums.
- Apply Changes: Once you have customized your settings, click on the “Apply” button to save the changes.
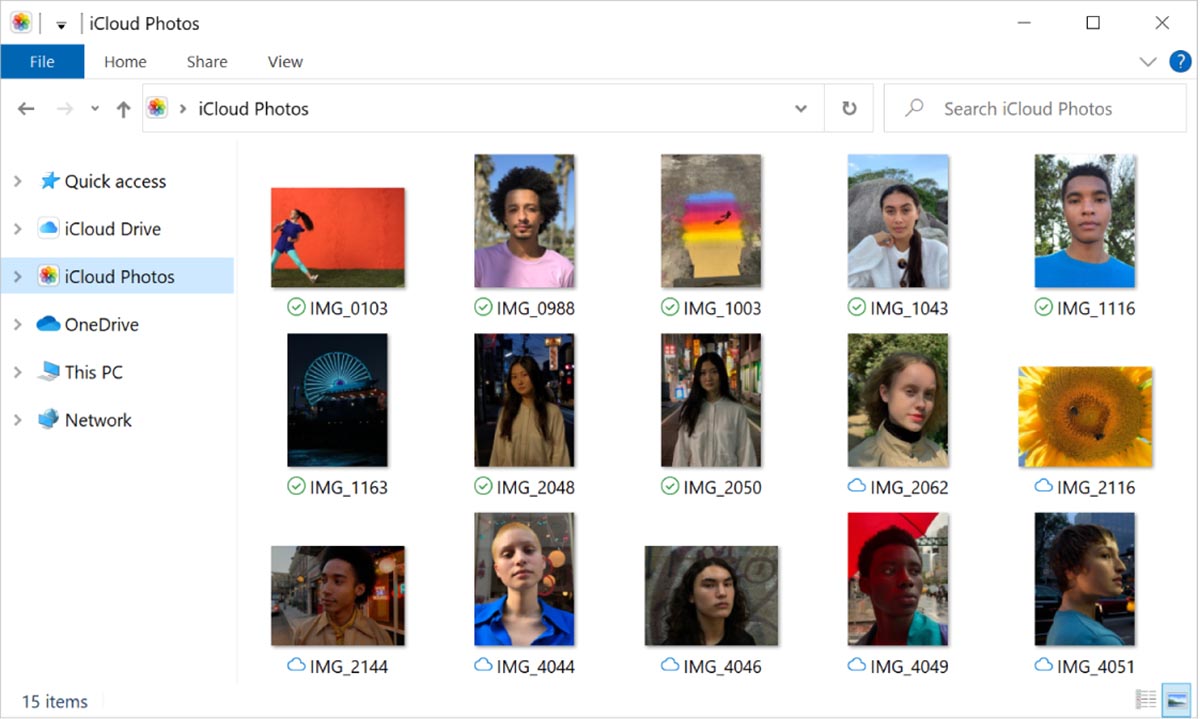
- Access and Download Photos: Open the File Explorer on your PC and navigate to the “iCloud Photos” folder. Here, you will find all your synced photos organized by year and month. From here, you can select and copy the desired photos to another location on your PC for safekeeping.
Using iCloud for Windows provides a seamless way to store your iPhone photos on your PC. By syncing your photos with iCloud, you can easily access and manage them from multiple devices, ensuring your precious memories are securely stored.
Method 2: Using iTunes
Another method to store iPhone photos on a PC is by using iTunes. Although iTunes is primarily known for managing media files and syncing with iOS devices, it also allows you to transfer photos from your iPhone to your PC.
Follow these steps to use iTunes to store your iPhone photos:
- Download and Install iTunes: If you don’t already have iTunes installed on your PC, visit the official Apple website (https://www.apple.com/itunes/) and download the latest version of iTunes.
- Connect your iPhone to your PC: Use a USB cable to connect your iPhone to your PC. Launch iTunes if it doesn’t open automatically.
- Trust the Computer: On your iPhone, a prompt will appear asking you to trust the computer. Tap “Trust” and enter your passcode if prompted.
- Enable Photo Syncing: In iTunes, select your iPhone from the device menu. Navigate to the “Photos” tab, located on the left-hand side of the screen.
- Select and Sync Photos: Check the box next to “Sync Photos” and choose whether you want to sync your entire photo library or selected albums. You can also choose to include videos in the sync.
- Apply Changes and Sync: Click on the “Apply” or “Sync” button to start the syncing process. iTunes will begin transferring your selected photos from your iPhone to your PC.
- Access Transferred Photos: Once the sync is complete, you can find your transferred photos in the designated folder on your PC. By default, iTunes creates a folder named “iTunes Photos” in your “Pictures” directory.
Using iTunes to store your iPhone photos provides a straightforward method for transferring and backing up your photos to your PC. It also gives you the option to organize your photos into albums before syncing, allowing for better organization and easier access to your memories.
You can easily store iPhone photos on your PC by connecting your iPhone to the computer using a USB cable, then importing the photos using the Photos app on Windows or the Image Capture app on Mac.
Method 3: Using Windows File Explorer
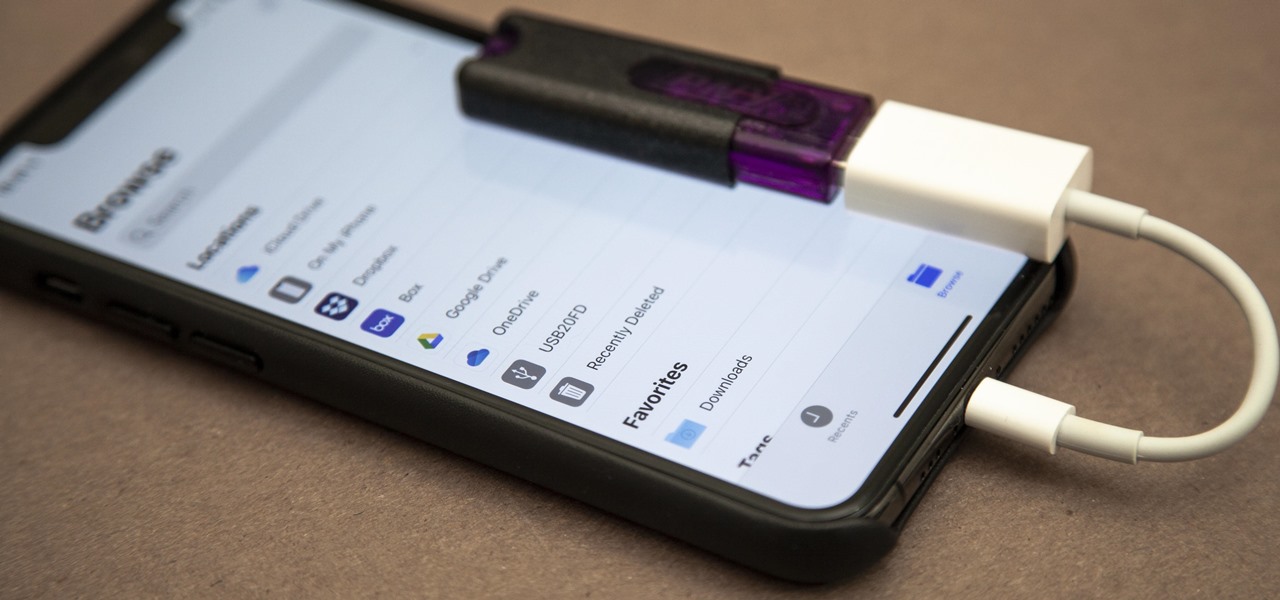
If you prefer a more direct approach to store your iPhone photos on your PC without using any additional software, you can utilize the built-in Windows File Explorer. This method allows you to manually browse the file system of your iPhone and copy photos to your PC.
Here’s how you can use Windows File Explorer to store iPhone photos:
- Connect your iPhone to your PC: Use a USB cable to connect your iPhone to your PC. Ensure your iPhone is unlocked and trust the computer if prompted.
- Open Windows File Explorer: On your PC, open Windows File Explorer by pressing the Windows key and E simultaneously, or by clicking on the File Explorer icon in your taskbar.
- Access iPhone Photos: In Windows File Explorer, you will see your iPhone listed under “This PC” or “Devices and Drives”. Double-click on your iPhone to access its file system.
- Navigate to the DCIM Folder: Within your iPhone’s file system, locate and open the “Internal Storage” or “Apple iPhone” folder. From there, navigate to the “DCIM” folder, which contains your iPhone’s photos.
- Select and Copy Photos: Inside the DCIM folder, you will find various sub-folders labeled with numbers. Each folder represents a specific photo album on your iPhone. Open the desired folder and select the photos you want to store on your PC. Right-click on the selected photos and choose “Copy”.
- Paste Photos on your PC: Navigate to the folder on your PC where you want to store the copied photos. Right-click on an empty space in the folder and choose “Paste”. The selected photos will be copied from your iPhone and stored on your PC.
Using Windows File Explorer gives you direct control over transferring your iPhone photos to your PC. It allows you to manually select which photos to copy, making it easy to organize and store your photos in a way that suits your preferences.
Method 4: Using Third-Party Apps
If you’re looking for alternative methods to store iPhone photos on your PC, there are several third-party apps available that can simplify the process. These apps offer additional features and flexibility in managing and transferring your photos. Let’s explore some popular options:
- Google Photos: Google Photos is a free app that allows you to store and back up your iPhone photos to the cloud. You can then access them on your PC by logging into your Google account and navigating to photos.google.com. From there, you can download your photos to your PC.
- Dropbox: Dropbox is a popular cloud storage service that offers a mobile app for iPhone. By installing the Dropbox app on your iPhone, you can automatically sync your photos to the cloud. Then, on your PC, you can access your Dropbox account and download the photos to your computer.
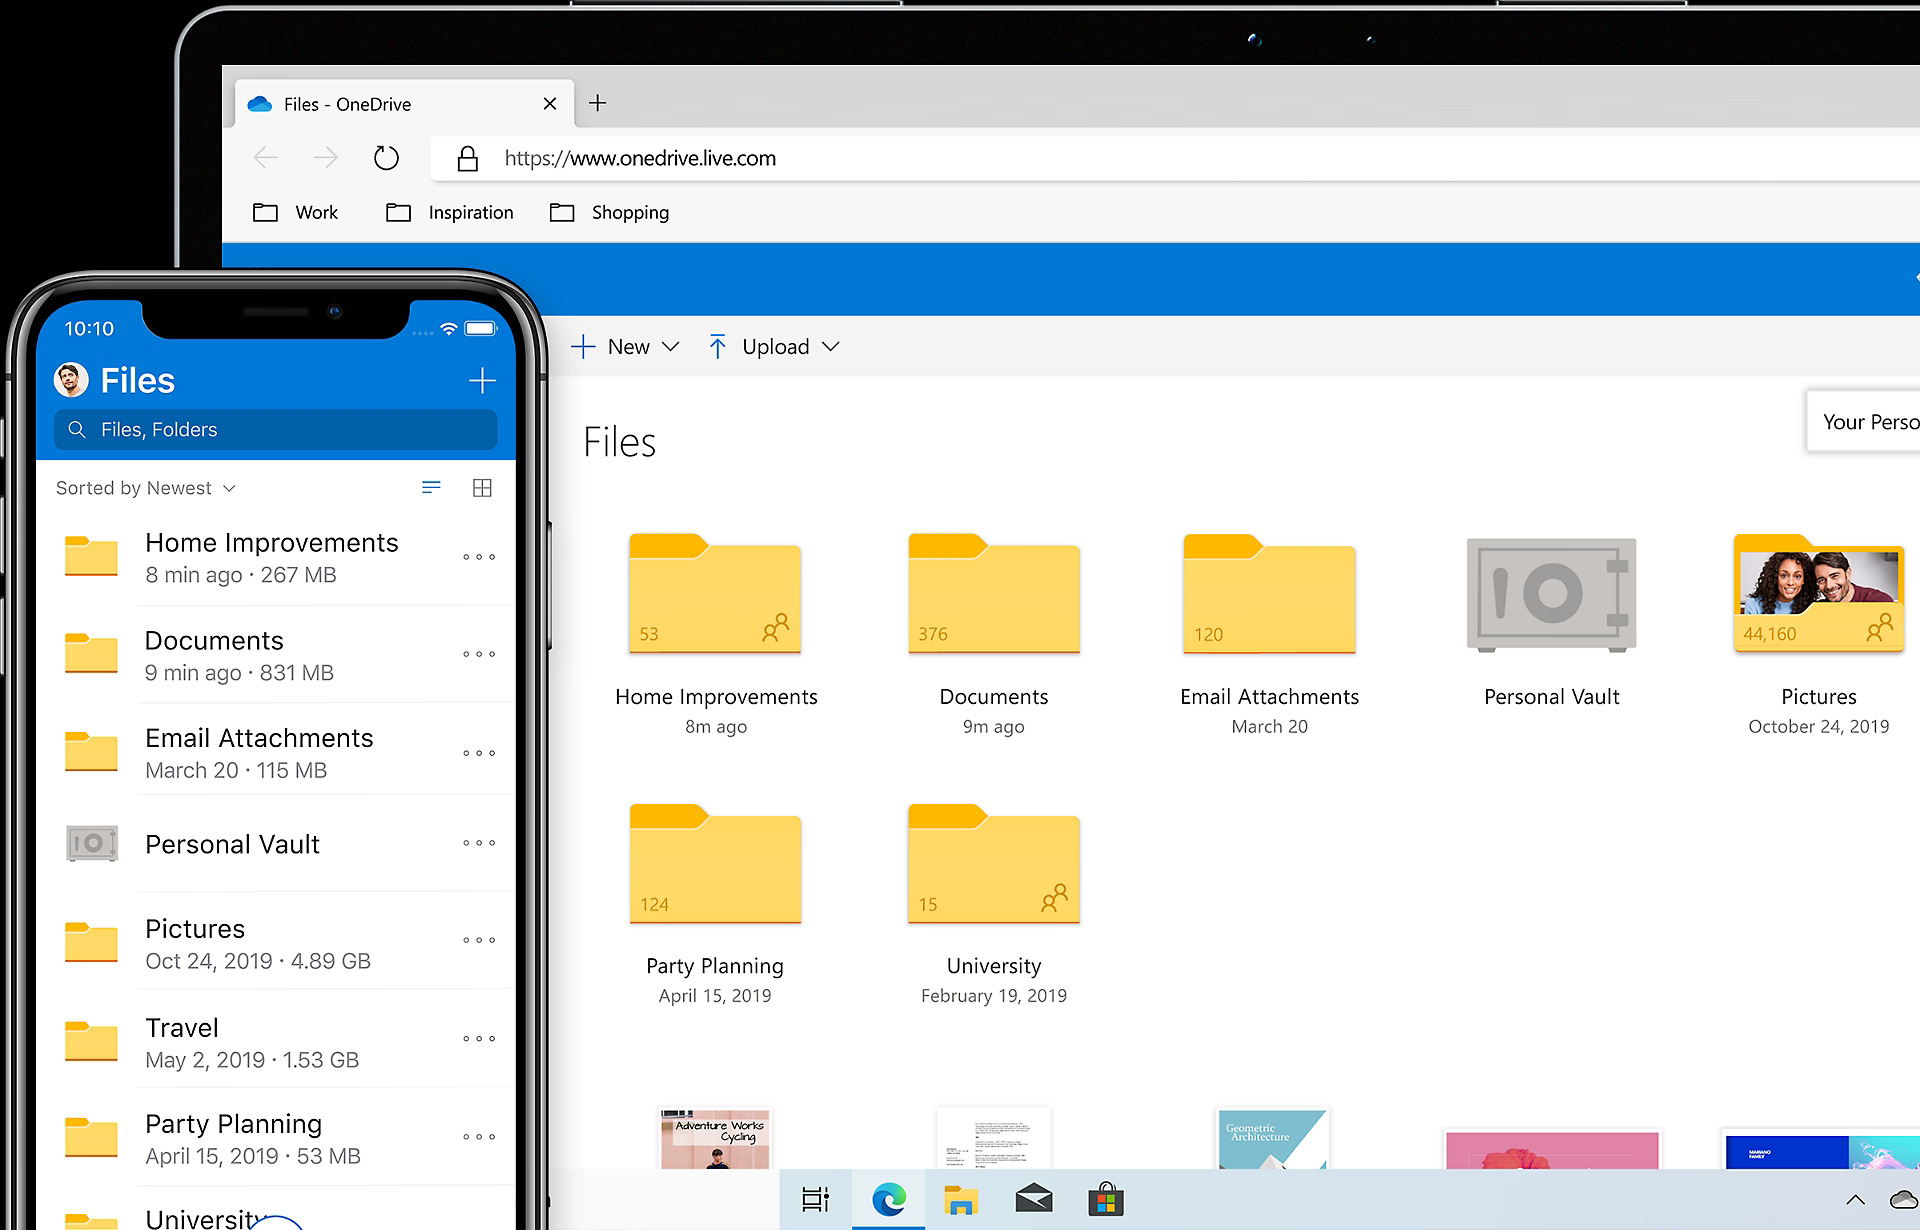
- OneDrive: OneDrive is Microsoft’s cloud storage service that integrates seamlessly with iPhones. By installing the OneDrive app on your iPhone, you can backup and sync your photos to the cloud. On your PC, you can sign in to your OneDrive account and download the photos to your computer.
- PhotoSync: PhotoSync is a paid app that allows wireless transfer of photos and videos between your iPhone and your PC. It supports various transfer methods, including Wi-Fi, Bluetooth, and even direct transfer over a local network. With PhotoSync, you can easily transfer your photos to your PC without the need for cables.
These are just a few examples of the many third-party apps available for storing iPhone photos on a PC. It’s important to choose a trusted app from a reputable developer and ensure that it meets your specific needs. These apps provide convenience and flexibility in managing your photo collection and keeping your memories safe.
Read more: How To Store IPhone Photos On ICloud
Conclusion
Storing iPhone photos on a PC is a practical and efficient way to free up space on your device and ensure the safety of your precious memories. In this article, we explored several methods to accomplish this, each with its own advantages and features to suit different preferences. Whether you prefer using official apps like iCloud for Windows and iTunes, or you opt for third-party apps like Google Photos, Dropbox, or PhotoSync, there is a method that will fit your needs.
Using iCloud for Windows allows you to sync and download photos seamlessly, while iTunes provides a straightforward way to transfer and organize your photos. Alternatively, utilizing the Windows File Explorer gives you direct control and flexibility in manually copying the photos from your iPhone. And, if you prefer additional features and cloud storage options, third-party apps like Google Photos, Dropbox, or OneDrive can provide a convenient solution.
Consider your requirements, such as the amount of storage space needed, ease of use, and desired features, when choosing the method that suits you best. It’s recommended to have a backup system in place to ensure the safety of your photos in case of data loss or device malfunction.
By storing your iPhone photos on your PC, you not only free up space on your device but also create a backup of your precious memories that can be easily accessed and enjoyed whenever you want. Take the time to explore these methods and choose the one that aligns with your workflow and preferences, and you’ll have peace of mind knowing your cherished photos are safely stored on your PC.
Frequently Asked Questions about How To Store IPhone Photos On PC
Was this page helpful?
At Storables.com, we guarantee accurate and reliable information. Our content, validated by Expert Board Contributors, is crafted following stringent Editorial Policies. We're committed to providing you with well-researched, expert-backed insights for all your informational needs.


0 thoughts on “How To Store IPhone Photos On PC”