Articles
How To Use Black And Decker Laser Level
Modified: October 20, 2024
Learn how to effectively use the Black And Decker laser level for precise measurements. Discover expert articles and tips to enhance your DIY projects.
(Many of the links in this article redirect to a specific reviewed product. Your purchase of these products through affiliate links helps to generate commission for Storables.com, at no extra cost. Learn more)
Introduction
Welcome to our comprehensive guide on how to use the Black and Decker Laser Level. Whether you’re a DIY enthusiast or a professional contractor, having a laser level can greatly simplify your projects and ensure precise measurements and alignments. When it comes to laser levels, Black and Decker is a trusted and reputable brand known for its high-quality and reliable tools.
In this article, we will walk you through the step-by-step process of using the Black and Decker Laser Level effectively. We will cover everything from getting familiar with the tool to adjusting the level, aligning objects, and exploring additional features and tips. By the end of this guide, you’ll have the knowledge and confidence to make the most out of your Black and Decker Laser Level.
Whether you’re hanging picture frames, installing shelves, or working on large-scale construction projects, the Black and Decker Laser Level will become an indispensable tool in your toolbox. So, let’s dive in and get started on unlocking the full potential of this amazing tool!
Key Takeaways:
- The Black and Decker Laser Level is a versatile and user-friendly tool that simplifies projects with its compact design, intuitive controls, and highly visible laser beam, making it a valuable addition to any toolkit.
- By following the step-by-step guide, users can confidently familiarize themselves with the laser level, set it up for accurate measurements, align objects with precision, and explore additional features to maximize its functionality and efficiency.
Overview of the Black and Decker Laser Level
The Black and Decker Laser Level is a versatile and user-friendly tool designed to provide accurate and precise leveling and alignment for various projects. It utilizes a laser beam to project a straight line, making it easy to hang pictures, install shelves, lay tiles, and perform other tasks that require precise alignment.
One of the standout features of the Black and Decker Laser Level is its compact and lightweight design, making it easy to handle and transport. It is also equipped with a sturdy mounting accessory that allows you to secure it to walls, ceilings, or tripods, ensuring a stable and reliable setup.
With its intuitive interface and user-friendly controls, the Black and Decker Laser Level is suitable for both beginners and experienced users. It typically features a power button, a mode selector, and a bubble vial for manual leveling. Some models even come with additional features such as self-leveling mechanisms, multiple line projection options, and pulse mode for extended outdoor range.
The laser beam emitted by the Black and Decker Laser Level is usually highly visible, even in well-lit environments, thanks to its bright and clear projections. This makes it easy to work efficiently and accurately, even in challenging lighting conditions.
When it comes to power source, the Black and Decker Laser Level typically runs on batteries, providing you with portability and convenience. However, it’s important to keep spare batteries on hand to ensure uninterrupted operation.
Overall, the Black and Decker Laser Level is a reliable and efficient tool that can greatly improve your accuracy and productivity in various projects. Now that we have a general understanding of the tool, let’s move on to the next step – familiarizing yourself with the laser level.
Step 1: Familiarizing Yourself with the Laser Level
Before diving into using the Black and Decker Laser Level, it’s important to familiarize yourself with the different components and functions of the tool. This will help you navigate its features and settings with ease.
Start by unpacking the laser level from its packaging and take a close look at it. You will notice the main body of the laser level, which houses the laser beam projectors and the controls. Take note of the buttons and switches present on the device and examine their functions.
Next, locate the power button, typically marked with a symbol or an on/off label. Press the power button to turn on the laser level. If it has a battery compartment, make sure to insert the required batteries and secure the cover.
Now, let’s discuss the different modes and settings available on the Black and Decker Laser Level. Most laser levels offer multiple projection options, such as a horizontal line, vertical line, or a crosshair. These modes can be selected using the mode selector button or switch, usually located on the side or top of the laser level.
Additionally, some laser levels come with a self-leveling feature that automatically adjusts the level by using an internal pendulum. This feature is especially useful for ensuring accurate alignments without the need for manual adjustments. If your laser level has a self-leveling mode, familiarize yourself with how to activate and use it.
Another important aspect to consider when familiarizing yourself with the laser level is the accuracy and range of the laser beam. The accuracy of the laser level refers to how closely it can project a straight line, while the range is the maximum distance over which the laser is visible.
Take the time to read through the instruction manual provided with your Black and Decker Laser Level. It will provide specific details about the different features and settings of your particular model. It may also include helpful tips and troubleshooting information.
By taking the time to familiarize yourself with the laser level, you’ll be better equipped to use it effectively and efficiently in your projects. Now that you have a good understanding of the tool, let’s move on to the next step – setting up the laser level.
Step 2: Setting up the Laser Level
Setting up the Black and Decker Laser Level properly is crucial for accurate and reliable measurements. Follow these steps to ensure a stable and secure setup:
- Choose the location: Start by selecting the location where you want to use the laser level. Ensure that the surface is flat, stable, and free from any obstructions that may interfere with the laser’s projection.
- Mounting options: Depending on your specific model, the Black and Decker Laser Level can be mounted using different methods. It may come with a built-in mounting bracket, or you may need to attach it to a tripod or use adhesive strips or clamps to secure it to a surface. Refer to the instruction manual to determine the best mounting method for your laser level.
- Secure the laser level: Once you have chosen the mounting option, securely attach the laser level to the chosen location. Make sure it is tightly secured to prevent any movement or vibrations that could affect the accuracy of the laser beam.
- Adjust the laser level: Using the built-in bubble vial or the self-leveling feature, align the laser level horizontally or vertically. This step ensures that the laser beam projects perfectly straight and at the desired angle. Adjust the level accordingly until you achieve the desired alignment.
- Check the stability: Once the laser level is set up and adjusted, double-check its stability. Gently tap on the laser level or the surface it is mounted on to make sure it remains in position and doesn’t move or shift.
- Test the laser beam: Before starting your project, test the laser beam’s visibility and clarity by projecting it onto a nearby surface. Ensure that the laser is bright and clearly visible, even in different lighting conditions.
It’s important to note that the setup process may vary slightly depending on the specific model of the Black and Decker Laser Level you are using. Always refer to the manufacturer’s instructions for detailed setup guidelines and any specific requirements for your particular model.
Properly setting up the laser level ensures accurate and reliable measurements and alignments. Now that you have set up the laser level, let’s move on to the next step – adjusting the level for precise measurements.
When using a Black and Decker laser level, make sure to carefully read the instruction manual to understand the different functions and settings. This will help you use the tool effectively and accurately.
Step 3: Adjusting the Level
Adjusting the level of the Black and Decker Laser Level is crucial to ensure accurate and precise measurements. Follow these steps to properly adjust the level:
- Activate the leveling mechanism: If your laser level has a self-leveling feature, activate it by pressing the appropriate button or switch. The internal pendulum will then automatically adjust the level of the laser. This feature is especially useful for quick and effortless setup.
- Manual leveling: If your laser level does not have a self-leveling feature or if you want to manually fine-tune the level, use the built-in bubble vial. The bubble vial indicates whether the laser level is horizontal or vertical. Adjust the position of the laser level until the bubble is centered within the vial. This ensures that the laser beam is projected perfectly straight.
- Verify the level: To verify the accuracy of the level, project the laser beam onto a flat surface at a reasonable distance. Use a measuring tape or ruler to check if the laser line remains level along its entire length. Make any necessary adjustments to the laser level until the line is perfectly straight.
- Recheck the stability: After making adjustments, ensure that the laser level remains securely mounted and stable. Check for any movement or vibrations that could affect the levelness of the laser beam. If needed, re-adjust and recheck until satisfied with the stability and accuracy.
- Restore self-leveling: If you manually adjusted the laser level using the bubble vial, and your laser level has a self-leveling feature, it’s important to restore the self-leveling mechanism. This will ensure that the laser level maintains its accuracy for future measurements and alignments.
Remember, accurate leveling is essential for precise measurements and alignments. Take your time to adjust the level properly, and always double-check the accuracy before proceeding with your project. Now that you have adjusted the level, let’s move on to the next step – using the laser level to align objects.
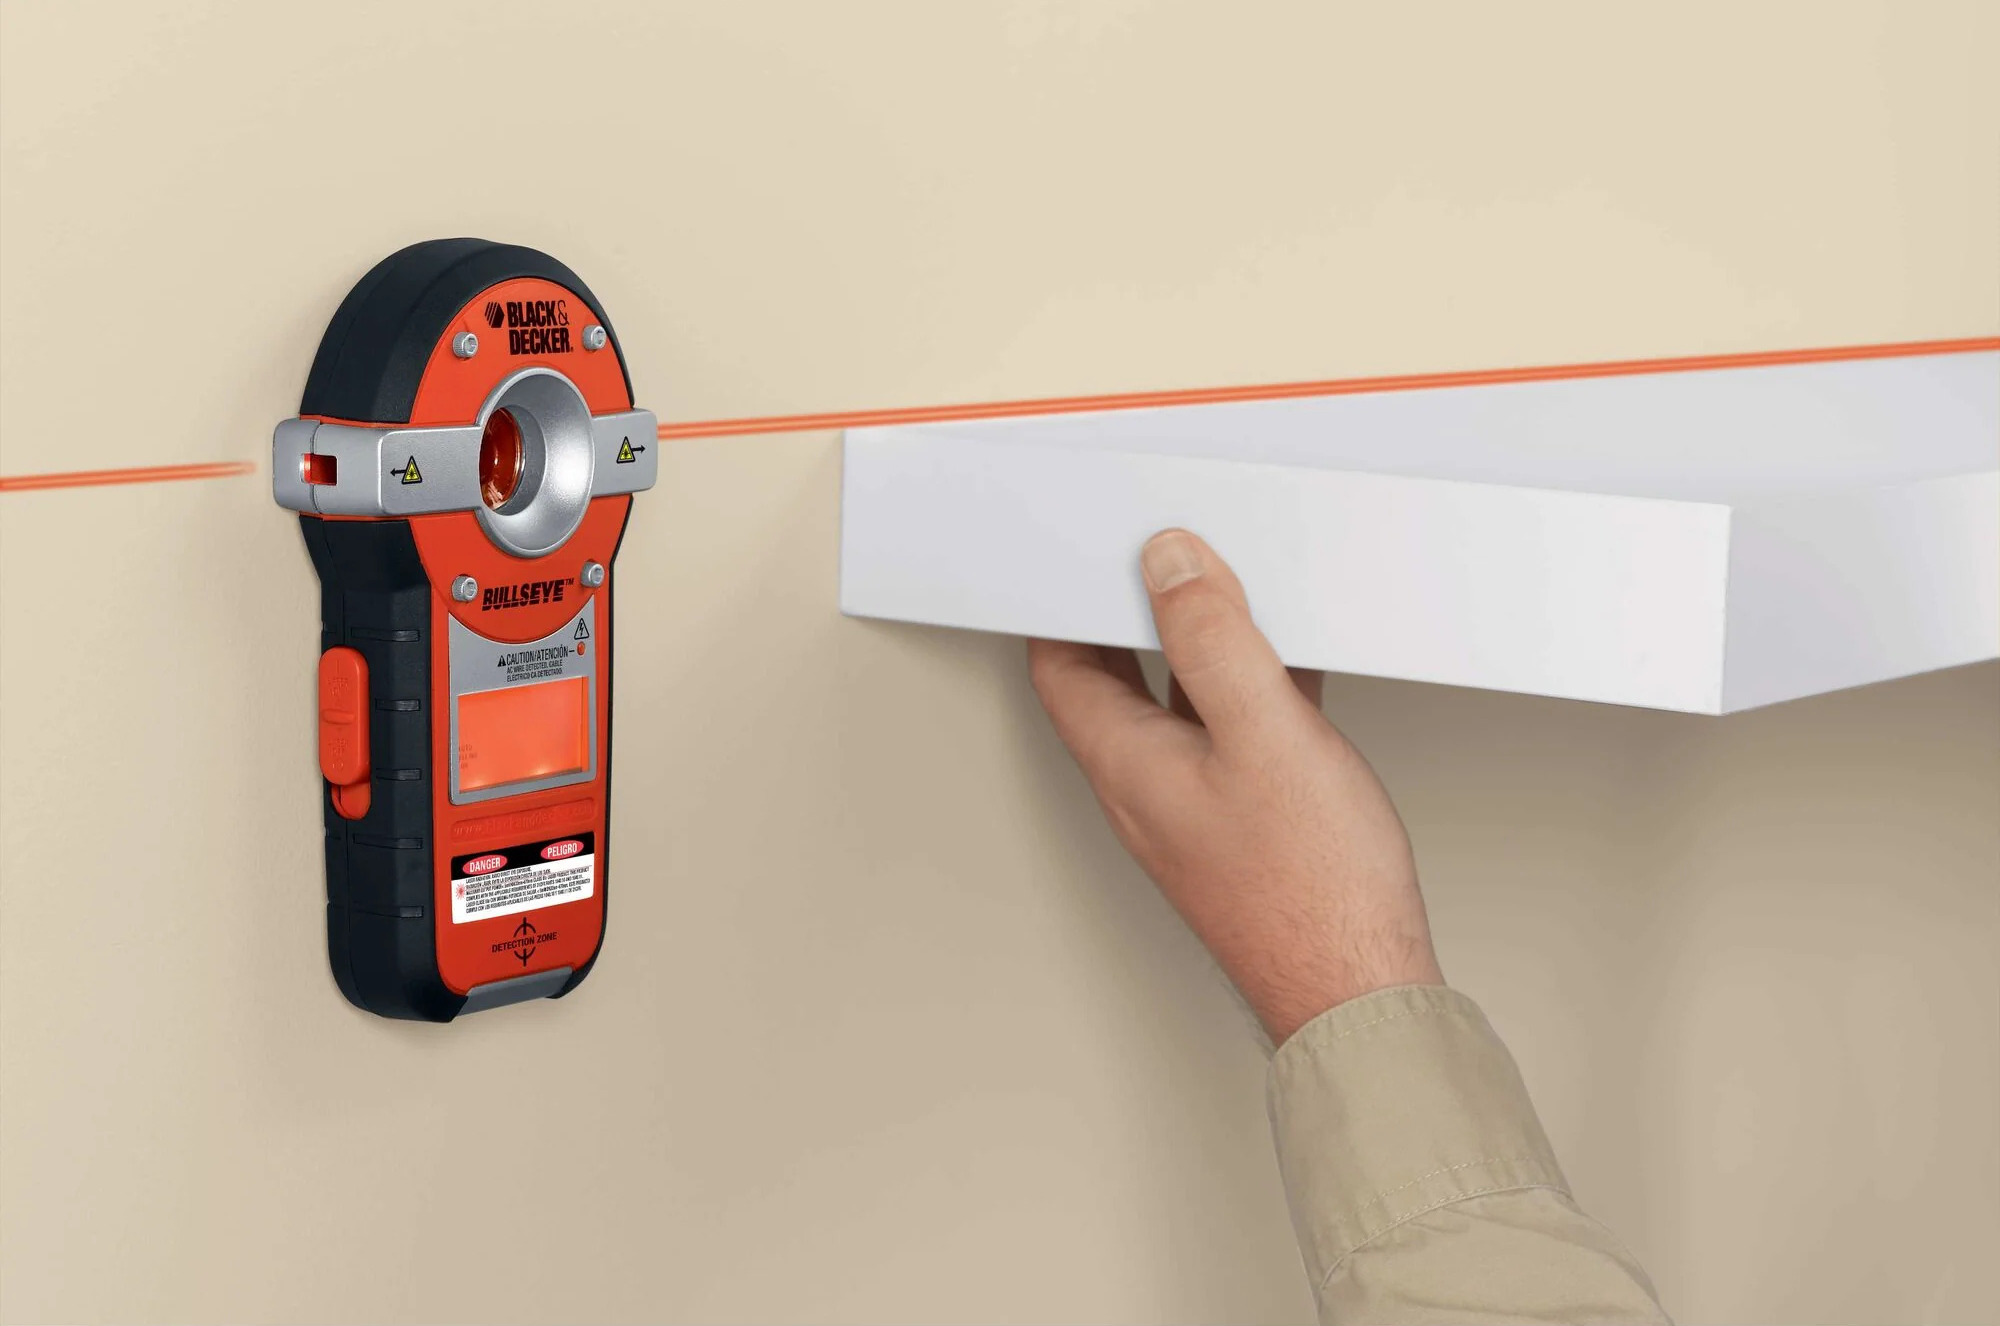
Step 4: Using the Laser Level to Align Objects
Now that you have set up and adjusted the Black and Decker Laser Level, you can use it to align objects with ease and precision. Follow these steps to effectively align objects using the laser level:
- Select the alignment point: Determine the point or area where you want to align your objects. It could be a specific height on a wall, the edge of a surface, or any other reference point where you want your objects to be perfectly aligned.
- Position the laser level: Position the laser level in such a way that the laser beam projects onto the alignment point you selected. Adjust the angle and position of the laser level accordingly to achieve the desired alignment.
- Align the objects: Place the objects you want to align along the projected laser line. Make sure they are positioned precisely based on the alignment point you selected. Whether you’re hanging picture frames, installing shelves, or aligning tiles, use the laser line as a guide to ensure accurate placement.
- Measure and adjust: Use a measuring tape or ruler to measure the distance between the laser line and the objects you are aligning. Make any necessary adjustments to achieve the desired alignment. You can move the objects slightly or adjust their positioning until they are perfectly aligned along the laser line.
- Secure the objects: Once the objects are aligned, secure them in place. Use appropriate tools such as screws, nails, or adhesive to ensure they remain in the desired position. Double-check the alignment by visually inspecting and verifying the position of each object.
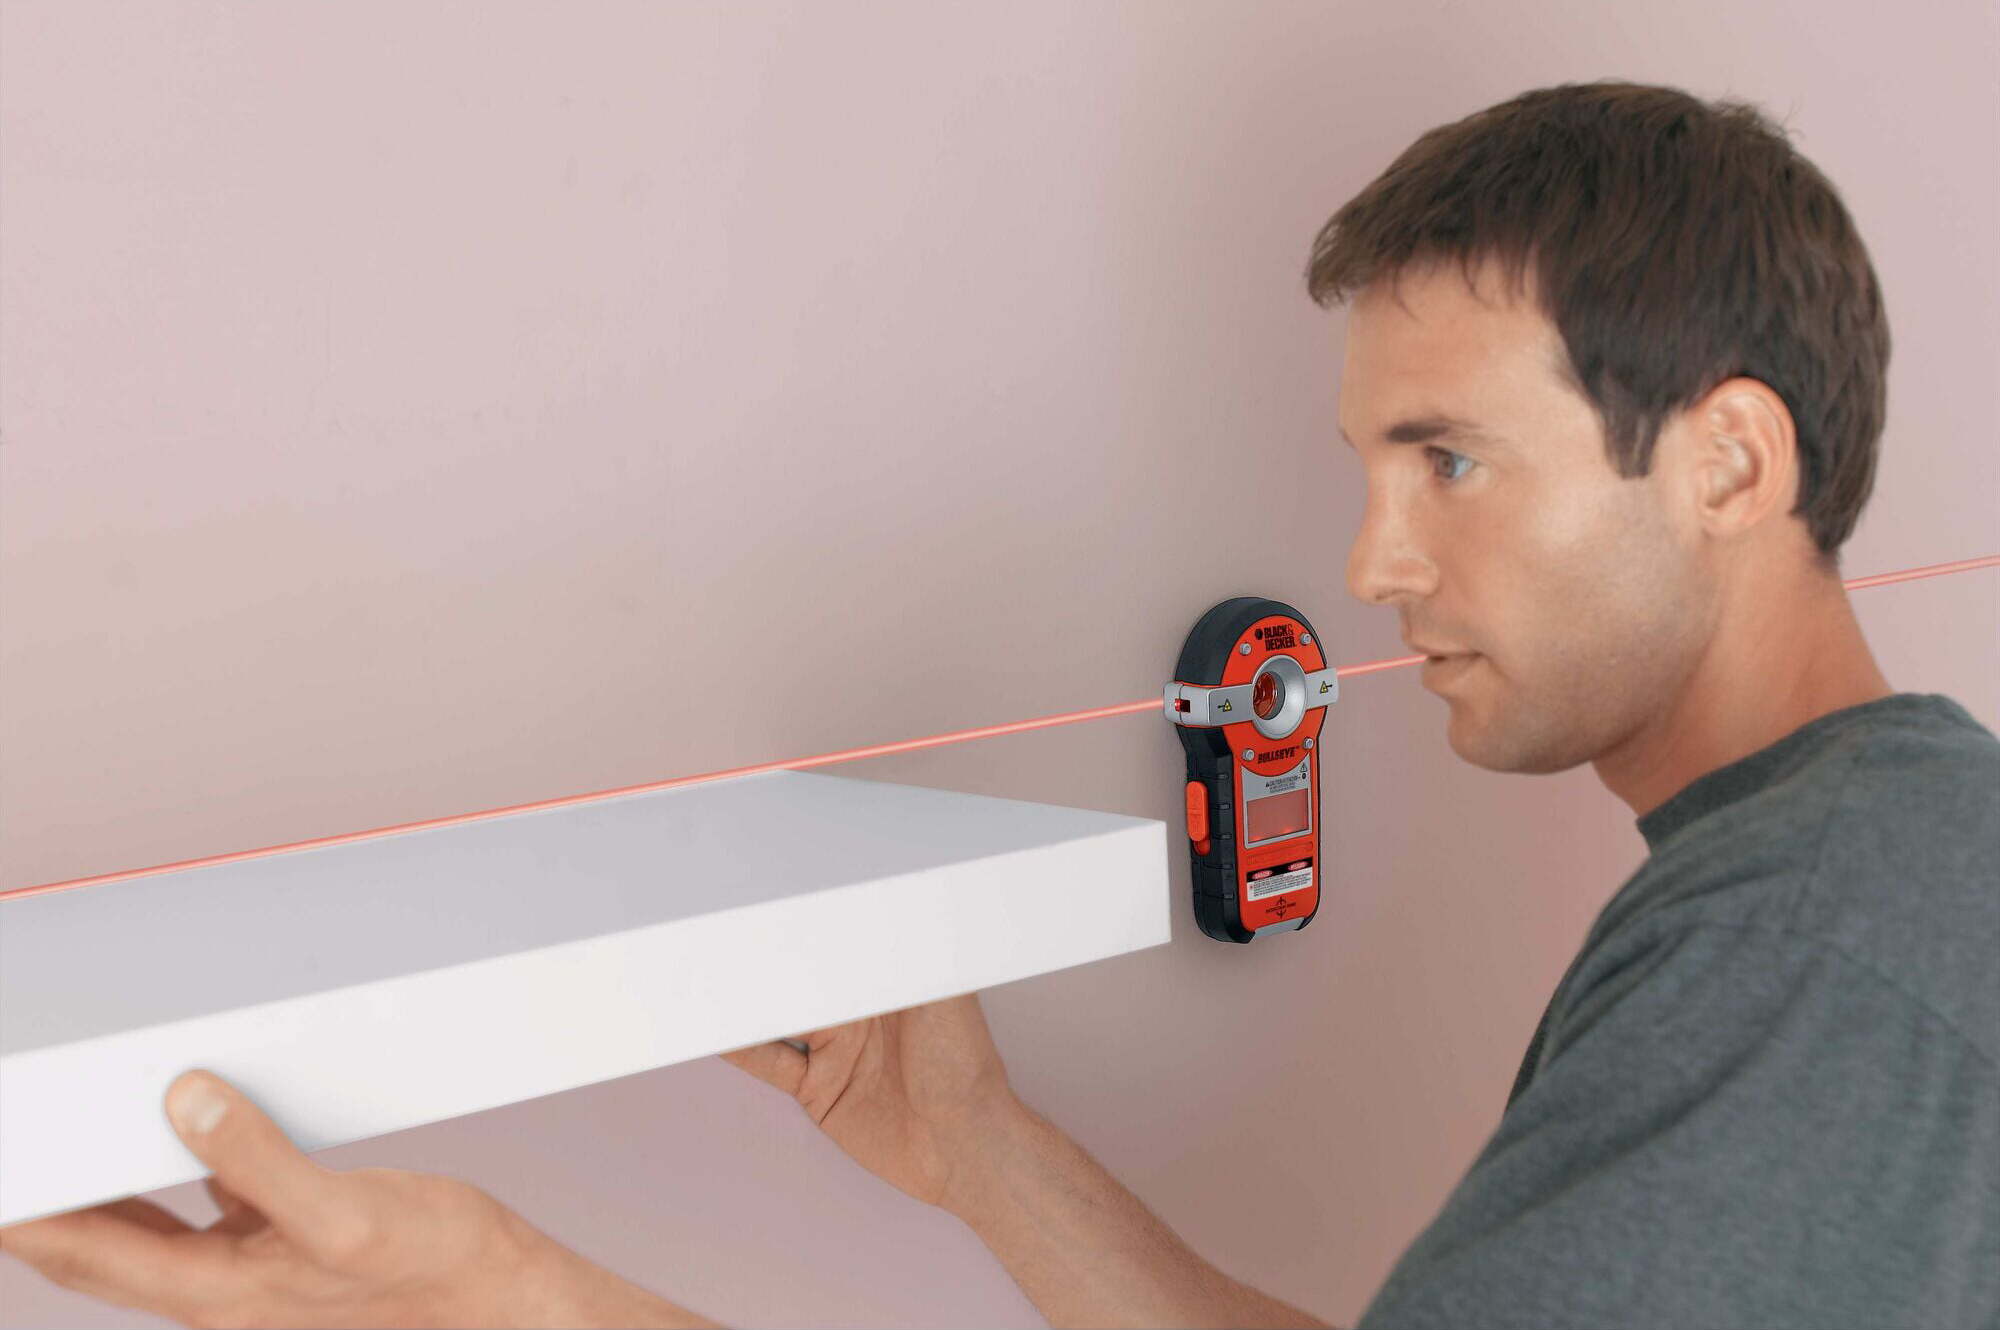
Remember to take safety precautions when aligning objects. Avoid looking directly into the laser beam, as it can be harmful to your eyes. Use caution when using tools and ensure proper installation and secure attachment of the objects you are aligning.
Using the Black and Decker Laser Level to align objects ensures precise and professional-looking results. Now that you have successfully aligned your objects, let’s move on to the final step – exploring additional features and tips to get the most out of your laser level.
Step 5: Additional Features and Tips
Aside from the core functionality of leveling and aligning objects, the Black and Decker Laser Level may have additional features and helpful tips that can further enhance your experience. Let’s explore some of these features and tips:
- Pulse mode: Some laser levels have a pulse mode that extends the visibility of the laser beam, making it useful for outdoor projects or when working in bright light conditions.
- Multiple line projections: Certain laser levels offer the flexibility of projecting multiple lines simultaneously, such as vertical lines, horizontal lines, or crosshairs. Take advantage of these features to efficiently align objects in multiple directions.
- Locking mechanism: If your laser level has a locking mechanism, use it to secure the position of the laser beam. This prevents accidental movement of the laser level and helps maintain consistent alignment throughout your project.
- Marking positions: Before removing the laser level or making any adjustments, mark the positions of the aligned objects. This will allow you to easily restore their placement after repositioning the laser level or performing any necessary adjustments.
- Calibration and maintenance: It’s important to periodically calibrate and maintain your laser level to ensure accurate measurements. Follow the manufacturer’s instructions for calibration procedures and keep the laser level clean and free from dust and debris for optimal performance.
- Practice and experimentation: Like any tool, it may take some practice to become fully comfortable and proficient with the Black and Decker Laser Level. Experiment with different settings, projection options, and techniques to find what works best for your specific projects.
- Proper storage: When not in use, store the laser level in a safe and dry place. Protect it from extreme temperatures and avoid dropping or mishandling the tool to ensure its longevity and continued accuracy.
By exploring the additional features and implementing these tips, you can maximize the functionality and efficiency of your Black and Decker Laser Level.
Now that you have a comprehensive understanding of how to use the Black and Decker Laser Level, you’re ready to tackle your projects with confidence and precision. Enjoy the convenience and accuracy that this versatile tool offers, and elevate the quality of your work.
Remember to refer to the instruction manual provided with your specific laser level model for detailed usage instructions and safety guidelines. Happy aligning!
Conclusion
Congratulations! You have reached the end of our comprehensive guide on how to use the Black and Decker Laser Level. Armed with this knowledge, you are now equipped to confidently tackle various projects that require precise alignment and measurements.
The Black and Decker Laser Level is a versatile and reliable tool that can greatly simplify your tasks, whether you are a DIY enthusiast or a professional contractor. Its compact design, intuitive controls, and bright laser beam make it a valuable addition to your toolkit.
Throughout this guide, we covered the key steps to effectively use the laser level. We started by familiarizing ourselves with the tool, understanding its features, and adjusting the level for accurate measurements. We then explored how to align objects using the laser beam, and discovered additional features and tips to enhance your experience with the laser level.
Remember, safe operation is paramount when using the Black and Decker Laser Level. Always follow the manufacturer’s guidelines, use proper eye protection, and exercise caution when working with tools and objects.
With practice and experience, you’ll become more proficient in using the laser level and discover creative ways to apply its functionality to your projects. Don’t hesitate to experiment and adapt the techniques to suit your specific needs.
Now it’s time to put your new knowledge into practice. Grab your Black and Decker Laser Level, select your project, and enjoy the precision and efficiency it brings to your work. Whether you’re hanging pictures, installing shelves, or working on construction projects, the Black and Decker Laser Level will be your reliable companion.
Thank you for reading our guide, and we hope it has been informative and helpful. Happy leveling and aligning!
Frequently Asked Questions about How To Use Black And Decker Laser Level
Was this page helpful?
At Storables.com, we guarantee accurate and reliable information. Our content, validated by Expert Board Contributors, is crafted following stringent Editorial Policies. We're committed to providing you with well-researched, expert-backed insights for all your informational needs.


0 thoughts on “How To Use Black And Decker Laser Level”