Home>Articles>How To Use A Laser Level To Make Sure Wall Is Plumb
Articles
How To Use A Laser Level To Make Sure Wall Is Plumb
Modified: October 27, 2024
Learn how to use a laser level to ensure your wall is perfectly plumb. Read our informative articles for step-by-step instructions and expert tips.
(Many of the links in this article redirect to a specific reviewed product. Your purchase of these products through affiliate links helps to generate commission for Storables.com, at no extra cost. Learn more)
Introduction
Welcome to the world of construction and home improvement where precision is key. One essential aspect of any construction or renovation project is ensuring that walls are perfectly plumb. A plumb wall is one that is perfectly vertical, aligning perfectly with the force of gravity. This is crucial for both structural integrity and aesthetic appeal.
Traditionally, ensuring a wall is plumb required the use of a spirit level and a keen eye for accuracy. However, thanks to modern technology, we now have laser levels that make the task much easier and more precise. Laser levels utilize lasers to project a perfectly vertical or horizontal line onto a surface, aiding in aligning and leveling walls, cabinets, and other elements with utmost accuracy.
In this article, we will guide you through the process of using a laser level to ensure that your walls are perfectly plumb. We’ll cover everything from understanding plumb to the setup and adjustment of the laser level. So, let’s dive in and explore the world of laser leveling!
Key Takeaways:
- Using a laser level simplifies the process of ensuring walls are perfectly plumb by providing a visual reference point for precise measurements, eliminating human error, and enhancing the efficiency of the leveling process.
- Properly preparing, positioning, and setting up the laser level, along with careful adjustment and finalization of the wall, guarantees a secure, stable, and aesthetically pleasing result, making it an essential tool for accurate and efficient wall leveling.
Read also: 13 Best Sure Grip Laser Level for 2025
Understanding Plumb
Before we delve into using a laser level, it’s important to have a clear understanding of what “plumb” means in the context of construction. A wall is considered plumb when it is perfectly vertical, aligned with the force of gravity. If a wall is not plumb, it can impact the structural integrity and overall stability of the building.
The concept of plumb is essential in construction because it ensures that walls are straight and perpendicular to the ground. This is particularly important when installing doors, windows, cabinets, and other elements that require precise alignment. An uneven or slanted wall can lead to gaps, uneven surfaces, and difficulty in mounting fixtures.
To determine if a wall is plumb, builders have traditionally used a spirit level or a plumb bob. A spirit level is a simple construction tool consisting of a glass tube filled with a liquid (usually alcohol or oil) and an air bubble. By aligning the bubble in the center of the tube, builders can ensure that the wall is perfectly vertical.
The plumb bob, on the other hand, is a pointed weight attached to a string. When the weight is suspended, it hangs perfectly vertical due to gravity. By aligning the plumb bob with the wall, builders can determine if it is plumb or if it leans to one side.
While these traditional methods work, they require manual alignment and can be time-consuming. This is where laser levels come in to simplify the process and provide more accurate results.
Now that we have a clear understanding of what plumb means and why it’s important, let’s move on to getting familiar with a laser level and how it can help us achieve perfectly plumb walls.
Getting Familiar with a Laser Level
Before we can start using a laser level to ensure our walls are plumb, it’s important to become familiar with this handy tool. A laser level is a device that emits a beam of laser light, creating a perfectly straight line that can be projected onto a surface. This line serves as a reference point for aligning and leveling various elements, including walls, shelves, tiles, and more.
Laser levels come in different types and sizes, ranging from small handheld devices to larger, more advanced models. They can be categorized into two main types: line laser levels and dot laser levels.
A line laser level projects a straight line onto a surface, which can be horizontal, vertical, or both. This type of laser level is commonly used for aligning walls, installing tiles, mounting shelves, or any task that requires a straight reference line.
A dot laser level emits multiple laser dots in different directions. This type is particularly useful for plumbing projects where you need to ensure various points are perfectly aligned. Dot laser levels can also be used for tasks such as hanging pictures or installing light fixtures.
Most laser levels are equipped with additional features to enhance their functionality and usability. Some models have a self-leveling feature, which automatically adjusts the laser line to be perfectly level. Others may have a manual leveling feature that requires you to adjust the position of the laser level until it is level.
In addition to the leveling features, laser levels often come with a range of measurement options, such as measuring angles or distances. They may also have different projection modes, allowing you to switch between horizontal, vertical, or cross-line projections. These features can greatly enhance the versatility and usefulness of the laser level.
Now that we understand the basics of a laser level, including the different types and features available, let’s move on to preparing the laser level for use.
Preparing the Laser Level
Before we can start using a laser level to ensure our walls are perfectly plumb, we need to make sure the laser level is properly prepared. This involves a few simple steps to ensure its accuracy and functionality.
The first step is to check the batteries. Most laser levels are powered by batteries, so it’s important to ensure they are fully charged or have fresh batteries installed. This will ensure the laser level operates smoothly and consistently during our wall leveling process.
Next, we need to calibrate the laser level. Calibration is the process of aligning the internal components of the laser level to ensure it provides accurate measurements and projections. Calibration instructions can usually be found in the user manual that comes with the laser level. Follow these instructions carefully to ensure the laser level is properly calibrated.
Once the laser level is calibrated, we need to check the stability of its base. A stable base is crucial for accurate measurements and projections. Make sure the base of the laser level is clean and free from any debris that may affect its stability. Some laser levels also come with a tripod or mounting bracket for added stability. If your laser level has these accessories, make sure to use them for the best results.
Lastly, check the visibility of the laser beam. Laser levels emit a beam of light, and its visibility depends on various factors such as the brightness of the surrounding environment or the distance of the projection. Before starting the wall leveling process, test the laser level in different lighting conditions and distances to ensure the laser beam is easily visible and distinguishable.
By taking these preparatory steps, we can ensure that our laser level is ready for action and will provide accurate and reliable measurements and projections. Now that we have prepared the laser level, let’s move on to positioning it correctly for our wall leveling task.
Positioning the Laser Level
Proper positioning of the laser level is crucial for obtaining accurate and precise measurements when leveling walls. Before we begin, it’s important to ensure that the surface on which the laser level will be positioned is clean and flat. This will allow for a stable base and accurate projections.
When positioning the laser level, consider the height at which you want to start leveling the wall. It is recommended to start at the bottom of the wall and work your way up. This will allow for a systematic approach and ensure that each section of the wall is properly aligned.
Begin by placing the laser level on a surface or mounting it on a tripod. If you’re using a tripod, make sure it is set up securely and at the desired height. Adjust the legs of the tripod until the laser level is level with the ground or the reference point you want to work from.
If you’re working on a small section, you can also use a sturdy, flat object like a table or shelf as a base for the laser level. Just ensure that the object is level before placing the laser level on it.
Once the laser level is positioned, double-check its stability. Shake the surface or gently tap the tripod to ensure that the laser level remains stable and stationary. Any movement during the leveling process can result in inaccurate measurements and projections.
It’s also important to consider the distance between the laser level and the wall. This will depend on the range and capabilities of your specific laser level model. Most laser levels have a specified maximum distance at which they can accurately project the laser beam. Make sure you position the laser level within this range to obtain reliable measurements.
Lastly, consider the angle at which you want to project the laser beam. If you’re working on a vertical wall, you’ll want to project a vertical line onto the surface. If you’re working on a horizontal surface, you’ll want to project a horizontal line. Adjust the laser level accordingly to ensure it projects the desired line.
By carefully positioning the laser level, we can ensure that the measurements and projections are accurate and aligned with the reference points. With the laser level properly positioned, we can now move on to setting it up for use.
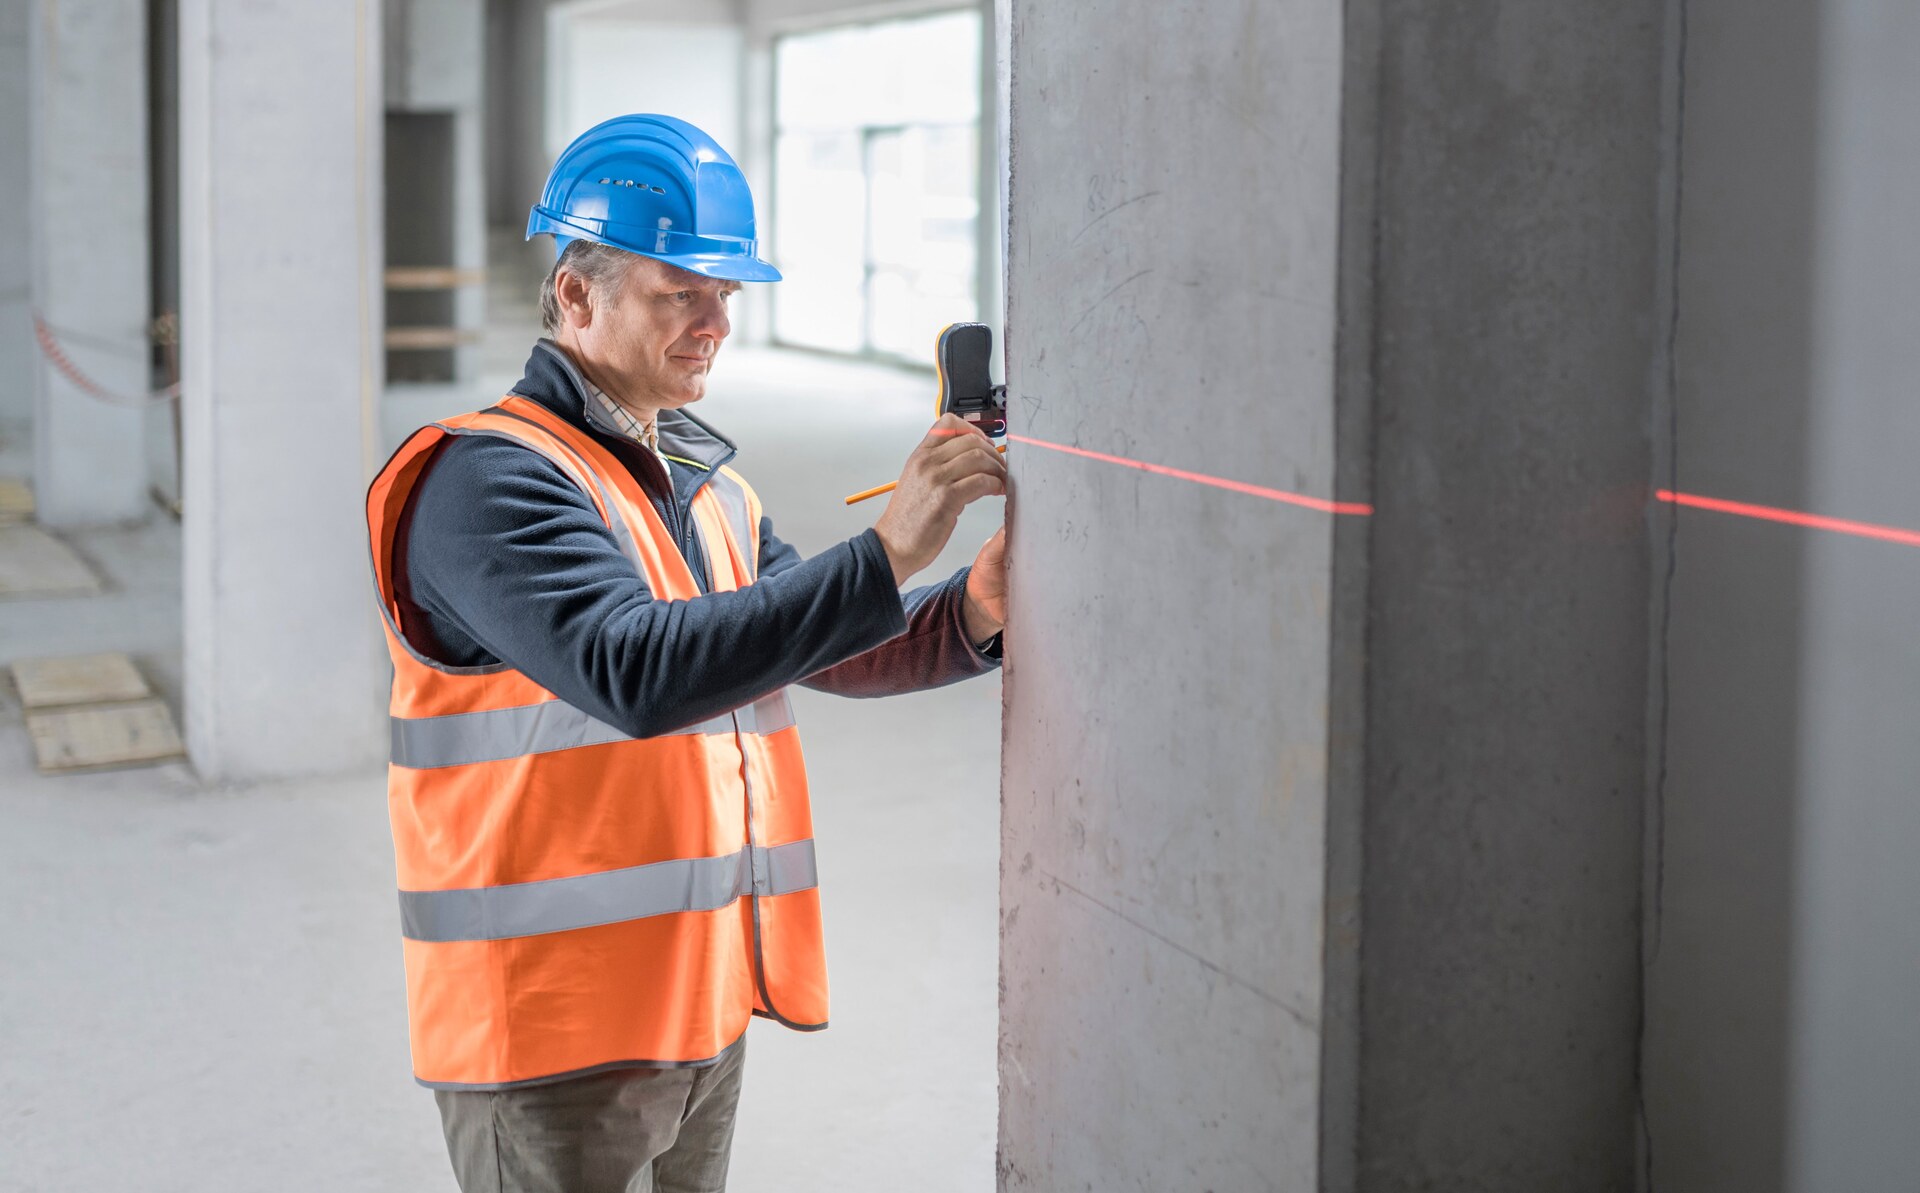
Before using a laser level to check for plumb, make sure the device is properly calibrated and placed on a stable surface. Double-check the level’s position to ensure accurate results.
Setting Up the Laser Level
Now that we have positioned the laser level correctly, it’s time to set it up for use. Setting up the laser level involves a few simple steps to ensure it is ready to project the desired lines onto the wall for leveling.
First, turn on the laser level according to the manufacturer’s instructions. Most laser levels have a power button or switch that needs to be activated. Once the laser level is turned on, a laser beam will be emitted, either as a line or a dot, depending on the type of laser level you have.
If your laser level has a self-leveling feature, make sure it is enabled. This feature automatically adjusts the laser level to be perfectly level. If your laser level does not have this feature, you may need to manually level it by adjusting the base or using built-in leveling mechanisms. Refer to the user manual for specific instructions on how to level your laser level.
Once the laser level is leveled, ensure that the projected line or dot is aligned with the reference point on the wall. This could be the starting point at the bottom of the wall or any other reference point you have established. Adjust the laser level’s position if needed to align the projected line or dot with the reference point.
It’s also important to ensure that the laser level is securely positioned. Any movement or shifting during the leveling process can result in inaccurate measurements. Double-check the stability of the laser level by gently shaking the surface or tripod to confirm that it remains firmly in place.
Furthermore, check the visibility of the laser beam. If the laser level is not projecting a visible beam due to ambient light or other factors, you may need to adjust the brightness settings or use a laser detector to enhance visibility. A laser detector is a device that can detect and amplify the laser beam, making it easier to see even in bright conditions.
By setting up the laser level properly, we ensure that it is ready to project accurate lines or dots onto the wall for leveling. With the laser level set up, we’re now ready to move on to the actual process of checking for plumb and adjusting the wall accordingly.
Checking for Plumb
Now that the laser level is set up and projecting a straight line or dot onto the wall, we can begin the process of checking for plumb. This step is crucial to ensure that the wall is perfectly vertical and aligned with the force of gravity.
To check for plumb, observe the laser line or dot on the wall. It should run parallel to the edge of the wall from top to bottom. If the laser line or dot deviates from being perfectly vertical, it indicates that the wall is not plumb.
Begin at the starting point or reference point established earlier. Using a ruler or tape measure, measure the distance between the laser line or dot and the edge of the wall at both the top and the bottom. If the measurements are the same, it means the wall is plumb. However, if there is a variation between the measurements, it indicates that the wall is not perfectly vertical.
Record any measurements that indicate the amount of deviation from plumb. This will provide a clear understanding of the adjustment needed to make the wall plum. For example, if the top measurement shows a larger distance from the laser line or dot than the bottom measurement, it means the wall leans outward at the top and needs to be adjusted accordingly.
Repeat this process at different points along the wall to ensure accuracy and consistency. Measure the distance from the laser line or dot to the edge of the wall at various intervals, such as every foot or meter, to identify any irregularities in the wall’s vertical alignment.
During this process, it may be helpful to use a level or a plumb bob as a reference tool. Place the level or plumb bob against the wall to compare its alignment with the laser line or dot. This additional reference point can help confirm if the wall is truly plumb or if adjustments need to be made.
By checking for plumb using the laser level, ruler or tape measure, and potentially a level or plumb bob, we can accurately assess the vertical alignment of the wall. Once we have identified any deviations from plumb, it’s time to move on to the next step – adjusting the wall.
Adjusting the Wall
After determining that the wall is not plumb through our measurements, it’s time to make the necessary adjustments to ensure its vertical alignment. The specific methods for adjusting the wall will depend on the construction materials and techniques used.
If the wall is made of drywall or plaster, one common method for adjusting the wall is to use shims. Shims are thin, wedge-shaped pieces of material, such as wood or plastic, that can be inserted behind the wall to correct the deviation from plumb. Start by removing any nails or screws that attach the wall to the structural framework. Then, carefully insert shims at the top or bottom of the wall as needed to gradually bring it back into plumb. Use a level or plumb bob to verify the vertical alignment as you make the adjustments.
If the wall is made of masonry or concrete, adjusting the wall may require a different approach. In this case, it may be necessary to use specialized tools and techniques. One option is to chisel or grind down protruding areas of the wall to correct for any deviations from plumb. Alternatively, you can add additional layers of mortar or plaster to build up areas of the wall that are recessed.
It’s important to take a cautious and gradual approach when adjusting the wall. Make small adjustments at a time and constantly check with the laser level, ruler or tape measure, and level or plumb bob to ensure that the wall is gradually being brought back into plumb. Rushing the adjustment process may result in an overcorrection or damage to the wall.
Once you have made the necessary adjustments to the wall, recheck its vertical alignment using the laser level and other measurement tools. Repeat the process of measuring the distance between the laser line or dot and the edge of the wall to ensure that the wall is now plumb. Make any additional adjustments if needed until the wall is perfectly plumb.
Remember to take care when handling and working near the laser level, ensuring that it remains stable and secure throughout the adjustment process. Safety should always be a top priority.
With the wall now properly adjusted and plumb, we can move on to the final step of finalizing the wall.
Finalizing the Wall
Now that we have successfully adjusted the wall to be perfectly plumb, it’s time to finalize the wall and ensure its stability and integrity. This step involves a few additional measures to secure the wall and make it ready for further construction or finishing touches.
The first step in finalizing the wall is to reattach any fasteners that were removed during the adjustment process. This includes nails, screws, or other hardware used to secure the wall to the structural framework. Make sure to use appropriate fasteners based on the construction materials and ensure they are properly positioned to ensure the stability and strength of the wall.
Next, inspect the wall for any gaps or cracks that may have appeared during the adjustment process. If you notice any, fill them with an appropriate filler or joint compound and smooth it out for a seamless finish. This will not only improve the aesthetic appearance of the wall but also enhance its structural integrity.
If necessary, consider reinforcing the wall with additional support. This could involve adding additional framing, braces, or anchors to ensure the wall remains stable and secure in the long term. Consult with a professional if you have any concerns about the stability of the wall or if you are working on a particularly complex construction project.
Finally, take a final measurement to confirm the wall is now precisely plumb. Use the laser level, ruler or tape measure, and level or plumb bob to verify that the wall is perfectly vertical from top to bottom. This last check ensures that the adjustment process was successful and that the wall is now in optimal condition.
With the wall finalized and confirmed to be plumb, you can now proceed with any further construction or finishing work. Whether you are adding drywall, painting, or installing fixtures, you can have confidence in the stability and precision of the wall.
Remember to keep the laser level and any other tools used for the wall leveling process in a safe place for future use. Regularly inspect and maintain your tools to ensure they are in good working condition whenever they are needed.
By following these finalizing steps, you can ensure that the wall is ready for the next stages of your construction or renovation project. Congratulations on successfully using a laser level to achieve a perfectly plumb wall!
Read more: How To Use A Laser Level
Conclusion
In conclusion, using a laser level to ensure that your walls are plumb is a game-changer in the construction and home improvement industry. The precision and accuracy offered by these modern tools make the task of achieving a perfectly vertical wall much easier and more efficient.
By understanding the concept of plumb and the importance of vertical alignment in construction, you can appreciate why using a laser level is essential. Laser levels provide a reliable and visual reference point for leveling walls, ensuring both structural integrity and aesthetic appeal.
Getting familiar with a laser level and its different types, features, and setup is crucial for successful wall leveling. Preparing the laser level by checking batteries, calibrating it, and ensuring stability sets the foundation for accurate measurements and projections.
Properly positioning the laser level and setting it up according to the desired line or dot projection is key. This allows for precise measurement, observation, and assessment of any deviations from the plumb line.
Checking for plumb using the laser level, ruler or tape measure, and potentially a level or plumb bob provide valuable data for adjustments. By carefully adjusting the wall using shims, mortar, or other techniques, you can bring the wall back into plumb and ensure its stable and vertical position.
Finalizing the wall by reattaching fasteners, filling gaps or cracks, and reinforcing its structure guarantees a secure, stable, and aesthetically pleasing result. Taking a final measurement to ensure the wall is indeed plumb provides peace of mind and confidence in the completed project.
The use of a laser level not only saves time but also eliminates human error, resulting in a more precise and professional outcome. Additionally, the availability of laser levels with self-leveling features and additional functionalities further enhances the ease and accuracy of the leveling process.
Incorporating a laser level into your construction toolkit is a worthwhile investment, as it simplifies the task of achieving plumb walls. Whether you’re a DIY enthusiast or a professional contractor, a laser level is an essential tool for accurate and efficient wall leveling.
So, the next time you embark on a construction or renovation project, make sure to utilize a laser level to guarantee your walls are perfectly plumb. With this tool at your disposal, you can achieve precise and visually appealing results that will stand the test of time.
Now that you've mastered using a laser level to ensure walls are plumb, why stop there? Dive into our comprehensive guide on DIY home improvement. Whether you're looking to refresh a room or tackle larger projects, this article offers practical advice and creative solutions that empower you to transform your space with confidence and style.
Frequently Asked Questions about How To Use A Laser Level To Make Sure Wall Is Plumb
Was this page helpful?
At Storables.com, we guarantee accurate and reliable information. Our content, validated by Expert Board Contributors, is crafted following stringent Editorial Policies. We're committed to providing you with well-researched, expert-backed insights for all your informational needs.


0 thoughts on “How To Use A Laser Level To Make Sure Wall Is Plumb”