Home>Articles>How To Use Black And Decker BullsEye Laser Level
Articles
How To Use Black And Decker BullsEye Laser Level
Modified: August 17, 2024
Learn how to use the Black and Decker Bullseye Laser Level with these informative articles. Find tips, tricks, and step-by-step instructions to achieve precise leveling in your projects.
(Many of the links in this article redirect to a specific reviewed product. Your purchase of these products through affiliate links helps to generate commission for Storables.com, at no extra cost. Learn more)
Introduction
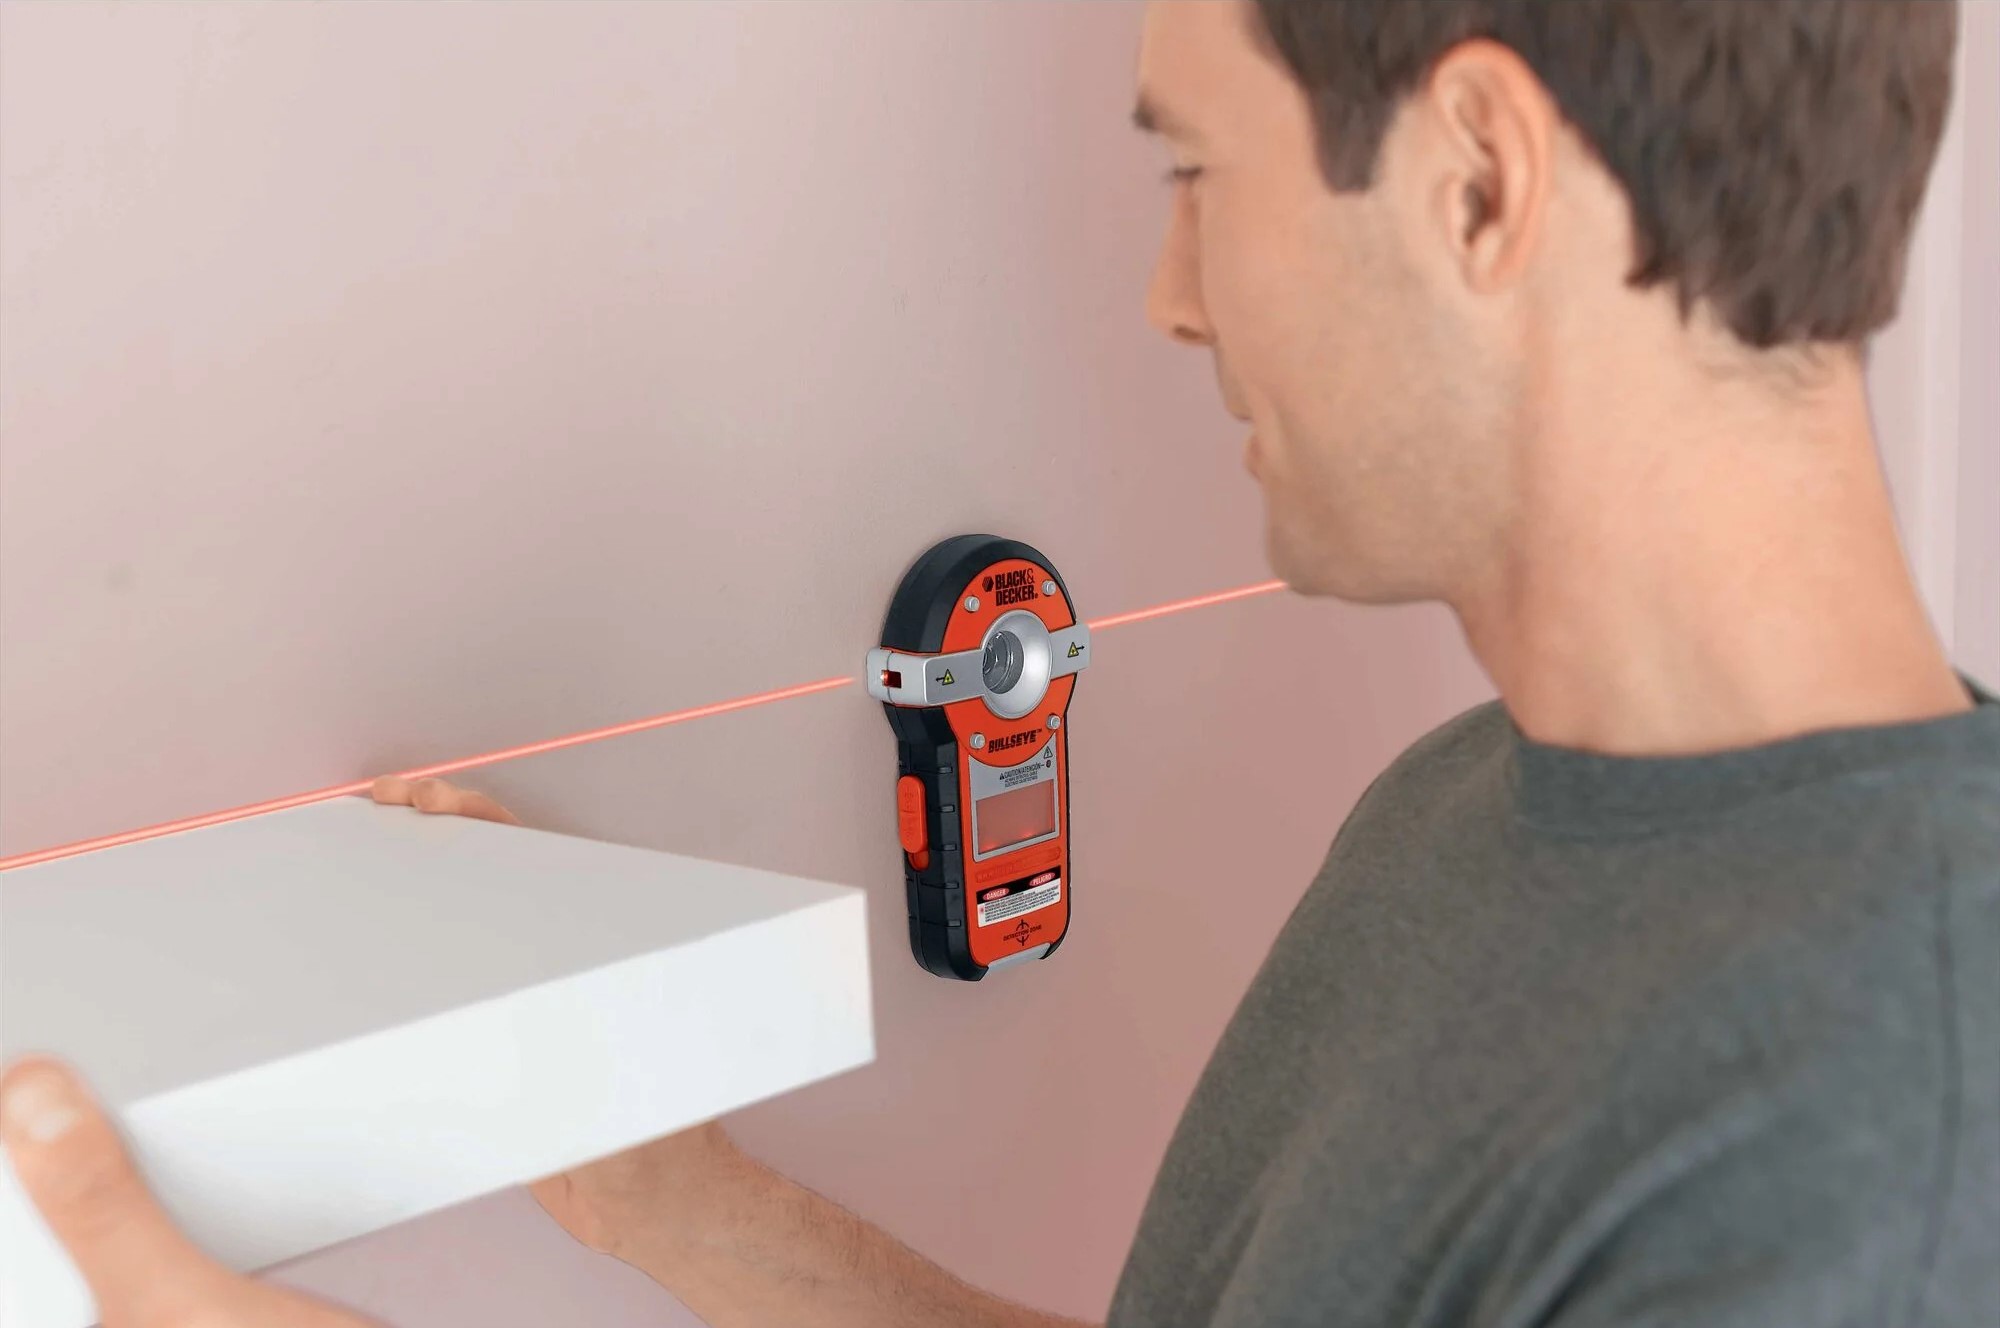
Welcome to the world of DIY home improvement, where precision and accuracy are key. If you’re looking to hang pictures, install shelves, or tackle any project that requires a straight, level line, the Black and Decker Bullseye Laser Level is an essential tool to have in your arsenal. This handy device takes the guesswork out of leveling, allowing you to achieve professional-grade results with ease.
In this comprehensive guide, we will walk you through step-by-step on how to use the Black and Decker Bullseye Laser Level effectively. From setting up the device to troubleshooting common issues, we’ve got you covered. Whether you’re a seasoned DIY enthusiast or a beginner, this article will provide you with the knowledge and confidence to use the Bullseye Laser Level like a pro.
Before we dive into the details, let’s take a closer look at what the Black and Decker Bullseye Laser Level is and why it’s a must-have tool for any DIYer.
Key Takeaways:
- The Black and Decker Bullseye Laser Level is a versatile and user-friendly tool that simplifies leveling and alignment tasks. Its dual functionality, precise laser projection, and safety precautions make it an essential companion for DIY enthusiasts.
- Proper maintenance, calibration, and choosing the right wall mount are crucial for maximizing the performance and longevity of the Bullseye Laser Level. Following step-by-step instructions and safety precautions ensures safe and accurate usage.
Read more: How To Use Black And Decker Laser Level
Overview of the Black and Decker Bullseye Laser Level
The Black and Decker Bullseye Laser Level is a versatile and user-friendly tool designed to make leveling and alignment tasks a breeze. It features a built-in laser that projects a perfectly straight line onto surfaces, allowing you to easily determine if something is level or plumb. The device comes with a variety of features and functions that make it suitable for a wide range of projects.
One of the standout features of the Bullseye Laser Level is its dual functionality. It functions not only as a laser level, but also as a stud finder. With the push of a button, you can switch between the laser level mode and the stud finder mode, making it a convenient and multi-purpose tool.
The Bullseye Laser Level is equipped with both horizontal and vertical leveling capabilities, allowing you to align objects in both directions. It offers an accuracy of within 1/8 inch at 30 feet, ensuring precise and reliable measurements for your projects.
Another notable feature is the backlit bubble vials, which provide enhanced visibility in low-light conditions. This makes it easier to achieve accurate readings, even in dimly lit areas.
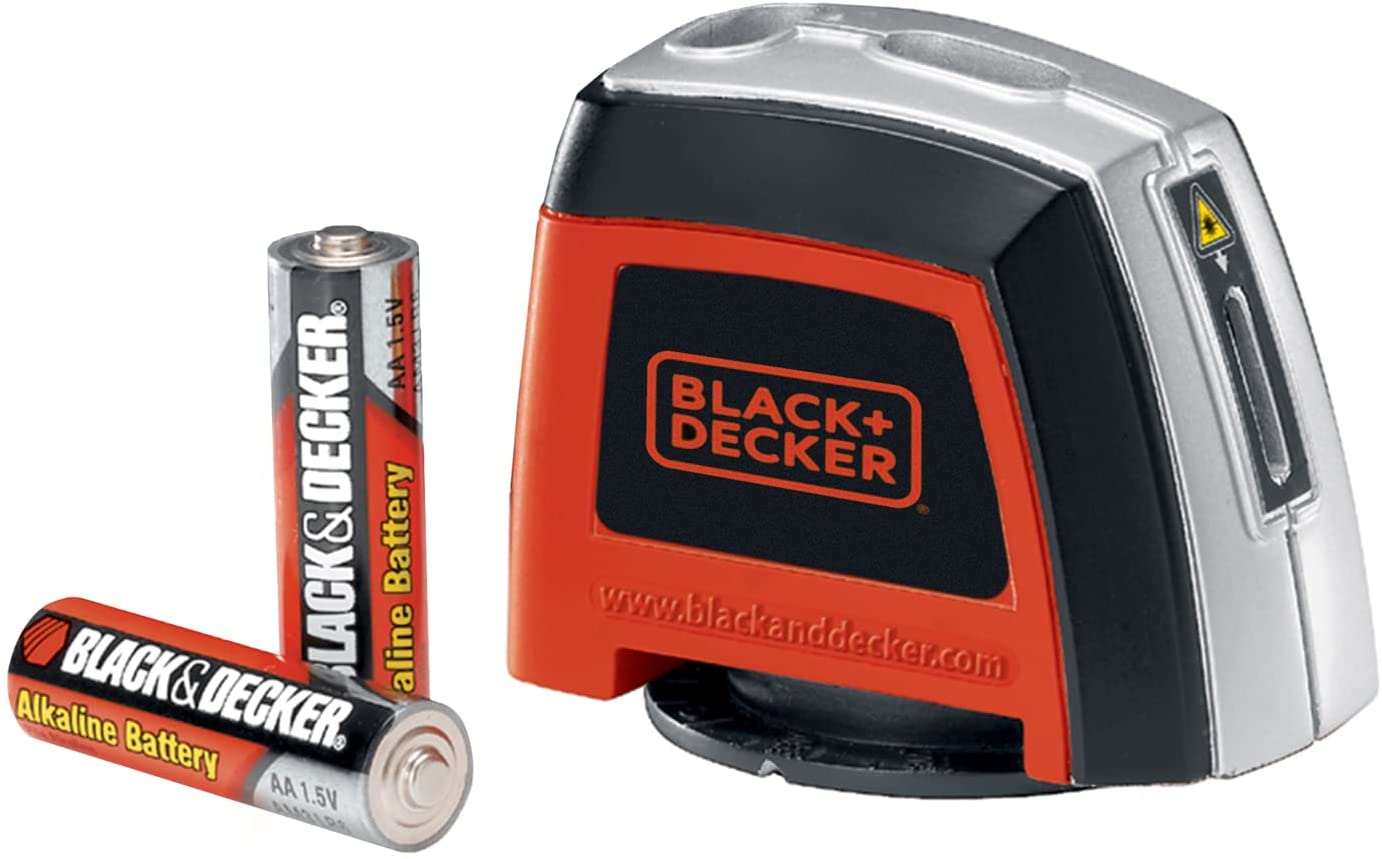
The Black and Decker Bullseye Laser Level is not only functional but also highly portable. It is compact and lightweight, making it easy to carry and maneuver. It is powered by two AA batteries, providing long-lasting performance. Additionally, it comes with a convenient wall mount bracket for hands-free operation.
Overall, the Black and Decker Bullseye Laser Level is a reliable and efficient tool that simplifies the leveling process. Its versatility, accuracy, and user-friendly features make it an excellent investment for any DIYer or professional contractor.
Safety Precautions
Before using the Black and Decker Bullseye Laser Level, it is important to prioritize safety. Follow these precautions to ensure a safe and accident-free experience:
- Read the user manual: Familiarize yourself with the manufacturer’s instructions and guidelines provided in the user manual. This will help you understand how to operate the laser level properly and avoid potential safety hazards.
- Protect your eyes: The laser beam emitted by the Bullseye Laser Level is powerful and can cause eye damage if not used correctly. Never stare directly into the laser beam or point it toward anyone’s eyes. It is recommended to wear safety glasses or goggles while using the device.
- Avoid electrical hazards: When using the Bullseye Laser Level, be mindful of electrical wires and outlets. Ensure that you are not working near live electrical sources to prevent any risk of electrical shock.
- Secure your ladder: If you need to use a ladder while using the laser level, ensure that it is stable and secure. Always place the ladder on a level and firm surface, and use the necessary precautions to prevent falls and accidents.
- Use caution on uneven surfaces: When positioning the Bullseye Laser Level on uneven surfaces, take extra caution to ensure stability. Avoid working on slippery or uneven surfaces that could cause the device to fall or tilt.
- Store the device safely: When not in use, store the Bullseye Laser Level in a safe and dry location. Keep it away from children and pets to prevent accidental damage or injuries.
- Do not modify the device: The Bullseye Laser Level is designed and engineered for specific purposes. Do not attempt to modify or alter the device in any way, as it can compromise its functionality and safety.
By adhering to these safety precautions, you can ensure a safe and enjoyable experience while using the Black and Decker Bullseye Laser Level. Remember, safety should always be a top priority when working with any kind of power tool or device.
Step-by-Step Guide on How to Use the Black and Decker Bullseye Laser Level
Using the Black and Decker Bullseye Laser Level is a straightforward process. Follow these step-by-step instructions to make the most out of your leveling and alignment tasks:
- Prepare the device: Start by ensuring that the Bullseye Laser Level is in good working condition. Check the batteries to ensure they are properly inserted and fully charged. Inspect the device for any visible damage or defects.
- Select the mode: Determine whether you want to use the laser level mode or the stud finder mode. To switch between modes, locate the mode switch button on the device and press it accordingly. The laser level mode is ideal for leveling tasks, while the stud finder mode helps locate studs behind walls.
- Set up the laser level: Find a suitable location to place the Bullseye Laser Level. Ensure that the surface is stable and level. If needed, use the wall mount bracket provided with the device to attach it securely to the wall.
- Calibrate the laser level: Before use, it is essential to calibrate the laser level for accurate measurements. Align the bubble vials on the device until they indicate a level position. This helps ensure that the laser line projected is truly level.
- Align vertically: If you are working on a vertical alignment task, position the Bullseye Laser Level against the wall or surface. Use the bubble vial to make sure it is vertically aligned. The laser beam projected should be perfectly vertical.
- Align horizontally: For horizontal alignment tasks, place the Bullseye Laser Level on a stable surface such as a table or countertop. Again, use the bubble vial to ensure that the device is horizontally aligned. The laser line projected should be perfectly horizontal.
- Utilize the stud finder: If you are in stud finder mode, move the Bullseye Laser Level slowly along the wall, and listen for the audible alert or see the LED indicator light up when it detects a stud. This helps in locating studs for hanging heavy objects or installing shelves.
- Check for plumb and level: Once the laser line is projected onto the surface, use a bubble level or a ruler to determine if the line is perfectly plumb or level. Make adjustments as necessary until you achieve the desired result.
- Complete your project: With the Bullseye Laser Level providing accurate measurements and alignments, you can now confidently proceed with your DIY project. Use the laser line as a guide to hang pictures, install shelves, or any other task that requires precision.
By following these step-by-step instructions, you will be able to use the Black and Decker Bullseye Laser Level effectively and achieve professional-grade results in your home improvement projects.
Setting up the Laser Level
Before you can start using the Black and Decker Bullseye Laser Level, it is important to properly set it up. Follow the steps below to ensure a successful setup:
- Inspect the device: Before using the laser level, carefully inspect it for any visible damage or defects. Check the buttons, switches, and the laser projection window to ensure they are all in good condition.
- Insert batteries: The Bullseye Laser Level is typically powered by two AA batteries. Open the battery compartment, and insert the batteries correctly following the polarity indicators. Close the battery compartment securely.
- Turn on the laser level: Locate the power button or switch on the laser level. Press the button or slide the switch to turn on the device. Ensure that the laser projection window is not covered or blocked.
- Select the mode: Determine whether you want to use the laser level mode or the stud finder mode. Some Bullseye Laser Level models may have a mode switch button, while others may have separate buttons for each mode. Refer to the user manual for specific instructions on selecting the mode.
- Adjust laser intensity: Depending on your lighting conditions, you may need to adjust the laser level’s intensity. Look for a brightness adjustment dial or button and adjust it to your preferred setting. This will ensure optimal visibility of the laser line.
- Mount the laser level: If you need to mount the Bullseye Laser Level on a wall or surface, use the wall mount bracket that comes with the device. Align the bracket to the desired location and secure it using screws or adhesive, depending on the type of bracket provided.
- Calibrate the laser level: Calibration is essential to ensure accurate leveling and alignment. Place the Bullseye Laser Level on a flat and stable surface. Adjust the bubble vials on the device until they indicate a level position. This step ensures that the laser line projected is truly level.
- Verify the projection: Once the laser level is set up and calibrated, verify that the laser line is projected correctly. Point the laser level towards a wall or surface and observe the projected line. It should be straight, clearly visible, and accurately aligned based on the device’s position.
By following these steps, you will be able to set up the Black and Decker Bullseye Laser Level properly. A well-set and calibrated laser level will ensure accurate measurements and alignments, helping you achieve professional results in your DIY projects.
Calibrating the Laser Level
Calibrating the laser level is a crucial step to ensure accurate measurements and precise alignments. Here is a step-by-step guide on how to calibrate the Black and Decker Bullseye Laser Level:
- Choose a stable surface: Start by finding a flat and stable surface to place the laser level. A table or countertop works well for this purpose.
- Turn on the laser level: Press the power button or slide the switch to turn on the device. Make sure the laser projection window is not covered or blocked.
- Position the laser level: Place the Bullseye Laser Level on the chosen surface. Ensure that it is stable and not at risk of being knocked over or moved during the calibration process.
- Observe the bubble vials: The Bullseye Laser Level is equipped with bubble vials that indicate if the device is in a level position. There are typically two bubble vials, one for horizontal leveling and one for vertical leveling.
- Adjust the bubble vials: Using the adjustment screws or buttons, make small adjustments to the position of the bubble vials. The goal is to center the bubbles within the vials, indicating a truly level position.
- Check the laser projection: Once the bubbles are centered, verify that the laser line projected by the device is also level. Point the laser level towards a flat, vertical surface, such as a wall, and observe the projected line. It should be perfectly horizontal and straight.
- Make adjustments if needed: If the laser line is not level, make further adjustments to the bubble vials until both the bubbles and the laser line are properly aligned.
- Verify calibration: After making adjustments, double-check the calibration by projecting the laser line onto different surfaces and checking for accuracy. Ensure that the line remains straight and level in various orientations. Make any additional adjustments if necessary.
Calibrating the Black and Decker Bullseye Laser Level is a simple process that ensures the accuracy of your measurements. By taking the time to properly calibrate the device, you can rely on it to provide precise leveling and alignment for your DIY projects.
Choosing the Right Wall Mount
When using the Black and Decker Bullseye Laser Level, having the right wall mount is essential for secure and accurate leveling and alignment. Here are some key aspects to consider when selecting the right wall mount:
- Type of wall mount: There are various types of wall mounts available, including magnetic mounts, adhesive mounts, and screw mounts. Consider the type of surface you will be mounting the laser level on and choose a wall mount that is compatible with that surface.
- Compatibility: Ensure that the wall mount you choose is compatible with the Bullseye Laser Level model you own. Check the manufacturer’s specifications or consult the user manual to determine the recommended wall mount for your specific device.
- Stability and durability: Look for a wall mount that offers stability and durability. It should securely hold the laser level in place and withstand any vibrations or movements during use. Opt for mounts made from sturdy materials such as metal or high-quality plastic.
- Adjustability: Consider whether you need a wall mount that allows for easy adjustability. Some mounts offer 360-degree rotation and tilt adjustment, providing flexibility in positioning the laser level for different tasks and angles.
- Easy installation: Choose a wall mount that is easy to install and doesn’t require complicated procedures. Magnetic mounts or adhesive mounts are often the quickest and simplest options, as they can be easily attached to the surface without the need for drilling or screwing.
- Portability: If you plan on using the Bullseye Laser Level in different locations or on different surfaces, consider a wall mount that is portable and easy to detach and reattach. This allows for convenient transport and use in various settings.
- User reviews: Before making a purchase, read user reviews and testimonials for the wall mount you are considering. This can provide insights into the reliability, stability, and overall satisfaction of other users who have used the mount with the Bullseye Laser Level.
By carefully considering these factors, you can choose the right wall mount for your Black and Decker Bullseye Laser Level. A suitable wall mount will ensure the stability and accuracy of the laser level, allowing you to achieve precise leveling and alignment in your projects.
When using the Black and Decker Bullseye Laser Level, make sure to calibrate it on a flat surface before use to ensure accurate leveling and alignment.
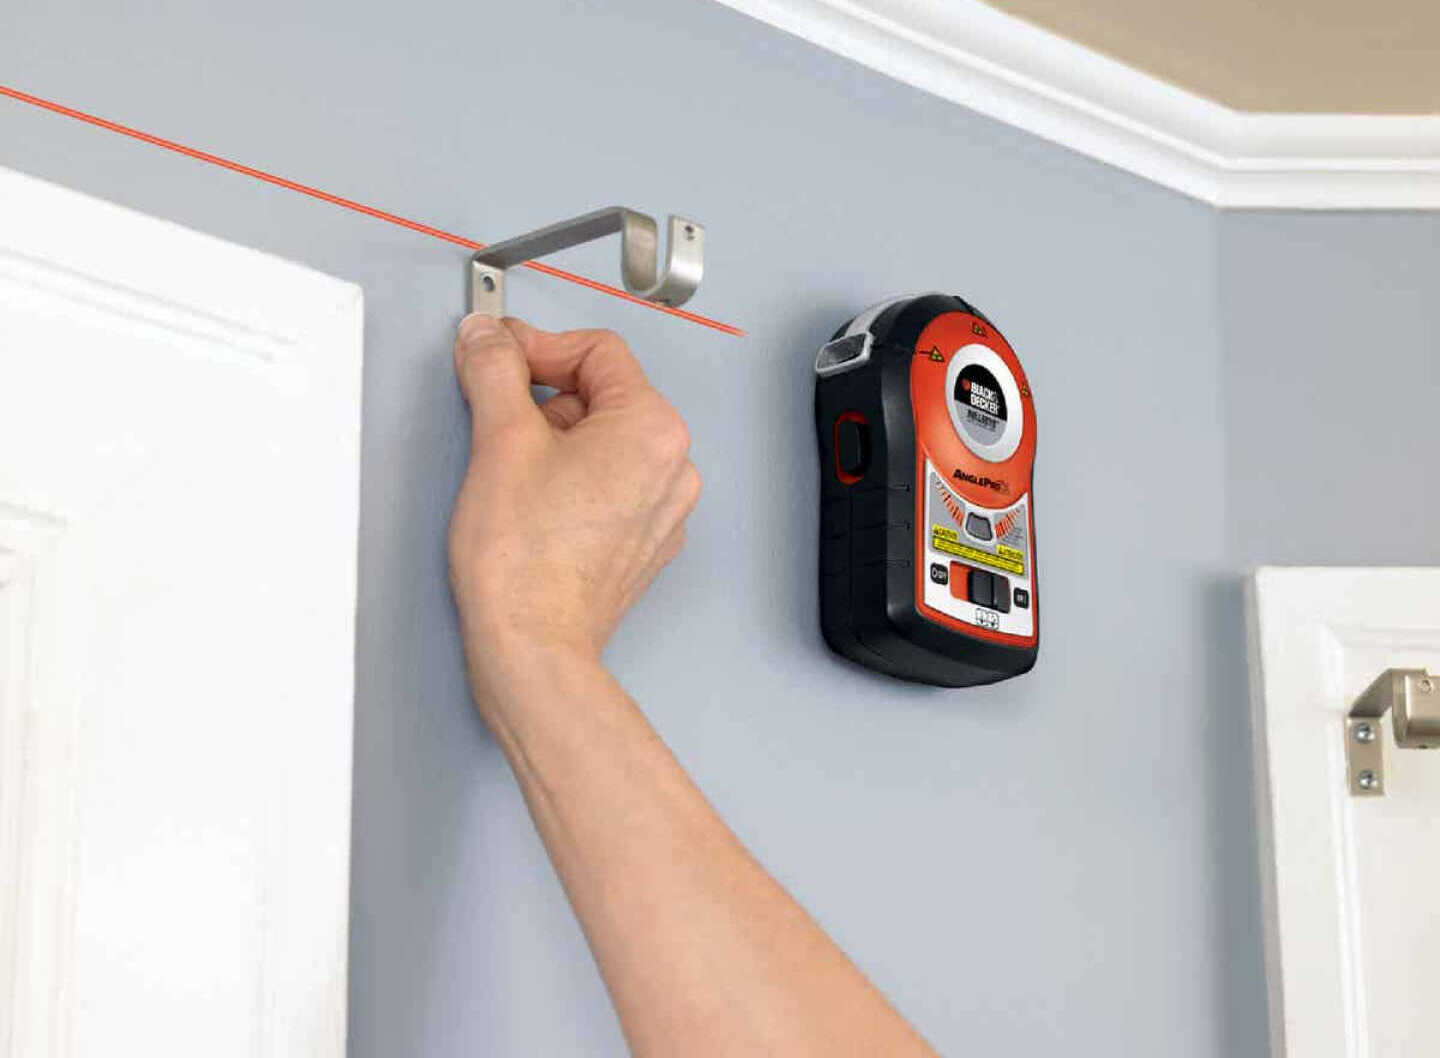
Using the Laser Level for Vertical Alignments
The Black and Decker Bullseye Laser Level is a valuable tool for achieving accurate vertical alignments in your home improvement projects. Follow these steps to effectively use the laser level for vertical alignments:
- Choose the placement: Determine the location where you want to align something vertically. This could be a wall-mounted object, a cabinet, or any other item that requires a straight and level line.
- Set up the laser level: Place the Bullseye Laser Level on a stable surface or use a suitable wall mount to secure it. Ensure that the device is level and positioned at the desired height to align with your project.
- Activate the laser: Turn on the laser level and select the laser level mode if necessary. The laser will project a straight line onto the surface to help with alignment.
- Align with the projected line: Position your object or mark along the projected laser line. Use a spirit level or a ruler to ensure that your object or mark is perfectly aligned and level with the laser line.
- Make adjustments if needed: If the object or mark is not aligned with the laser line, adjust its position until it is. Take your time to make small movements and check the alignment frequently to achieve precision.
- Secure in place: Once the object or mark is aligned, secure it in place using appropriate tools such as screws or adhesive. Double-check the alignment before finalizing the installation.
- Verify the alignment: Step back and observe the alignment from various angles to ensure it meets your requirements. Utilize the laser level’s projection to assist in identifying any imperfections or adjustments needed.
Using the Black and Decker Bullseye Laser Level for vertical alignments provides you with a visual reference that eliminates the guesswork. Whether you’re hanging artwork, installing shelves, or aligning cabinets, this tool allows you to achieve professional-level results with precision and ease.
Using the Laser Level for Horizontal Alignments
The Black and Decker Bullseye Laser Level is a versatile tool that can be used for horizontal alignments, ensuring accurate and level installations. Follow these steps to effectively use the laser level for horizontal alignments:
- Select the installation area: Identify the surface or area where you want to achieve a horizontal alignment. This could be installing kitchen cabinets, hanging a shelf, or aligning tiles on a wall.
- Prepare the laser level: Set up the Bullseye Laser Level on a stable surface or use a wall mount to secure it. Make sure that the device is level and positioned at the desired height for proper alignment.
- Activate the laser: Turn on the laser level and select the laser level mode if necessary. The laser will project a straight, level line onto the surface, providing a visual aid for alignment.
- Align your installation item: Position your installation item, such as a cabinet or shelf, along the projected laser line. Use a spirit level or a ruler to ensure that your item is perfectly horizontal and aligned with the laser line.
- Make adjustments if needed: If the installation item is not parallel or level with the laser line, make slight adjustments until it aligns perfectly. Use a spirit level to guide you in achieving precise alignment.
- Secure the installation item: Once the item is aligned with the laser line, secure it in place using appropriate tools such as screws or adhesive. Check the alignment one final time before finalizing the installation.
- Verify the overall alignment: Step back and observe the overall alignment of your installation from different angles. Ensure that it meets your desired levelness and appearance. Utilize the laser level’s projection to identify any adjustments needed.
Using the Black and Decker Bullseye Laser Level for horizontal alignments eliminates the guesswork and allows for precise and professional results. Whether you’re installing cabinets, hanging shelves, or aligning tiles, this versatile tool ensures that your horizontal alignments are accurate and level.
Checking for Plumb and Level
Ensuring that objects are plumb and level is vital for achieving a professional-looking finish in your home improvement projects. The Black and Decker Bullseye Laser Level simplifies the process by providing a visual guide. Here’s how to check for plumb and level using the laser level:
- Select the area to check: Identify the object or surface that you want to verify for plumbness or levelness. This could be a wall, a door frame, or any other vertical or horizontal element.
- Position the laser level: Place the Bullseye Laser Level on a stable surface or use a wall mount to secure it. Ensure that the device is level and at the desired height or orientation to line up with the object you are checking.
- Activate the laser: Turn on the laser level and select either the vertical or horizontal level mode, depending on the orientation of the object you are checking.
- Align the laser line: Adjust the position of the Bullseye Laser Level until its projected laser line is in direct contact with the object. For example, align the laser line with the edge of a door frame or the corner of a wall.
- Observe and measure: Using a spirit level or a ruler, check if the object is plumb or level in relation to the laser line. For vertical alignment, ensure that the object is perfectly upright or at the desired angle. For horizontal alignment, check that the object is parallel to the laser line.
- Make adjustments if necessary: If the object is not plumb or level, make adjustments as needed. For vertical alignment, adjust the object’s position until it is perfectly upright. For horizontal alignment, move the object until it is parallel to the laser line.
- Verify the alignment: Step back and observe the overall alignment of the object. Take measurements from different angles to confirm that it is truly plumb or level. Use the laser level’s projection as a reference to identify any further adjustments required.
By checking for plumb and level with the Black and Decker Bullseye Laser Level, you can ensure accuracy and precision in your home improvement projects. The laser line eliminates any guesswork, allowing you to achieve a professional finish with ease.
Troubleshooting Common Issues
While the Black and Decker Bullseye Laser Level is a reliable tool, there might be some common issues that can arise during its use. Here are a few troubleshooting steps to help you address these issues:
- Weak or dim laser: If you notice that the laser projection is weak or dim, first check the battery level. Replace the batteries if they are low. Clean the laser projection window with a soft, lint-free cloth to ensure clarity. If the issue persists, contact the manufacturer for further assistance.
- Inaccurate readings: If you are experiencing inaccurate readings, ensure that the device is properly calibrated. Check the bubble vials and adjust them until they indicate a level position. Make sure the laser level is placed on a stable surface to avoid any unintentional movements.
- Laser not turning on: If the laser level does not turn on, check the battery compartment to ensure that the batteries are properly inserted. Make sure the batteries are fully charged or replace them with new ones. If the issue persists, contact the manufacturer for troubleshooting or repair options.
- Interference with other devices: If you encounter interference from other electronic devices, try turning off or moving those devices away from the Bullseye Laser Level. Additionally, ensure that there are no objects blocking the laser beam’s path that may be causing distortion or interference.
- Off-level readings: If you consistently get off-level readings, ensure that the surface or area where the laser level is placed is truly level. If not, adjust the positioning or use shims to create a level surface. Check that the bubble vials are properly calibrated and aligned before use.
- Device not powering off: If you are unable to power off the laser level, try pressing and holding the power button for a few seconds. If this does not work, remove the batteries temporarily to turn off the device. Replace the batteries and try again. If the issue persists, seek assistance from the manufacturer or consult the user manual for further instructions.
- Malfunctioning buttons or switches: If you experience issues with the buttons or switches on the laser level, ensure that they are not obstructed or damaged. Clean the buttons or switches with a soft cloth to remove any dirt or debris. If the problem persists, contact the manufacturer for assistance.
If you encounter any other issues or difficulties with the Black and Decker Bullseye Laser Level that cannot be resolved through troubleshooting, it is recommended to contact the manufacturer’s customer support for further assistance. They will be able to provide you with specific solutions or arrange for repairs if necessary.
Maintenance and Storage Tips
To ensure the longevity and optimal performance of your Black and Decker Bullseye Laser Level, it is important to follow proper maintenance and storage practices. Here are some tips to keep your laser level in excellent condition:
- Clean the device: Regularly clean the laser level with a soft, lint-free cloth. Wipe down the exterior of the device to remove any dirt, dust, or debris. Pay special attention to the laser projection window to ensure a clear and unobstructed laser beam.
- Protect the device: When not in use, keep the Bullseye Laser Level in a protective case or pouch to shield it from potential damage. This helps prevent scratches, impacts, and exposure to moisture or extreme temperatures.
- Avoid dropping the device: Accidental drops can cause damage to the laser level and affect its performance. Handle the device with care, being mindful of its fragile components. Always place it on a stable surface when not in use.
- Store in a dry location: Moisture can damage the internal components of the laser level. Store it in a dry location away from water sources or areas with high humidity. Avoid subjecting the device to extreme temperature variations as well.
- Remove batteries when not in use: If you do not plan on using the laser level for an extended period, remove the batteries to prevent potential leakage and damage. This helps preserve the battery life and prevents corrosion within the device.
- Check battery life regularly: Keep an eye on the battery life of the Bullseye Laser Level. Replace the batteries as needed or when they show signs of low power. This ensures consistent and reliable performance when using the device.
- Store in a safe location: Keep the laser level out of reach of children and pets. Store it in a secure place where it won’t be accidentally knocked over or damaged. Consider using a lockable storage cabinet or drawer specifically designated for your tools.
- Regularly calibrate the device: Calibrating the laser level ensures accurate measurements. Periodically check and recalibrate the device as needed, following the manufacturer’s instructions. This helps maintain the precision and reliability of the laser level.
- Inspect before each use: Before using the laser level, inspect it for any visible damage or defects. Ensure that all buttons, switches, and the laser projection window are in good condition. If you notice any issues, contact the manufacturer for guidance.
By following these maintenance and storage tips, you can extend the lifespan of your Black and Decker Bullseye Laser Level and ensure its consistent performance for all your leveling and alignment needs. Proper care and storage will help you get the most out of your investment and continue to achieve professional-grade results in your DIY projects.
Conclusion
The Black and Decker Bullseye Laser Level is a valuable tool that simplifies the process of leveling and alignment in your home improvement projects. With its precise laser projection, dual functionality, and user-friendly features, it enables you to achieve professional-grade results with ease.
In this comprehensive guide, we have explored the various aspects of using the Bullseye Laser Level effectively. From setting up the device to calibrating it, choosing the right wall mount to troubleshooting common issues, we have covered all the essential steps to ensure optimal performance.
By following the step-by-step instructions, you can confidently use the Bullseye Laser Level for vertical and horizontal alignments, achieving accurate and level installations. Checking for plumb and level becomes a breeze with the visual reference provided by the laser projection, eliminating any guesswork.
Remember to prioritize safety by following the recommended precautions while using the laser level. Protect your eyes, secure ladders, and avoid electrical hazards to ensure a safe and accident-free experience.
Proper maintenance and storage practices are also important to prolong the lifespan of your Bullseye Laser Level. Regular cleaning, protecting the device, and storing it in a dry location will help keep it in excellent condition for years to come.
Whether you are a seasoned DIY enthusiast or a beginner, the Black and Decker Bullseye Laser Level is a must-have tool in your arsenal. Its versatility, accuracy, and user-friendly design make it an essential companion for any leveling and alignment tasks.
So, go ahead and tackle those home improvement projects with confidence and precision using the Black and Decker Bullseye Laser Level!
Frequently Asked Questions about How To Use Black And Decker BullsEye Laser Level
Was this page helpful?
At Storables.com, we guarantee accurate and reliable information. Our content, validated by Expert Board Contributors, is crafted following stringent Editorial Policies. We're committed to providing you with well-researched, expert-backed insights for all your informational needs.


0 thoughts on “How To Use Black And Decker BullsEye Laser Level”