Home>Construction & Tools>Building Materials>How To Build A Smoker Out Of Brick
Building Materials
How To Build A Smoker Out Of Brick
Modified: October 19, 2024
Learn how to build a smoker out of brick using affordable building materials. Create your own DIY smoker for delicious barbecue at home.
(Many of the links in this article redirect to a specific reviewed product. Your purchase of these products through affiliate links helps to generate commission for Storables.com, at no extra cost. Learn more)
Introduction
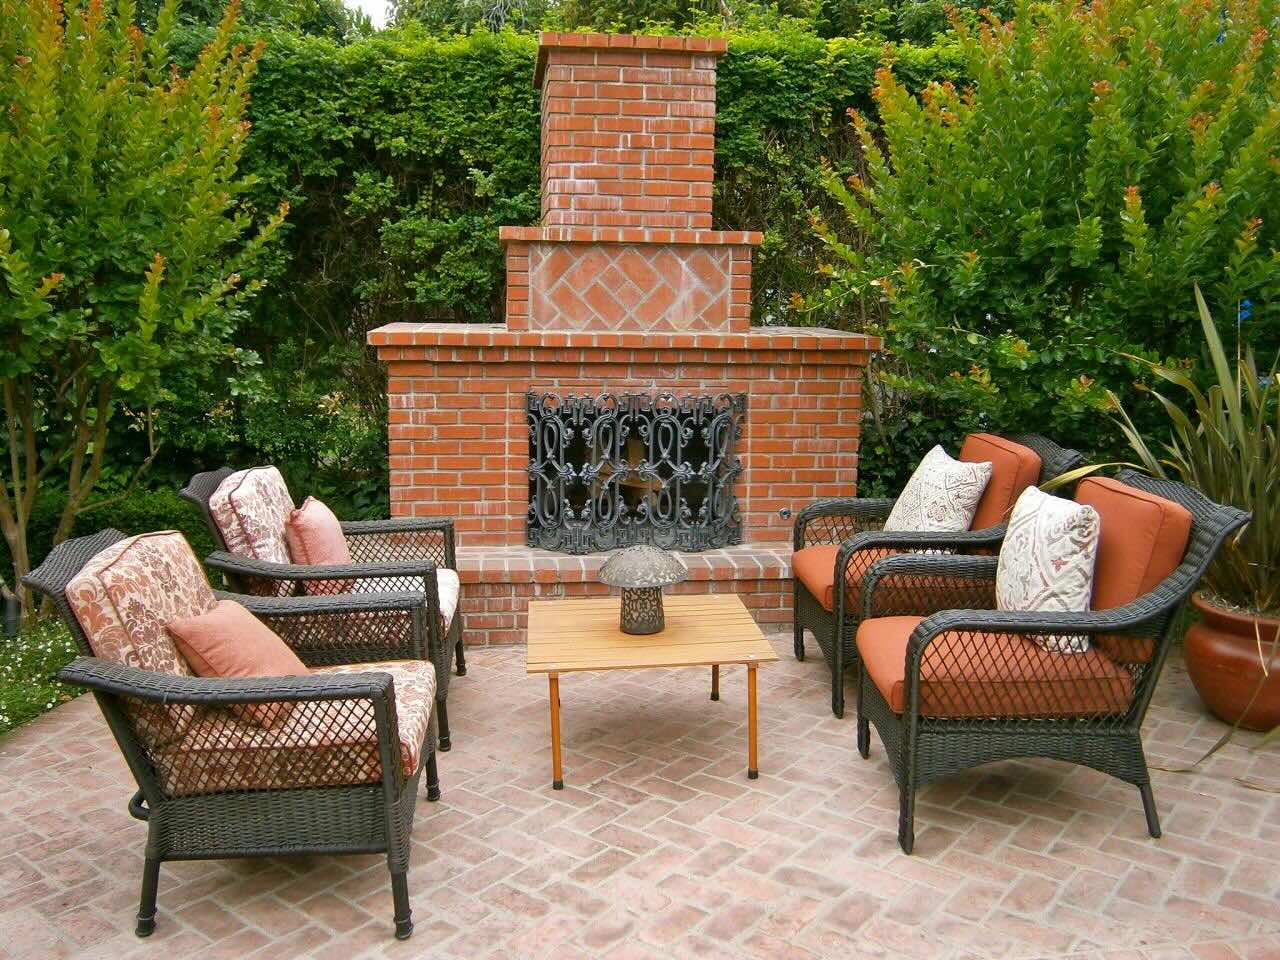
Building a smoker out of brick is a rewarding and practical project for barbecue enthusiasts and DIY enthusiasts alike. Brick smokers are renowned for their durability, excellent heat retention, and timeless aesthetic appeal. Whether you're a seasoned builder or a novice looking to embark on a new project, constructing a brick smoker can be a fulfilling endeavor that adds value to your outdoor space and culinary experiences.
In this comprehensive guide, we will walk you through the step-by-step process of building a brick smoker, from selecting the ideal location to adding the finishing touches. By the end of this journey, you will have the knowledge and confidence to create a custom brick smoker that will elevate your outdoor cooking adventures to new heights.
Let's dive into the materials needed and the essential steps to bring your brick smoker to life. Whether you're envisioning savory slow-cooked ribs, tender brisket, or flavorful smoked vegetables, this brick smoker will become the centerpiece of your outdoor cooking repertoire. So, roll up your sleeves, gather your materials, and let's get started on this exciting and rewarding project.
Key Takeaways:
- Building a brick smoker is a fun and rewarding project that adds value to outdoor cooking. From laying the foundation to adding finishing touches, it’s a journey of craftsmanship and culinary creativity.
- A custom brick smoker becomes a symbol of passion and tradition, where the art of slow cooking intertwines with the joy of shared meals. It’s a celebration of creativity, good food, and the simple pleasures of outdoor gatherings.
Read more: How To Make A Brick Bbq Smoker
Materials Needed
To embark on the journey of building a brick smoker, you will need a range of materials to ensure a sturdy and functional end product. Here's a comprehensive list of the essential items required for this project:
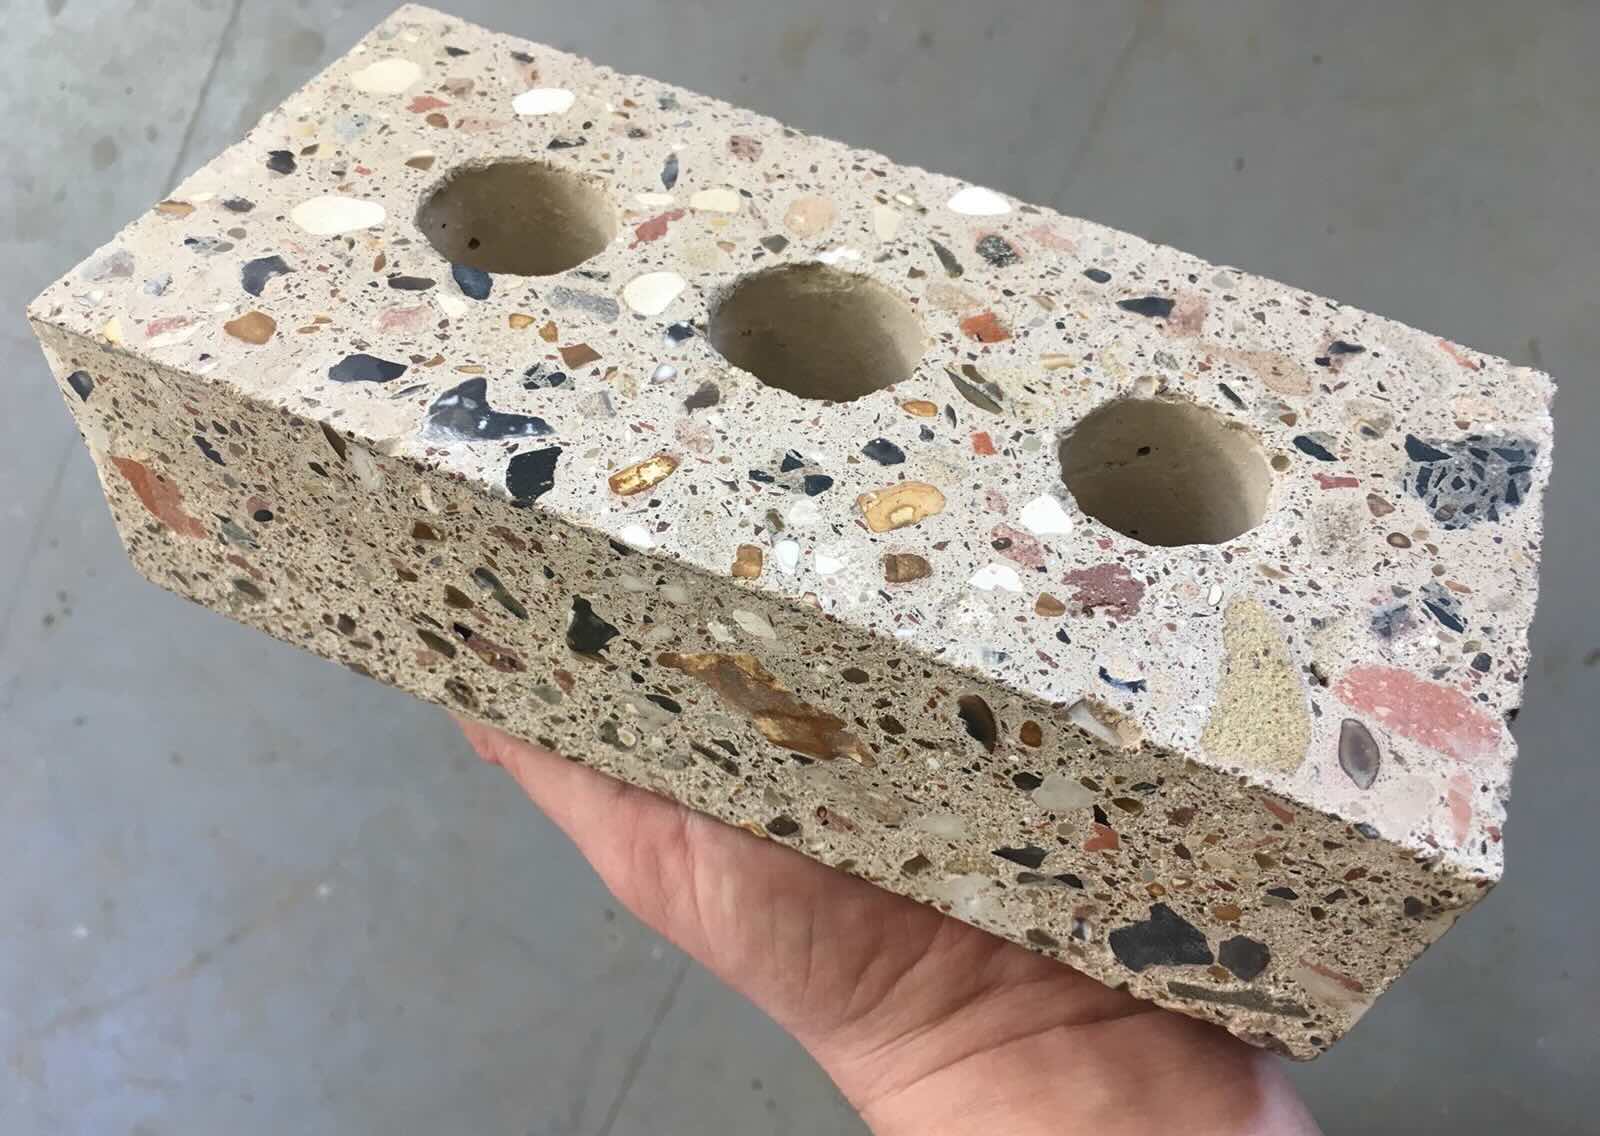
Bricks and Mortar
The backbone of your brick smoker will be the bricks and mortar used to construct its sturdy frame. Opt for high-quality, heat-resistant bricks that can withstand the intense temperatures generated during the smoking process. Additionally, ensure that the mortar is suitable for outdoor use and can withstand prolonged exposure to heat and weather elements.
Grate and Firebox
A durable cooking grate is essential for supporting the food being smoked. Look for a stainless steel or cast iron grate that can withstand high temperatures and provide ample space for your culinary creations. Additionally, you will need a firebox to house the charcoal or wood fuel, so consider a firebox that is appropriately sized for your smoking needs.
Metal Door and Hinges
To create access to the smoking chamber, you will need a metal door and hinges that can withstand the heat and provide a secure seal when closed. The door should be crafted from heat-resistant metal to ensure longevity and efficient heat retention during the smoking process.
Read more: How To Build A Blacksmith Forge Out Of Brick
Chimney and Ventilation
A well-designed chimney and ventilation system are crucial for regulating airflow and maintaining the ideal smoking conditions within the smoker. Invest in a high-quality chimney that is tall enough to draw smoke away from the cooking chamber and prevent it from lingering around the food. Additionally, consider incorporating adjustable vents to fine-tune the airflow and temperature control.
Insulating Materials
To enhance heat retention and ensure consistent smoking temperatures, consider incorporating insulating materials such as fire bricks or ceramic insulation blankets. These materials can help minimize heat loss and create a more efficient smoking environment within the brick smoker.
Tools and Safety Gear
In addition to the primary materials, gather a set of essential tools for the construction process, including a trowel, level, masonry saw, and protective gear such as gloves and safety goggles. These tools will facilitate the precise assembly of the brick smoker while ensuring your safety throughout the project.
By acquiring these materials and tools, you will be well-equipped to commence the construction of your custom brick smoker. With careful planning and attention to detail, you can transform these raw materials into a robust and visually striking smoker that will serve as the focal point of your outdoor cooking adventures.
Step 1: Choosing the Location
Selecting the ideal location for your brick smoker is a crucial first step that sets the foundation for a successful and enjoyable smoking experience. The chosen spot should not only accommodate the size of the smoker but also consider factors such as airflow, safety, and convenience. Here's a detailed exploration of the key considerations when choosing the location for your brick smoker:
Read more: How To Build A Brick Mailbox
1. Assessing Space and Accessibility
Begin by evaluating the available outdoor space and determining the most suitable area for the brick smoker. Ideally, the location should offer ample space for the smoker's dimensions, ensuring that it is positioned a safe distance from any flammable structures or materials. Additionally, consider the accessibility of the chosen spot, as it should allow for easy maneuvering and maintenance of the smoker.
2. Airflow and Ventilation
Optimal airflow is essential for maintaining consistent smoking temperatures and preventing the accumulation of smoke around the cooking chamber. When selecting the location, take note of the prevailing wind patterns and identify an area that allows for adequate ventilation. Positioning the smoker in a well-ventilated space will contribute to efficient smoke dispersion and enhance the overall smoking process.
3. Safety and Fire Prevention
Prioritize safety by choosing a location that minimizes fire hazards and promotes a secure smoking environment. Avoid placing the smoker near dry vegetation, wooden structures, or any other flammable materials. Additionally, ensure that the chosen location complies with local fire safety regulations and maintains a safe distance from buildings, fences, and other potential fire risks.
4. Convenience and Utility
Consider the practicality of the chosen location in relation to your outdoor cooking activities. Ideally, the smoker should be positioned within a convenient distance from your outdoor kitchen or cooking area, allowing for seamless integration into your culinary workflow. Moreover, assess the proximity to utilities such as water and electricity, as these factors can influence the overall functionality and convenience of the smoking setup.
By carefully evaluating these considerations and selecting a location that aligns with these principles, you can lay the groundwork for a successful and enjoyable brick smoker installation. The chosen location should not only provide a safe and functional setting for the smoker but also contribute to a harmonious outdoor cooking environment that enhances your culinary pursuits.
Read more: How To Build Brick Steps
Step 2: Laying the Foundation
The foundation of a brick smoker serves as the fundamental base upon which the entire structure rests, providing stability and support for the smoking chamber and firebox. Properly laying the foundation is essential to ensure the longevity and structural integrity of the smoker. Here's a detailed exploration of the key steps involved in laying the foundation for your brick smoker:
1. Site Preparation
Begin by preparing the site where the brick smoker will be constructed. Clear the designated area of any debris, vegetation, or obstructions to create a clean and level surface for the foundation. Use a shovel and a level to ensure that the ground is adequately graded and free from any unevenness that could compromise the stability of the smoker.
2. Marking the Foundation
Once the site is prepared, mark the dimensions of the foundation using stakes and string. The foundation should be sized to accommodate the footprint of the smoker, including the smoking chamber, firebox, and any additional features. Use measuring tape and a carpenter's square to ensure that the foundation layout is precise and aligns with the intended design of the smoker.
3. Excavation and Formwork
With the foundation layout in place, proceed to excavate the marked area to the desired depth for the foundation. The depth of the excavation will depend on the specific design and size of the smoker, but it is essential to create a stable and level base for the foundation. Once the excavation is complete, construct formwork using wooden boards to contain the concrete that will be poured to create the foundation.
Read more: How To Build A Brick Grill
4. Pouring and Leveling Concrete
Prepare a batch of concrete according to the manufacturer's instructions, ensuring that it achieves the proper consistency for pouring. Carefully pour the concrete into the formwork, distributing it evenly to create a uniform foundation. Use a screed board and a level to smooth the surface of the concrete and achieve a consistent level across the entire foundation. Allow the concrete to cure and set according to the recommended timeframe provided by the manufacturer.
5. Reinforcement and Finishing
For added strength and durability, consider incorporating reinforcement such as rebar or wire mesh within the concrete foundation. This reinforcement can enhance the load-bearing capacity of the foundation and minimize the risk of cracking over time. Once the concrete has fully cured, remove the formwork and inspect the foundation for any imperfections. Make any necessary adjustments or repairs to ensure that the foundation is structurally sound and ready to support the construction of the brick smoker.
By meticulously following these steps and paying close attention to the details of laying the foundation, you can establish a solid and reliable base for your brick smoker. The foundation serves as the cornerstone of the smoker's construction, laying the groundwork for the subsequent stages of building the walls, installing the smoking chamber, and adding the finishing touches. With the foundation in place, you are one step closer to bringing your custom brick smoker to fruition, ready to infuse your outdoor culinary endeavors with the rich flavors of smoked delicacies.
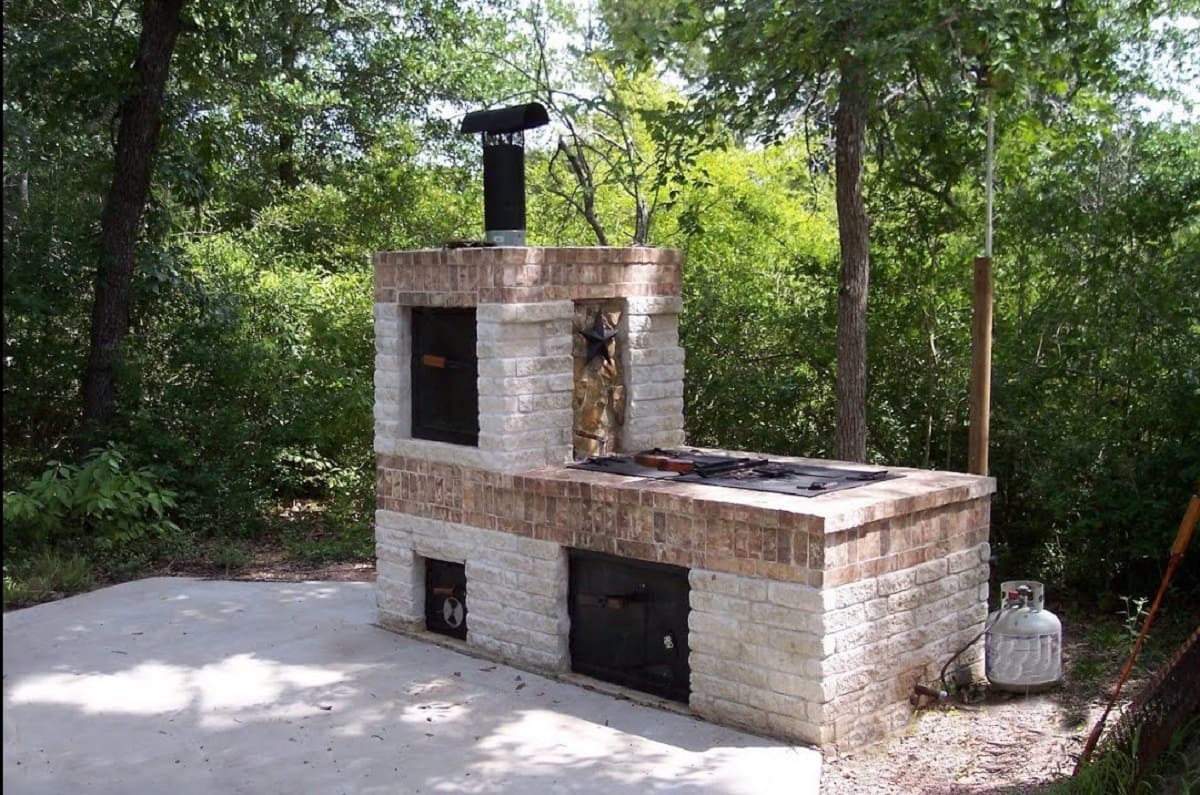
Step 3: Building the Walls
With the foundation set, the next pivotal phase in constructing a brick smoker involves building the walls that will form the structure's robust and enduring frame. The walls not only provide the enclosure for the smoking chamber and firebox but also contribute to the smoker's overall stability and heat retention capabilities. Here's a comprehensive exploration of the essential steps involved in building the walls of your custom brick smoker:
1. Selecting High-Quality Bricks and Mortar
The foundation for a durable and visually appealing brick smoker lies in the selection of high-quality bricks and mortar. Opt for heat-resistant bricks that can withstand the intense temperatures generated during the smoking process, ensuring longevity and structural integrity. Additionally, choose a suitable mortar that is designed for outdoor use and exhibits excellent heat resistance properties, providing a secure bond between the bricks while withstanding the rigors of the smoking environment.
Read more: How To Build A Brick Column
2. Planning the Wall Layout
Before commencing the construction of the walls, carefully plan the layout and dimensions of the smoking chamber and firebox. Use a tape measure, level, and chalk line to mark the precise locations where the walls will be erected, ensuring that the dimensions align with the intended design of the smoker. Pay close attention to the alignment and verticality of the walls, as precision in the initial layout will contribute to the overall structural integrity and aesthetic appeal of the smoker.
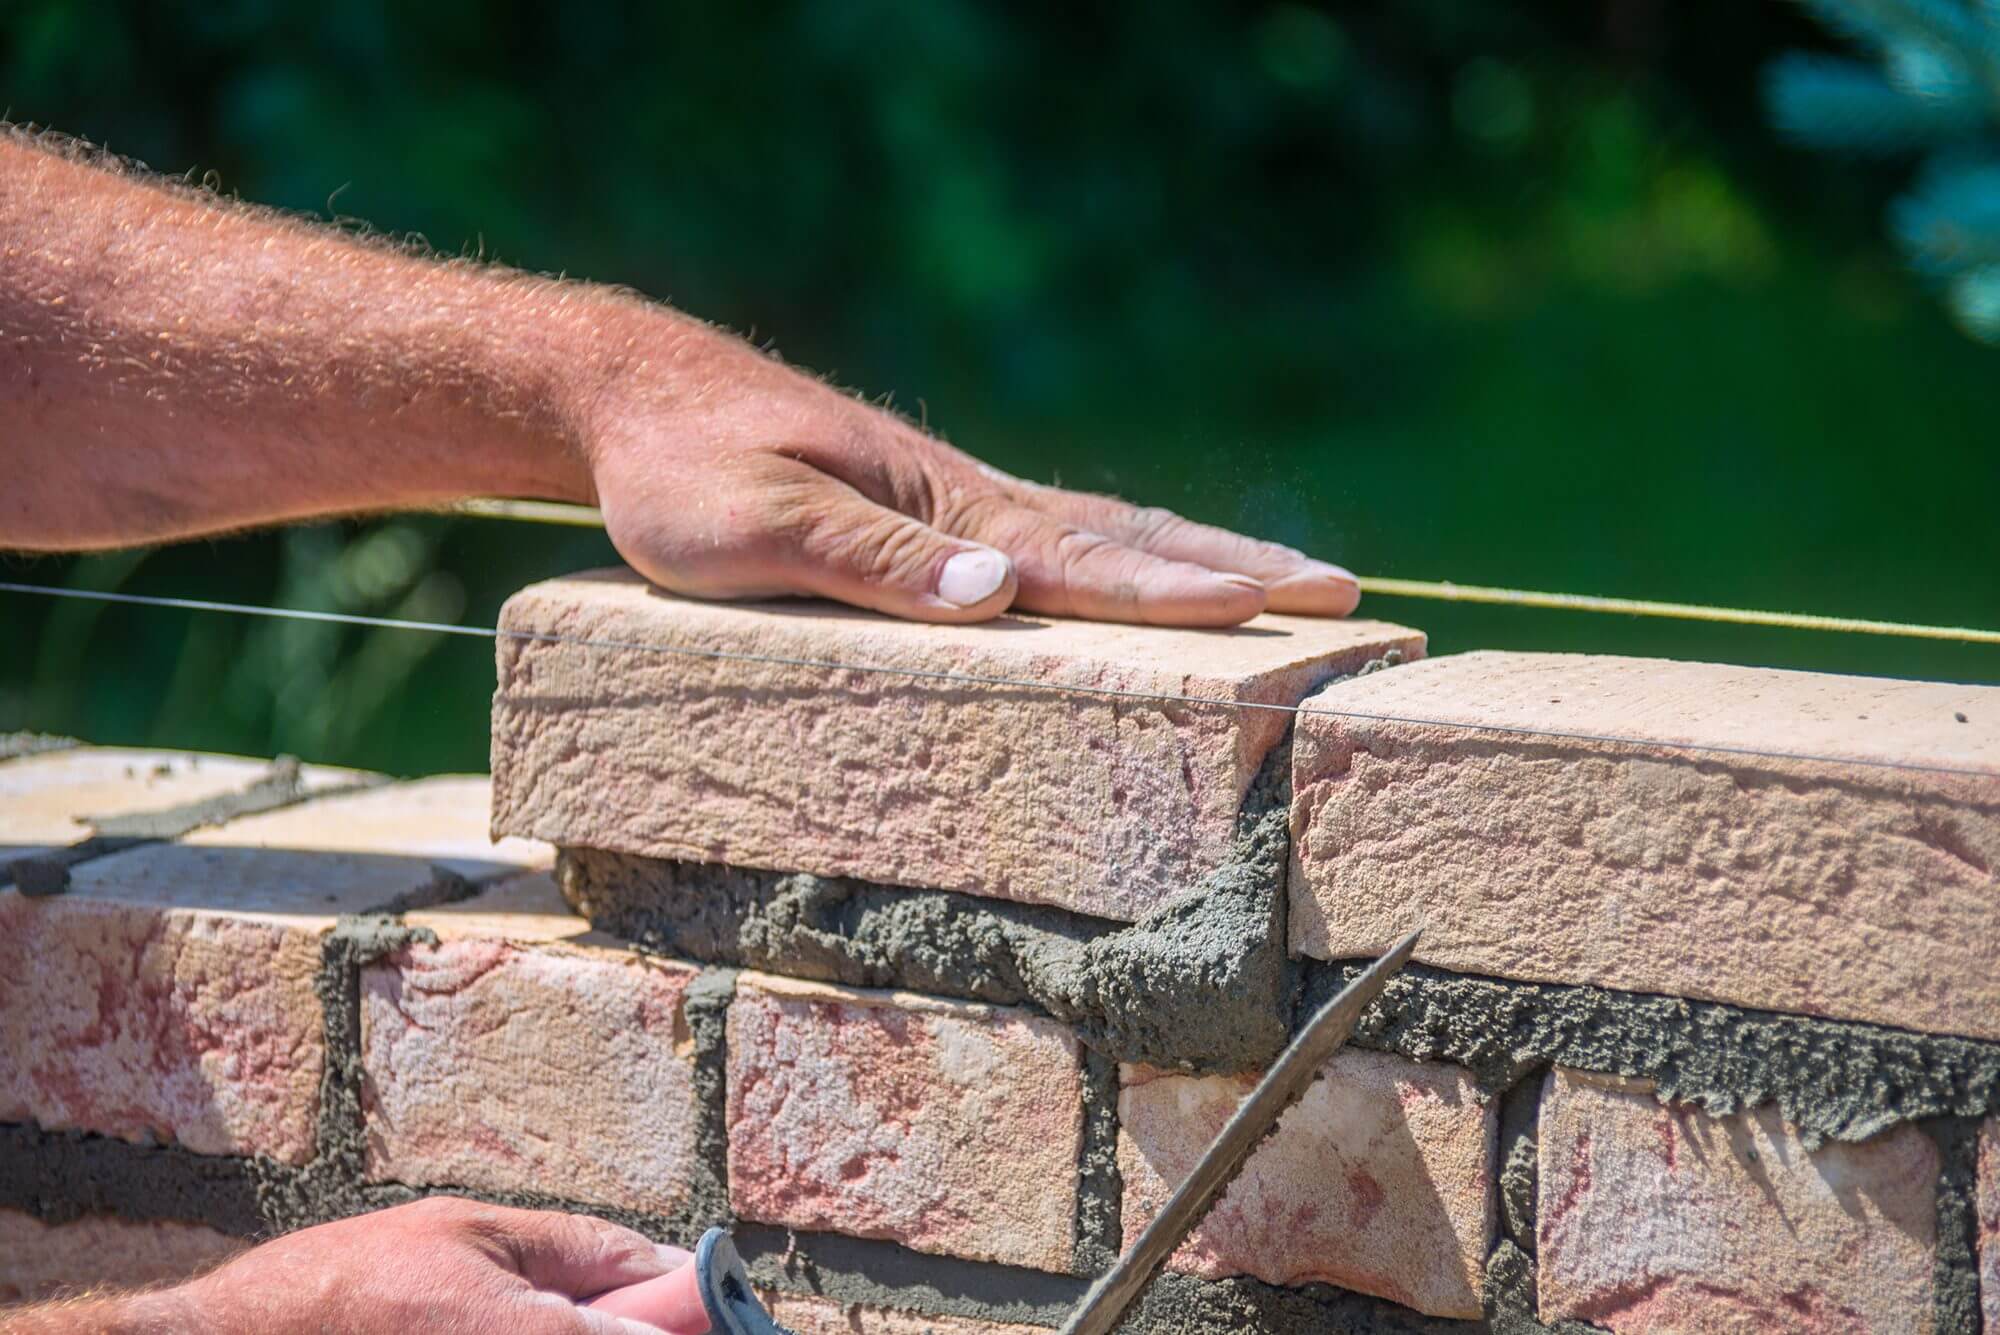
3. Laying the Bricks
Begin the process of building the walls by laying the bricks according to the predetermined layout. Apply a generous amount of mortar to the foundation and the ends of each brick, ensuring a strong and secure bond between the bricks. Use a trowel to spread the mortar evenly and create uniform joints between the bricks. As you progress, periodically check the vertical and horizontal alignment of the bricks to maintain a consistent and level wall structure.
4. Incorporating Openings and Features
As the walls take shape, consider incorporating openings for the smoker's door, vents, and chimney. Carefully plan and construct these openings to ensure proper functionality and seamless integration with the overall design. Additionally, if your design includes shelves or other features within the smoking chamber, strategically integrate these elements into the wall construction, ensuring that they are securely anchored and contribute to the smoker's functionality.
5. Ensuring Structural Integrity
Throughout the process of building the walls, prioritize the structural integrity of the smoker by reinforcing the corners and junctions where the walls meet. Utilize corner bricks and additional mortar to strengthen these critical points, enhancing the overall stability and durability of the smoker. Additionally, periodically assess the alignment and plumbness of the walls to maintain a uniform and structurally sound construction.
By meticulously following these steps and paying attention to the details of building the walls, you can establish a sturdy and visually striking enclosure for your brick smoker. The walls serve as the defining framework for the smoking chamber and firebox, setting the stage for the subsequent installation of the grate, chimney, and smoking chamber. With the walls in place, your custom brick smoker will begin to take shape, embodying the timeless allure and functional prowess of traditional brick smokers.
Read more: How To Build A Brick Hearth
Step 4: Installing the Grate and Chimney
As the construction of the brick smoker progresses, the installation of the grate and chimney marks a pivotal phase that contributes to the functionality and performance of the smoking apparatus. The grate serves as the platform for supporting the food being smoked, while the chimney plays a critical role in regulating airflow and smoke dispersion. Here's a detailed exploration of the essential steps involved in installing the grate and chimney, ensuring that they seamlessly integrate into the overall design of the brick smoker.
1. Grate Installation
Begin by positioning the cooking grate within the smoking chamber, ensuring that it is securely anchored and level. The grate should be situated at an optimal height to facilitate efficient heat circulation and accommodate the desired quantity of food for smoking. Depending on the design of your smoker, the grate may be adjustable or fixed in place, providing flexibility in managing the smoking process. Once the grate is in position, verify its stability and alignment, as it will serve as the primary surface for arranging the food to be smoked.
2. Chimney Integration
The installation of the chimney involves carefully positioning and securing the chimney structure to facilitate the efficient venting of smoke from the smoking chamber. The chimney should be strategically located to draw smoke away from the cooking area, minimizing the risk of smoke retention and ensuring a consistent smoking environment. Depending on the design of your smoker, the chimney may be affixed directly to the smoking chamber or connected via a duct, providing a pathway for the expulsion of smoke. Verify that the chimney is securely attached and extends to an adequate height to promote effective smoke dispersion.
3. Sealing and Insulation
Once the grate and chimney are in place, pay attention to sealing any gaps or openings around these components to prevent smoke leakage and ensure optimal heat retention. Utilize heat-resistant gaskets or sealants to create a tight seal between the grate and the smoking chamber, minimizing heat loss and promoting even smoking temperatures. Additionally, consider incorporating insulation around the chimney to enhance its heat retention capabilities and prevent the exterior surfaces from becoming excessively hot during operation. These measures contribute to the overall efficiency and performance of the smoker, creating a controlled and consistent smoking environment.
Read more: How To Build A Brick Arch
4. Functional Testing
After installing the grate and chimney, conduct a functional test to assess their performance and integration within the smoker. Verify that the grate can support the intended load of food without any signs of instability or sagging. Additionally, evaluate the draft and smoke dispersion through the chimney, ensuring that it effectively draws smoke away from the cooking chamber. Make any necessary adjustments to optimize the functionality of these components, aligning them with the desired smoking conditions and culinary requirements.
By meticulously following these steps and ensuring the precise installation of the grate and chimney, you can elevate the functionality and performance of your custom brick smoker. The seamless integration of these components contributes to a controlled and efficient smoking environment, allowing you to embark on flavorful culinary adventures with confidence and precision. With the grate and chimney in place, your brick smoker is poised to deliver exceptional smoking results, infusing your culinary creations with the rich and aromatic essence of traditional wood-fired smoking.
Step 5: Adding the Smoking Chamber
The addition of the smoking chamber represents a pivotal stage in the construction of a brick smoker, as it serves as the core space where the culinary magic of smoking unfolds. The smoking chamber provides a controlled environment for infusing foods with rich, smoky flavors, and its meticulous integration into the overall design is essential for achieving optimal smoking results. Here's a detailed exploration of the essential steps involved in adding the smoking chamber to your custom brick smoker.
1. Chamber Placement and Sizing
Commence the process by carefully positioning the smoking chamber within the constructed walls, ensuring that it aligns with the predetermined dimensions and layout. The chamber should be situated to facilitate efficient heat circulation and smoke distribution, promoting uniform smoking across the entire cooking area. Pay close attention to the sizing of the chamber, ensuring that it accommodates the intended quantity of food for smoking while allowing for adequate airflow and heat retention.
2. Sealing and Insulation
Once the smoking chamber is in place, focus on sealing any gaps or joints to prevent smoke leakage and heat loss. Utilize high-temperature gaskets and sealants to create a tight and secure seal between the chamber and the surrounding walls, minimizing the escape of smoke and maintaining consistent smoking temperatures. Additionally, consider incorporating insulation within the chamber to enhance its heat retention capabilities, ensuring that the interior environment remains conducive to the smoking process.
Read more: How To Build A Brick Pathway
3. Ventilation and Airflow Control
Integrate adjustable vents or dampers within the smoking chamber to facilitate precise control over airflow and temperature regulation. These ventilation mechanisms allow for fine-tuning the smoking conditions, enabling you to adjust the heat and smoke levels according to the specific requirements of the food being smoked. Strategically position the vents to promote efficient smoke circulation and create a balanced smoking environment within the chamber.
4. Functional Testing and Calibration
After adding the smoking chamber, conduct a comprehensive functional test to evaluate its performance and functionality. Verify that the chamber maintains consistent smoking temperatures and facilitates the efficient dispersion of smoke throughout the cooking area. Test the ventilation controls to ensure that they provide the desired level of airflow regulation, allowing you to tailor the smoking conditions to suit various culinary endeavors. Make any necessary adjustments to optimize the smoking chamber's functionality, aligning it with the precise smoking requirements for a diverse range of delectable creations.
By meticulously following these steps and focusing on the intricate details of adding the smoking chamber, you can elevate the functionality and precision of your custom brick smoker. The seamless integration of the smoking chamber creates an environment where the art of smoking flourishes, allowing you to embark on a culinary journey filled with tantalizing aromas and mouthwatering flavors. With the smoking chamber in place, your brick smoker is primed to deliver exceptional smoking results, transforming ordinary ingredients into extraordinary culinary delights.
Step 6: Finishing Touches
As the construction of the brick smoker nears completion, attention to the finishing touches adds a layer of refinement and functionality to the structure. These final details not only enhance the visual appeal of the smoker but also contribute to its overall performance and longevity. Here's a detailed exploration of the essential finishing touches that will elevate your custom brick smoker to its full potential.
1. Surface Treatment and Protection
Apply a protective surface treatment to the exterior of the brick smoker to safeguard it against the elements and enhance its durability. Consider using a high-quality masonry sealer or heat-resistant paint designed for outdoor applications. This treatment not only shields the bricks from moisture and weathering but also adds a polished finish to the smoker, accentuating its timeless aesthetic appeal.
Read more: How To Build A Brick Chimney
2. Handle and Door Hardware
Install durable and heat-resistant handles and hardware on the smoker's door to ensure ease of access and secure closure. Opt for stainless steel or brass components that can withstand the high temperatures generated during the smoking process. A well-crafted handle not only enhances the functionality of the smoker but also adds a touch of elegance to its design.
3. Thermometer Integration
Incorporate a reliable and accurate thermometer within the smoking chamber to monitor the internal temperature during the smoking process. A high-quality thermometer provides essential feedback for maintaining precise smoking conditions, allowing you to achieve consistent and delectable results with every culinary creation.
4. Work Surface and Storage
Consider adding a dedicated work surface or shelf adjacent to the smoker to facilitate food preparation and assembly. This convenient space provides a functional area for arranging ingredients, seasoning food, and organizing cooking utensils, enhancing the overall efficiency of the outdoor cooking setup. Additionally, integrate storage compartments or hooks for stowing essential smoking accessories, ensuring that everything you need is readily accessible.
5. Personalized Elements
Infuse your unique style and personality into the brick smoker by incorporating personalized elements such as decorative tiles, custom signage, or embellishments that reflect your outdoor cooking passion. These personalized touches not only add character to the smoker but also create a welcoming and inviting ambiance in your outdoor cooking space.
By meticulously attending to these finishing touches, you can elevate your custom brick smoker to a level of sophistication and functionality that aligns with your culinary aspirations. The thoughtful integration of these details transforms the smoker into a focal point of outdoor culinary creativity, where the art of smoking intertwines with the joy of creating memorable dining experiences. With the finishing touches in place, your brick smoker stands as a testament to craftsmanship, innovation, and the timeless allure of traditional wood-fired smoking.
Read more: How To Build A Brick Fence
Conclusion
In conclusion, the journey of building a brick smoker is a testament to craftsmanship, dedication, and the timeless allure of traditional wood-fired smoking. From the initial selection of materials to the meticulous construction of the smoking chamber, every step in the process contributes to the creation of a culinary centerpiece that embodies both functionality and aesthetic appeal.
As the final bricks are laid and the finishing touches are applied, the custom brick smoker stands as a testament to innovation and the art of outdoor cooking. Its sturdy frame, carefully integrated components, and personalized details converge to form a space where the rich aromas of smoked delicacies mingle with the joy of culinary creativity.
With the completion of the brick smoker, a new chapter unfolds in the outdoor cooking repertoire, offering a platform for culinary exploration and the creation of memorable dining experiences. The smoker becomes a focal point where friends and family gather to savor the tantalizing flavors of slow-cooked meats, vibrant vegetables, and an array of culinary creations infused with the essence of traditional wood-fired smoking.
Beyond its functional prowess, the brick smoker embodies the spirit of craftsmanship and the joy of bringing culinary visions to life. It stands as a testament to the enduring appeal of outdoor cooking traditions, where the art of smoking intertwines with the warmth of shared meals and the delight of creating unforgettable dining moments.
As the smoke gently wafts from the chimney and the savory aromas envelop the outdoor space, the custom brick smoker becomes more than a culinary apparatus—it becomes a symbol of creativity, passion, and the art of savoring life's simple pleasures. It represents the culmination of a journey marked by dedication, attention to detail, and the unwavering pursuit of culinary excellence.
In the end, the brick smoker is not merely a structure of bricks and mortar; it is a testament to the art of slow cooking, the joy of outdoor gatherings, and the enduring legacy of traditional wood-fired smoking. It stands as a reminder that amidst the hustle of modern life, there exists a space where time slows down, flavors intensify, and the simple act of cooking becomes a celebration of tradition, creativity, and the shared love of good food.
Frequently Asked Questions about How To Build A Smoker Out Of Brick
Was this page helpful?
At Storables.com, we guarantee accurate and reliable information. Our content, validated by Expert Board Contributors, is crafted following stringent Editorial Policies. We're committed to providing you with well-researched, expert-backed insights for all your informational needs.
0 thoughts on “How To Build A Smoker Out Of Brick”