Home>Construction & Tools>Building Materials>How To Build A Brick Hearth
Building Materials
How To Build A Brick Hearth
Modified: October 19, 2024
Learn how to build a sturdy brick hearth using high-quality building materials. Our step-by-step guide will help you create a durable and beautiful fireplace foundation.
(Many of the links in this article redirect to a specific reviewed product. Your purchase of these products through affiliate links helps to generate commission for Storables.com, at no extra cost. Learn more)
Introduction
Welcome to the world of DIY home improvement! Building a brick hearth is a rewarding project that not only adds a touch of timeless elegance to your home but also serves as a functional and visually appealing feature in your living space. Whether you're a seasoned DIY enthusiast or just starting to explore the world of construction, creating a brick hearth can be a fulfilling endeavor that adds warmth and character to your home.
In this comprehensive guide, we will walk you through the step-by-step process of building a brick hearth, from gathering the necessary materials and tools to adding the finishing touches. Whether you're envisioning cozy evenings by the fireplace or simply looking to enhance the aesthetic appeal of your living room, this guide will equip you with the knowledge and confidence to embark on this exciting project.
So, roll up your sleeves, put on your DIY hat, and let's dive into the art of building a brick hearth. Get ready to unleash your creativity and craftsmanship as we embark on this fulfilling journey of transforming raw materials into a stunning focal point for your home. Let's get started!
Key Takeaways:
- Building a brick hearth is a creative and rewarding DIY project that adds warmth and character to your home. From gathering materials to adding finishing touches, this guide equips you with the knowledge and confidence to embark on this fulfilling journey.
- By meticulously preparing the area, laying a solid foundation, and constructing the hearth with care, you can transform raw materials into a stunning and functional brick hearth. Embrace the warmth and beauty it brings to your living space.
Read more: How To Remove A Brick Hearth
Step 1: Gather Materials and Tools
Before diving into the construction process, it’s essential to gather all the necessary materials and tools for building a brick hearth. Here’s a comprehensive list to help you kick-start your project:
Materials:
- Bricks: Choose high-quality, fire-resistant bricks that are suitable for constructing a hearth. Common options include clay bricks and firebricks.
- Mortar: Select a durable mortar mix designed for masonry projects. Opt for a mortar that complements the color of your bricks for a cohesive look.
- Concrete: You'll need concrete to create a solid foundation for the hearth. Ensure that the concrete mix is appropriate for structural applications.
- Rebar: Reinforcing the concrete foundation with rebar will enhance its strength and stability.
- Gravel: Use gravel as a base material for the concrete foundation to improve drainage and support.
- Firebrick Backer Board: This heat-resistant material serves as a protective barrier between the firebox and the surrounding structure.
- Insulation: Consider adding insulation materials to improve the energy efficiency of your hearth.
- Steel Lintels: If your design includes an opening for a fireplace, steel lintels provide essential support for the bricks above the opening.
- Wood or Metal for Formwork: If you're pouring a concrete foundation, you'll need materials for creating formwork to contain the concrete.
Tools:
- Trowel: A trowel is essential for applying mortar and leveling the surface of the bricks.
- Masonry Saw: Use a masonry saw to cut bricks to the required size and shape.
- Level: A level ensures that the bricks are laid evenly and horizontally, maintaining the structural integrity of the hearth.
- Tape Measure: Accurate measurements are crucial in ensuring a precise and well-constructed hearth.
- Wheelbarrow: Use a wheelbarrow for mixing concrete and transporting heavy materials.
- Protective Gear: Safety goggles, work gloves, and a dust mask are essential for personal protection during construction.
- Hammer and Chisel: These tools are useful for shaping and adjusting bricks to fit the desired layout.
- Brush: A stiff-bristled brush is handy for cleaning excess mortar and debris from the bricks.
By gathering these materials and tools, you’ll be well-prepared to embark on the construction of your brick hearth. With everything at your fingertips, you’re ready to move on to the next exciting phase of this project.
Step 2: Prepare the Area
Before laying the foundation for your brick hearth, it’s crucial to prepare the designated area to ensure a solid and stable base for construction. Follow these essential steps to get the area ready for building your hearth:
Read more: How To Build A Fireplace Hearth
Clear the Space:
Begin by removing any existing flooring, such as carpet, tiles, or wood, to expose the subfloor. Ensure that the area is clear of any debris or obstructions that may hinder the construction process.
Check the Subfloor:
Inspect the subfloor to verify its condition and stability. Address any issues such as uneven surfaces or structural concerns before proceeding with the construction of the hearth.
Mark the Layout:
Use a chalk line or painter’s tape to mark the layout of the hearth on the subfloor. This will provide a visual guide for the placement of the foundation and bricks, ensuring accuracy and precision in the construction process.
Create a Level Surface:
Utilize leveling compounds or shims to ensure that the subfloor within the marked area is perfectly level. A level surface is essential for the stability and integrity of the hearth structure.
Read more: How To Build A Brick Mailbox
Install Backer Board:
If your design incorporates a firebox or wood stove, install firebrick backer board within the marked area. This heat-resistant material provides a protective barrier and ensures the safety of the surrounding structures.
Prepare for Concrete:
If your design includes a concrete foundation, set up the formwork within the marked area. Ensure that the formwork is securely in place and aligned with the layout markings.
By meticulously preparing the area for construction, you’ll establish a solid foundation for your brick hearth, setting the stage for the next phases of the building process. With the area prepped and ready, you’re one step closer to bringing your vision of a stunning brick hearth to life.
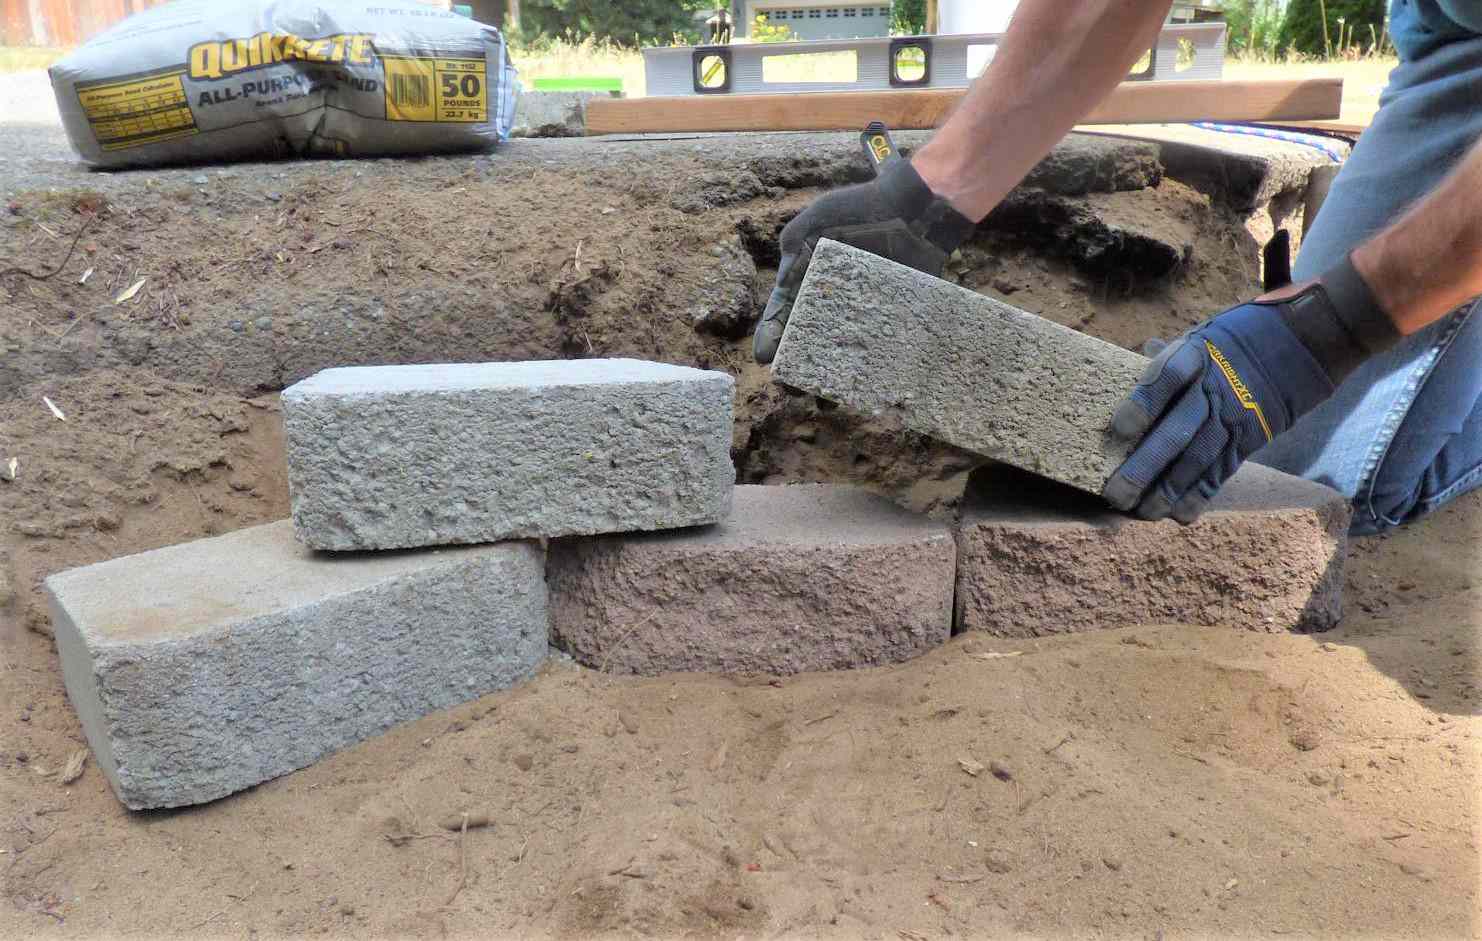
Step 3: Lay the Foundation
With the area prepared, it’s time to lay the foundation for your brick hearth. Whether you’re constructing a concrete base or utilizing an existing floor, this step forms the groundwork for the structural integrity of the hearth. Follow these essential guidelines to ensure a solid foundation:
Concrete Foundation:
If your design calls for a concrete base, carefully mix the concrete according to the manufacturer’s instructions. Pour the concrete into the prepared formwork, ensuring even distribution and a level surface. Use a trowel to smooth the concrete and eliminate any air pockets or irregularities.
Read more: How To Build Brick Steps
Reinforcement:
For added strength and stability, incorporate rebar within the concrete foundation. Position the rebar in a grid pattern, ensuring that it is fully encased within the concrete to enhance the structural integrity of the hearth.
Curing Process:
Allow the concrete to cure thoroughly according to the recommended timeframe provided by the concrete manufacturer. Adequate curing is essential for the concrete to achieve its maximum strength and durability.
Existing Floor Adaptation:
If you’re building the hearth on an existing floor, ensure that the surface is adequately prepared to support the weight of the bricks and provide a stable base for the structure. Address any necessary modifications or reinforcements to accommodate the hearth’s requirements.
Leveling and Alignment:
Use a level to verify that the foundation, whether concrete or existing floor, is perfectly level and aligned with the layout markings. This precision is crucial for the successful construction of the hearth.
By laying a solid foundation, you’re establishing the groundwork for the structural integrity and stability of your brick hearth. With the foundation in place, you’re ready to embark on the exciting phase of building the hearth itself, bringing you one step closer to the captivating centerpiece you envision for your home.
Read more: How To Build A Brick Grill
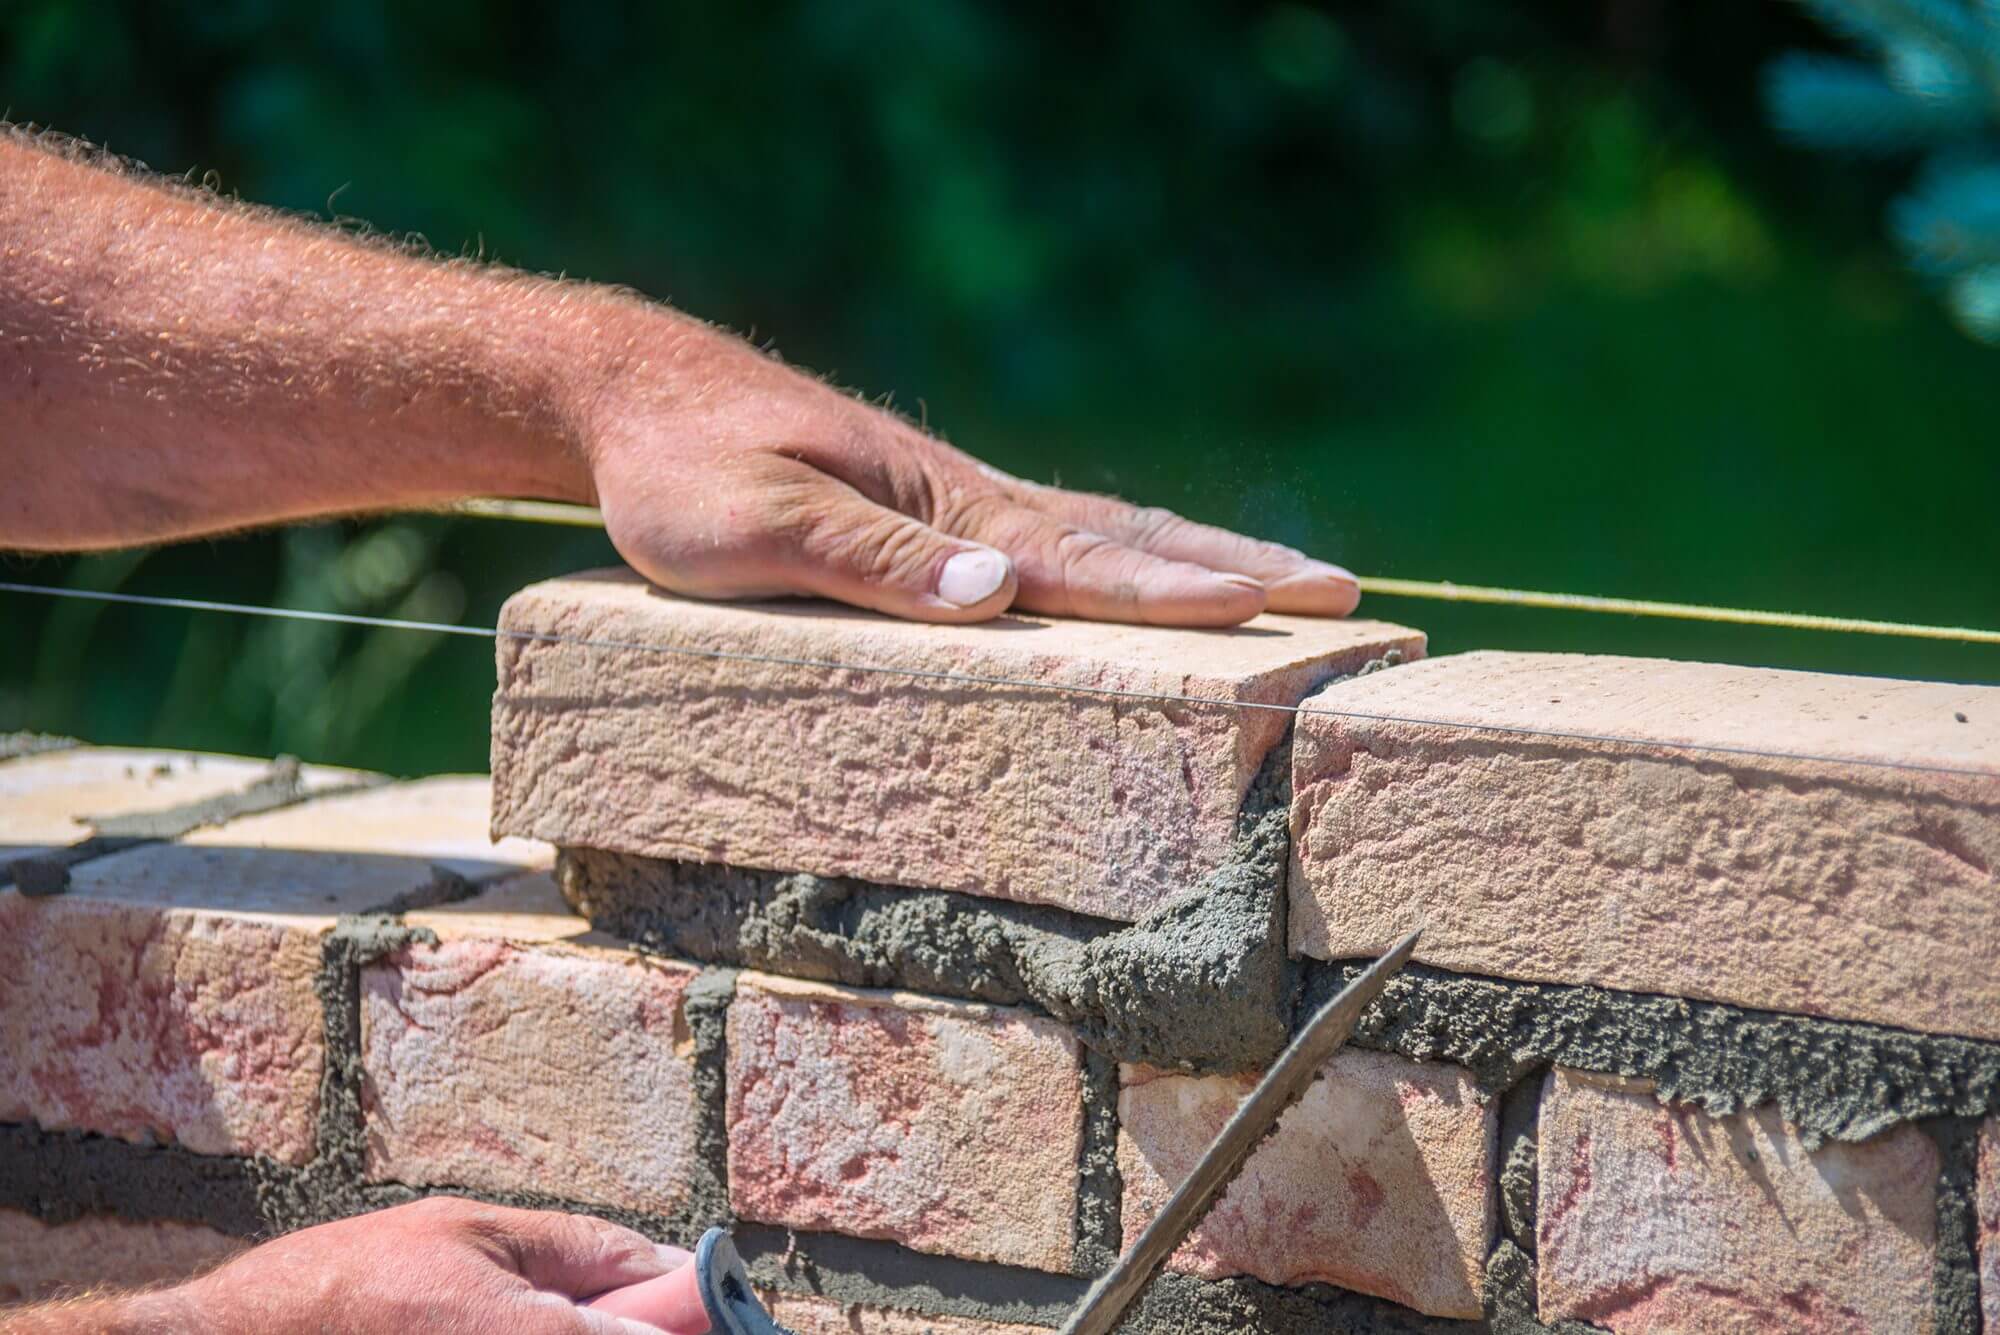
Step 4: Build the Hearth
Now comes the exciting phase of bringing your brick hearth to life. Building the hearth involves the meticulous arrangement of bricks, the application of mortar, and the creation of a visually stunning and structurally sound structure. Follow these essential steps to construct your brick hearth:
Layout Design:
Begin by planning the layout of the bricks, considering the desired pattern and design for your hearth. Whether you opt for a classic herringbone pattern, a contemporary stacked layout, or a custom design, visualize the arrangement before proceeding with the construction.
Applying Mortar:
Use a trowel to apply mortar to the surface where the bricks will be placed. Ensure that the mortar is evenly spread and of the appropriate thickness to support the bricks securely.
Placing the Bricks:
Carefully position each brick in the designated layout, pressing them firmly into the mortar. Use a level to ensure that the bricks are aligned and evenly positioned, maintaining a uniform and aesthetically pleasing appearance.
Read more: How To Build A Brick Column
Creating Joints:
As you lay each brick, leave a small gap between them to create mortar joints. Use a jointer tool to smooth and shape the mortar joints, enhancing the overall finish of the hearth.
Building Layers:
Continue layering the bricks and applying mortar, ensuring that each layer is level and stable before progressing to the next. Pay attention to the vertical and horizontal alignment of the bricks to maintain the structural integrity of the hearth.
Customization and Detailing:
As you progress, customize the design by incorporating special bricks, creating decorative patterns, or adding unique features to personalize the hearth to your preferences.
Allow for Set Time:
Once the bricklaying is complete, allow the mortar to set and cure according to the manufacturer’s recommendations. This crucial step ensures the strength and durability of the brickwork.
By following these steps, you’ll transform a collection of bricks and mortar into a stunning and functional brick hearth. Each carefully placed brick contributes to the creation of a captivating focal point that adds warmth, charm, and character to your living space.
Read more: How To Build A Brick Arch
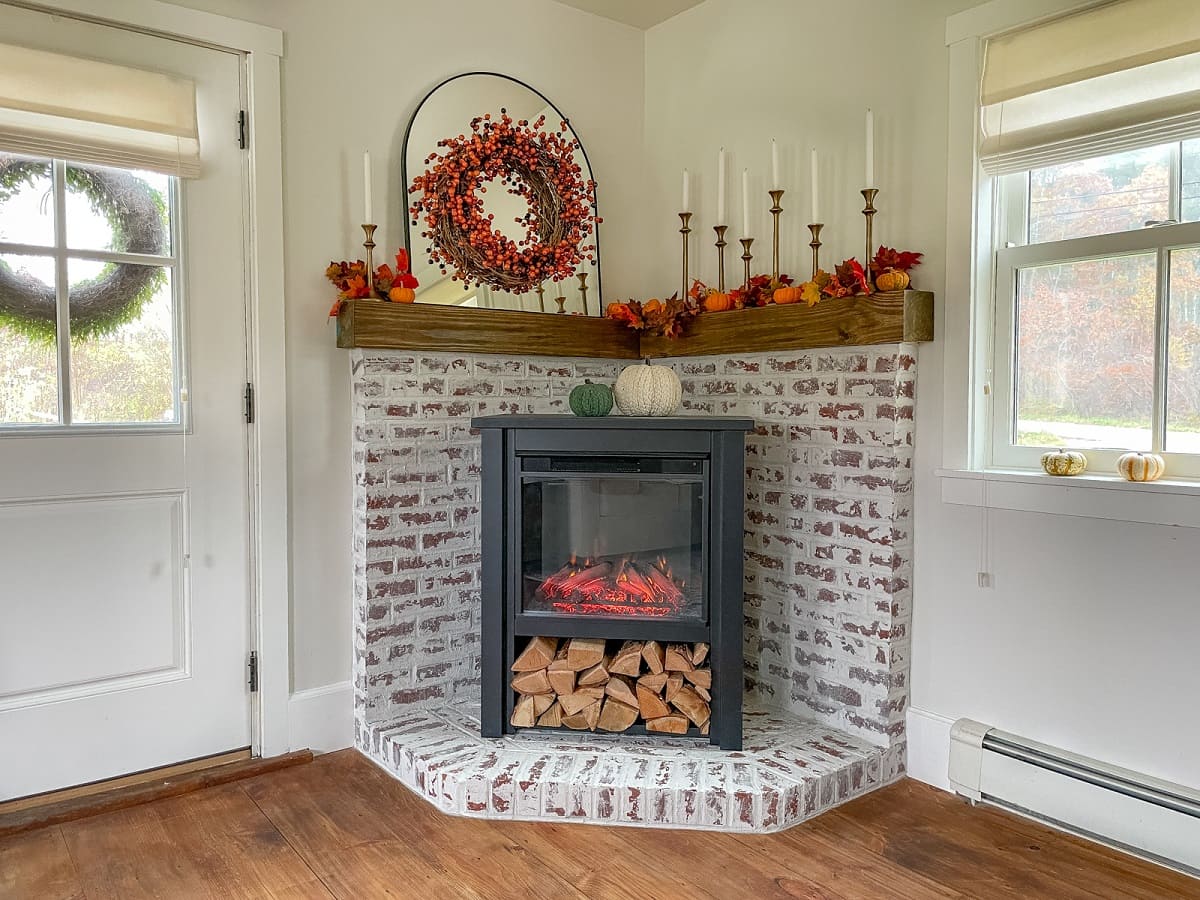
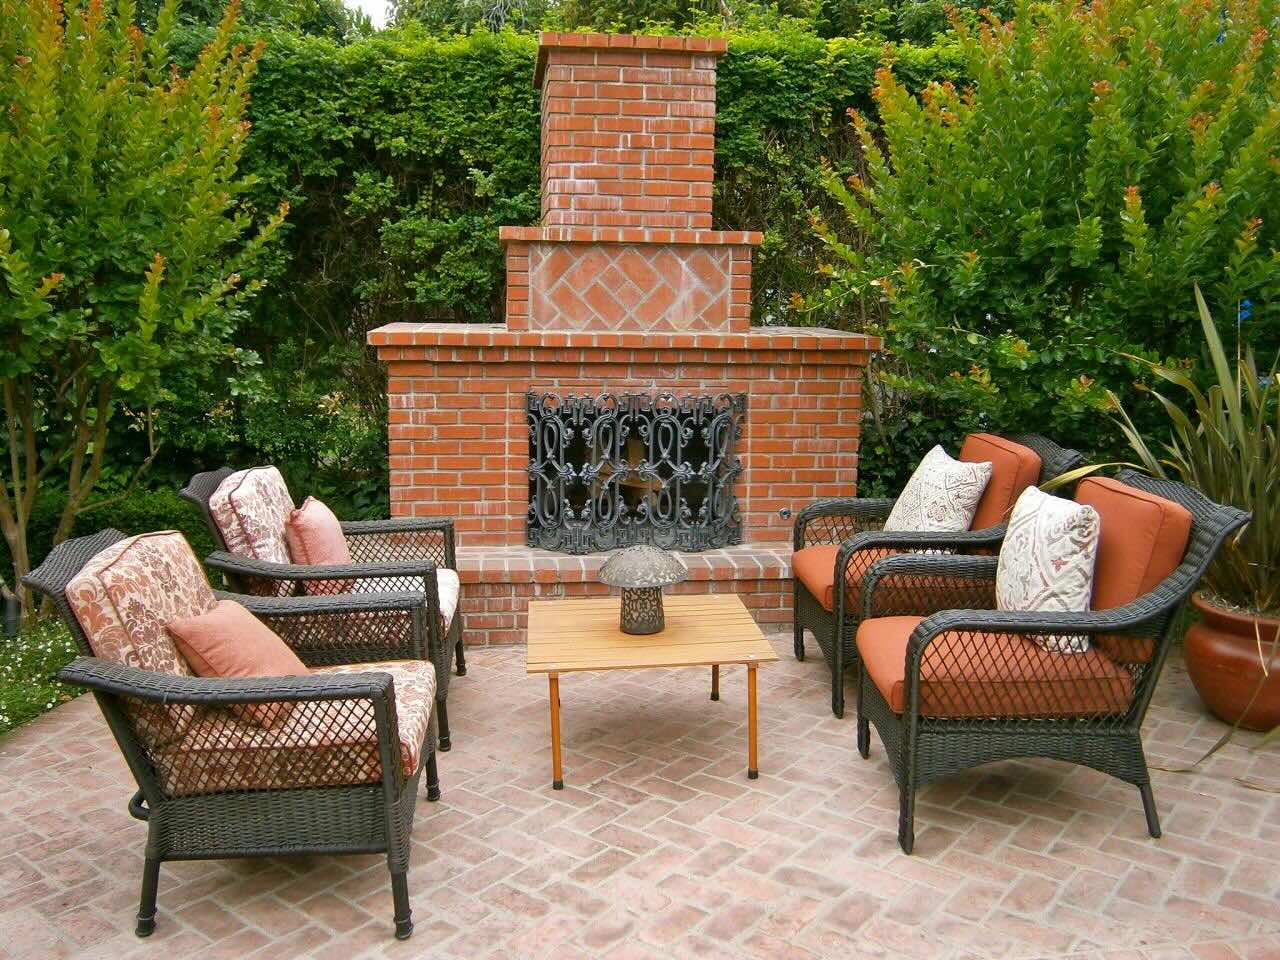
Step 5: Finishing Touches
As you near the completion of your brick hearth, it’s time to add the finishing touches that will elevate its visual appeal and ensure its functionality. These final steps will bring your project to fruition, creating a captivating centerpiece for your home. Let’s explore the essential finishing touches for your brick hearth:
Cleaning and Sealing:
Once the mortar has fully cured, clean the surface of the bricks and mortar joints to remove any residual mortar and debris. Consider applying a suitable sealer to protect the bricks and mortar, enhancing their longevity and resistance to stains and moisture.
Accessorizing:
Enhance the aesthetic appeal of your hearth by adding complementary accessories such as a decorative fire screen, a mantel shelf, or personalized accents that reflect your style and preferences. These additions contribute to the overall ambiance of the hearth and the surrounding space.
Functional Additions:
If your design includes a fireplace or wood-burning stove, ensure that the necessary functional components, such as a firebox, flue, and damper, are installed and operational. These elements are essential for the safe and efficient use of the hearth.
Read more: How To Build A Brick Pathway
Decorative Elements:
Consider incorporating decorative elements such as ceramic tiles, natural stone accents, or custom detailing to enhance the visual impact of the hearth. These embellishments add a touch of artistry and individuality to the overall design.
Final Inspection:
Conduct a thorough inspection of the completed hearth, verifying the structural integrity, alignment, and overall craftsmanship. Address any minor adjustments or touch-ups to ensure that the hearth meets your expectations and safety standards.
Enjoying the Hearth:
Once the finishing touches are in place, take a moment to bask in the warmth and beauty of your newly constructed brick hearth. Whether it’s cozying up by the fire on a chilly evening or simply admiring the craftsmanship, savor the fulfillment of bringing this captivating feature to life in your home.
With the completion of these finishing touches, your brick hearth stands as a testament to your creativity and craftsmanship, adding a touch of timeless allure and functionality to your living space. Embrace the warmth and ambiance it brings, knowing that you’ve successfully transformed raw materials into a captivating centerpiece that enriches the heart of your home.
Conclusion
Congratulations on successfully completing the construction of your brick hearth! This journey has been a testament to your dedication, creativity, and craftsmanship, resulting in a captivating centerpiece that adds warmth, character, and visual appeal to your home. As you reflect on the process and admire the finished hearth, it’s important to acknowledge the transformative power of this project.
Building a brick hearth is not merely a construction endeavor; it’s a journey of creativity and self-expression. From the meticulous planning of the layout to the precise placement of each brick, you’ve infused your personal touch into every aspect of the hearth’s creation. This hands-on approach has not only yielded a stunning focal point but has also fostered a deep sense of pride and accomplishment.
Furthermore, the construction of the hearth has added value to your living space, creating a gathering point for cherished moments and conversations. Whether it’s the crackling warmth of a fire on a winter’s night or the visual allure of the hearth as a year-round feature, its impact extends beyond its physical presence, enriching the ambiance and comfort of your home.
As you enjoy the fruits of your labor, take pride in the craftsmanship and attention to detail that have brought the hearth to life. Every brick laid and every finishing touch applied has contributed to the creation of a timeless and enduring feature that will be cherished for years to come.
May your brick hearth serve as a source of joy, comfort, and inspiration, igniting moments of togetherness and reflection in the heart of your home. Your dedication to this project has not only resulted in a striking architectural element but has also enriched the essence of your living space, creating a welcoming and inviting atmosphere.
As you embark on future endeavors, may the experience of building a brick hearth serve as a reminder of your ingenuity, resilience, and the transformative power of hands-on craftsmanship. Whether it’s a DIY project or a creative pursuit, may you continue to infuse your surroundings with the warmth and beauty that reflect your unique vision and passion.
Once again, congratulations on the successful completion of your brick hearth. Embrace the comfort and charm it brings, knowing that you’ve created more than a structure – you’ve crafted a captivating centerpiece that embodies the spirit of your home.
Frequently Asked Questions about How To Build A Brick Hearth
Was this page helpful?
At Storables.com, we guarantee accurate and reliable information. Our content, validated by Expert Board Contributors, is crafted following stringent Editorial Policies. We're committed to providing you with well-researched, expert-backed insights for all your informational needs.


0 thoughts on “How To Build A Brick Hearth”