Home>Construction & Tools>Building Materials>How To Fix A Brick Wall That Is Separating
Building Materials
How To Fix A Brick Wall That Is Separating
Modified: October 20, 2024
Learn how to repair a separating brick wall with the right building materials and techniques. Fix the problem before it worsens with our expert tips.
(Many of the links in this article redirect to a specific reviewed product. Your purchase of these products through affiliate links helps to generate commission for Storables.com, at no extra cost. Learn more)
Introduction
Brick walls are renowned for their durability and timeless appeal, but over time, they can develop issues such as separating or cracking. These problems are not only unsightly but can also compromise the structural integrity of the wall. Fortunately, with the right knowledge and tools, you can effectively address these issues and restore the beauty and stability of your brick wall.
In this comprehensive guide, we will explore the step-by-step process of fixing a brick wall that is separating. From assessing the damage to executing the necessary repairs and finishing touches, you will gain valuable insights into rejuvenating your brick wall with confidence and precision. Whether you are a seasoned DIY enthusiast or a novice homeowner, this article will equip you with the expertise to tackle this common maintenance issue effectively.
Join us on this journey as we delve into the art of brick wall repair, empowering you to transform a deteriorating wall into a testament of resilience and craftsmanship.
Key Takeaways:
- Assess the Damage Before Repair
Thoroughly inspect your brick wall for cracks, gaps, and structural stability. Consider environmental factors and internal examination to understand the damage and plan effective repairs. - Gather Tools and Materials for Repair
Prepare essential tools like masonry chisel, wire brush, and mortar mix. Get materials such as brick sealant and replacement bricks to streamline the repair process and restore your brick wall with confidence.
Read more: How To Fix Stairs Separating From Wall
Assessing the Damage
Before embarking on the repair process, it is crucial to conduct a thorough assessment of the damage to your brick wall. This initial step will provide valuable insights into the extent of the separation and guide you in determining the most appropriate course of action. Here are the key aspects to consider when assessing the damage:
- Visual Inspection: Begin by visually examining the entire surface of the brick wall. Look for any noticeable cracks, gaps, or areas where the bricks appear to be pulling away from each other. Take note of the location and size of the separations, as well as any surrounding factors that may have contributed to the damage.
- Structural Integrity: Assess the structural stability of the wall by gently pressing against the affected areas. Pay attention to any significant movement or give in the bricks, as this could indicate a more serious issue that requires immediate attention.
- Weather and Environmental Factors: Consider the environmental conditions that may have impacted the wall, such as extreme temperature fluctuations, moisture exposure, or seismic activity. Understanding the potential causes of the separation will aid in implementing preventive measures during the repair process.
- Internal Examination: If possible, inspect the interior side of the wall to identify any signs of damage or displacement from the opposite surface. This internal assessment can provide valuable insights into the underlying causes of the separation and inform your repair strategy.
By meticulously evaluating these factors, you will gain a comprehensive understanding of the condition of your brick wall and be better equipped to proceed with the necessary repairs. Remember that a detailed assessment is the foundation of effective repair work, allowing you to address the root causes of the separation and restore the wall to its former strength and resilience.
Gathering the Necessary Tools and Materials
Before initiating the repair process, it is essential to assemble the requisite tools and materials to ensure a smooth and efficient restoration of your brick wall. By having the following items on hand, you will be well-prepared to address the separation and execute the necessary repairs:
Tools:
- Masonry Chisel and Hammer: These tools are indispensable for carefully removing loose mortar and preparing the damaged areas for repair.
- Wire Brush: Utilized for cleaning the surface of the bricks and removing any debris or loose particles that may hinder the repair process.
- Trowel: An essential tool for applying new mortar and ensuring precise placement during the repair work.
- Mortar Mixing Tools: Depending on the scale of the repair, you may require a mixing container, margin trowel, and a reliable mortar mix to prepare the bonding agent for the bricks.
- Safety Gear: Prioritize your safety by wearing protective gloves, safety goggles, and a dust mask to shield yourself from potential hazards during the repair process.
Materials:
- Mortar Mix: Select a high-quality mortar mix that is compatible with the composition of your existing mortar and capable of providing strong adhesion to the bricks.
- Brick Sealant: Consider using a reputable brick sealant to safeguard the repaired areas from moisture infiltration and enhance the longevity of the wall.
- Replacement Bricks: If the damage to the wall necessitates the replacement of bricks, ensure that you have matching replacement bricks on hand to seamlessly integrate them into the structure.
- Waterproofing Compound: Opt for a reliable waterproofing compound to fortify the repaired sections against water penetration and weather-related deterioration.
- Clean Water: Having access to clean water is essential for mixing the mortar and facilitating the cleaning process before and after the repairs.
By procuring these tools and materials in advance, you will streamline the repair process and minimize disruptions, enabling you to focus on restoring the integrity and aesthetics of your brick wall with confidence and efficiency.
Read more: How To Render A Brick Wall
Repairing Small Cracks
Small cracks in a brick wall can detract from its visual appeal and compromise its structural integrity if left unaddressed. Fortunately, with the right approach, you can effectively repair these minor imperfections and prevent them from escalating into more significant issues. Follow these steps to mend small cracks in your brick wall:
- Clean the Area: Begin by using a wire brush to remove any debris, loose mortar, or dirt from the cracked area. Ensure that the surface is clean and free from any impediments that could hinder the repair process.
- Prepare the Mortar: Mix a small batch of mortar according to the manufacturer’s instructions, ensuring that it achieves a smooth and workable consistency. Use a margin trowel for precise mixing and to attain the desired texture.
- Apply the Mortar: Using a trowel, carefully apply the mortar into the crack, ensuring that it fills the entire void and adheres firmly to the surrounding bricks. Smooth the surface of the mortar to achieve a seamless blend with the existing mortar joints.
- Shape and Finish: Once the mortar is in place, shape it to match the contour of the surrounding mortar joints using the edge of the trowel or a specialized tool. This step is crucial for achieving a cohesive and visually appealing repair.
- Cure and Protect: Allow the repaired area to cure as per the mortar manufacturer’s recommendations. Once fully cured, consider applying a suitable brick sealant to fortify the repair and shield it from environmental elements.
By diligently following these steps, you can effectively address small cracks in your brick wall, restoring its integrity and aesthetic allure. Remember that timely intervention and meticulous execution can prevent minor cracks from developing into more severe structural issues, preserving the beauty and strength of your brick wall for years to come.
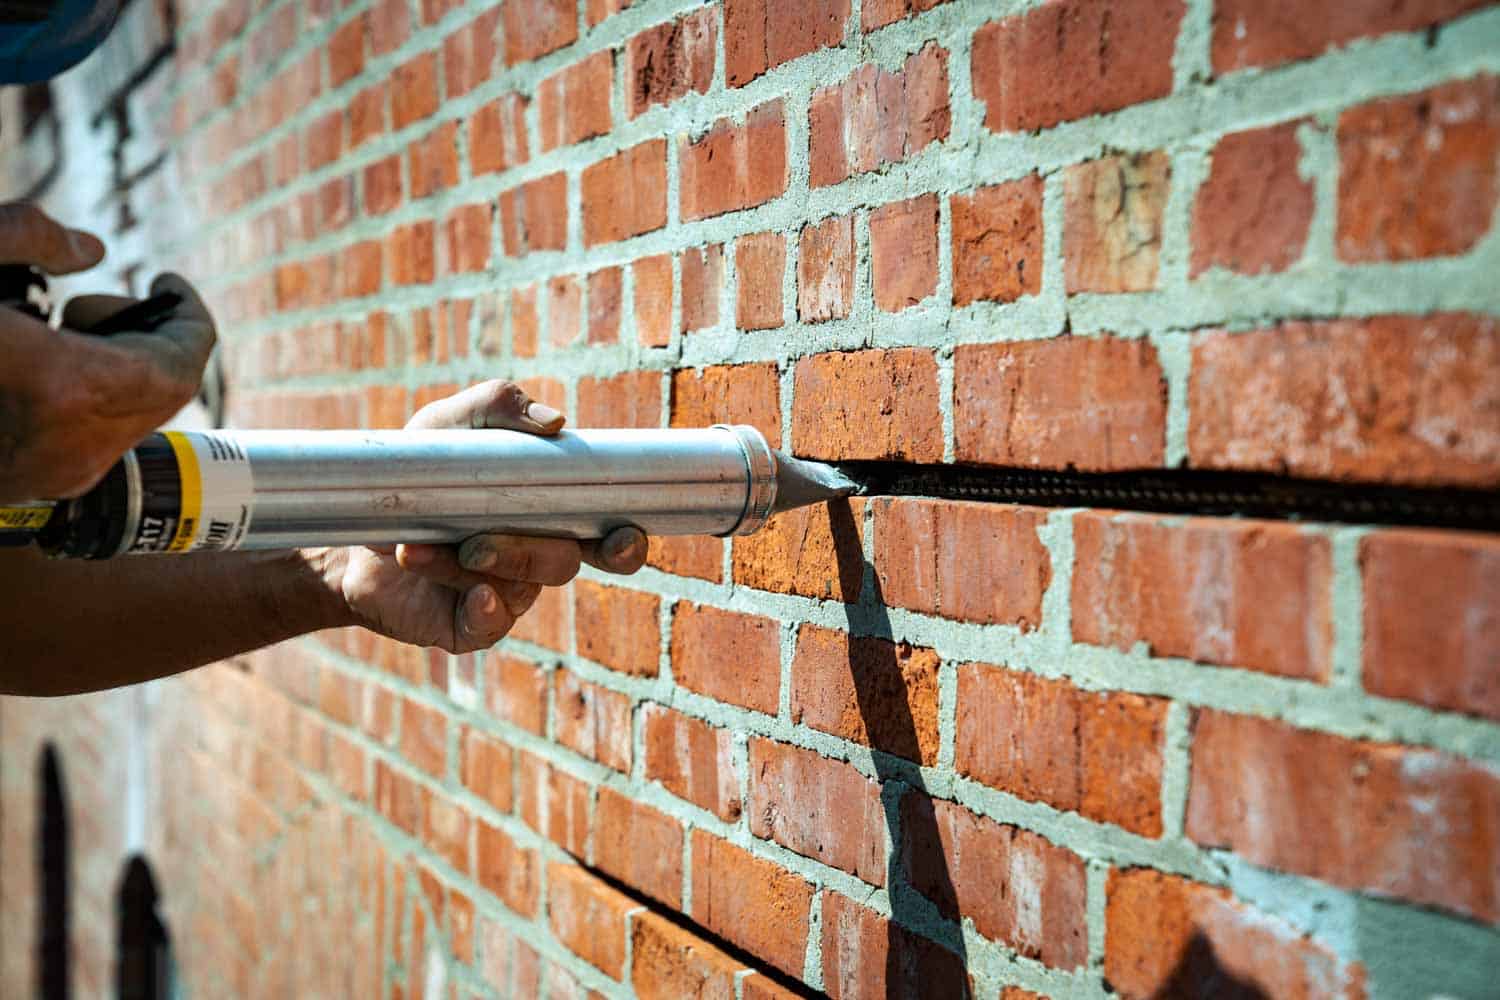
Fixing Larger Separations
When faced with larger separations in a brick wall, it is essential to approach the repair process with precision and care to ensure a seamless and enduring restoration. Addressing significant separations requires a methodical approach and the utilization of specialized techniques to effectively mend the compromised areas. Follow these steps to fix larger separations in your brick wall:
- Assess the Extent of the Separation: Evaluate the size and depth of the separation to determine the scope of the repair. Large separations may require more extensive measures to achieve a robust and lasting solution.
- Prepare the Area: Use a masonry chisel and hammer to carefully remove any loose bricks or deteriorated mortar from the separated area. Ensure that the surface is clean and free from debris to facilitate optimal adhesion during the repair process.
- Rebuild and Realign: If the separation has caused bricks to become displaced, carefully realign and reposition them to restore the structural integrity of the wall. Use a suitable mortar mix to secure the bricks in place, ensuring a strong and durable bond.
- Fill the Gaps: Apply mortar to the gaps and voids created by the separation, ensuring that it thoroughly fills the spaces and provides robust support to the surrounding bricks. Use a trowel to shape and contour the mortar to seamlessly blend with the existing mortar joints.
- Finishing Touches: Once the repair is complete, inspect the area to ensure that the mortar is properly shaped and aligned with the surrounding joints. Consider using a wire brush to gently remove any excess mortar and achieve a uniform appearance.
- Protect and Maintain: After allowing the repair to cure, consider applying a high-quality brick sealant to safeguard the repaired sections from moisture and environmental elements. Regular maintenance and inspections will help preserve the integrity of the repaired areas over time.
By meticulously executing these steps, you can effectively address larger separations in your brick wall, restoring its strength and visual appeal. Remember that patience and precision are key to achieving a durable and aesthetically pleasing repair that will stand the test of time.
Use a chisel and hammer to remove loose mortar. Apply new mortar with a trowel, pressing firmly. Use a level to ensure the bricks are aligned.
Finishing Touches and Maintenance
Upon completing the repair of your brick wall, attention to finishing touches and ongoing maintenance is essential to ensure the longevity and resilience of the restored structure. By incorporating meticulous finishing touches and implementing a proactive maintenance strategy, you can preserve the beauty and structural integrity of your brick wall for years to come.
Finishing Touches:
After the repair work is done, take the following steps to enhance the overall appearance and durability of the wall:
- Inspect and Refine: Conduct a thorough inspection of the repaired areas, ensuring that the mortar is uniformly shaped and aligned with the existing mortar joints. Use a wire brush to gently refine the appearance of the mortar and achieve a seamless integration with the surrounding surface.
- Apply Brick Sealant: Consider applying a high-quality brick sealant to the entire repaired section of the wall. This protective sealant will fortify the mortar, shield it from moisture infiltration, and enhance the overall resilience of the repaired areas.
- Ensure Consistent Color: If the repaired sections appear noticeably different in color from the rest of the wall, consider using a suitable brick stain or tinted sealant to achieve a harmonious and consistent aesthetic throughout the structure.
Read more: How To Point A Brick Wall
Maintenance:
To uphold the structural integrity and visual appeal of your brick wall, implement the following maintenance practices:
- Regular Inspections: Periodically inspect the entire surface of the wall for signs of new cracks, separations, or areas of deteriorating mortar. Timely identification of potential issues will allow for prompt intervention and prevent minor concerns from escalating.
- Cleaning and Protection: Clean the brick wall periodically to remove dirt, debris, and organic growth that can compromise its appearance and structural integrity. Additionally, reapply brick sealant as needed to reinforce the protective barrier against environmental elements.
- Addressing Emerging Issues: If new separations or cracks emerge, promptly address them using the appropriate repair techniques to prevent further deterioration and maintain the structural soundness of the wall.
By attending to these finishing touches and embracing a proactive maintenance regimen, you can safeguard the structural integrity and visual allure of your brick wall, ensuring that it remains a steadfast and enduring feature of your property for years to come.
Frequently Asked Questions about How To Fix A Brick Wall That Is Separating
Was this page helpful?
At Storables.com, we guarantee accurate and reliable information. Our content, validated by Expert Board Contributors, is crafted following stringent Editorial Policies. We're committed to providing you with well-researched, expert-backed insights for all your informational needs.


0 thoughts on “How To Fix A Brick Wall That Is Separating”