Home>Construction & Tools>Building Materials>How To Restore Brick Wall

Building Materials
How To Restore Brick Wall
Modified: August 28, 2024
Learn how to restore a brick wall using the best building materials and techniques. Our expert guide will help you achieve a professional finish. Discover the secrets to a successful brick wall restoration project.
(Many of the links in this article redirect to a specific reviewed product. Your purchase of these products through affiliate links helps to generate commission for Storables.com, at no extra cost. Learn more)
**
Introduction
**
Restoring a brick wall can breathe new life into the facade of a building, adding charm and character to the overall aesthetic. Whether it's a weathered exterior wall or a fireplace in need of rejuvenation, the process of restoring a brick wall requires patience, attention to detail, and the right materials. In this comprehensive guide, we will explore the step-by-step process of restoring a brick wall, from assessing the damage to sealing and protecting the restored surface.
Restoring a brick wall is not only about enhancing its visual appeal but also about ensuring its structural integrity. Over time, bricks can deteriorate due to exposure to the elements, moisture, and general wear and tear. The mortar joints between the bricks can also degrade, leading to potential structural issues. By undertaking a restoration project, you can address these concerns and preserve the longevity of the brick wall.
Whether you're a seasoned DIY enthusiast or a homeowner looking to embark on a rewarding project, this guide will equip you with the knowledge and insights needed to restore a brick wall effectively. From assessing the damage to gathering the necessary materials and tools, each step plays a crucial role in the restoration process. By following the guidelines outlined in this article, you can revitalize a weathered brick wall and take pride in the transformation it brings to your space.
Throughout this guide, we will delve into the intricacies of cleaning the brick surface, repairing damaged bricks, replacing missing bricks, repointing mortar joints, and sealing the restored brick wall. Each of these steps is essential in the restoration journey, and we will provide detailed instructions and valuable tips to ensure a successful outcome.
By the end of this article, you will have a comprehensive understanding of the brick wall restoration process, empowering you to tackle this project with confidence and precision. So, roll up your sleeves, gather your tools, and let's embark on the fulfilling endeavor of restoring a brick wall to its former glory.
**
Key Takeaways:
- Restoring a brick wall involves assessing damage, gathering materials, cleaning the surface, repairing and replacing bricks, repointing mortar joints, and sealing the wall. Each step is crucial for a successful restoration.
- By following a systematic process, including thorough cleaning, precise repairs, and protective sealing, a weathered brick wall can be rejuvenated, preserving its structural integrity and enhancing its visual appeal.
Read more: How To Restore Brick Color
Assessing the Damage
**
Before diving into the restoration process, it is crucial to assess the extent of damage to the brick wall. A thorough evaluation will help determine the necessary steps and materials required for the restoration project. Here are the key aspects to consider when assessing the damage:
- Visual Inspection: Begin by visually inspecting the entire brick wall, paying close attention to any signs of deterioration, cracks, or discoloration. Note the areas where the mortar joints appear worn or damaged.
- Structural Integrity: Assess the structural integrity of the wall by checking for any loose or unstable bricks. Gently tap each brick with a rubber mallet to identify any hollow-sounding or loose units that may need attention.
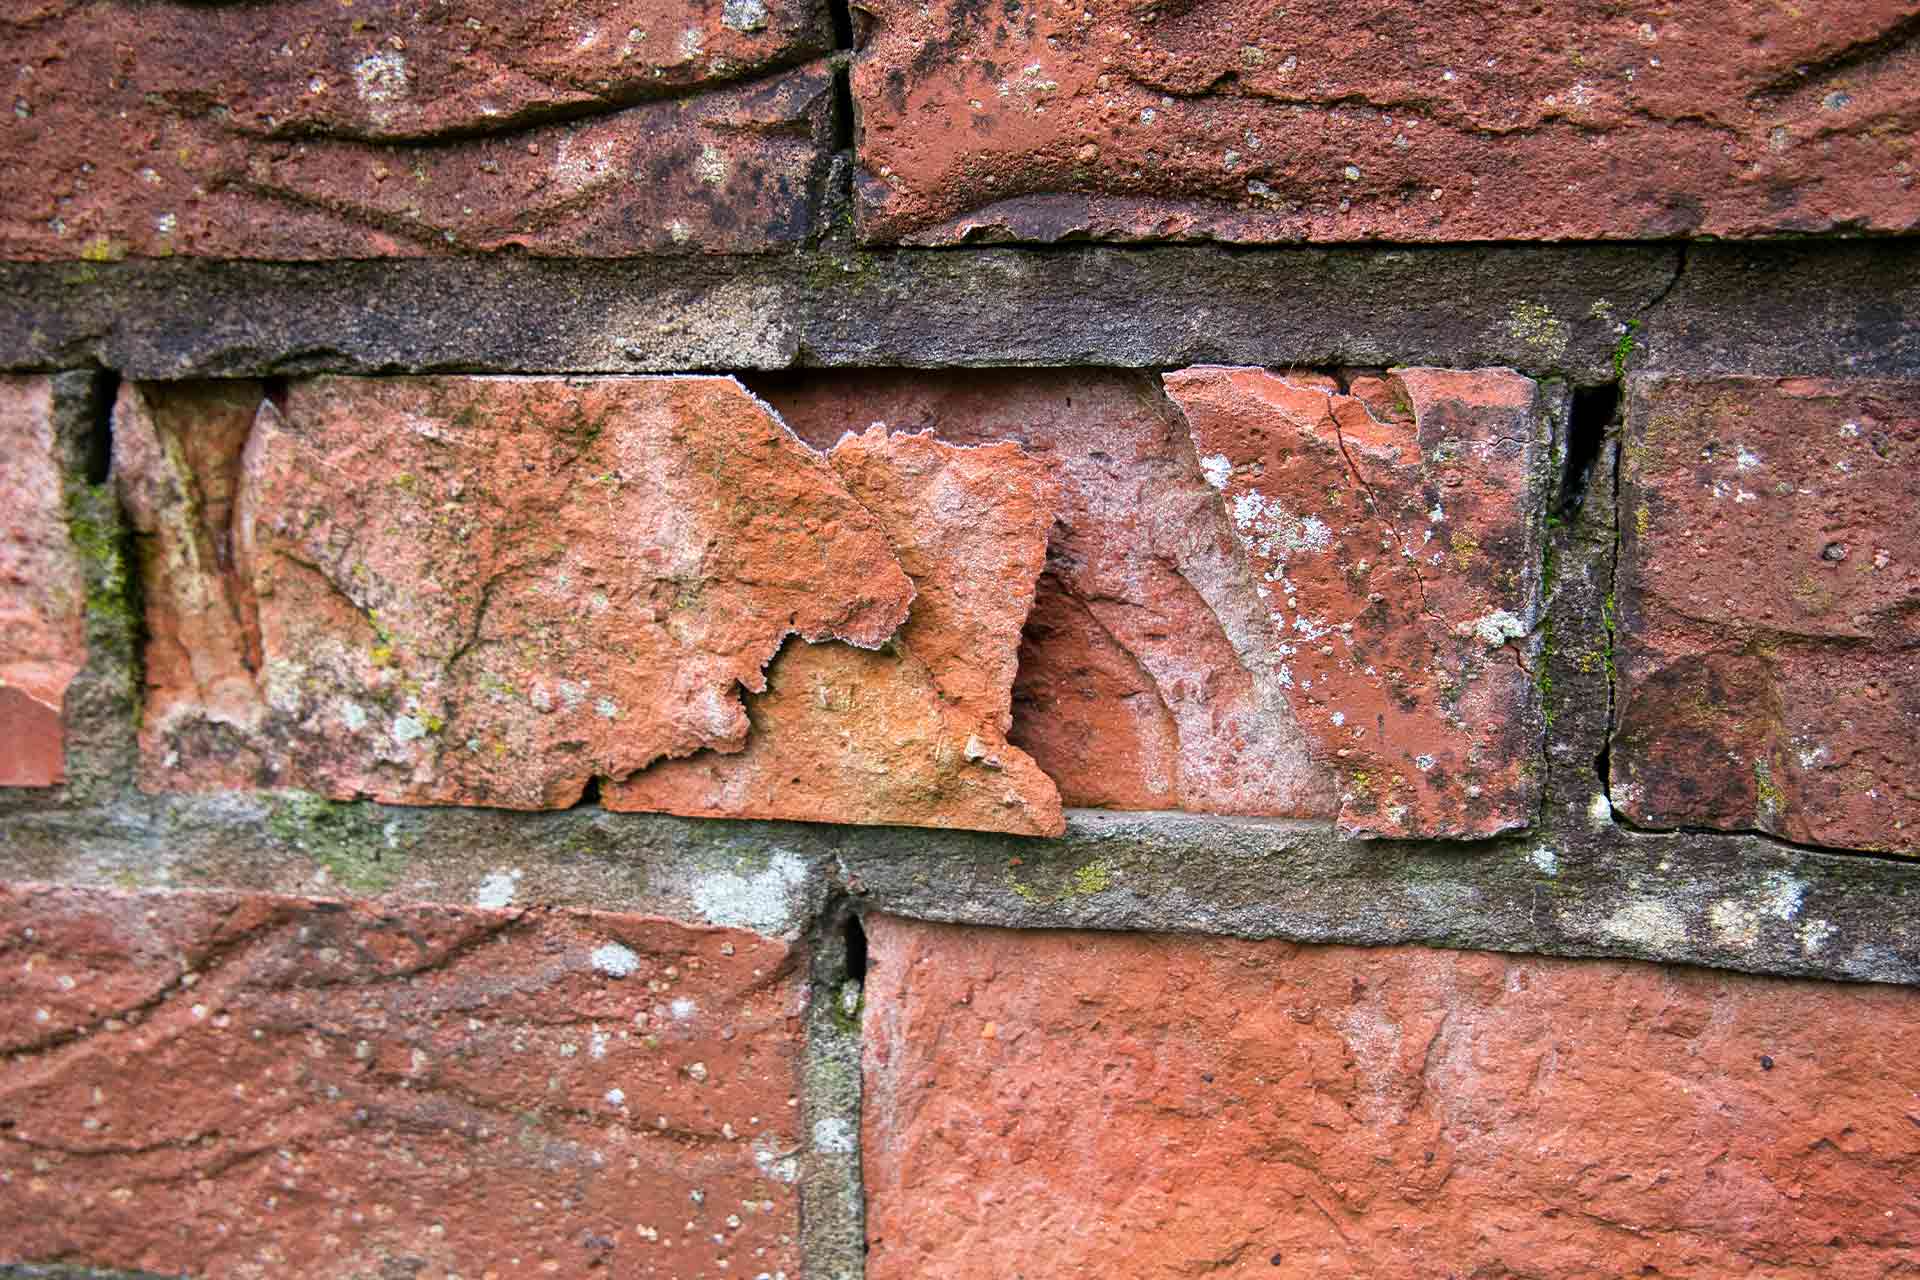
- Moisture Damage: Look for signs of moisture damage, such as efflorescence (white powdery deposits) on the surface of the bricks, which can indicate water infiltration and potential deterioration.
- Mortar Condition: Evaluate the condition of the mortar joints, noting any areas where the mortar has crumbled or eroded. Pay attention to the depth of the mortar joints, as excessive erosion can compromise the stability of the wall.
By conducting a comprehensive assessment, you will gain a clear understanding of the specific issues plaguing the brick wall. This knowledge will inform the subsequent steps in the restoration process, guiding your approach to cleaning, repairing, and preserving the integrity of the wall.
Furthermore, documenting the areas of damage through photographs can serve as a valuable reference throughout the restoration journey. These visual records will aid in tracking the progress of the project and identifying the areas that require focused attention.
Once the assessment is complete, you will be equipped with a detailed overview of the condition of the brick wall, laying the groundwork for a targeted and effective restoration plan. With a clear understanding of the damage at hand, you can proceed to gather the necessary materials and tools for the subsequent phases of the restoration process.
**
Gathering Materials and Tools
**
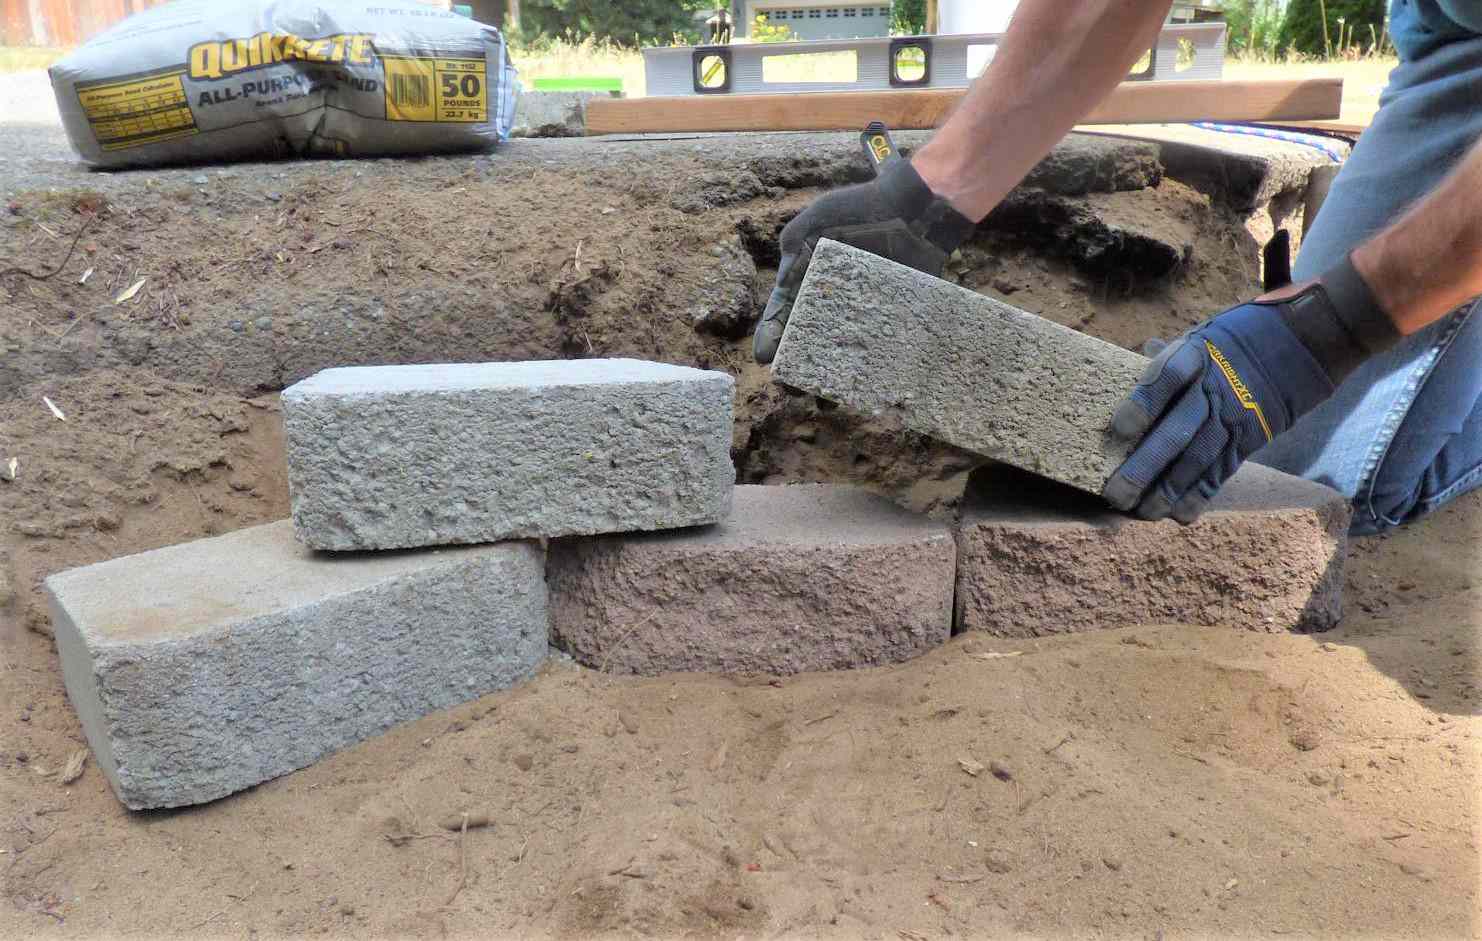
Embarking on a brick wall restoration project necessitates the acquisition of specific materials and tools to ensure a thorough and successful undertaking. From cleaning solutions to mortar mix, the following items are essential for the restoration process:
- Cleaning Solutions: Select a high-quality brick cleaner or a mild detergent that is suitable for removing dirt, grime, and efflorescence from the surface of the bricks. Additionally, consider acquiring a stiff-bristled brush for scrubbing stubborn stains.
- Safety Gear: Prioritize safety by obtaining protective gear, including goggles, gloves, and a respirator, to shield yourself from potential exposure to cleaning chemicals and airborne particles.
- Repair Mortar: Invest in a durable and color-matched mortar mix for repairing damaged mortar joints. Ensure that the mortar blend complements the existing color and texture of the wall for a seamless finish.
- Brick Repair Compound: Acquire a reliable brick repair compound designed to fill cracks and voids in the bricks, restoring their structural integrity and visual appeal.
- Masonry Tools: Gather essential masonry tools such as a pointing trowel, margin trowel, joint raker, and brick hammer to facilitate precise and efficient repair work.
- Replacement Bricks: If the assessment reveals missing or severely damaged bricks, procure replacement bricks that closely match the size, texture, and color of the existing ones.
- Sealant: Select a high-quality masonry sealant to protect the restored brick wall from moisture infiltration and environmental elements, enhancing its durability and longevity.
While gathering the necessary materials, it is equally important to assemble a comprehensive set of tools to execute the restoration tasks effectively. Ensure that you have access to a sturdy ladder, a wheelbarrow for mixing mortar, and a reliable caulking gun for applying sealant.
By proactively acquiring the essential materials and tools, you will streamline the restoration process and minimize interruptions during the project. Additionally, investing in high-quality products and reliable tools will contribute to the overall quality and longevity of the restored brick wall.
With the materials and tools at your disposal, you are now prepared to proceed to the subsequent phases of the restoration process, beginning with the crucial step of cleaning the brick surface to prepare it for repair and rejuvenation.
**
Cleaning the Brick Surface
**
Preparing the brick surface for restoration entails thorough cleaning to remove accumulated dirt, grime, and efflorescence, unveiling the natural beauty of the bricks. The following steps outline the process of cleaning the brick surface effectively:
- Preparation: Prior to cleaning, protect surrounding areas and landscaping by covering them with plastic sheeting or drop cloths. This precaution will prevent cleaning solutions and debris from causing unintended damage.
- Test Cleaning Solution: Before applying the cleaning solution to the entire surface, conduct a small-scale test in an inconspicuous area to ensure compatibility and assess the effectiveness of the product.
- Application: Dilute the chosen brick cleaner or mild detergent as per the manufacturer’s instructions. Apply the solution to the brick surface using a sprayer or a brush, ensuring thorough coverage of the entire area.
- Scrubbing: Utilize a stiff-bristled brush to scrub the bricks, focusing on areas with stubborn stains or discoloration. Employ circular or back-and-forth motions to dislodge dirt and grime effectively.
- Rinsing: After allowing the cleaning solution to dwell for the recommended duration, rinse the bricks thoroughly with water. Use a garden hose or a pressure washer set to a gentle setting to avoid damaging the bricks.
- Efflorescence Removal: Address efflorescence by gently scrubbing the affected areas with a solution of white vinegar and water, followed by a thorough rinse to eliminate the white powdery deposits.
Effective cleaning not only revitalizes the appearance of the brick wall but also creates an optimal foundation for subsequent repair and restoration efforts. By meticulously removing dirt, grime, and efflorescence, you pave the way for seamless repairs and a visually appealing outcome.
Upon completing the cleaning process, allow the brick surface to dry completely before proceeding to the next phase of the restoration project. This essential step sets the stage for addressing damaged bricks, replacing missing units, and rejuvenating the mortar joints to restore the structural and aesthetic integrity of the wall.
With the brick surface now cleansed and ready for repair, the subsequent steps will focus on addressing specific issues such as repairing damaged bricks, replacing missing units, and repointing the mortar joints to rejuvenate the overall appearance and structural stability of the wall.
**
To restore a brick wall, start by cleaning the surface with a wire brush and water. Then, repair any damaged bricks or mortar. Finally, apply a new coat of masonry sealer to protect the wall from future damage.
Repairing Damaged Bricks
**
Addressing damaged bricks is a critical aspect of restoring a brick wall, as it directly impacts both the structural integrity and visual appeal of the surface. The following steps outline the process of repairing damaged bricks effectively:
- Assessment: Begin by identifying the extent of damage to the bricks, including cracks, chips, or spalling. Evaluate whether the damage is superficial or if it compromises the structural stability of the wall.
- Cleaning: Thoroughly clean the damaged areas to remove debris, loose mortar, and any contaminants that may hinder the repair process. Use a brush and a gentle cleaning solution to prepare the surface for repair.
- Preparation: If the damage is minor, consider using a reliable brick repair compound to fill in cracks and voids. For more extensive damage, carefully remove the damaged brick using a cold chisel and a hammer, ensuring the surrounding bricks remain intact.
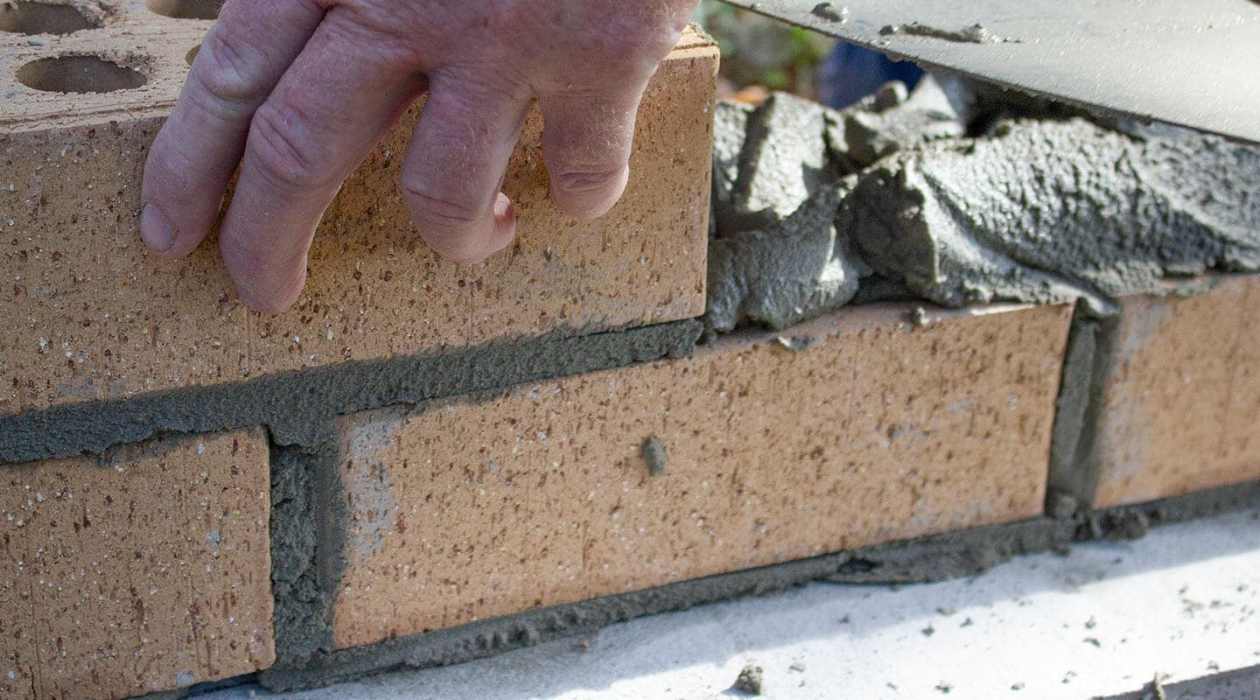
- Replacement: In cases where the damage is severe, carefully remove the damaged brick and replace it with a new unit that matches the size, texture, and color of the existing bricks. Apply mortar to the replacement brick and position it securely in place.
- Mortar Application: For minor repairs, apply the brick repair compound to the damaged areas using a trowel, ensuring a smooth and even application. If replacing a brick, apply mortar to the surrounding joints and press the new brick into place, aligning it with the existing pattern.
- Finishing: Once the repair compound or mortar has been applied, use a jointing tool or a pointed trowel to match the texture of the surrounding mortar joints, creating a cohesive and seamless finish.
By meticulously addressing damaged bricks, you not only restore the structural integrity of the wall but also preserve its visual appeal. Whether through minor repairs using specialized compounds or the replacement of severely damaged bricks, each action contributes to the overall rejuvenation of the brick surface.
Upon completing the repair of damaged bricks, the restoration process progresses to the next crucial phase: replacing missing bricks to ensure the uniformity and integrity of the wall. By seamlessly integrating new bricks and addressing voids in the surface, you will further enhance the overall appearance and durability of the restored brick wall.
**
Read more: How To Render A Brick Wall
Replacing Missing Bricks
**
Replacing missing bricks is a pivotal step in the restoration process, ensuring the structural integrity and visual cohesion of the brick wall. The following guidelines outline the systematic approach to replacing missing bricks effectively:
- Identification: Identify areas where bricks are missing or severely damaged, creating voids in the wall. Assess the surrounding bricks to determine their size, texture, and color, facilitating the selection of suitable replacement units.
- Brick Removal: Carefully remove any residual debris, mortar, or obstructions from the void left by the missing brick. Use a cold chisel and a hammer to gently dislodge any remaining mortar and create a clean, level surface for the new brick.
- Replacement Selection: Select replacement bricks that closely match the characteristics of the existing bricks, ensuring a seamless integration that harmonizes with the overall aesthetic of the wall.
- Mortar Application: Apply a layer of mortar to the void using a trowel, ensuring an even and consistent coverage that accommodates the dimensions of the replacement brick.
- Positioning: Place the replacement brick into the prepared void, pressing it firmly into the mortar bed while aligning it with the surrounding bricks to maintain a uniform and cohesive appearance.
- Mortar Finishing: Once the replacement brick is in position, address the mortar joints by using a jointing tool or a pointed trowel to match the texture and profile of the existing joints, creating a seamless transition between the new and old bricks.
By replacing missing bricks with precision and attention to detail, you contribute to the overall structural stability and visual continuity of the brick wall. Each carefully positioned replacement brick enriches the surface, ensuring a cohesive and harmonious presentation of the restored facade.
Following the successful replacement of missing bricks, the restoration journey progresses to the pivotal phase of repointing the mortar joints. This crucial step involves rejuvenating the mortar to enhance its strength and appearance, further fortifying the structural integrity of the brick wall.
**
Repointing the Mortar Joints
**
Repointing the mortar joints is a fundamental aspect of brick wall restoration, essential for fortifying the structural integrity and enhancing the overall appearance of the surface. The following steps outline the meticulous process of repointing the mortar joints effectively:
- Assessment: Assess the condition of the existing mortar joints, noting areas where erosion, cracking, or deterioration has occurred. Determine the depth of the joints and the type of mortar used in the original construction.
- Preparation: Utilize a joint raker or a suitable tool to remove deteriorated mortar from the joints, ensuring a clean and uniform depth that accommodates the application of new mortar.
- Mortar Mixing: Prepare a batch of mortar by combining the appropriate ratio of sand, cement, and water to achieve a consistent and workable blend. Ensure that the mortar matches the color and texture of the existing joints for a seamless finish.
- Joint Filling: Apply the freshly mixed mortar to the prepared joints using a pointing trowel, pressing it firmly to ensure complete filling and adhesion. Work in manageable sections to maintain control over the application process.
- Tooling: Once the mortar is in place, use a jointing tool or a striking iron to shape and compact the mortar, creating a uniform profile that aligns with the surrounding joints. This step contributes to the cohesive and visually appealing finish of the repointed joints.
- Cleaning: Carefully remove any excess mortar from the brick surface using a brush or a damp cloth, ensuring that the bricks remain free of mortar smears and blemishes. This meticulous cleaning process enhances the clarity and definition of the repointed joints.
By meticulously repointing the mortar joints, you rejuvenate the strength and stability of the brick wall while harmonizing the overall aesthetic presentation. The renewed mortar joints contribute to the cohesive and enduring integrity of the restored surface, ensuring its longevity and visual appeal.
Following the successful repointing of the mortar joints, the restoration process advances to the pivotal phase of sealing and protecting the restored brick wall. This essential step involves safeguarding the surface against environmental elements and moisture infiltration, preserving the integrity and beauty of the rejuvenated facade.
**
Sealing and Protecting the Restored Brick Wall
**
Sealing and protecting the restored brick wall is the final, crucial phase of the restoration process, ensuring the longevity, resilience, and visual allure of the rejuvenated surface. The following steps outline the essential process of sealing and safeguarding the restored brick wall effectively:
- Surface Inspection: Conduct a comprehensive inspection of the restored brick wall, ensuring that all repair, replacement, and repointing work has been completed to satisfaction. Address any remaining debris or smears to prepare the surface for sealing.
- Sealant Selection: Choose a high-quality masonry sealant that is specifically formulated to protect brick surfaces from moisture, UV exposure, and environmental contaminants. Select a sealant that enhances the natural appearance of the bricks without altering their texture or color.
- Application Preparation: Prepare the brick surface for sealing by ensuring it is clean, dry, and free of any residual mortar, dust, or debris. Protect surrounding areas from overspray or drips by covering them with plastic sheeting or drop cloths.
- Application Technique: Apply the masonry sealant using a brush, roller, or sprayer, ensuring even coverage across the entire surface. Work methodically to avoid missed areas and achieve a consistent application of the sealant.
- Drying Time: Allow the sealant to dry according to the manufacturer’s recommendations, ensuring that the brick wall remains undisturbed during the curing process. Adequate drying time is essential for the sealant to form a durable and protective barrier.
- Final Inspection: Conduct a final inspection of the sealed brick wall, ensuring that the sealant has created a uniform and resilient barrier across the surface. Address any touch-up areas or irregularities to achieve a flawless finish.
By sealing and protecting the restored brick wall, you fortify its resistance to moisture, weathering, and environmental factors, safeguarding the beauty and integrity of the rejuvenated facade. The application of a high-quality sealant serves as a proactive measure to preserve the restored surface and prolong its visual appeal for years to come.
With the completion of the sealing process, the brick wall restoration journey culminates in a surface that exudes enduring charm, structural strength, and timeless allure. The meticulous efforts invested in each phase of the restoration process converge to breathe new life into the brick wall, honoring its heritage while ensuring its resilience for the future.
Frequently Asked Questions about How To Restore Brick Wall
Was this page helpful?
At Storables.com, we guarantee accurate and reliable information. Our content, validated by Expert Board Contributors, is crafted following stringent Editorial Policies. We're committed to providing you with well-researched, expert-backed insights for all your informational needs.


0 thoughts on “How To Restore Brick Wall”