Home>diy>Architecture & Design>How To Design A Floor Plan For A 24×50 House With Two Bedrooms And One And Three-Quarters Baths

Architecture & Design
How To Design A Floor Plan For A 24×50 House With Two Bedrooms And One And Three-Quarters Baths
Modified: October 28, 2024
Learn how to create a functional floor plan for a 24x50 house with two bedrooms and one and three-quarters baths. Expert tips on architecture design.
(Many of the links in this article redirect to a specific reviewed product. Your purchase of these products through affiliate links helps to generate commission for Storables.com, at no extra cost. Learn more)
Introduction
Designing a floor plan for a house is an exciting and important process. It involves carefully considering the dimensions and layout of each room to ensure optimal functionality and aesthetics. In this article, we will guide you through the process of designing a floor plan for a 24×50 house with two bedrooms and one and three-quarters baths.
When creating a floor plan, there are several key factors to consider. It’s crucial to take into account the size and layout of each room, as well as the overall flow and functionality of the house. Whether you’re designing a new home or renovating an existing one, thoughtful planning can make all the difference in creating a comfortable and efficient living space.
Before diving into the specifics of each room, it’s important to establish a clear vision for your house. Consider the overall style and atmosphere you want to achieve. Do you prefer an open-concept layout, or do you prefer more defined spaces? Are you looking for a contemporary or traditional design? These considerations will help inform your decisions as you design each room.
Another crucial consideration is the number of residents and their needs. Are you designing the house for a couple, a small family, or individuals? Understanding the specific requirements of the occupants will help you make informed decisions about the layout and functionality of each room.
Now that we have a general understanding of the design process, let’s dive into the details of each room. We will provide guidelines for the ideal size and layout of the bedrooms, bathrooms, kitchen, living area, dining area, laundry room, and storage spaces. By following these recommendations, you can create a well-designed floor plan that maximizes the space available and meets the needs of the occupants.
Key Takeaways:
- Careful consideration of size and layout is crucial when designing a floor plan for a 24×50 house. Prioritize functionality, flow, and natural light to create a comfortable and visually appealing living space.
- Incorporating personal style and creativity into the design process is essential. Choose colors, materials, and decor that reflect your taste, and infuse each room with proper lighting for enhanced functionality and ambiance.
Read more: How To Design A House Floor Plan In AutoCAD
Considerations Before Designing
Before you start designing the floor plan for your 24×50 house, there are a few important considerations to keep in mind. These considerations will help guide your decision-making process and ensure that you create a functional and well-designed space:
- Budget: Determine your budget for the project. This will help you prioritize your design choices and make informed decisions.
- Building Codes and Regulations: Familiarize yourself with the building codes and regulations in your area. This will ensure that your design complies with safety standards and legal requirements.
- Climate and Orientation: Consider the climate in which your house is located. Take into account factors such as sunlight, wind direction, and prevailing weather patterns. Orient your house and its windows to maximize natural light and take advantage of passive heating and cooling strategies.
- Functionality: Determine the main functions of each room. Consider how you and your family will be using the space and plan accordingly. For example, if you enjoy cooking and entertaining, prioritize a spacious and well-equipped kitchen.
- Accessibility: Design your floor plan with accessibility in mind. Ensure that doorways and hallways are wide enough to accommodate individuals with mobility aids, and consider incorporating universal design principles to make your home accessible to people of all ages and abilities.
- Privacy: Consider the desired level of privacy for each room. Position bedrooms away from common areas and consider the placement of windows to maximize privacy without sacrificing natural light.
- Storage: Determine your storage needs and incorporate built-in storage solutions wherever possible. This will help keep your space organized and clutter-free.
- Aesthetics: Decide on the overall style and aesthetic you want to achieve. Consider factors such as color schemes, materials, and architectural details to create a cohesive and visually pleasing design.
By taking these considerations into account, you will be well-prepared to design a floor plan that meets your needs and reflects your personal style. It’s important to spend time carefully planning and visualizing the layout before moving forward with construction or renovation. Once you have a clear vision in mind, you can proceed to the next step of determining the size and layout of each room.
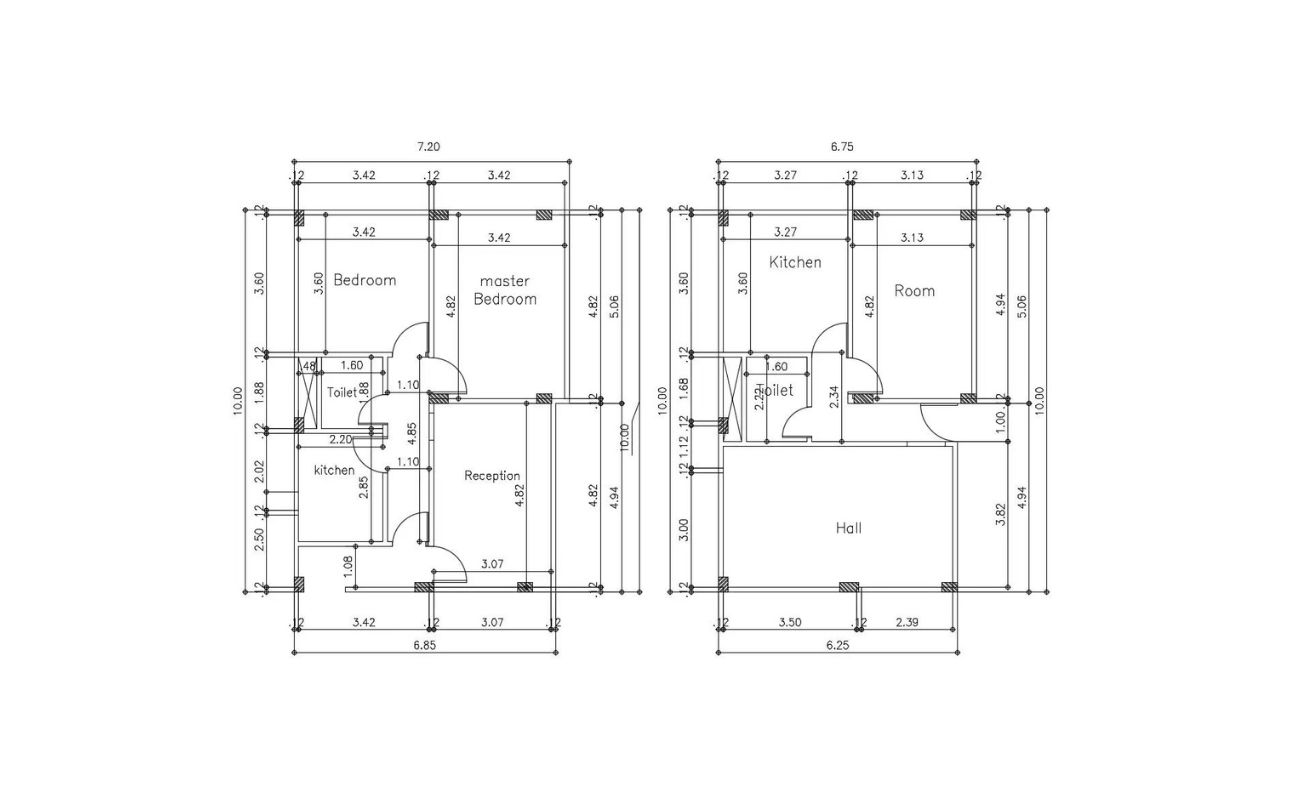
Room Dimensions and Layout
The dimensions and layout of each room in your 24×50 house play a crucial role in determining the overall functionality and comfort of the space. By carefully considering the size and arrangement of each room, you can create a harmonious and efficient floor plan. Let’s explore the ideal dimensions and layout for the main rooms:
- Bedrooms: For a comfortable bedroom, aim for a minimum size of 10×10 feet (3×3 meters). This allows for enough space to accommodate a queen-size bed and other furniture, such as a nightstand and dresser. Consider positioning the bed against a wall to create a focal point and allow for easy circulation.
- Bathrooms: The primary bathroom should have a minimum size of 5×8 feet (1.5×2.4 meters), which allows for a standard-sized bathtub or shower, toilet, and vanity. The three-quarters bath can be slightly smaller, with a minimum size of 4×7 feet (1.2×2.1 meters). Leave enough space for comfortable movement and storage options.
- Kitchen: Design a functional kitchen with a minimum size of 10×10 feet (3×3 meters). This provides ample space for essential appliances, countertop workspace, and storage. Create an efficient work triangle by placing the sink, stove, and refrigerator in close proximity to each other.
- Living Area: The living area should have a minimum size of 12×12 feet (3.7×3.7 meters) to comfortably accommodate seating arrangements, such as a sofa, chairs, and a coffee table. Allow for clear pathways and consider the placement of windows to maximize natural light and views.
- Dining Area: Aim for a minimum size of 8×10 feet (2.4×3 meters) for the dining area. This allows for a dining table and chairs. Consider the proximity of the dining area to the kitchen for ease of serving and cleaning up after meals.
- Laundry Room: Allocate a minimum of 4×6 feet (1.2×1.8 meters) for the laundry room. This provides space for essential appliances, such as a washer and dryer, as well as storage for laundry supplies.
- Storage Spaces: Incorporate sufficient storage throughout the house. This can include built-in closets, cabinets, and shelving units. Consider utilizing vertical space to maximize storage capacity.
These dimensions serve as a starting point, and you can adjust them based on your specific needs and preferences. Remember to consider the overall flow and functionality of the house when determining the layout of each room. Create clear pathways and ensure that there is adequate space for furniture arrangement and movement.
As you design your floor plan, keep in mind that these are general guidelines and can be modified to suit your individual requirements. It’s important to consider the size and layout of each room in relationship to the overall size of your house. By striking the right balance between space and functionality, you can create a well-designed floor plan that enhances your daily living experience.
Bedroom 1: Size and Layout
Bedroom 1 is an important space in your 24×50 house, serving as a personal retreat for relaxation and rest. It’s essential to consider the size and layout of this room to ensure optimal comfort and functionality. Let’s explore the ideal dimensions and layout for Bedroom 1:
Size: Aim for a minimum size of 10×10 feet (3×3 meters) for Bedroom 1. This provides enough space to accommodate a queen-size bed, bedside tables, and additional furniture such as a dresser or a desk. If you have the flexibility to allocate more space, consider increasing the dimensions to create a more spacious and comfortable bedroom.
Layout: When planning the layout of Bedroom 1, prioritize creating a focal point with the placement of the bed. Positioning the bed against a wall can help define the space and allow for easy circulation. Plan for bedside tables on either side of the bed to provide convenient storage for personal items and lighting options for reading or relaxing.
Consider the placement and size of windows to maximize natural light and views in Bedroom 1. Well-positioned windows can enhance the overall ambiance and create a soothing and inviting atmosphere. Be mindful of privacy and consider window coverings that allow for privacy when needed.
Incorporating ample storage is important in Bedroom 1. Consider incorporating a closet or wardrobes to keep clothing and personal belongings organized. Utilizing vertical space with built-in shelving or storage units can help maximize storage capacity without taking up valuable floor space.
When arranging furniture in Bedroom 1, ensure that there is enough space for comfortable movement and circulation. Avoid overcrowding the room with unnecessary furniture, keeping in mind that the main purpose of the room is relaxation and rest.
Additionally, it’s important to consider the overall aesthetic of Bedroom 1. Choose a color scheme and décor that reflects your personal style and creates a calming and cozy atmosphere. Consider incorporating soft lighting options, such as bedside lamps or dimmer switches, to create a relaxing ambiance.
By carefully considering the size and layout of Bedroom 1, you can create a tranquil and functional space that promotes rest and relaxation. Remember to personalize the room with décor and accessories that make it feel like your own personal sanctuary.
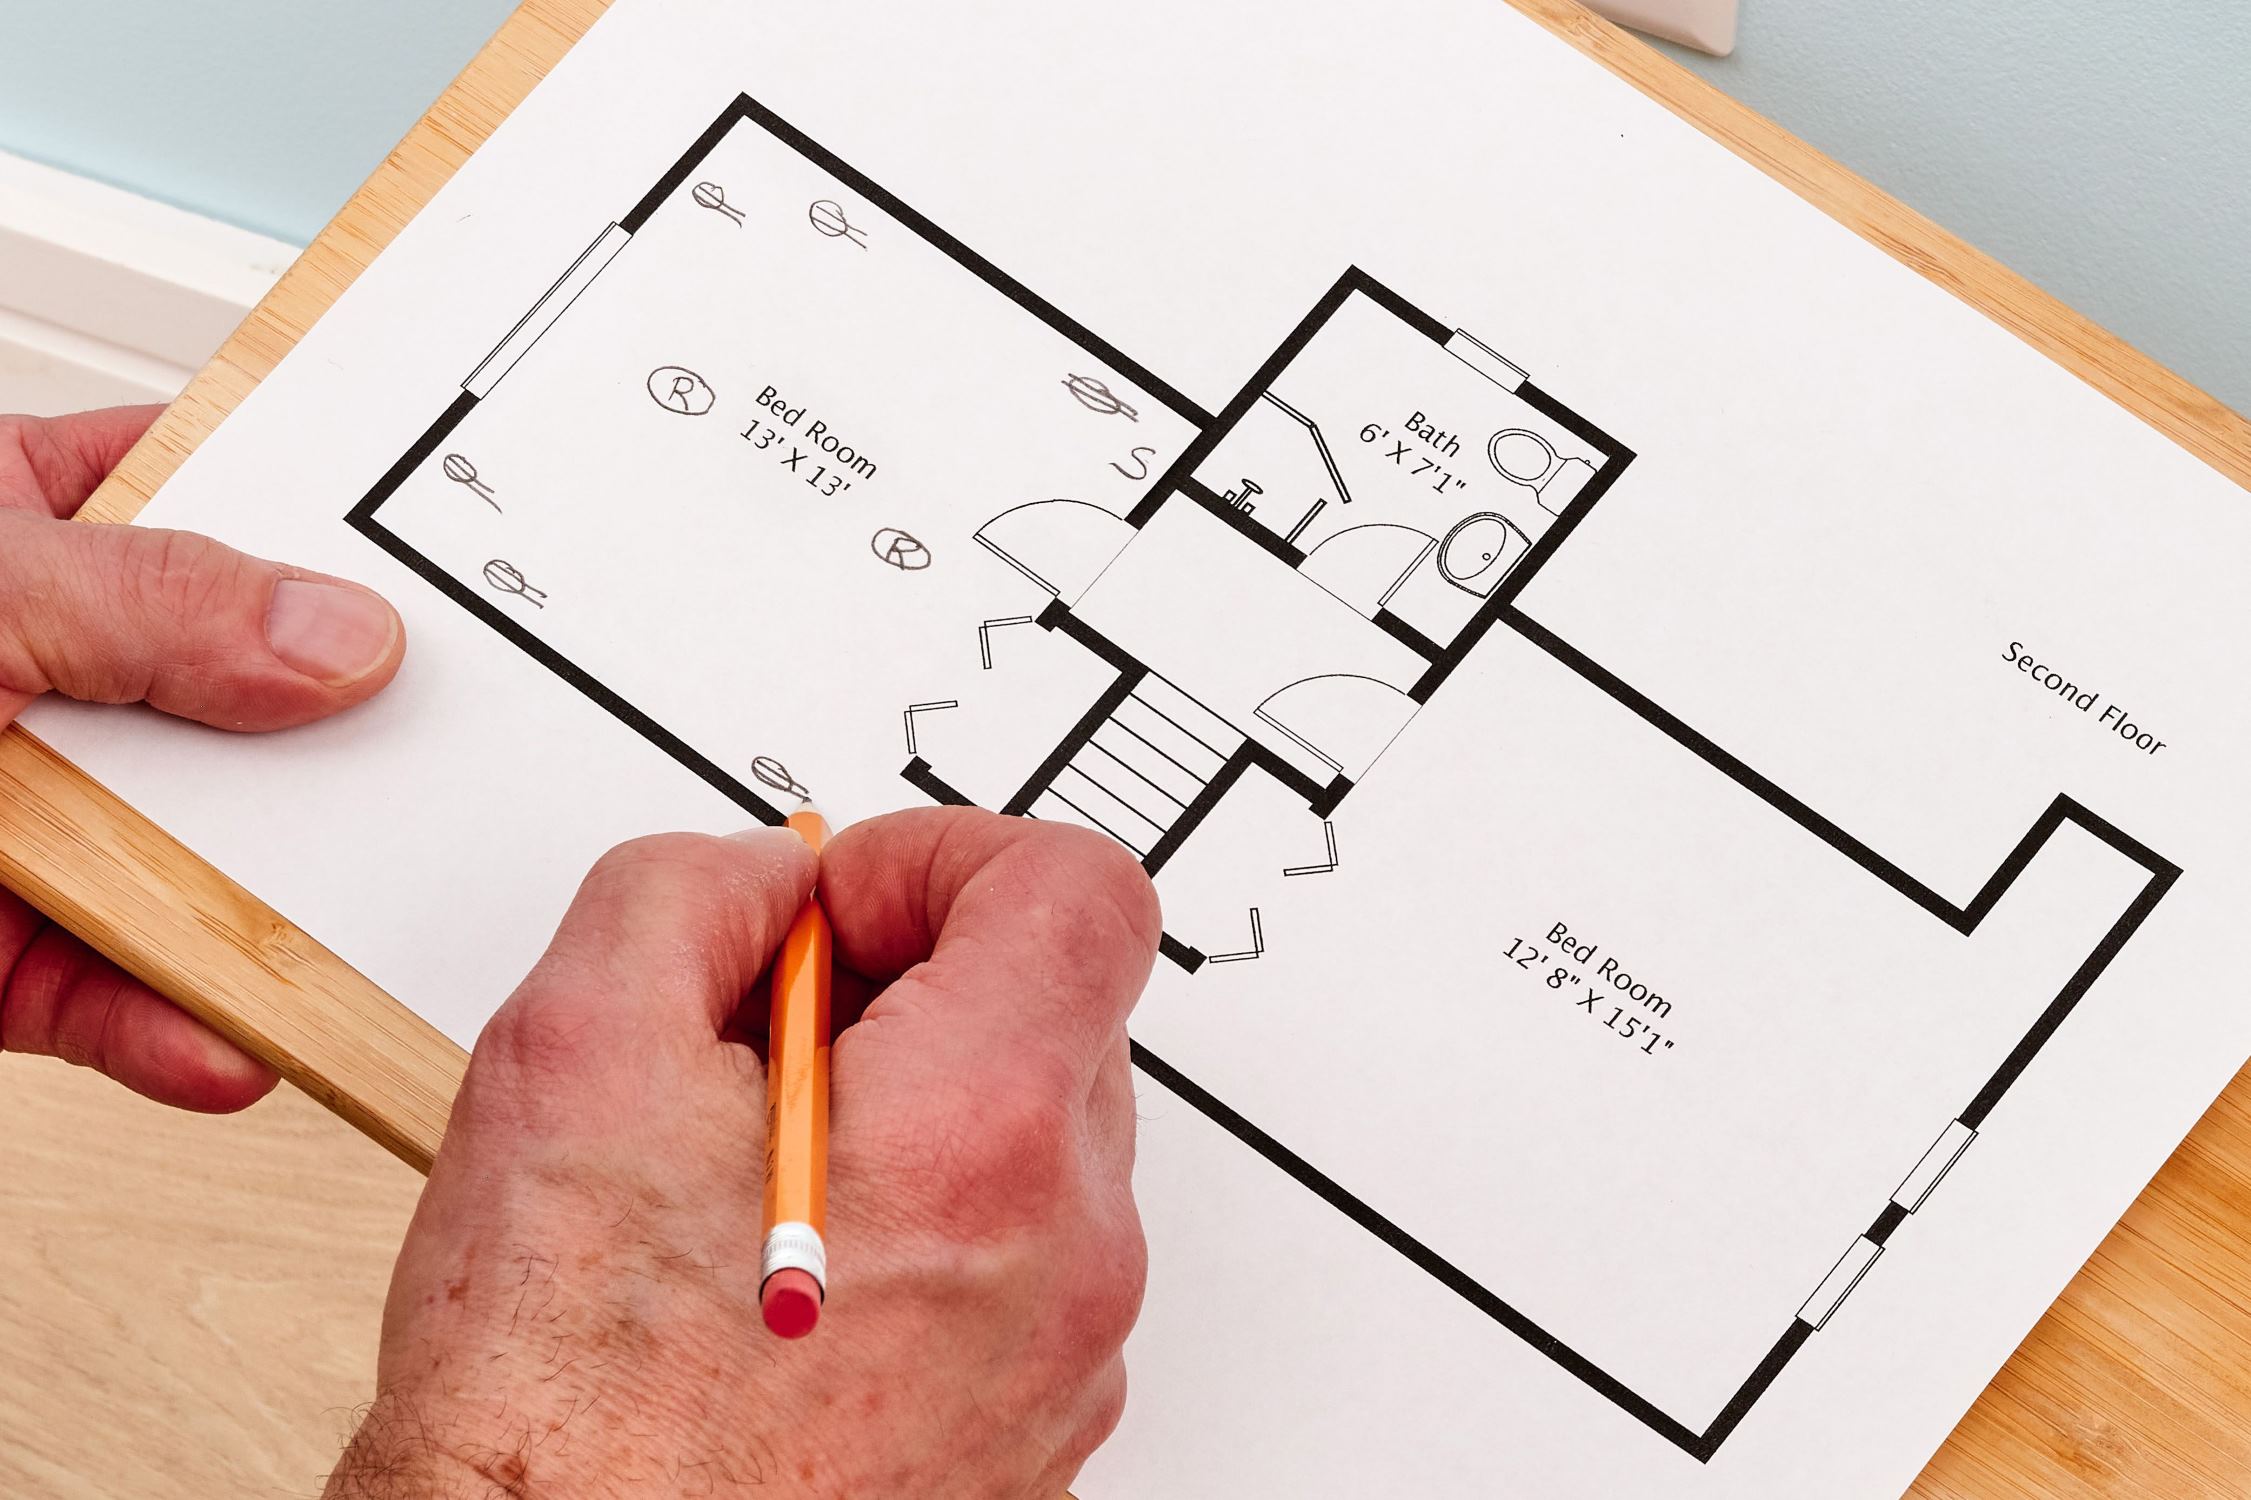
Bedroom 2: Size and Layout
Bedroom 2 is another important space in your 24×50 house, serving as a versatile area that can be used as a guest room, home office, or a bedroom for another family member. When designing Bedroom 2, it’s crucial to consider the size and layout to ensure functionality and comfort. Let’s explore the ideal dimensions and layout for Bedroom 2:
Size: Aim for a minimum size of 10×10 feet (3×3 meters) for Bedroom 2. This provides enough space to accommodate a twin or full-size bed, a desk, and additional furniture such as a small dresser or shelving unit. If you have the flexibility to allocate more space, consider increasing the dimensions to create a more spacious and versatile bedroom.
Layout: Determine the primary function of Bedroom 2 and plan the layout accordingly. If it will primarily be used as a guest room, focus on creating a comfortable and inviting space. Position the bed against a wall and ensure there is enough space for a bedside table or two. Consider adding a small seating area or a desk if space permits.
If you plan to use Bedroom 2 as a home office, prioritize functionality and organization. Choose a desk that suits your needs and ensure there is enough space for additional storage, such as shelves or a filing cabinet. Plan the layout to optimize natural light and ensure a conducive environment for work.
For a second bedroom for a family member, consider the needs and preferences of the occupant. If it’s for a child, incorporate age-appropriate furniture and add playful elements to the design. If it’s for a teenager or an adult, create a space that reflects their personal style and provides ample storage for clothing and belongings.
As with Bedroom 1, consider the placement and size of windows to maximize natural light and views. Ensure that there is adequate privacy, especially if Bedroom 2 is used as a guest room. Consider window coverings that allow for adjustable privacy and light control.
In terms of storage, include a closet or wardrobes in Bedroom 2 to keep belongings organized and out of sight. If space permits, consider incorporating built-in shelving or storage units to maximize vertical space.
Ultimately, the layout of Bedroom 2 should be designed to meet the specific needs and preferences of those who will be occupying the space. Consider the overall aesthetic and create a comfortable and functional environment that aligns with the purpose of the room.
By carefully considering the size and layout of Bedroom 2, you can create a versatile and inviting space that accommodates the needs of guests, serves as a productive home office, or provides a comfortable bedroom for another family member.
Read more: How Do I Get The Floor Plan For My House
Bathroom 1: Size and Layout
Bathroom 1 is a vital space in your 24×50 house, providing essential amenities for personal care and hygiene. When designing Bathroom 1, it’s crucial to consider the size and layout to ensure functionality and comfort. Let’s explore the ideal dimensions and layout for Bathroom 1:
Size: Aim for a minimum size of 5×8 feet (1.5×2.4 meters) for Bathroom 1. This provides enough space to accommodate a standard-sized bathtub or shower, a toilet, and a vanity. If you have the flexibility to allocate more space, consider increasing the dimensions to create a more spacious and luxurious bathroom.
Layout: When planning the layout of Bathroom 1, focus on creating a flow that maximizes efficiency and convenience. Place the bathtub or shower against one wall, leaving enough space for easy access and movement. Position the toilet and the vanity in a way that allows for comfortable use and adequate storage space.
If you opt for a bathtub, consider the size and style that best suits your needs and preferences. A standard-sized bathtub is around 60 inches long and 30 inches wide (152×76 centimeters), but there are various options available, such as corner tubs or freestanding tubs, depending on the space and design aesthetic you desire.
Alternatively, if you prefer a shower, consider a spacious walk-in shower with a glass enclosure for a modern and open feel. Ensure that the shower area is large enough to comfortably accommodate a showerhead, controls, and built-in shelves or niches for storing toiletries.
Position the toilet in a way that allows for privacy while also considering its proximity to the tub or shower and the vanity. Create enough space around the toilet for easy access and ensure that there is sufficient room for clearance when the toilet seat is lifted.
When planning the vanity area in Bathroom 1, consider the available space and your storage needs. A single-sink vanity with a width of 30-36 inches (76-91 centimeters) is typically sufficient and provides ample countertop space and storage options. If space permits, consider incorporating a larger vanity or separate storage cabinets for added functionality.
Pay attention to the placement and size of windows in Bathroom 1 to maximize natural light while still ensuring privacy. Consider using frosted or textured glass or incorporating window coverings for adjustable privacy control.
Lastly, incorporate appropriate lighting in Bathroom 1 to create a functional and aesthetically pleasing space. Include a combination of overhead lighting, vanity lighting, and accent lighting to provide ample illumination for various activities and to enhance the overall ambiance.
By carefully considering the size and layout of Bathroom 1, you can create a well-designed space that offers both functionality and comfort. Remember to choose fixtures, materials, and colors that align with your personal style and create a cohesive aesthetic throughout the bathroom.
Bathroom 2 (Three-Quarters Bath): Size and Layout
Bathroom 2, also known as the three-quarters bath, is a convenient addition to your 24×50 house, providing an additional bathroom for guests or family members. When designing Bathroom 2, it’s important to consider the size and layout to maximize functionality and comfort. Let’s explore the ideal dimensions and layout for Bathroom 2:
Size: Aim for a minimum size of 4×7 feet (1.2×2.1 meters) for Bathroom 2. While it is slightly smaller compared to the primary bathroom, this size still allows for essential fixtures and provides a functional space. If you have more space available, consider increasing the dimensions for added comfort.
Layout: When planning the layout of Bathroom 2, prioritize the essentials: a toilet, a sink, and a shower. Consider installing a corner shower to optimize space utilization and create a visually appealing focal point.
Position the shower against one wall, leaving enough space for easy entry and a comfortable showering experience. Consider incorporating a sliding or pivot shower door to save space and make the bathroom feel more open and spacious.
Place the toilet adjacent to the shower, ensuring there is sufficient space for comfortable use and easy access. Opt for a compact or wall-mounted toilet to maximize the available space if necessary.
For the sink/vanity area, choose a small or medium-sized vanity that fits the dimensions of the bathroom. This will provide storage under the sink and space for toiletries and essentials. Alternatively, consider a wall-mounted sink or a pedestal sink for a sleek and minimalist look that saves space.
In terms of storage, make the most of the available wall space by incorporating wall-mounted cabinets or shelves above the toilet or next to the vanity. This will provide storage for towels, toiletries, and other bathroom essentials without taking up valuable floor space.
Consider the placement of windows in Bathroom 2 to maximize natural light and ventilation. If privacy is a concern, you can utilize frosted glass or incorporate window coverings that allow for adjustable privacy control.
Lighting is essential in Bathroom 2 to create a bright and inviting space. Install overhead lighting for general illumination and consider adding task lighting around the vanity area for specific tasks such as grooming or applying makeup.
By considering the size and layout of Bathroom 2, you can create a functional and inviting space for guests or family members. Remember to choose fixtures and materials that reflect your style and preferences while maximizing the available space.
When designing a floor plan for a 24×50 house with two bedrooms and one and three-quarters baths, consider creating an open-concept living area to maximize space and natural light. Additionally, utilize built-in storage to optimize functionality in smaller rooms.
Kitchen: Size and Layout
The kitchen is the heart of any home, and designing the kitchen in your 24×50 house requires careful consideration of both size and layout to ensure functionality and efficiency. Let’s explore the ideal dimensions and layout for the kitchen:
Size: Aim for a minimum size of 10×10 feet (3×3 meters) for the kitchen. This provides enough space for essential appliances, countertop workspace, and storage. If you have more room available, consider increasing the dimensions to create a more spacious and comfortable kitchen.
Layout: When planning the layout of the kitchen, prioritize the effective use of the work triangle. The work triangle connects the sink, the stove, and the refrigerator, and optimizing this layout can significantly enhance efficiency in the kitchen.
One popular kitchen layout is the U-shape, where cabinets and countertops wrap around three walls, forming a U. This layout provides ample storage and workspace, with each element of the work triangle easily accessible.
Another option is the L-shape layout, where cabinets and countertops are arranged along two perpendicular walls. This design maximizes corner space and allows for an open flow between the kitchen and adjacent areas.
If space permits, consider incorporating a kitchen island. This provides additional workspace, storage, and seating options. The island can serve as a food preparation area, a breakfast bar, or an entertainment space when hosting guests.
When determining the placement of appliances, consider the natural flow of the kitchen. Position the refrigerator in a convenient location, allowing easy access to fresh produce and other perishables. Place the sink near a window, if possible, for natural light and views, and position it in close proximity to the stove for efficient meal preparation.
Allocate adequate countertop space for food preparation, including a space for cutting, chopping, and mixing. Incorporate a variety of storage solutions, such as cabinets, drawers, and pantry space, to ensure efficient organization of cookware, utensils, and ingredients.
Lighting is crucial in the kitchen to ensure visibility and functionality. Consider a combination of ambient, task, and accent lighting. Install overhead lighting for general illumination, under-cabinet lighting for task lighting on countertops, and pendant lights or recessed lighting above the island or dining area for ambient and decorative purposes.
Lastly, choose materials and finishes that are durable, easy to clean, and reflect your personal style. Consider incorporating elements such as backsplash tiles, stylish cabinet hardware, and a color scheme that complements the overall aesthetic of your home.
By carefully considering the size and layout of your kitchen, you can create a functional and inviting space that meets your cooking and entertaining needs. Remember to optimize the work triangle, maximize storage and countertop space, and incorporate lighting that enhances the ambiance of the room.
Living Area: Size and Layout
The living area in your 24×50 house serves as a central gathering space for relaxation, entertaining, and quality time with family and friends. When designing the living area, it’s essential to consider both size and layout to create a comfortable and functional space. Let’s explore the ideal dimensions and layout for the living area:
Size: Aim for a minimum size of 12×12 feet (3.7×3.7 meters) for the living area. This size allows for ample seating space, such as a sofa and chairs, and provides room for a coffee table and other pieces of furniture. If you have more space available, consider increasing the dimensions to create a larger and more spacious living area.
Layout: When planning the layout of the living area, consider the focal point of the room. This could be a fireplace, a television, or a beautiful view from a window. Arrange the furniture around the focal point to create a sense of balance and visual appeal.
If the living area is adjacent to other spaces such as the dining area or kitchen, consider an open-concept layout that allows for easy flow and interaction between the areas. This can create a sense of spaciousness and promote socializing and connectivity, especially when entertaining.
For smaller living areas, consider using multi-functional furniture to optimize the space. Choose a sofa with a pull-out bed or storage compartments, and select coffee tables or ottomans with hidden storage to minimize clutter.
When arranging the furniture, ensure there is enough space for comfortable movement and circulation. Plan for clear pathways that allow easy access to seating areas and ensure that the furniture does not obstruct doorways or windows.
Consider the placement of windows in the living area to maximize natural light and views. Arrange the furniture in a way that takes advantage of the natural light, and consider using window coverings that allow for adjustable privacy control and light filtering.
Add lighting elements that create a warm and inviting atmosphere. Incorporate a combination of overhead lighting, such as ceiling fixtures or recessed lights, as well as table or floor lamps to provide task lighting or ambient lighting as needed.
Lastly, personalize the living area to reflect your style and personality. Decorate with artwork, throw pillows, and other accessories that add warmth and character to the space. Consider incorporating elements such as area rugs to define specific seating areas or create visual interest.
By carefully considering the size and layout of the living area, you can create an inviting and comfortable space for relaxation and socializing. Remember to pay attention to the focal point, arrange furniture for optimal flow and function, and incorporate lighting and décor that enhance the overall ambiance of the room.
Read more: How To Dimension A Floor Plan
Dining Area: Size and Layout
The dining area in your 24×50 house is a place where family and friends gather to enjoy meals and create lasting memories. Designing the dining area requires careful consideration of size and layout to ensure functionality and comfort. Let’s explore the ideal dimensions and layout for the dining area:
Size: Aim for a minimum size of 8×10 feet (2.4×3 meters) for the dining area. This size allows for a dining table and chairs, providing enough space for comfortable seating and movement around the table. If you have more room available, consider increasing the dimensions to accommodate a larger dining set or to allow for additional seating when hosting guests.
Layout: When planning the layout of the dining area, consider the proximity to the kitchen and the overall flow of the space. Position the dining area close to the kitchen for easy access and serving during meals.
If your floor plan allows for it, consider an open-concept layout that combines the dining area with the living area or kitchen. This creates a seamless flow between the spaces and allows for interaction and connectivity when entertaining or hosting gatherings.
Choose a dining table that suits the size and style of the dining area. Round or rectangular tables are popular choices, but make sure to leave enough space around the table for chairs and movement. If space is limited, consider using a smaller table or a drop-leaf table that can be expanded when needed.
When arranging the dining chairs, ensure that there is enough space between them for comfortable seating. Leave ample room behind the chairs to allow for easy movement when sitting down or getting up from the table.
Consider the placement of windows or natural light sources in the dining area. Natural light can create a pleasant and airy ambiance, enhancing the dining experience. Position the dining table in a way that takes advantage of the natural light while still considering the desired level of privacy.
Incorporate appropriate lighting to illuminate the dining area. Hang a pendant light or chandelier above the dining table to provide direct, focused lighting for meals. Consider dimmers to adjust the lighting level for different occasions and to create a cozy atmosphere during evening dinners.
Add personal touches to the dining area with elements such as a rug under the dining table, artwork on the walls, or a centerpiece on the table. These additions can enhance the visual appeal of the space and reflect your personal style.
By carefully considering the size and layout of the dining area, you can create a comfortable and inviting space for enjoying meals and gathering with loved ones. Remember to choose a dining set that fits the space, ensure there is ample room for seating and movement, and incorporate lighting and décor that enhance the dining experience.
Laundry Room: Size and Layout
The laundry room in your 24×50 house is a functional space dedicated to handling laundry tasks efficiently. Designing the laundry room requires thoughtful consideration of size and layout to ensure practicality and organization. Let’s explore the ideal dimensions and layout for the laundry room:
Size: Allocate a minimum of 4×6 feet (1.2×1.8 meters) for the laundry room. This size provides enough space to accommodate essential laundry appliances, such as a washer and dryer, as well as additional storage and folding areas. If you have more space available, consider increasing the dimensions to create a more spacious and functional laundry room.
Layout: When planning the layout of the laundry room, consider both the workflow and the organization of the space. Position the washer and dryer adjacent to each other to facilitate the transfer of clothes between the appliances. Allow space for proper ventilation and easy access to perform maintenance or repairs if needed.
Include a countertop or folding table next to the appliances for sorting, folding, and organizing laundry. This surface provides a dedicated workspace and helps to keep the room tidy and clutter-free. If space is limited, consider utilizing wall-mounted folding tables or installing a pull-out countertop that can be easily tucked away when not in use.
Incorporate storage solutions to keep laundry supplies organized. Wall-mounted cabinets or open shelves above the appliances are ideal for storing detergents, fabric softeners, and other laundry essentials. Consider including a hanging rod for air-drying delicate items or clothes that cannot be tumble-dried.
Make the most of vertical space by installing wall-mounted drying racks or hooks to hang clothes, reducing the need for additional floor space. Utilize baskets or bins for sorting dirty laundry, and allocate space for a hamper or a designated area for storing clean clothes before folding and returning them to their respective rooms.
Include proper lighting in the laundry room to ensure visibility while performing laundry tasks. Overhead lighting, as well as task lighting above the countertop or folding area, will help to illuminate the space adequately.
Consider the placement of windows or ventilation in the laundry room to promote airflow and reduce humidity. If possible, position the appliances near a window to take advantage of natural light and create a brighter and more pleasant laundry environment.
Lastly, add personal touches to make the laundry room more inviting. Paint the walls in a color that inspires a sense of cleanliness and tranquility or add decorative touches, such as artwork or plants, to create a pleasant atmosphere in an otherwise functional space.
By carefully considering the size and layout of the laundry room, you can create an organized and efficient space for handling laundry tasks. Remember to prioritize functionality, incorporate storage solutions, and utilize vertical space to maximize the available area. With a well-designed laundry room, you can streamline your laundry routine and make this everyday chore more manageable and enjoyable.
Storage Spaces: Size and Layout
Storage spaces are essential in any home, providing organized solutions for keeping belongings tidy and easily accessible. When designing the storage spaces in your 24×50 house, it’s important to consider their size and layout to maximize functionality and optimize the use of space. Let’s explore the ideal dimensions and layouts for storage spaces:
Closets: Incorporating closets throughout your house is essential for efficient storage. Aim for a minimum width of 4 feet (1.2 meters) for reach-in closets. This width allows for proper hanging space and storage of clothing, accessories, and other items. For walk-in closets, allocate a minimum of 6×6 feet (1.8×1.8 meters) to provide ample room for efficient organization and easy accessibility.
Consider the layout of the closet to accommodate hanging rods, shelves, and drawers. Optimize the use of vertical space by installing adjustable shelving to accommodate different items and make the most of the available area.
Pantry: If your 24×50 house includes a kitchen pantry, aim for a minimum size of 4×4 feet (1.2×1.2 meters). This size allows for efficient storage of dry goods, canned items, and kitchen supplies. Utilize shelves, drawers, and bins to organize the pantry and create designated spaces for different types of food and equipment.
Consider installing adjustable shelves or organizing systems to maximize the use of vertical space. Incorporate proper lighting, such as LED strips or recessed lighting, to ensure visibility and make it easier to locate items within the pantry.
Cabinetry: In addition to dedicated storage spaces, maximize storage capacity throughout your house with well-designed cabinetry. In the kitchen, opt for upper and lower cabinets with a minimum depth of 12 inches (30 centimeters) to accommodate various cookware, dishes, and small appliances.
In bathrooms, include vanities or medicine cabinets with ample storage for toiletries and personal care items. In the living area, consider incorporating built-in bookshelves or entertainment centers to display books, decorative items, and media equipment.
Garage: Designing storage in the garage is also important for keeping tools, equipment, and seasonal items organized. Allocate enough space to accommodate shelves, cabinets, and wall-mounted storage systems. Consider installing hooks or racks to hang bicycles, ladders, and other large items.
Layout: When planning the layout of storage spaces, consider the accessibility and ease of use. Designate specific areas for different categories of items to create a logical organization system. For example, store frequently used items in easily accessible closets or cabinets, and reserve higher or harder-to-reach spaces for less frequently needed items.
Utilize labels, bins, or clear containers to further organize and categorize belongings, making it easier to find and retrieve items as needed. Consider utilizing vertical space with the use of wall-mounted shelving or hanging storage solutions to make the most of the available area.
By carefully considering the size and layout of storage spaces, you can create an organized and clutter-free environment in your 24×50 house. Remember to maximize vertical space, incorporate adjustable shelving, and utilize proper lighting to ensure efficient and accessible storage throughout the house. With well-designed storage spaces, you can easily find and enjoy your belongings while maintaining a clean and organized living space.
Conclusion
Designing a floor plan for your 24×50 house with two bedrooms and one and three-quarters baths involves careful consideration of size and layout to achieve a functional and aesthetically pleasing living space. By following the guidelines provided for each room, you can create a well-designed floor plan that meets your needs and reflects your personal style.
Before embarking on the design process, it is important to consider several key factors such as budget, building codes and regulations, climate and orientation, functionality, accessibility, privacy, storage, and aesthetics. These considerations will help guide your decision-making process and ensure that your design choices align with your priorities and requirements.
When determining the size and layout of each room, keep in mind the minimum dimensions recommended for optimal functionality. However, feel free to adapt these dimensions to suit your specific needs and preferences. Consider the flow and interaction between rooms, prioritize natural light and views, and incorporate storage solutions to enhance organization and maximize space.
Throughout the design process, remember to infuse your personal style and creativity into the space. Choose colors, materials, and decor that reflect your taste and create a cohesive and inviting environment. Additionally, don’t forget to incorporate proper lighting in each room to enhance both functionality and ambiance.
In conclusion, designing a floor plan for a 24×50 house with two bedrooms and one and three-quarters baths requires thoughtful planning and attention to detail. By considering the size and layout of each room, as well as the overall flow and functionality of the house, you can create a comfortable and visually appealing living space that meets your needs and reflects your personal style. With proper design and organization, your house will become a place you are proud to call home.
Frequently Asked Questions about How To Design A Floor Plan For A 24x50 House With Two Bedrooms And One And Three-Quarters Baths
Was this page helpful?
At Storables.com, we guarantee accurate and reliable information. Our content, validated by Expert Board Contributors, is crafted following stringent Editorial Policies. We're committed to providing you with well-researched, expert-backed insights for all your informational needs.


0 thoughts on “How To Design A Floor Plan For A 24×50 House With Two Bedrooms And One And Three-Quarters Baths”