Home>diy>Architecture & Design>How To Create A Floor Plan For Free
Architecture & Design
How To Create A Floor Plan For Free
Modified: August 17, 2024
Learn how to create a professional floor plan for free with our easy-to-use architecture design tools. Start designing your dream space today!
(Many of the links in this article redirect to a specific reviewed product. Your purchase of these products through affiliate links helps to generate commission for Storables.com, at no extra cost. Learn more)
Introduction
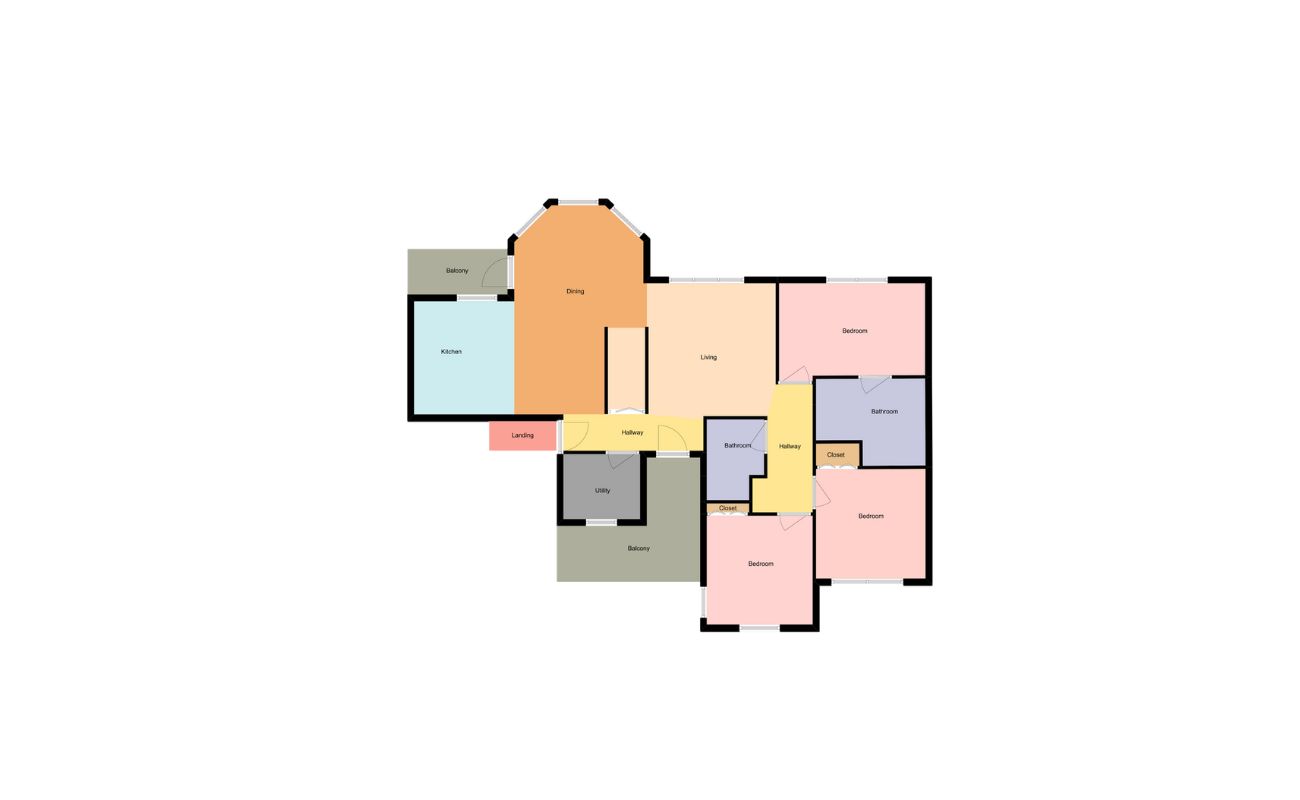
Whether you’re planning a home renovation, moving into a new house, or designing a commercial space, creating a floor plan is an essential step. A floor plan is a visual representation of a building or space, showcasing the layout and arrangement of rooms, walls, windows, and other architectural elements.
Having a well-designed floor plan helps you in many ways. It allows you to visualize how the space will look and function, helping you make informed decisions about furniture placement, traffic flow, and overall aesthetics. It also enables contractors and builders to understand your vision, resulting in a smoother construction process.
In the past, creating a floor plan required hiring an architect or using complex software. However, with the advancement of technology, there are now online tools that allow you to create floor plans for free, without any professional design experience. These tools are intuitive and user-friendly, making floor plan creation accessible to everyone.
In this article, we will guide you through the process of creating a floor plan for free using online tools. We will discuss the importance of floor plans, help you choose the right tool, and provide step-by-step instructions on how to create a detailed and visually appealing floor plan.
So, if you’re ready to bring your design ideas to life and create a functional and beautiful space, let’s get started on your floor plan journey.
Key Takeaways:
- Creating a floor plan is a dynamic and accessible process, allowing anyone to bring their design ideas to life. Utilize online tools, gather accurate measurements, and customize your plan to create a functional and visually appealing space.
- Understanding the importance of floor plans and following a step-by-step guide empowers individuals to create detailed and well-designed spaces. Incorporate furniture, customize colors, and render the final plan for a comprehensive visual representation.
Read more: How To Create A Floor Plan In Word
Understanding the Importance of Floor Plans
Floor plans are crucial elements in the design and construction process for a variety of reasons. They serve as the foundation for any architectural project, providing a blueprint for the layout and functionality of a space. Here are a few key reasons why floor plans are important:
- Visualization: A floor plan allows you to visualize how a space will look before any construction begins. It provides a clear representation of the size and layout of rooms, the flow of traffic, and the overall arrangement of furniture and fixtures. This visualization helps you fully understand the spatial relationships within a building, enabling you to make informed decisions about design and functionality.
- Space Planning: One of the primary purposes of a floor plan is to facilitate effective space planning. By accurately depicting the dimensions and proportions of rooms, corridors, and other areas, a floor plan helps you determine the best possible use of space. It allows you to strategically allocate different areas for specific functions, such as living spaces, bedrooms, kitchens, and bathrooms. With a well-designed floor plan, you can ensure optimal utilization of space and create a harmonious environment.
- Furniture Placement: Another essential aspect of floor plans is that they assist in furniture placement. By including the dimensions and positions of doors, windows, and other architectural features, a floor plan gives you a clear idea of where furniture pieces can be positioned without obstructing pathways or creating cramped spaces. This ensures that the final arrangement of furniture is both functional and aesthetically pleasing.
- Building Regulations and Codes: Floor plans play a vital role in complying with building regulations and codes. These regulations often dictate the minimum required dimensions for rooms, the number and size of windows for proper ventilation and natural light, and other safety and accessibility standards. By referencing a floor plan, architects and builders can ensure that the design adheres to these regulations and create a safe and structurally sound building.
- Collaboration and Communication: Floor plans serve as a common language for architects, designers, contractors, and clients. They provide a visual reference that facilitates clear communication and understanding among all parties involved in the project. A well-documented floor plan eliminates ambiguity, reduces misunderstandings, and streamlines the design and construction process.
In summary, floor plans are essential tools in architecture and design. They aid in visualization, space planning, furniture placement, compliance with regulations, and effective communication. By understanding the importance of floor plans, you can appreciate their role in creating functional, aesthetically pleasing, and well-designed spaces.
Choosing the Right Online Tool for Creating Floor Plans
Now that you understand the importance of floor plans, the next step is to choose the right online tool to create them. With a plethora of options available, selecting the best tool can feel overwhelming. Here are some factors to consider when choosing an online tool for creating floor plans:
- User-Friendliness: Look for a tool that is user-friendly and intuitive. You want to ensure that you can easily navigate through the features and create your floor plan without any technical difficulties. A tool with a clean and organized interface, drag-and-drop functionality, and helpful guides or tutorials will make the process much smoother.
- Template Variety: Check if the online tool offers a wide range of templates to choose from. Templates provide pre-designed layouts and dimensions for different types of spaces, such as homes, apartments, offices, and commercial buildings. Having access to diverse templates can save you time and effort in creating your floor plan.
- Customization Options: Look for a tool that allows you to customize your floor plan according to your specific needs. This includes the ability to change wall lengths, add or remove rooms, and adjust the size and position of doors and windows. The tool should also offer options to incorporate a variety of furniture and fixtures, allowing you to personalize your floor plan to suit your style and preferences.
- Accurate Measurements: Accuracy is crucial when creating floor plans. Ensure that the online tool provides precise measurement capabilities, allowing you to input and display dimensions accurately. This will ensure that your floor plan reflects the actual size of the rooms and the spatial relationships within the space.
- Collaboration Features: If you are working with a team or collaborating with others on your floor plan project, consider whether the online tool offers collaboration features. This may include the ability to share and collaborate on the floor plan in real-time, leave comments and annotations, and export the floor plan in various formats to share with others.
- Additional Features: Take into account any additional features that the online tool may offer. This could include 3D rendering capabilities, virtual reality integration, or the ability to generate material lists or cost estimates. These extra features can enhance your floor plan creation experience and provide you with valuable insights.
By considering these factors, you can narrow down your options and choose the online tool that best suits your needs. Remember to take advantage of any trial versions or demos offered by the tools to ensure they meet your requirements before committing to a specific tool.
Now that you have selected the right online tool for creating floor plans, let’s move on to the actual process of creating a floor plan.
Step 1: Gathering Necessary Information and Measurements
Before you dive into creating your floor plan, it’s essential to gather all the necessary information and measurements. This step is crucial as it lays the foundation for an accurate and detailed floor plan. Here’s what you need to do:
- Obtain Architectural Drawings: If you have access to architectural drawings or blueprints of the space, gather them as they provide a wealth of information. These drawings typically include dimensions, wall thickness, and other structural details that you can reference while creating your floor plan. If you don’t have architectural drawings, don’t worry. You can still create a floor plan by taking measurements yourself.
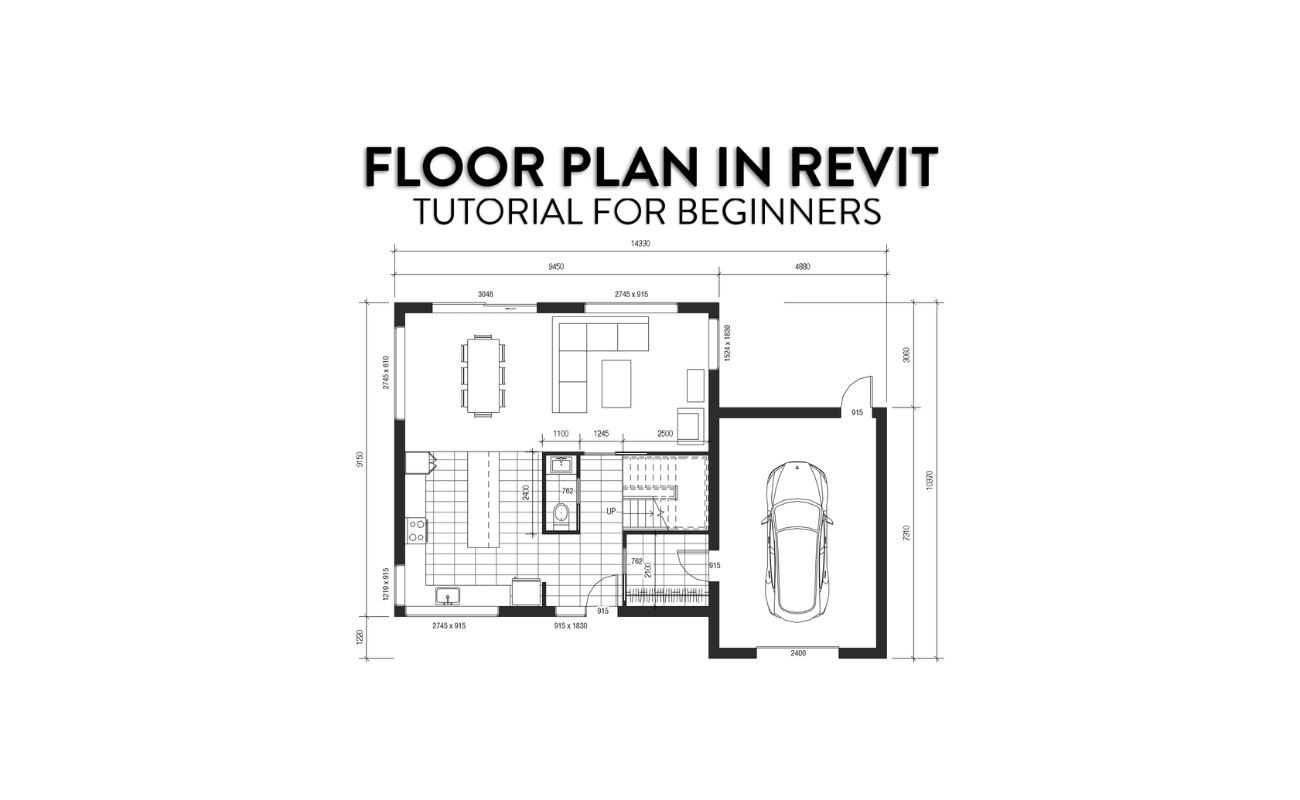
- Measure the Space: Use a tape measure or laser measuring tool to measure the dimensions of the rooms and areas you want to include in your floor plan. Start by measuring the overall dimensions of the space, including the length, width, and ceiling height. Then, move on to measuring individual rooms, hallways, and other areas of interest. Make sure to record accurate measurements in feet or meters.
- Document Structural Elements: Take note of any structural elements that need to be considered in your floor plan, such as load-bearing walls, columns, beams, or staircases. These elements will impact the layout and design of your floor plan, so it’s essential to accurately document their locations and dimensions.
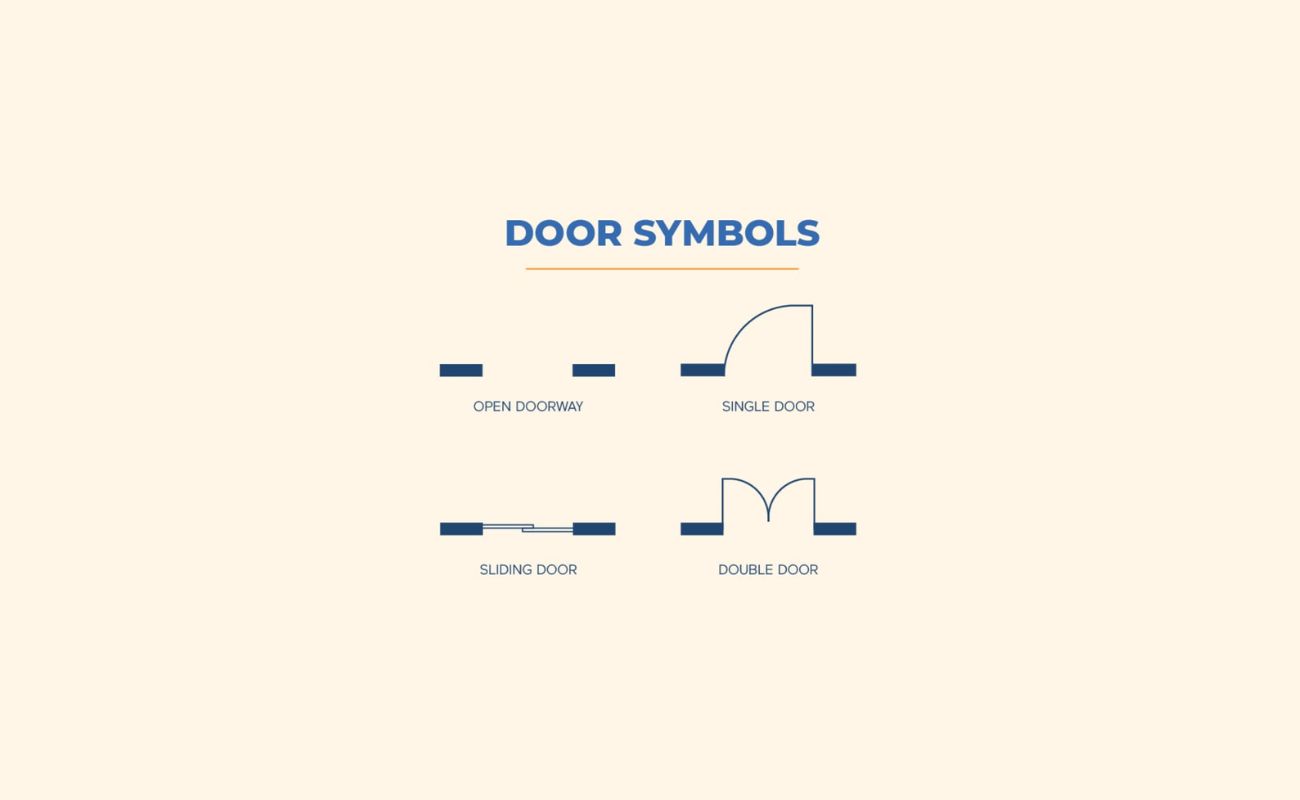
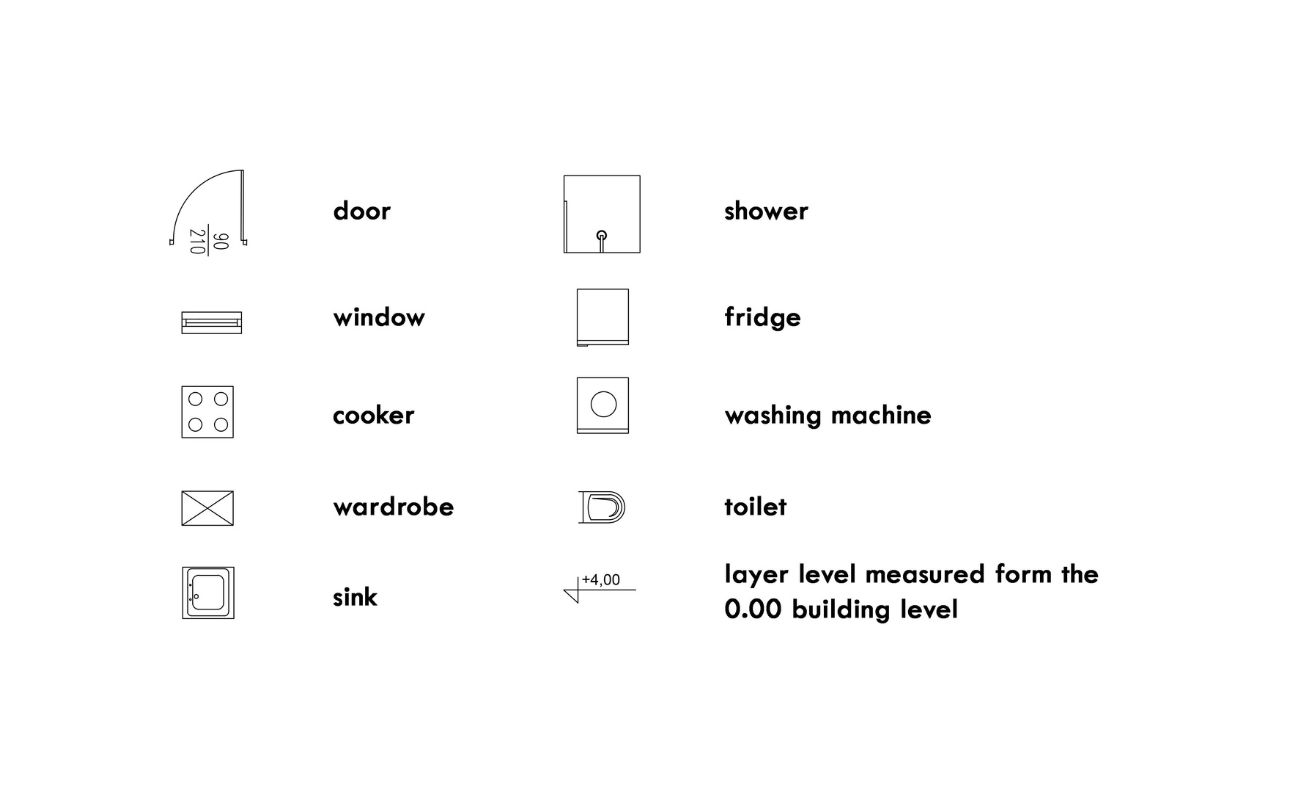
- Identify Doors and Windows: Take note of the location, size, and swing direction of doors and windows in the space. These details are crucial for accurate placement in your floor plan. If possible, measure the dimensions of each door and window to ensure they are represented accurately in your floor plan.
- Consider Electrical and Plumbing Fixtures: Take note of the locations of electrical outlets, light switches, and plumbing fixtures, such as sinks and toilets. These fixtures will impact the layout and functionality of your space. It’s important to consider their placement while creating your floor plan.
- Photograph the Space: Take photographs of the space from different angles, as they can provide additional reference points while creating your floor plan. Photographs can be especially helpful when it comes to capturing unique architectural details or understanding the flow of natural light in the space.
By gathering this necessary information and measurements, you will have a solid foundation to start creating your floor plan. This step ensures that your floor plan accurately reflects the dimensions and layout of the space, setting the stage for a successful design process.
Once you have all the information you need, it’s time to move on to the next step: selecting a template or creating your floor plan from scratch.
Step 2: Selecting a Template or Creating from Scratch
Now that you have gathered all the necessary information and measurements, it’s time to decide whether to use a pre-designed template or create your floor plan from scratch. Both options have their advantages, so let’s explore them:
Option 1: Using a Template
If you’re looking for a quick and convenient way to create your floor plan, using a pre-designed template can be a great starting point. Many online tools offer a wide range of templates for various types of spaces, such as homes, offices, or retail stores. Here’s how to make the most of templates:
- Browse the Template Collection: Take some time to explore the template collection provided by the online tool. Look for a template that closely matches the shape and layout of your space.
- Select the Appropriate Template: Choose a template that best represents the overall layout and structure of your space. Templates often include standard room sizes and common architectural features, making it easier for you to visualize your floor plan.
- Customize the Template: Once you’ve selected a template, you can start customizing it to match your specific needs. Adjust the dimensions of rooms, relocate walls, and modify any other architectural elements to accurately reflect your space.
- Add Furniture and Fixtures: Most templates come with a selection of furniture and fixtures. Use these options to furnish your space and experiment with different layouts. This will give you a clear idea of how furniture placement affects the flow and functionality of the space.
- Make Further Modifications: Don’t hesitate to make additional modifications to the template to better suit your vision. Remember, the template is just a starting point, and you have the creative freedom to adapt it as needed.
Option 2: Creating from Scratch
If you prefer a more customized approach or have a unique space that doesn’t align with any available templates, creating your floor plan from scratch is the way to go. Here’s how to approach it:
- Start with Basic Shapes: Begin by drawing the basic structure of your space, using simple shapes like rectangles for rooms and straight lines for walls. Use your gathered measurements and accurate scale to ensure the proportions are correct.
- Add Details and Structural Elements: Once you have the basic structure in place, start adding doors, windows, walls, and other architectural elements. Make sure to accurately represent the measurements and locations based on your gathered information.
- Incorporate Furniture and Fixtures: Next, add furniture, fixtures, and other elements to the floor plan. You can use symbols or icons to represent each item, ensuring they are proportionally sized and accurately placed.
- Refine and Edit: Continuously review and refine your floor plan, making adjustments as needed. Pay attention to the flow and functionality of the space, ensuring that it meets your requirements and design goals.
Whether you choose to use a pre-designed template or create your floor plan from scratch, the key is to create a blueprint that accurately represents your space and serves as the foundation for the next steps of your design process.
With your chosen approach in mind, it’s time to move on to the next step: adding walls and structural elements to your floor plan.
Read more: How To Create Floor Plan In Excel
Step 3: Adding Walls and Structural Elements
Now that you have your floor plan layout ready, it’s time to add walls and structural elements. This step will give your floor plan the necessary structure and help define the rooms and spaces within your design. Here’s how to proceed:
- Select Wall Tool: In your chosen online tool, look for the wall creation tool or option. This tool allows you to draw and customize walls according to your measurements and design preferences.
- Create Exterior Walls: Begin by drawing the exterior walls of your space. Start with one wall and use the measurement tool or input the dimensions manually. Repeat this process for each side of the space, ensuring that walls are aligned properly.
- Add Interior Walls: Once the exterior walls are in place, it’s time to add interior walls to define individual rooms and areas. Use the wall tool to draw walls within the floor plan, based on the measurements and structural elements you gathered.
- Consider Wall Thickness: Keep in mind that walls have a thickness. Depending on your chosen online tool, you may need to indicate the thickness of the walls to accurately represent them in your floor plan.
- Include Structural Elements: Beyond walls, be sure to add other structural elements such as columns, beams, or support walls that are present in the space. These elements are crucial for both the design and functionality of the building and will contribute to the accuracy of your floor plan.
- Label Walls: As you add walls, consider using labels or tags to indicate the type of walls (e.g., exterior, interior, load-bearing) or any special wall features (e.g., firewalls). This additional detail will provide valuable information during the construction or renovation stages.
- Review and Refine: After adding walls and structural elements, take a step back and review your floor plan. Pay attention to the flow, proportions, and functionality of the space to ensure that it aligns with your design objectives and accurately reflects the measurements you gathered.
Remember to utilize the snapping or alignment features in your online tool to ensure the walls are properly aligned and connected. This will help create a neat and visually appealing floor plan.
Adding walls and structural elements is a crucial step in the floor plan creation process. It establishes the framework for your design and sets the stage for the next steps, such as adding doors, windows, and other openings. With your walls in place, it’s time to move on to Step 4: inserting doors, windows, and openings into your floor plan.
Step 4: Inserting Doors, Windows, and Openings
Now that you have added walls and structural elements to your floor plan, it’s time to incorporate doors, windows, and other openings. This step will enhance the functionality and aesthetics of your design. Here’s how to proceed:
- Select the Opening Tool: In your online tool, look for the opening tool or option. This tool allows you to insert doors, windows, and other openings into your floor plan.
- Identify Door and Window Locations: Reference your gathered information and measurements to determine the desired locations for doors and windows. Consider factors such as accessibility, natural light, views, and traffic flow when deciding where to place these openings.
- Add Doors: Use the opening tool to insert doors into your floor plan. Select the type of door and customize its dimensions to match your measurements. Ensure that doors are placed properly aligned with the walls and create smooth pathways within the space.
- Insert Windows: Next, insert windows into your floor plan. Choose the appropriate window style and customize its dimensions to accurately represent the size and location of your windows. Consider factors such as ventilation, natural light, and views when placing windows.
- Include Other Openings: In addition to doors and windows, you may have other openings in your space, such as archways, pass-throughs, or skylights. Use the opening tool to add these elements, ensuring they match the dimensions and locations you gathered.
- Label and Specify Openings: Just like with walls, consider labeling or tagging your openings to indicate their type or purpose. This information will be valuable during the construction or renovation process.
- Review and Fine-Tune: After adding doors, windows, and other openings, take a step back and review your floor plan. Assess the placement of openings in relation to walls and furniture, making any necessary adjustments to ensure a cohesive and functional layout.
Remember, doors and windows play a vital role in the functionality, natural light, and ventilation of your space. Thoughtfully placing these openings will contribute to the overall design and livability of your floor plan.
Now that you’ve successfully added doors, windows, and other openings, it’s time to move on to Step 5: incorporating furniture and fixtures into your floor plan.
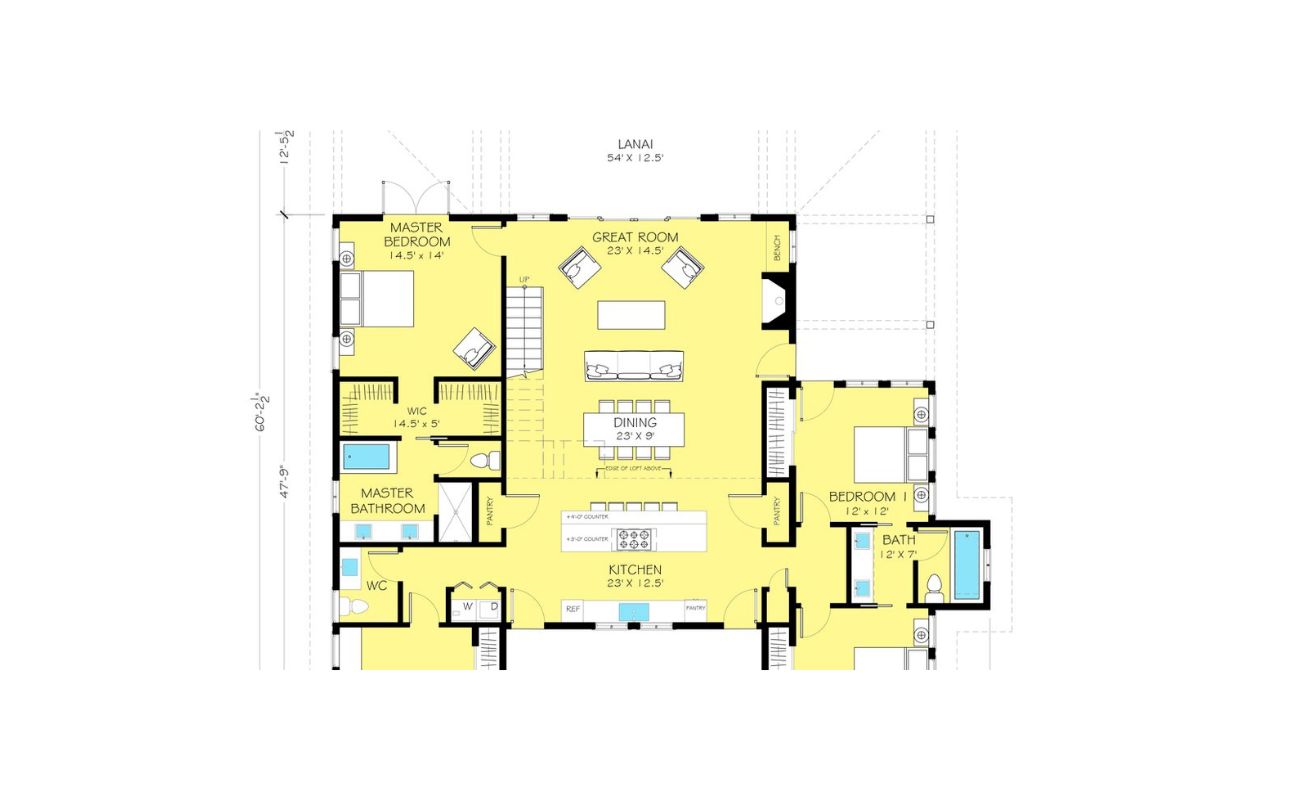
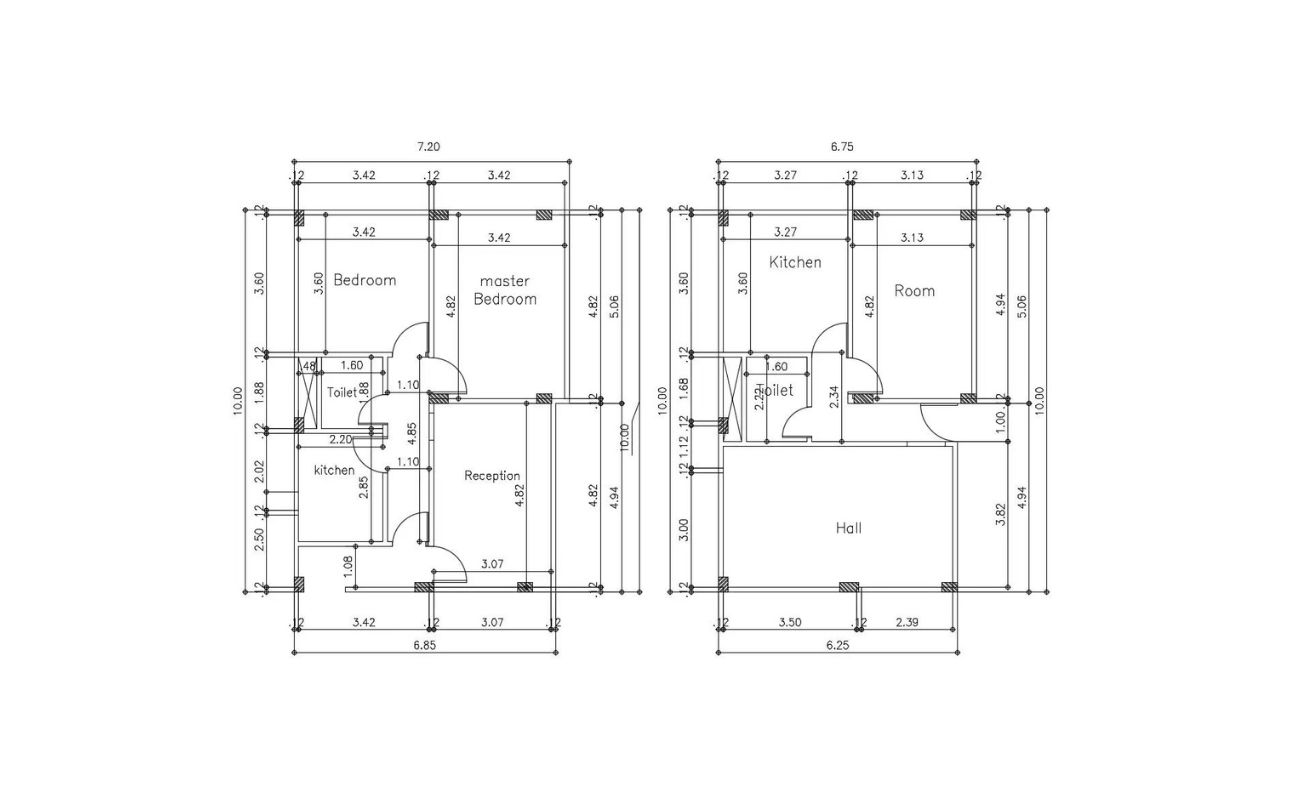
Utilize online floor plan software such as RoomSketcher or Planner 5D to create a floor plan for free. These tools offer easy-to-use interfaces and a wide range of features for designing your space.
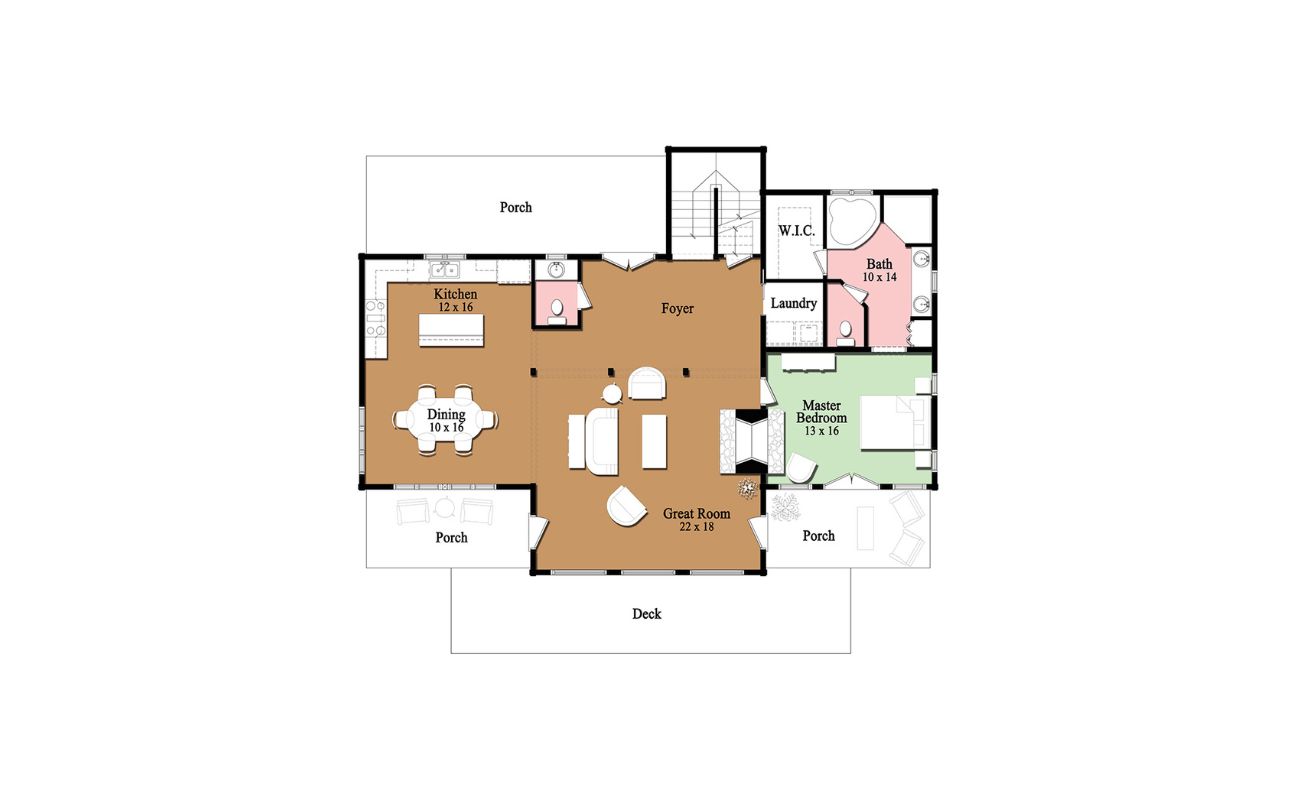
Step 5: Incorporating Furniture and Fixtures
Now that you have your floor plan layout complete with walls, structural elements, and openings, it’s time to bring your space to life by incorporating furniture and fixtures. This step allows you to visualize how your chosen items will fit within the designated areas. Here’s how to proceed:
- Select Furniture and Fixture Options: In your chosen online tool, look for the furniture and fixture library. This library will provide a range of options for various items such as sofas, tables, beds, kitchen appliances, and bathroom fixtures.
- Choose Styles and Sizes: Select furniture and fixtures that match your design style and preferences. Consider the functionality and size of each item, ensuring they fit within the designated spaces as per your gathered measurements.
- Drag and Drop: Use the drag-and-drop function to place furniture and fixtures within the rooms of your floor plan. Experiment with different layouts and arrangements to find the most aesthetically pleasing and functional options.
- Consider Traffic Flow: Take into account the flow of movement within your space. Ensure that there is enough space around furniture pieces for comfortable navigation and that door swings and windows are not obstructed.
- Focus on Proportions: Pay attention to the proportions and scale of furniture and fixtures in relation to the room size. Avoid overcrowding or undersizing items, as this can affect the overall balance and functionality of your space.
- Customize and Arrange: Most online tools allow you to customize furniture colors, textures, and finishes. Take advantage of these options to match your desired aesthetic. Also, experiment with different arrangements and layouts to find the most visually appealing and functional arrangement for your floor plan.
- Make Adjustments as Needed: Continuously review and refine your furniture and fixture placements. Consider the usability and accessibility of each item, and make adjustments as necessary to achieve the desired look and functionality.
Incorporating furniture and fixtures into your floor plan will help you gain a better understanding of the space’s layout and functionality. It allows you to visualize how the chosen items will fit together, ensuring a cohesive and practical design.
With furniture and fixtures now in place, it’s time to move on to Step 6: customizing colors, textures, and finishes within your floor plan.
Step 6: Customizing Colors, Textures, and Finishes
Now that your floor plan is populated with furniture and fixtures, it’s time to add the finishing touches by customizing colors, textures, and finishes. This step allows you to envision the final look and feel of your space. Here’s how to proceed:
- Select the Customization Tool: In your chosen online tool, look for the customization options such as color palette, material library, or surface finishes. These tools will allow you to modify the appearance of various elements in your floor plan.
- Choose a Color Scheme: Decide on a color scheme that aligns with your design vision. Consider the mood you want to create in each room and how colors will coordinate and flow throughout your space. You can choose bold and vibrant colors, or opt for a more neutral and calming palette.
- Apply Colors to Walls: Use the customization tool to apply your chosen colors to the walls in your floor plan. Experiment with different shades and hues to find the best match for each room. Remember that color can greatly impact the ambiance and visual appeal of a space.
- Define Textures and Finishes: Consider the textures and finishes you want to incorporate within each area. Do you prefer smooth, glossy surfaces or rustic, textured materials? Use the customization tool to assign appropriate textures and finishes to walls, floors, and other elements in your floor plan.
- Apply Finishes to Furniture and Fixtures: Extend your customization efforts to the furniture and fixtures in your floor plan. Some online tools allow you to modify the colors, materials, and finishes of these items as well. Coordinate them with the overall color scheme and desired aesthetic of your space.
- Pay Attention to Lighting: Consider the impact of lighting on your chosen colors, textures, and finishes. Natural light and interior lighting can greatly influence how colors appear in a space. Take this into account when making your selections.
- Review and Adjust: Step back and review your customized floor plan. Consider if the chosen colors, textures, and finishes work harmoniously together to create the desired atmosphere and visual effect. Make any necessary adjustments to achieve the desired result.
Customizing colors, textures, and finishes allows you to personalize your floor plan and bring your design vision to life. It adds depth, character, and a sense of cohesion to your space.
With the customization process complete, it’s time to move on to Step 7: adding annotations and labels to your floor plan.
Read more: What Is The Best Free Floor Plan Software
Step 7: Adding Annotations and Labels
As you near completion of your floor plan, it’s important to add annotations and labels to provide important information and clarify certain elements. Annotations and labels help ensure everyone involved in the project understands the floor plan and can follow it accurately. Here’s how to proceed:
- Select the Annotation Tool: In your chosen online tool, look for the annotation or labeling feature. This tool allows you to add text and callouts to specific areas or objects in your floor plan.
- Identify Areas that Require Annotation: Review your floor plan and identify areas or elements that may require clarification or additional information. These could include room labels, measurements, appliance specifications, or any other details that are important for comprehension and execution.
- Add Room Labels: Begin by labeling each room with its respective name or purpose. This helps identify and distinguish different areas within the floor plan. Labeling rooms also aids in navigation and communication about the space.
- Include Measurements: Add measurement annotations for key elements such as walls, room dimensions, or specific furniture pieces. This provides important numerical information for accurate execution during construction or renovation.
- Provide Appliance and Fixture Specifications: If you have specific appliances or fixtures, such as kitchen appliances or bathroom fixtures, add annotations that provide details about size, brand, model, or any other relevant information. This ensures that the intended specifications are properly communicated to contractors or builders.
- Label Important Features: Identify and label important features or unique aspects of your floor plan, such as built-in storage, focal points, or architectural details. This allows others to appreciate the intended design and create them accurately.
- Use Callouts for Clarity: If there are specific areas or elements that require more detailed explanation or clarification, use callouts or text boxes to provide additional information. These annotations help avoid misunderstandings and ensure everyone understands the intended design and layout.
- Review and Proofread: After adding annotations and labels, thoroughly review and proofread your floor plan. Double-check the accuracy of the information provided and ensure that it is clear, concise, and easy to understand.
Adding annotations and labels to your floor plan enhances clarity, improves communication, and aids in proper execution during the construction or renovation process. It ensures that everyone involved has a clear understanding of the intended design and layout.
With annotations and labels in place, it’s time to move on to Step 8: rendering and viewing the final floor plan.
Step 8: Rendering and Viewing the Final Floor Plan
As you reach the final step of creating your floor plan, it’s time to render and view the finished result. Rendering provides a visual representation of your floor plan, allowing you to see the design come to life. Here’s how to proceed:
- Select the Rendering Option: In your chosen online tool, look for the rendering or visualization feature. This option will allow you to generate a realistic or stylized representation of your floor plan.
- Choose the Rendering Style: Depending on the features of the online tool, you may have options for different rendering styles, such as 2D, 3D, or even virtual reality. Select the style that best showcases your floor plan and aligns with your design vision.
- Adjust Lighting and Camera Angle: Some rendering options allow you to adjust lighting conditions and camera angles for a more dynamic view of your floor plan. Experiment with these settings to find the most visually appealing presentation.
- Render the Floor Plan: Once you’ve selected the desired rendering settings, initiate the rendering process. Depending on the complexity of your floor plan and the capabilities of the online tool, this may take some time to generate the final image or interactive view.
- Review and Analyze: Take the time to carefully analyze the rendered floor plan. Pay attention to details such as materials, colors, furniture placement, and spatial relationships. This is the time to verify that the design meets your expectations and aligns with your vision.
- Make Final Adjustments: During the review process, you may identify areas that require further adjustment or refinement. Use the online tool to make these final modifications, ensuring that the rendered floor plan accurately represents your intentions.
- Save and Share: Once you are satisfied with the rendered floor plan, save it in a format that is appropriate for your needs. This could be a high-resolution image, a downloadable file, or even a shareable link. Share the final floor plan with relevant stakeholders, such as contractors, designers, or clients.
Rendering your floor plan gives you a comprehensive visual representation of the design and allows you to evaluate the functionality, aesthetics, and overall concept of your space. It’s an exciting moment when your floor plan comes to life!
With Step 8 completed, you have successfully created and rendered your final floor plan. Congratulations on your accomplishment! Now you can move forward with confidence in executing your design or sharing it with others.
If you’re interested in additional tips and resources related to floor plan creation, continue reading below.
Conclusion
Creating a floor plan allows you to envision and design a space that meets your needs and reflects your personal style. With the availability of online tools, the process has become more accessible to everyone, regardless of their design background. By following the step-by-step guide outlined in this article, you have learned how to create a comprehensive and visually appealing floor plan.
Understanding the importance of floor plans and their role in space planning, furniture placement, and communication with contractors and builders, you have gained a deeper appreciation for their significance. By choosing the right online tool that is user-friendly, offers customization options, and has a variety of templates, you set yourself up for success.
Through the process of gathering necessary information and measurements, selecting templates or creating from scratch, adding walls and structural elements, inserting doors, windows, and openings, incorporating furniture and fixtures, customizing colors, textures, and finishes, adding annotations and labels, and finally rendering and viewing the final floor plan, you have embarked on a creative journey. Each step allowed you to refine and refine your design, bringing you closer to the realization of your vision.
Remember that floor plans are not static documents; they are dynamic and can be adjusted and refined as your design evolves. The flexibility of online tools allows you to easily make changes and explore different possibilities. Don’t be afraid to experiment and iterate until you achieve the perfect floor plan for your space.
Now armed with your final floor plan, you can confidently proceed with your construction, renovation, or design project. Share your floor plan with contractors, designers, or clients, and use it as a visual guide throughout the process. The floor plan will act as a roadmap, ensuring everyone involved is on the same page and working towards a shared vision.
Creating a floor plan is an exciting and rewarding process that allows you to transform your ideas into a tangible representation. Whether it’s a home, office, retail space, or any other architectural project, a well-designed floor plan sets the stage for a successful and functional space.
So, roll up your sleeves, unleash your creativity, and let your floor plan lead the way to a beautifully designed environment!
Additional Tips and Resources:
- Utilize online tutorials and guides specific to your chosen online tool.
- Explore design inspirations and floor plan examples to gather ideas.
- Seek feedback from trusted friends, family, or professionals to get different perspectives on your floor plan.
- Consider conducting virtual walkthroughs or using augmented reality features to experience your floor plan in a more immersive way.
- Continue to educate yourself on architecture, design principles, and new trends to enhance your floor plan creation skills.
With these tips and resources at your disposal, you are well-equipped to tackle future floor plan projects and create spaces that are both functional and visually stunning.
Additional Tips and Resources
Creating a floor plan is a dynamic and creative process that requires attention to detail and careful consideration. To further enhance your floor plan creation skills, here are some additional tips and resources to explore:
1. Research Architectural Design Principles: Familiarize yourself with architectural design principles such as balance, proportion, rhythm, and harmony. Understanding these principles will help you create floor plans that are visually pleasing and functional.
2. Utilize Online Design Communities: Engage in online design communities and forums where you can connect with other individuals interested in floor plan creation. These communities offer a platform for sharing ideas, receiving feedback, and gaining inspiration from the works of others.
3. Stay Up-to-Date with Design Trends: Keep yourself informed about the latest design trends in architecture and interior design. This helps you stay relevant and ensures that your floor plans reflect current styles and preferences.
4. Study Real Estate Listing Photos: Analyze real estate listing photos to understand how professionals stage and present spaces. Pay attention to furniture placement, color palettes, and room layouts. This can provide valuable insights for creating visually appealing and marketable floor plans.
5. Take Advantage of Online Floor Plan Libraries: Many online tools offer floor plan libraries where you can browse through a wide range of pre-designed floor plans. This is a great resource for inspiration and a starting point for your own projects.
6. Collaborate with Professionals: If you have the opportunity, consider collaborating with professionals such as architects, interior designers, or contractors. Their expertise can provide valuable guidance and insights into creating functional and well-designed floor plans.
7. Experiment with Virtual Reality: If available, explore the use of virtual reality (VR) tools to create immersive experiences of your floor plans. This technology allows you to walk through the space virtually, providing a realistic preview of the design before implementation.
8. Utilize Mobile Apps: There are mobile apps specifically designed for floor plan creation. Explore these apps as they often offer unique features and tools that can enhance your floor plan creation process on-the-go.
9. Consider Sustainable Design: Incorporate sustainable design elements into your floor plans by focusing on energy efficiency, natural lighting, and environmentally friendly materials. This not only benefits the environment but also adds value to your space.
10. Continuously Learn and Improve: Keep the learning process ongoing. Attend workshops, webinars, or online courses to expand your knowledge and acquire new floor plan creation techniques. Stay curious and embrace opportunities for growth.
By implementing these tips and exploring the available resources, you can further refine your floor plan creation skills and develop a unique approach to designing functional and aesthetically pleasing spaces.
Frequently Asked Questions about How To Create A Floor Plan For Free
Was this page helpful?
At Storables.com, we guarantee accurate and reliable information. Our content, validated by Expert Board Contributors, is crafted following stringent Editorial Policies. We're committed to providing you with well-researched, expert-backed insights for all your informational needs.


0 thoughts on “How To Create A Floor Plan For Free”