Home>diy>Architecture & Design>How To Draw A Door In A Floor Plan
Architecture & Design
How To Draw A Door In A Floor Plan
Modified: October 18, 2024
Learn how to draw a door in a floor plan with our comprehensive guide. Enhance your architecture design skills and create professional floor plans.
(Many of the links in this article redirect to a specific reviewed product. Your purchase of these products through affiliate links helps to generate commission for Storables.com, at no extra cost. Learn more)
Introduction
Welcome to the world of architecture and design! If you’ve ever wondered how to draw a door in a floor plan, you’ve come to the right place. A floor plan is a key element in designing any building, and understanding how to accurately represent doors is crucial for creating functional and aesthetically pleasing spaces.
In this article, we will guide you through the process of drawing a door in a floor plan, step by step. Whether you’re a professional architect, a budding designer, or someone who simply enjoys exploring the world of architecture, this article will provide you with the knowledge and tools you need to create accurate and visually appealing floor plans.
But first, let’s briefly discuss what a floor plan is and its significance in the design process. A floor plan is a two-dimensional representation of a building’s layout, providing a bird’s eye view of the space. It showcases the arrangement of rooms, walls, windows, and, of course, doors. Architects and designers rely on floor plans to communicate their vision to clients, contractors, and other professionals involved in the construction process.
Creating a well-designed floor plan is not only essential for visualizing the space but also for ensuring that it meets the functional requirements of the building. Doors, in particular, play a critical role in defining the flow and accessibility of a building. They provide entrances, exits, and pathways between different rooms or areas.
In the following sections, we will walk you through each step in drawing a door in a floor plan. From measuring and marking the desired location of the door to adding details and finalizing the design, we’ll cover it all. So, grab your tools, put on your creative hat, and let’s get started on this exciting journey of architectural design!
Key Takeaways:
- Master the art of drawing doors in floor plans with precision and creativity using essential tools and step-by-step guidance. Elevate architectural designs and communicate vision effectively.
- Understand the significance of accurately representing doors in floor plans, from measuring and marking to adding details and finalizing the design. Contribute to functional and visually appealing spaces.
Read more: How To Draw A Sliding Door On A Floor Plan
Understanding Floor Plans
Before diving into the steps of drawing a door in a floor plan, it’s important to have a solid understanding of what a floor plan entails and how it is structured. A floor plan is essentially a scaled diagram that showcases the layout of a building from a top-down perspective. It provides a comprehensive view of the space, including rooms, walls, windows, and doors.
Typically, floor plans are drawn to scale, meaning that the measurements of the walls and other elements are proportionate to their actual size in the building. This allows architects, designers, and builders to accurately visualize and interpret the floor plan.
There are various types of floor plans, each serving different purposes. Some common types include:
- Residential Floor Plans: These plans are used for homes and apartments, and they include details such as bedrooms, bathrooms, kitchen, living areas, and any other spaces specific to the residential setting.
- Commercial Floor Plans: Commercial floor plans are designed for businesses such as offices, retail stores, and restaurants. They take into account factors like customer flow, seating arrangements, storage areas, and service access.
- Architectural Floor Plans: These are detailed floor plans prepared by architects, incorporating structural elements, electrical and plumbing systems, and other technical specifications.
- Interior Design Floor Plans: Interior designers create these floor plans to showcase furniture placement, room layouts, and overall aesthetics.
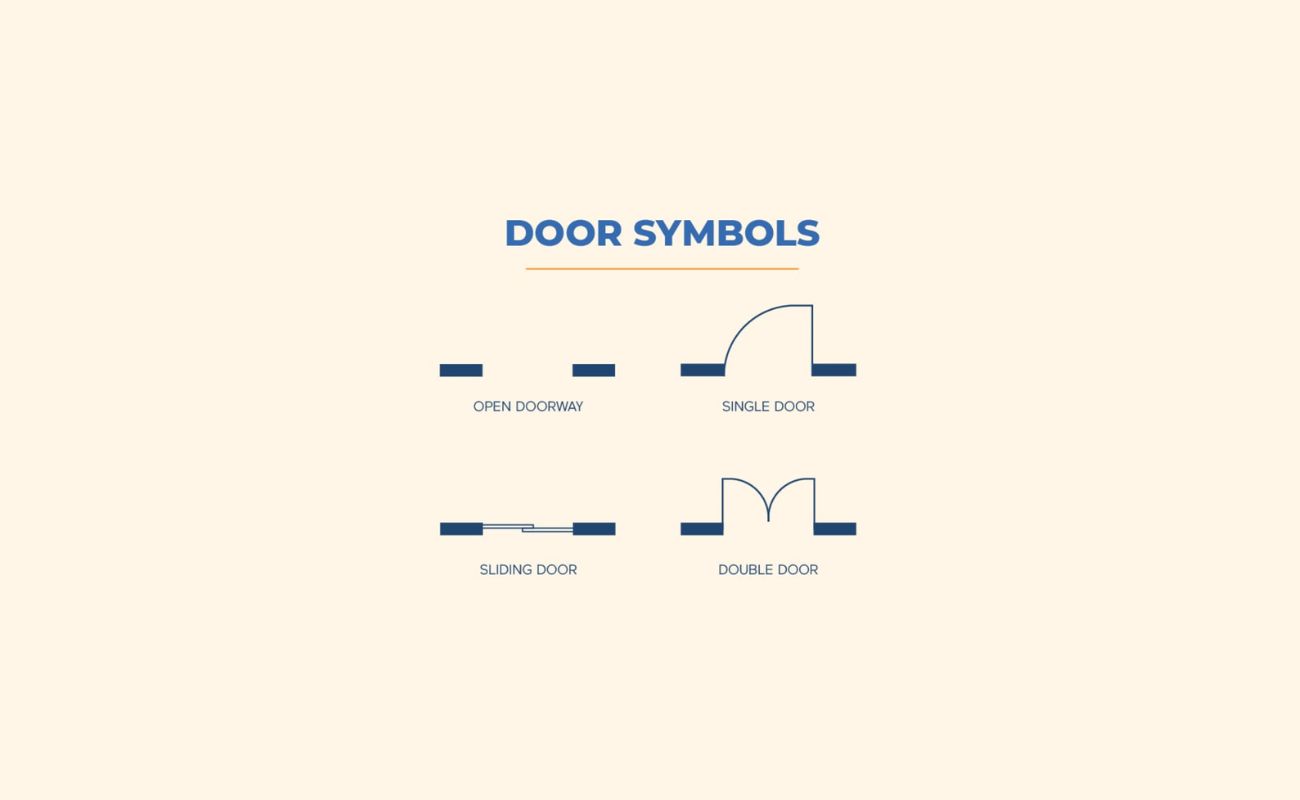
Regardless of the type, a floor plan is typically composed of a series of lines and symbols that represent the different elements within a building. Walls are represented by solid lines, while doors are typically indicated using specific symbols or shapes.
Understanding the symbols and conventions used in floor plans is crucial for accurately interpreting and creating them. Common symbols for doors include a rectangular shape with an arc at the top, representing the swinging motion of a door, or a simple straight line indicating a sliding door.
Now that you have a basic understanding of floor plans and their purpose, let’s move on to the tools and materials you’ll need to draw a door in a floor plan.
Tools and Materials Required
To draw a door in a floor plan, you’ll need a few essential tools and materials to ensure accuracy and precision. Here’s a list of what you’ll need to get started:
- Pencil: A good quality pencil will be your primary drawing tool. Opt for a mechanical pencil or one with a fine tip for better control.
- Eraser: A high-quality eraser will allow you to make adjustments and corrections as you sketch the door.
- Ruler: A ruler is crucial for drawing straight lines and measuring distances. A clear, transparent ruler with metric and imperial measurements is ideal for precise drawings.
- Scale: A scale ruler, which usually has different scales on each edge, is necessary to ensure that your floor plan is accurately proportioned.
- Architectural Templates: These templates come with pre-drawn symbols for doors, windows, and other architectural elements. They provide consistency and save time when drawing multiple doors.
- Graph paper or Tracing paper: Using graph paper or tracing paper will help you maintain straight lines and easily make changes or additions to your floor plan.
- Protractor: If your door includes curves or angles, a protractor will be handy for drawing and measuring them accurately.
- Compass: A compass can be useful for drawing arcs or circles in your door design.
- Colored Markers or Pens: Using different colors to indicate different elements in your floor plan will enhance its visual appeal and make it easier to read.
Having these tools and materials ready will ensure that you can create precise and visually appealing door designs in your floor plans. Now, let’s move on to the step-by-step process of actually drawing a door in a floor plan.
Step 1: Measure and Mark the Desired Location of the Door
Before you can start drawing the door in the floor plan, you need to determine its exact location. This involves measuring and marking the position where you want the door to be placed. Here’s how you can do it:
- Measure the wall: Use a measuring tape to determine the length of the wall where you plan to install the door. Note down this measurement for reference.
- Identify the center: Divide the length of the wall by 2 to find the center point. This is where the middle of the door will be placed.
- Mark the width: Decide on the width of the door and mark half of this width on either side of the center point. This will give you the starting and ending points of the door.
- Consider clearance: Keep in mind that the width of the door should also account for the door frame and any clearance required for proper operation.
- Double-check the measurements: Once you have marked the desired location of the door, double-check the measurements to ensure accuracy.
By taking these measurements and marking the desired location of the door, you’ll have a clear starting point for drawing the door in the floor plan. This will allow you to accurately represent its position within the space and ensure a smooth flow of movement in the building.
Now that you have marked the location of the door, let’s move on to the next step: deciding on the door width and height.
Step 2: Decide on the Door Width and Height
Once you have determined the location of the door in the floor plan, the next step is to decide on the width and height of the door. This is an important consideration as it affects the functionality and aesthetics of the space. Here’s how you can determine the door’s dimensions:
- Consider building codes and regulations: Before finalizing the door dimensions, it’s important to check local building codes and regulations, as they may specify minimum requirements for door widths and heights.
- Account for wheelchair accessibility: If the building needs to be wheelchair accessible, you may need to increase the width of the door to accommodate wheelchair users.
- Consider the function of the space: The function of the room or area where the door is located will also influence its dimensions. For example, a door leading to a main entrance may require a wider and taller opening compared to a door for a smaller room.
- Take into account architectural style: The architectural style of the building or space may also play a role in determining the door dimensions. For example, a modern design may feature larger, floor-to-ceiling doors for a sleek and spacious look.
- Sketch the door dimensions: Using your ruler and scale, sketch the door in the floor plan, making sure to accurately represent its width and height. Use the markings you made in the previous step as a reference for the door’s starting and ending points.
- Label the door dimensions: To avoid confusion, label the door dimensions directly on the floor plan. This will make it easier to understand and interpret the design.
By considering building codes, accessibility requirements, function, and architectural style, you can determine the right width and height for the door in your floor plan. Once you have made these decisions, you are ready to move on to the next step: drawing the door opening.
When drawing a door in a floor plan, use a standard symbol such as a straight line for the swing direction and a small arc to indicate the door swing. Make sure to include the door’s width and swing direction in your plan.
Read more: How To Draw A Garage Door On A Floor Plan
Step 3: Draw the Door Opening
Now that you have determined the location and dimensions of the door in your floor plan, it’s time to draw the door opening. The door opening represents the space occupied by the door, including the frame and swing motion. Here’s how you can draw the door opening in your floor plan:
- Using your ruler, draw a horizontal line to represent the base of the door opening. This line should be the same length as the width of the door you have decided on.
- From the two endpoints of the base line, draw two vertical lines upwards to represent the height of the door opening. The height should correspond to the height of the door you have determined.
- At the top of the vertical lines, draw a curved line connecting the two ends. This curved line represents the arc of the door swing.
- Once you have drawn the basic shape of the door opening, you can add detailing to indicate the door frame. Draw two vertical lines parallel to the sides of the door opening, inside the shape. These lines represent the door frame.
- Label the door opening: To avoid confusion, label the door opening with specific dimensions, indicating the width and height of the door. You can also use symbols or abbreviations to represent the door type, such as “SD” for “Single Door” or “DD” for “Double Door.
- Review and adjust: Take a step back and review the door opening you have drawn. Make any necessary adjustments to ensure that it accurately represents the intended design and dimensions.
By following these steps, you can create an accurate representation of the door opening in your floor plan. This will give you a clear visual understanding of how the door will fit into the overall space and allow for proper navigation and functionality.
Now that you have drawn the door opening, it’s time to move on to the next step: adding details to the door.
Step 4: Add Details to the Door
Now that you have drawn the basic shape of the door opening in your floor plan, it’s time to add some details to make the door visually appealing and informative. By adding these details, you can enhance the understanding of the door’s design and functionality. Here’s how you can add details to the door:
- Add a door swing symbol: To indicate the direction in which the door swings, you can draw a small arc or arrow within the door opening. This will help users understand how the door operates and ensure that it doesn’t obstruct any nearby furniture or walls.
- Add door handle and hardware: Draw a small rectangle or circle within the door opening to represent the door handle. You can also include additional details, such as hinges or a lock, depending on the level of detail you want to provide in your floor plan.
- Consider material and texture: If you want to convey the material or texture of the door, you can use shading or texture lines to indicate this. For example, you can use crosshatch lines to represent a wooden door or a smooth shaded area for a glass door.
- Label the door type: To provide additional clarity, you can label the door type next to the door opening. This can be useful when there are multiple doors in the floor plan or when specific types of doors are required, such as fire-rated doors or sliding doors.
- Indicate door swing clearance: If there are any obstructions or clearance requirements for the door swing, such as furniture or walls, you can indicate these with dotted lines or annotations. This will ensure that the door has enough space to open and close without any issues.
- Review and adjust: Take a step back and review the details you have added to the door. Make any necessary adjustments to ensure that they accurately represent the intended design and provide the necessary information.
By following these steps, you can add the necessary details to your floor plan, making the door design visually clear and informative. These details will aid in understanding the door’s functionality, its relationship with surrounding elements, and any specific requirements it may have.
With the details added to the door, let’s move on to the next step: incorporating other elements of the floor plan.
Step 5: Incorporate Other Elements of the Floor Plan
As you continue to create a comprehensive floor plan, it is essential to incorporate other elements that interact with the door. These elements include walls, windows, and other architectural features. By incorporating these elements, you can ensure accuracy and cohesion within the floor plan. Here’s how you can incorporate other elements into your floor plan:
- Draw walls: Using your ruler and scale, draw the walls surrounding the door. Ensure that the walls are correctly proportioned and aligned with the door opening. Consider the type of walls, such as load-bearing walls or partitions, and represent them accordingly.
- Position windows and openings: If there are any windows or openings near the door, indicate their position in relation to the door. Draw them accurately to scale and label them appropriately. Take note of the window placement as it affects the natural light and ventilation in the space.
- Account for wall thickness: Be mindful of the thickness of the walls when drawing them in the floor plan. Typically, walls are represented by solid lines, and their thickness may vary depending on the construction materials.
- Include architectural features: Consider any architectural features or design elements that interact with the door. This could include columns, arches, or decorative moldings. Incorporate these elements into the floor plan with precise measurements and accurate placement.
- Label and annotate: As you incorporate other elements into the floor plan, label each component and provide relevant annotations. This will help clarify the purpose and function of each element, aiding in understanding the overall design intent.
- Review and refine: Take a step back and review the floor plan as a whole. Ensure that all elements, including the door and surrounding features, are accurately represented and aligned. Make any necessary refinements or adjustments to achieve a cohesive and visually pleasing design.
By incorporating these elements into your floor plan, you create a holistic view of the space and how the door interacts with the surrounding architecture. This will allow you to better visualize and communicate your design ideas to clients, contractors, and other stakeholders involved in the building process.
Now that you have incorporated all the necessary elements, let’s move on to the final step: finalizing the door design in the floor plan.
Step 6: Finalize the Door Design
After going through the previous steps of measuring, marking, drawing, and incorporating other elements, it’s time to finalize the door design in your floor plan. This step involves reviewing the entire floor plan, making necessary adjustments, and ensuring that the door design aligns with your overall vision. Here’s how you can finalize the door design:
- Review the floor plan: Take a thorough look at the entire floor plan, paying close attention to the door design and its interaction with the surrounding elements. Check for any inconsistencies or inaccuracies in dimensions, labeling, or annotations.
- Make adjustments if needed: If you notice any discrepancies or areas that require refinement, make the necessary adjustments. This may involve redrawing lines, modifying dimensions, or adding additional details to improve the clarity and readability of the floor plan.
- Validate the door placement and functionality: Ensure that the door’s location and size make sense in the context of the space. Consider factors such as traffic flow, accessibility, and safety. Validate that the door swing doesn’t conflict with other elements in the floor plan.
- Enhance the visual presentation: If desired, enhance the visual presentation of the door by using different line weights, shading, or colors. This can help differentiate the door from other elements and make it stand out within the floor plan.
- Double-check labels and annotations: Verify that all labels and annotations are clear, concise, and placed appropriately. This will aid in understanding the purpose, dimensions, and functionality of the door within the floor plan.
- Seek feedback if necessary: If possible, seek feedback from colleagues, clients, or other experts in the field. Their input can provide valuable insights and help ensure that the door design is accurate, functional, and visually appealing.
By following these steps and finalizing the door design in your floor plan, you can confidently present your design concept to others involved in the building process. The finalized floor plan will serve as a valuable tool for communication, construction, and decision-making throughout the project.
And with that, you have successfully completed the process of drawing a door in a floor plan. Congratulations! Remember, practice and experimentation will further refine your skills in creating intricate and accurate floor plans. So, keep exploring, learning, and honing your architectural design abilities.
Best of luck with your future floor plans and architectural endeavors!
Read more: How To Draw A Pocket Door On A Floor Plan
Conclusion
Drawing a door in a floor plan is a fundamental skill for architects, designers, and anyone interested in the world of architecture and design. By understanding the process and following the steps outlined in this article, you can create accurate and visually appealing door designs within your floor plans.
A floor plan serves as the blueprint for a building, allowing designers, clients, and contractors to visualize the space and understand its functionality. The door plays a vital role in defining the flow and accessibility of a building, making it crucial to accurately represent it in the floor plan.
Throughout the steps outlined in this article, you learned how to measure and mark the desired location of the door, decide on its width and height, draw the door opening, add details, incorporate other elements of the floor plan, and finalize the door design. Each step is crucial in creating a comprehensive and informative floor plan that accurately depicts the door within the larger architectural context.
Remember to consider building codes, accessibility requirements, and the function of the space when making design decisions. Incorporate the necessary details, such as door swings, handles, and materials, to enhance the visual understanding of the door’s design and functionality.
By following these steps and continuously honing your skills, you will be able to create floor plans that effectively communicate your design vision, assist in construction processes, and improve the overall user experience of a building.
So, grab your tools, unleash your creativity, and start drawing doors in your floor plans. With practice and dedication, you will master the art of architectural design and contribute to the creation of inspiring and functional spaces.
Happy drawing!
Now that you've mastered drawing doors in floor plans, why not deepen your understanding of the entire concept? Our next article, "What Is A Floor Plan," offers a clear and engaging breakdown of what floor plans are, why they're crucial for effective architectural design, and how they can help you visualize spaces more effectively. This piece is perfect for refining your design skills further, ensuring every project reflects precise, professional standards.
Frequently Asked Questions about How To Draw A Door In A Floor Plan
Was this page helpful?
At Storables.com, we guarantee accurate and reliable information. Our content, validated by Expert Board Contributors, is crafted following stringent Editorial Policies. We're committed to providing you with well-researched, expert-backed insights for all your informational needs.


0 thoughts on “How To Draw A Door In A Floor Plan”