Home>diy>Architecture & Design>How To Measure A Floor Plan
Architecture & Design
How To Measure A Floor Plan
Modified: January 6, 2024
Learn how to measure a floor plan in architecture design and make accurate calculations for your project. Find step-by-step instructions and helpful tips for creating precise floor plans.
(Many of the links in this article redirect to a specific reviewed product. Your purchase of these products through affiliate links helps to generate commission for Storables.com, at no extra cost. Learn more)
Introduction
When it comes to designing or renovating a space, one of the first and most crucial steps is accurately measuring the floor plan. Whether you are an architect, interior designer, or a homeowner planning a DIY project, having precise measurements is essential for ensuring that furniture, fixtures, and other elements fit perfectly within the space.
In this comprehensive guide, we will walk you through the step-by-step process of measuring a floor plan. By following these instructions and using the right tools, you can obtain accurate measurements that will serve as the foundation for your design project.
Before we begin, it’s important to note that different types of spaces may require slight variations in the measuring process. For example, measuring a residential floor plan might differ from measuring a commercial floor plan. However, the basic principles discussed in this guide can be applied to most scenarios.
So, let’s dive in and learn how to measure a floor plan!
Key Takeaways:
- Accurate floor plan measurements are essential for successful design projects, ensuring furniture fits and layouts are well-planned. Follow the step-by-step guide and use the right tools for precision.
- Mastering the art of measuring a floor plan empowers architects, designers, and homeowners to create functional, aesthetically pleasing spaces that meet their vision and needs. Gather tools, set up the area, and measure with confidence.
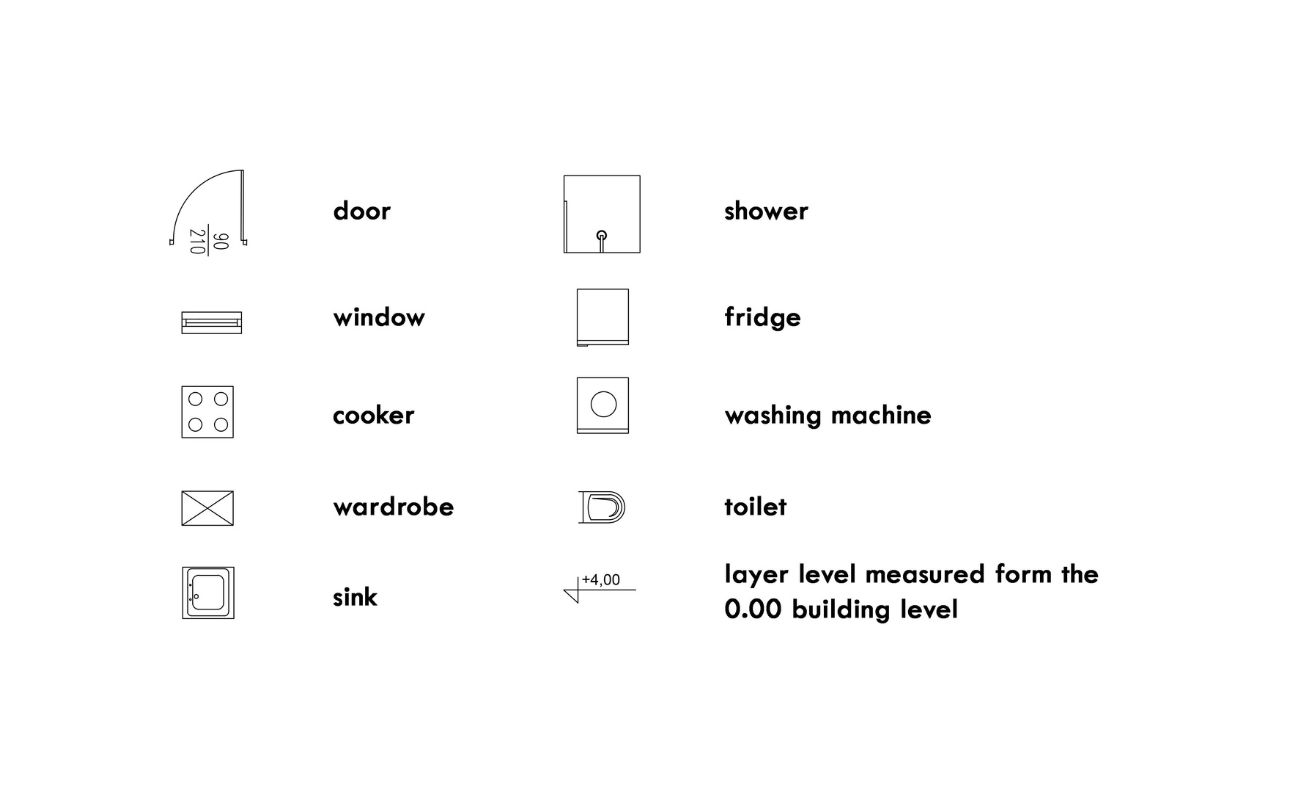
Read more: What Is A Floor Plan
Step 1: Gather necessary tools and materials
Before you begin measuring a floor plan, it is important to gather all the necessary tools and materials. Having the right equipment on hand will not only make the process easier but also help ensure accurate measurements. Here are the essential tools you will need:
- Tape measure: A sturdy tape measure is crucial for measuring the dimensions of walls, doors, windows, and rooms. Make sure it has both metric and imperial units for convenience.
- Pencil and notepad: These basic stationery items are essential for jotting down measurements, notes, and any additional details you need to document.
- Graph paper or a digital measuring app: These tools will help you create a scaled floor plan drawing. You can either use traditional graph paper and a ruler or opt for a digital measuring app on your smartphone or tablet.
- Camera or smartphone: Taking pictures of the space can be helpful, especially if you need to reference specific details later on.
- Optional: Laser measure or electronic measuring device: While not necessary, using a laser measure or electronic measuring device can save time and provide more precise measurements, especially for larger spaces.
Once you have gathered all the necessary tools and materials, you are ready to move on to the next steps and start measuring the floor plan.
Step 2: Set up your measuring area
Before you start measuring, it’s important to prepare the area to ensure accuracy and efficiency. Here are the steps to set up your measuring area:
- Clean and clear the space: Remove any furniture, clutter, or obstacles that could interfere with taking accurate measurements. This will give you a clear view of the walls and other features.
- Make sure the area is well-lit: Proper lighting is essential for accurately measuring the space. Ensure that there is sufficient natural light or use artificial lighting to brighten the area.
- Assign a reference point: Choose a fixed reference point in the room, such as a corner or a specific wall, that you will start measuring from. This will help maintain consistency throughout the process.
- Create a sketch or diagram: Before you begin measuring, it’s helpful to sketch a rough diagram of the floor plan on a piece of paper or using a digital app. This will act as a visual guide and help you stay organized.
Once you have set up your measuring area and have your sketch or diagram ready, you are prepared to move on to the next step of measuring the walls.
Step 3: Start measuring the walls
With your measuring area set up and your tools at the ready, it’s time to begin measuring the walls. Follow these steps to accurately measure the length of each wall:
- Select a wall to start with: Choose a wall as your starting point and focus on measuring it before moving on to the next one. This will help you maintain a systematic approach.
- Position your tape measure: Place the end of your tape measure against one corner of the wall and extend it along the length of the wall until you reach the other corner.
- Hold the tape measure taut: Ensure that the tape measure is held tightly against the wall, making sure it lies flat and straight along the surface. This will help you get an accurate measurement.
- Read the measurement: Look at the number on the tape measure where it meets the second corner of the wall. Note down the measurement in your notepad or digital app.
- Repeat for all walls: Continue this process for each wall in the room, measuring them one by one. Be sure to indicate the direction (e.g., north, south, east, west) of each wall in your diagram or notes for easy reference.
It’s important to measure each wall individually to account for any variations in length. Once you have measured all the walls in the room, you can move on to the next step of measuring the doors and windows.
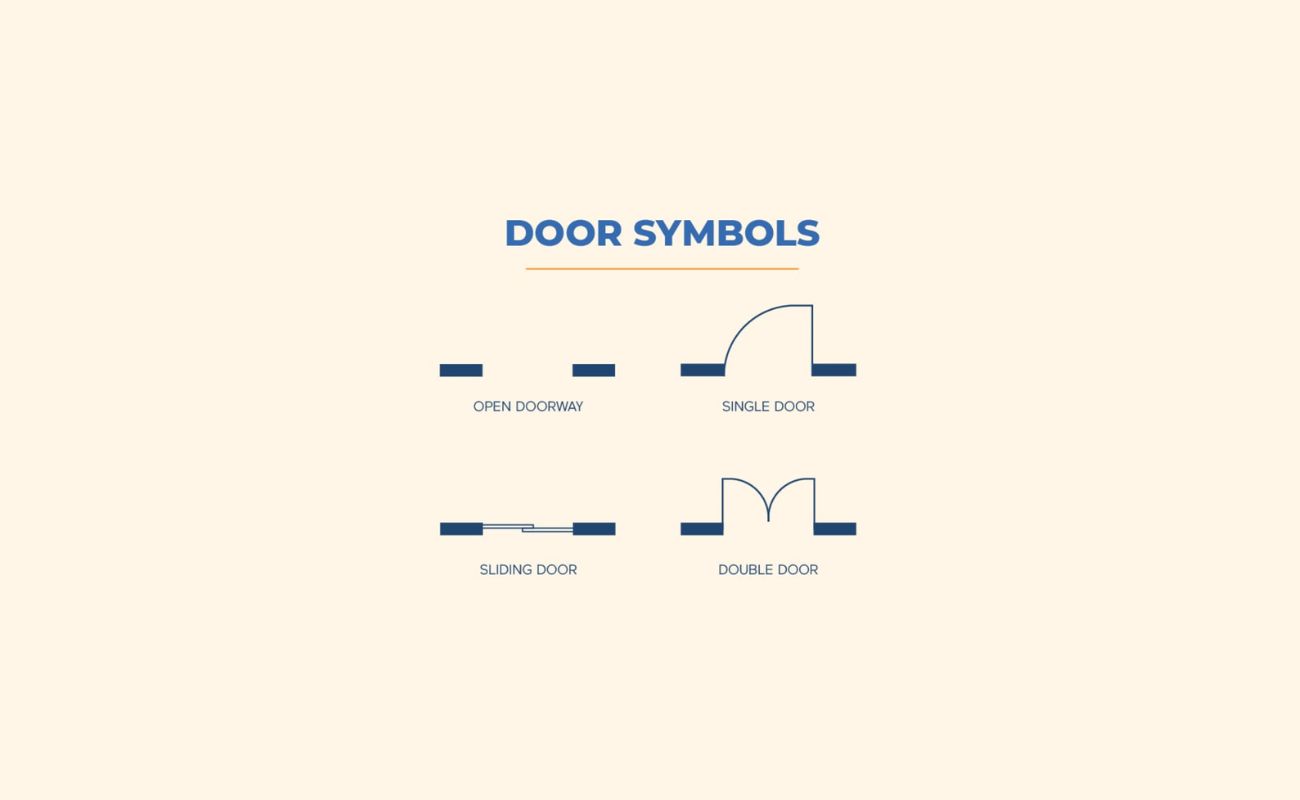
Step 4: Measure the doors and windows
After measuring the walls, it’s time to measure the dimensions of the doors and windows in the room. This step is crucial for accurately planning the placement of furniture and determining the overall layout of the space. Follow these steps to measure doors and windows:
- Position your tape measure: Place the end of your tape measure against one edge of the door or window frame.
- Extend the tape measure: Extend the tape measure along the width or height of the door or window until you reach the opposite edge of the frame.
- Hold the tape measure taut: Similar to measuring walls, make sure the tape measure is held firmly and lies flat against the frame to get an accurate measurement.
- Read the measurement: Look at the number on the tape measure where it meets the opposite edge of the door or window frame. Take note of the width and height measurements separately.
- Measure any additional features: If there are any additional details to note, such as trim, arches, or sills, measure their dimensions as well and include them in your notes.
Repeat these steps for each door and window in the room. Be sure to label each measurement and mark the location of doors and windows on your floor plan diagram for easy visualization.
With the doors and windows measured, you can now move on to the next step: measuring the dimensions of each room.
When measuring a floor plan, always start with the longest wall and work your way around the room in a clockwise direction. This will help you avoid missing any measurements and ensure accuracy.
Read more: How To Dimension A Floor Plan
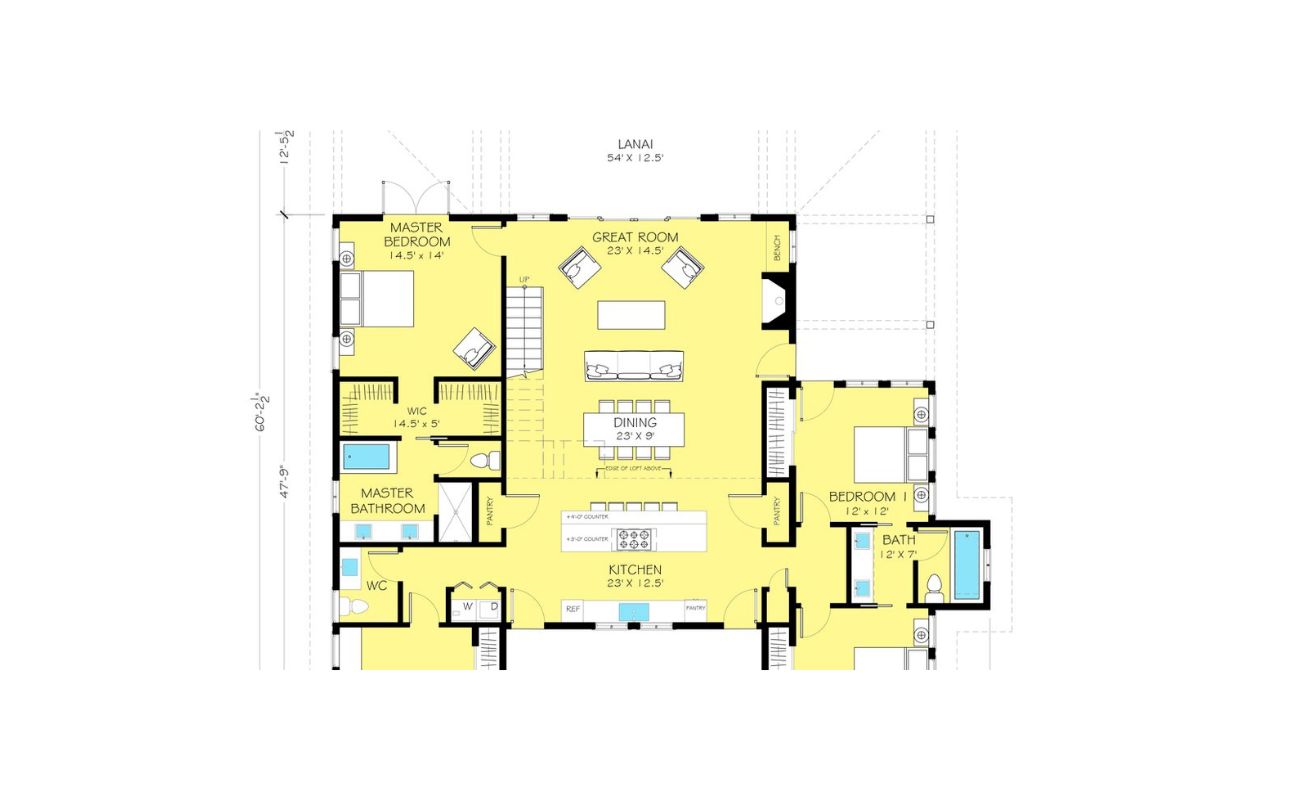
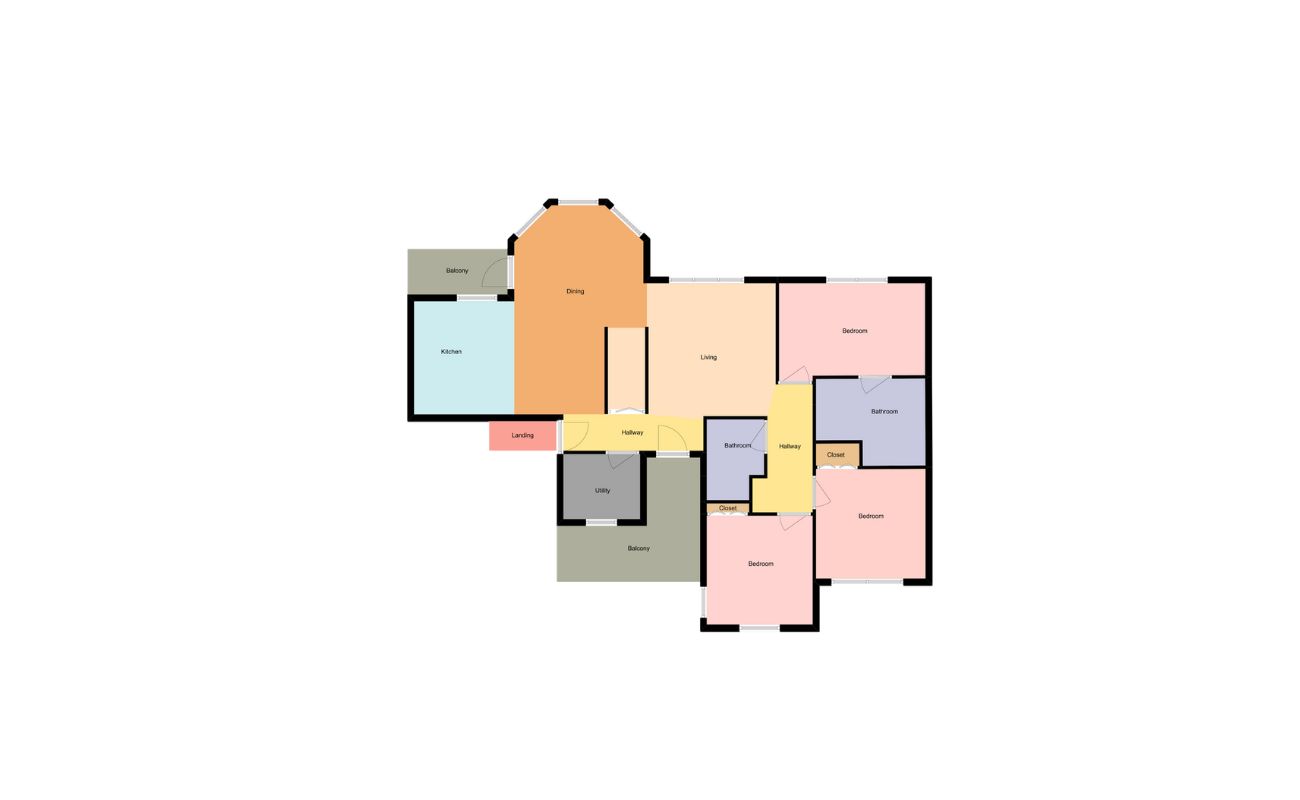
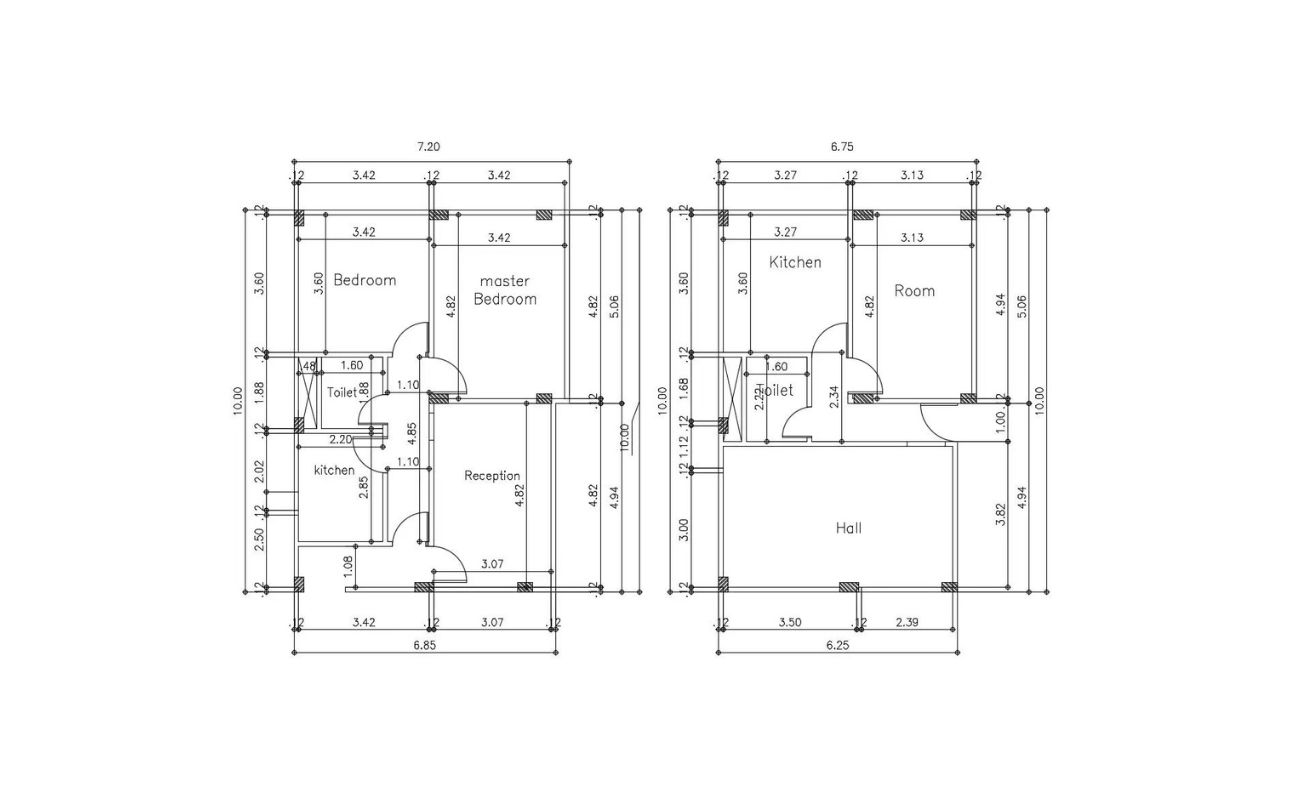
Step 5: Measure the dimensions of each room
Now that you have measured the walls, doors, and windows, it’s time to focus on measuring the dimensions of each individual room within the floor plan. Follow these steps to accurately measure the size of each room:
- Choose a starting point: Select a corner or wall to use as your reference point for measuring the room.
- Position your tape measure: Place the end of the tape measure against one edge of the wall or corner.
- Extend the tape measure: Extend the tape measure along the length or width of the room until you reach the opposite wall or corner.
- Hold the tape measure taut: Ensure that the tape measure lies flat against the floor and remains held firmly against the wall throughout the measurement.
- Read the measurement: Look at the number on the tape measure where it meets the opposite wall or corner. Note down the length or width measurement of the room.
- Measure diagonals if necessary: In the case of irregularly shaped rooms or rooms with angled walls, you may need to measure the diagonals to obtain accurate dimensions. This can be done by extending the tape measure from one corner of the room to the opposite corner.
- Repeat for each room: Move from one room to the next and repeat the above steps until you have measured the dimensions of all the rooms in your floor plan.
Be sure to label each room with its dimensions in your floor plan diagram or notes. This will help you visualize the layout and accurately plan furniture placement.
With the room dimensions measured, you can move on to the next step: calculating the total square footage.
Step 6: Calculate the total square footage
Calculating the total square footage of a floor plan is crucial for various reasons, such as determining the amount of materials needed for flooring, estimating costs, and understanding the overall size of the space. Follow these steps to calculate the total square footage:
- Calculate the area of each room: To calculate the area of each room, multiply the length by the width. For example, if a room measures 10 feet in length and 12 feet in width, the area would be 120 square feet.
- Add up all the room areas: Sum up the individual areas of each room to get the total area of the floor plan.
- Convert to square footage: Depending on your preferred unit of measurement, convert the total area to square footage. If you measured in feet, the total area will already be in square footage. If you measured in meters, multiply the total area by 10.764 to convert to square feet.
Be sure to record the total square footage in your notes or floor plan diagram for future reference.
It’s important to note that this method calculates the area of the rooms only. If you have open spaces, hallways, or other areas that are not part of any specific room, measure and calculate their areas separately, then add them to the total square footage.
With the total square footage calculated, move on to the final step: noting down any additional features or details.
Step 7: Note down any additional features or details
In the final step of measuring a floor plan, it’s important to observe and note down any additional features or details that are not captured in the previous measurements. These can include architectural elements, fixtures, or any unique characteristics of the space. Follow these steps to ensure you capture all the necessary information:
- Inspect the space: Take a thorough look around the room and pay attention to any architectural details such as columns, archways, or alcoves.
- Note down fixtures: Identify and record the location and dimensions of any fixtures, such as built-in shelves, fireplace mantels, or kitchen cabinets.
- Observe ceiling height: Measure and note down the height of the ceilings in each room. This information is essential for planning lighting and determining the overall spatial experience.
- Document electrical outlets and switches: Make note of the locations of electrical outlets, light switches, and any other electrical features that may impact the layout or design of the space.
- Photograph and document other details: Take pictures and describe any other unique details, such as flooring types, wall textures, or existing features that cannot be easily measured or annotated.
By noting down these additional features and details, you will have a comprehensive understanding of the space that will greatly assist you in the design or renovation process.
With this final step completed, you have successfully measured the floor plan! Make sure to review your notes, measurements, and sketches for accuracy before proceeding with your design project.
Remember, measuring a floor plan accurately is crucial for a successful design outcome. By following these steps and paying attention to detail, you will have a solid foundation to create a well-planned and functional space.
Now, it’s time to put your measurements to use and start bringing your design vision to life!
Conclusion
Measuring a floor plan is an essential step in any design or renovation project. Accurate measurements lay the groundwork for a successful outcome, ensuring that furniture fits perfectly, layouts are well-planned, and all elements come together harmoniously. By following the step-by-step process outlined in this guide and utilizing the necessary tools, you can confidently measure a floor plan with precision.
Remember to gather all the necessary tools, set up your measuring area, and start by measuring the walls, doors, and windows. Take note of all the dimensions and create a detailed floor plan diagram to visualize the space. Calculating the total square footage helps you estimate costs and plan for materials, while noting any additional features or details adds depth to your understanding of the space.
Throughout the measuring process, it is important to be attentive and thorough, ensuring all measurements are recorded accurately. Double-check your work and review the notes and sketches to confirm their accuracy before proceeding with your design project.
Whether you are an architect, interior designer, or a homeowner embarking on a DIY project, mastering the art of measuring a floor plan is a valuable skill. It empowers you to create functional, aesthetically pleasing spaces that meet your needs and vision.
So gather your tools, set up your measuring area, and start measuring with confidence. With accurate measurements in hand, you are one step closer to bringing your design dreams to life.
Frequently Asked Questions about How To Measure A Floor Plan
Was this page helpful?
At Storables.com, we guarantee accurate and reliable information. Our content, validated by Expert Board Contributors, is crafted following stringent Editorial Policies. We're committed to providing you with well-researched, expert-backed insights for all your informational needs.


0 thoughts on “How To Measure A Floor Plan”