Home>diy>Architecture & Design>How To Dimension A Floor Plan

Architecture & Design
How To Dimension A Floor Plan
Modified: January 6, 2024
Learn how to dimension a floor plan in this comprehensive guide. Discover key principles and techniques used by architects and designers to accurately measure and scale floor plans. Enhance your architecture design skills today!
(Many of the links in this article redirect to a specific reviewed product. Your purchase of these products through affiliate links helps to generate commission for Storables.com, at no extra cost. Learn more)
Introduction
When it comes to designing a floor plan, accuracy is of utmost importance. Properly dimensioning a floor plan is crucial in ensuring that the design aligns with the intended space and meets all safety and functionality requirements. Whether you are an architect, an interior designer, or simply redesigning your own home, understanding how to dimension a floor plan is essential.
In this article, we will guide you through the process of dimensioning a floor plan step by step. We will cover everything from understanding dimensions and selecting the appropriate scale to measuring the area accurately and adding important details like furniture, fixtures, and electrical outlets. By the end, you will have a comprehensive understanding of how to dimension a floor plan with precision.
Before we dive into the technical aspects of dimensioning a floor plan, let’s take a moment to understand the importance of accurate dimensions. A properly dimensioned floor plan not only provides a clear representation of the space but also serves as a guide for construction workers, plumbers, electricians, and other professionals involved in the implementation of the design.
Additionally, precise dimensions ensure that the furniture, fixtures, and appliances fit perfectly within the given space, maximizing functionality and aesthetics.
Now that we have established the significance of dimensioning a floor plan, let’s move on to the first step – understanding dimensions.
Key Takeaways:
- Precision in dimensioning a floor plan is crucial for accurate representation of space, ensuring functionality, and facilitating effective communication during construction and renovation.
- Attention to detail, thorough measurement, and continuous review are essential for creating accurate floor plans that bring architectural visions to life and exceed expectations.
Read more: How To Read A Floor Plan Dimensions
Understanding Dimensions
Before we begin dimensioning a floor plan, it is essential to have a clear understanding of what dimensions represent and how they are measured.
Dimensions on a floor plan refer to the measurements of the various elements within the space, such as walls, doors, windows, furniture, and fixtures. These measurements are typically represented in feet, inches, or meters.
There are two types of dimensions that you will encounter when dimensioning a floor plan: linear dimensions and area dimensions.
Linear dimensions are used to measure the length of walls, the width and height of doors and windows, and the size of furniture and fixtures. They are represented by a straight line with a measurement alongside it.
Area dimensions, on the other hand, are used to measure the square footage or square meters of a particular space. These dimensions are typically shown as a number within the outlined area.
When dimensioning a floor plan, it is crucial to be consistent with the unit of measurement. Ensure that all dimensions are either in feet or meters throughout the entire floor plan to avoid confusion and inconsistency.
It is also important to note that dimensions should be rounded to the nearest inch or centimeter for accuracy. This ensures that the measurements are practical and avoid unnecessary fractions or decimals.
Another key aspect of understanding dimensions is scale. The scale of a floor plan determines how the real-life dimensions are represented on paper. For example, if the scale is 1/4 inch = 1 foot, every 1/4 inch on the floor plan represents 1 foot in real life. Scale plays a critical role in accurately depicting the proportions and size of the space.
Now that we have a solid grasp of what dimensions are and how they are measured, let’s move on to the next step – selecting the scale for our floor plan.
Selecting the Scale
Now that we understand the importance of dimensions, it’s time to select the appropriate scale for our floor plan. The scale determines how the floor plan will be represented on paper and ensures that the dimensions are accurately represented in relation to the real-life space.
There are several common scales used in floor plan design, such as 1/4 inch = 1 foot, 1/8 inch = 1 foot, or 1/100 meter = 1 meter. The chosen scale should be based on the size of the space and the level of detail required.
For smaller spaces or simpler designs, a larger scale (e.g., 1/4 inch = 1 foot) may be suitable as it allows for more precise measurements and finer details. On the other hand, larger spaces or complex designs may require a smaller scale (e.g., 1/8 inch = 1 foot) to fit the entire floor plan on a single sheet of paper.
When selecting a scale, consider the limitations of the paper size you will be working with. Ensure that the floor plan can be comfortably accommodated within the given space without sacrificing clarity.
It’s also important to keep in mind that the chosen scale should be consistent throughout the entire floor plan. Using different scales for different areas can result in confusion and inaccurate representations.
Once you have determined the appropriate scale, it’s time to move on to the next step – measuring the area accurately.
Measuring the Area
Now that we have selected the scale for our floor plan, it’s time to measure the area accurately. This step is crucial in ensuring that the floor plan reflects the exact dimensions of the space.
Start by gathering the necessary measuring tools, such as a measuring tape or laser measuring device. It’s important to use a reliable and accurate measuring tool to ensure precise measurements.
Begin by measuring the overall dimensions of the room, including the length and width. Measure from wall to wall, making sure to account for any irregularities or protruding features.
Next, measure the height of the room, from the floor to the ceiling. This measurement is important for accurately representing the vertical dimensions of the space.
Once you have measured the main room dimensions, move on to measuring any additional rooms or spaces within the floor plan. Take note of any distinctive features, such as alcoves, bay windows, or closet spaces, and measure them accordingly.
During this process, it’s important to be thorough and meticulous. Take multiple measurements of each dimension to ensure accuracy and double-check your work to avoid any errors.
When noting the measurements on your floor plan, use a pencil or a design software that allows you to easily input the measurements. Make sure to clearly label each dimension and indicate the corresponding unit of measurement (e.g., feet, inches, or meters).
Remember to refer to the chosen scale and accurately translate the measurements onto the floor plan using the appropriate measurement increments.
Once you have accurately measured the area, we can move on to the next step – determining the layout of the rooms within the floor plan.
Determining Room Layout
Now that we have accurately measured the area, it’s time to determine the layout of the rooms within the floor plan. This step involves deciding where each room or area will be positioned and how they will flow together.
Start by considering the functionality and purpose of each room. Think about the ideal placement of rooms such as bedrooms, bathrooms, kitchen, living room, and dining area, based on their usage and privacy requirements.
Consider factors such as natural light, views, and accessibility when determining the room layout. For example, you may want to position the living room and bedrooms to take advantage of scenic views, or place the kitchen near the dining area for convenience.
Think about the arrangement of rooms in relation to each other. Determine the entry points and traffic flow within the floor plan. You want to create a logical and efficient layout that enhances the overall functionality and flow of the space.
Sketch out several possible room layouts, experimenting with different configurations. Take into account any architectural features, such as windows, columns, or structural elements, that may impact the layout.
Consider the size and proportions of each room in relation to the overall space. Ensure that there is a harmonious balance between the rooms, with adequate space for movement and furniture placement.
Once you have decided on the room layout, you can move on to the next step – dimensioning the walls of the floor plan.
Now that we have established a solid room layout for our floor plan, the next step is to dimension the walls.
Read more: What Is A Floor Plan
Dimensioning Walls
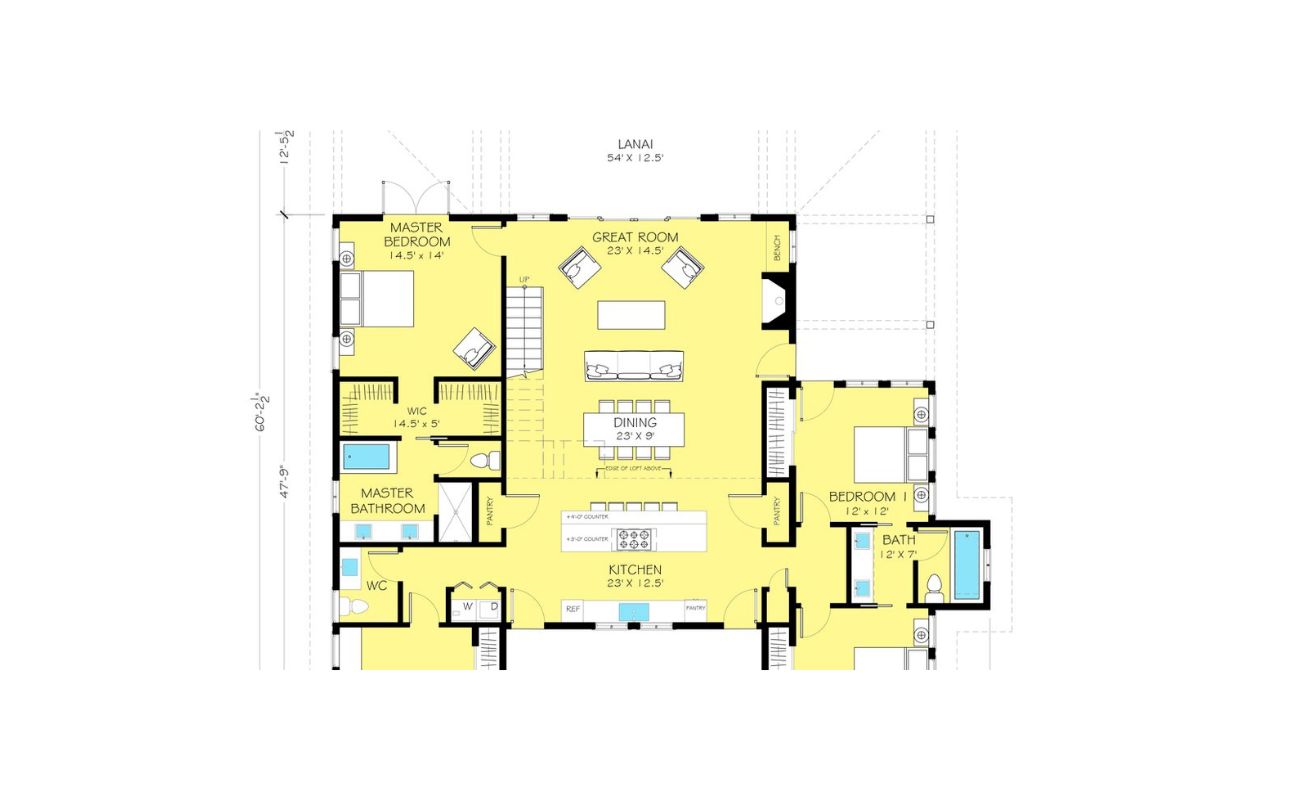
Dimensioning the walls is a crucial step in accurately representing the layout and size of each room in your floor plan. It involves measuring and indicating the length, height, and thickness of each wall.
Start by choosing a wall to begin dimensioning. Identify one of the walls as your reference point and measure its length from one corner to another. Note this measurement on your floor plan, indicating the dimension with a straight line that represents the length.
Continue dimensioning the remaining walls in a clockwise or counterclockwise direction, depending on your preference. Measure each wall’s length and add this measurement to the floor plan using a straight line with the corresponding dimension.
Next, measure the height of each wall from the floor to the ceiling. Indicate the height measurement on your floor plan using a vertical line that starts from the top of the wall and extends downwards.
If your floor plan includes walls with varying thicknesses, measure the thickness of each wall and indicate it on the floor plan by drawing a line parallel to the wall and including the dimension.
Ensure that all wall dimensions are proportional to the chosen scale. Double-check your measurements to ensure accuracy and make adjustments as necessary.
In addition to indicating wall dimensions, it can be helpful to label each wall with a unique identifier or room name for easier reference. This will make it easier to understand the layout and navigate the floor plan.
Dimensioning the walls provides crucial information about the size and layout of each room, allowing for a comprehensive understanding of the space. With the walls dimensioned, we can now move on to the next step – labeling doors and windows.
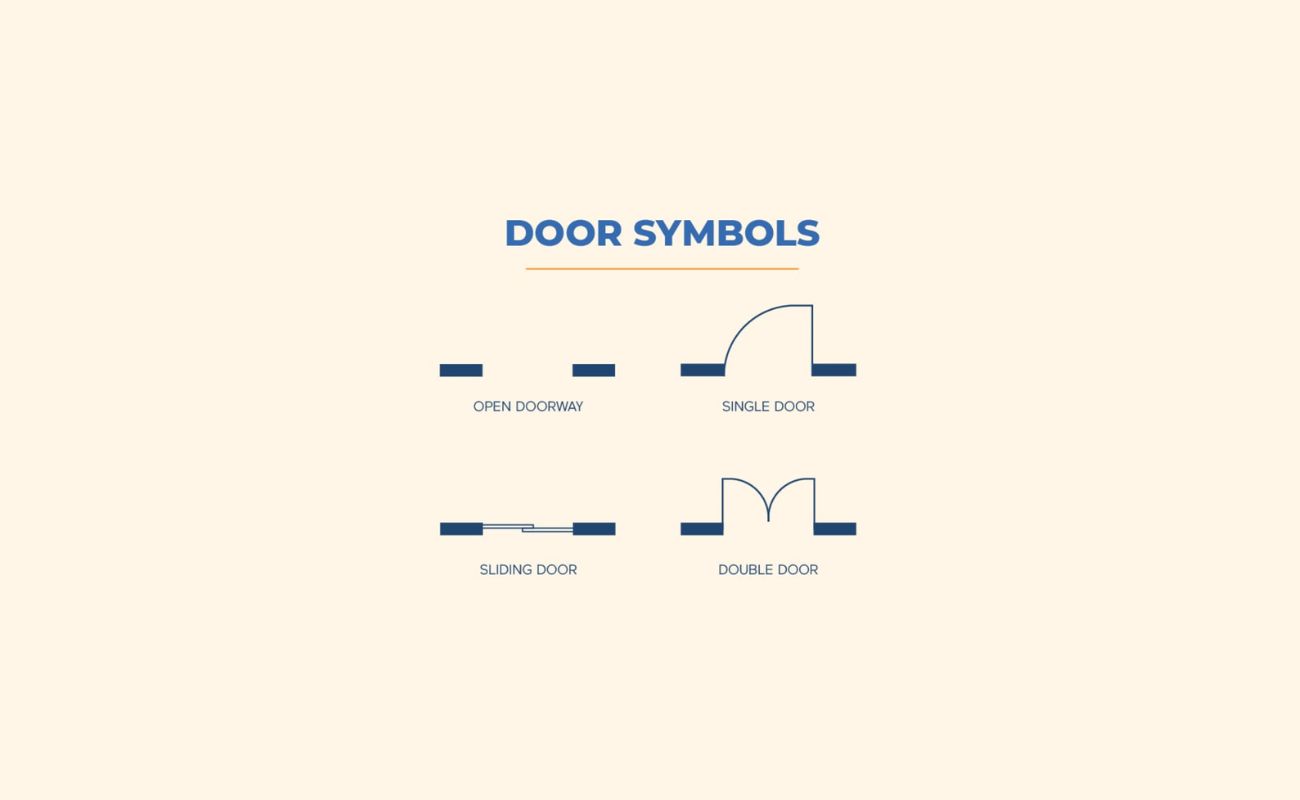
Labeling Doors and Windows
Labeling doors and windows is an essential part of dimensioning a floor plan, as it provides crucial information about the location and size of these openings. Properly labeling doors and windows helps to accurately represent their placement within each room and ensures that the floor plan reflects the intended design.
Begin by identifying each door and window within your floor plan. Measure the width and height of each opening, making sure to note down these dimensions accurately.
When labeling doors, use a straight line to represent the width and a vertical line to represent the height. Indicate the measurements alongside these lines, using the chosen scale to ensure proportionality.
For windows, use a similar approach. Draw a horizontal line to represent the width and a vertical line to represent the height of each window. Label the dimensions accordingly.
In addition to the dimensions, it can be helpful to label each door and window with a unique identifier or description. This makes it easier to refer to these openings when discussing the layout or construction details with others.
Depending on the complexity of your floor plan, you may also want to indicate the direction in which doors swing or windows open. This can be done using arcs or arrows to clearly illustrate the movement of each opening.
Labeling doors and windows accurately provides clarity in terms of their size, location, and functionality. It helps viewers of the floor plan understand how these openings contribute to the overall design and how they may impact factors such as furniture placement, lighting, and airflow.
With doors and windows properly labeled, we can move on to the next step – adding furniture to our floor plan.
When dimensioning a floor plan, always use a consistent unit of measurement throughout the entire plan to avoid confusion. This will ensure accuracy and clarity in the dimensions provided.
Adding Furniture
Adding furniture to a floor plan helps to visualize how the space will be utilized and gives a sense of scale and proportion to the design. Whether you are designing a home, an office, or any other type of space, furniture placement is a key aspect of creating a functional and aesthetically pleasing environment.
Start by selecting the appropriate furniture pieces for each room or area within your floor plan. Consider factors such as the purpose of the space, the size of the room, and the desired style or theme. This will help guide your furniture selection process.
Measure each piece of furniture accurately, noting down the length, width, and height of each item. This information will be used to accurately represent the furniture on the floor plan.
When adding furniture to the floor plan, use scaled furniture symbols or shapes to represent each piece. These symbols can be easily found in design software or by using pre-made furniture stencils.
Place the furniture symbols in the appropriate locations within each room, taking into account factors such as traffic flow, functionality, and aesthetics. Consider how the furniture arrangement will impact the overall layout and balance of the space.
When placing furniture, it’s important to maintain accurate proportions based on the scale of your floor plan. Ensure that the furniture symbols align with the dimensions and spacing indicated on the floor plan.
Adding furniture to the floor plan allows you to visualize how the space will be utilized and how different elements interact with each other. It helps to determine if there is enough space for movement, if the furniture fits comfortably within the room, and if there is a proper balance between functionality and aesthetics.
With furniture added to the floor plan, we can now move on to the next step – noting fixtures and appliances.
Noting Fixtures and Appliances
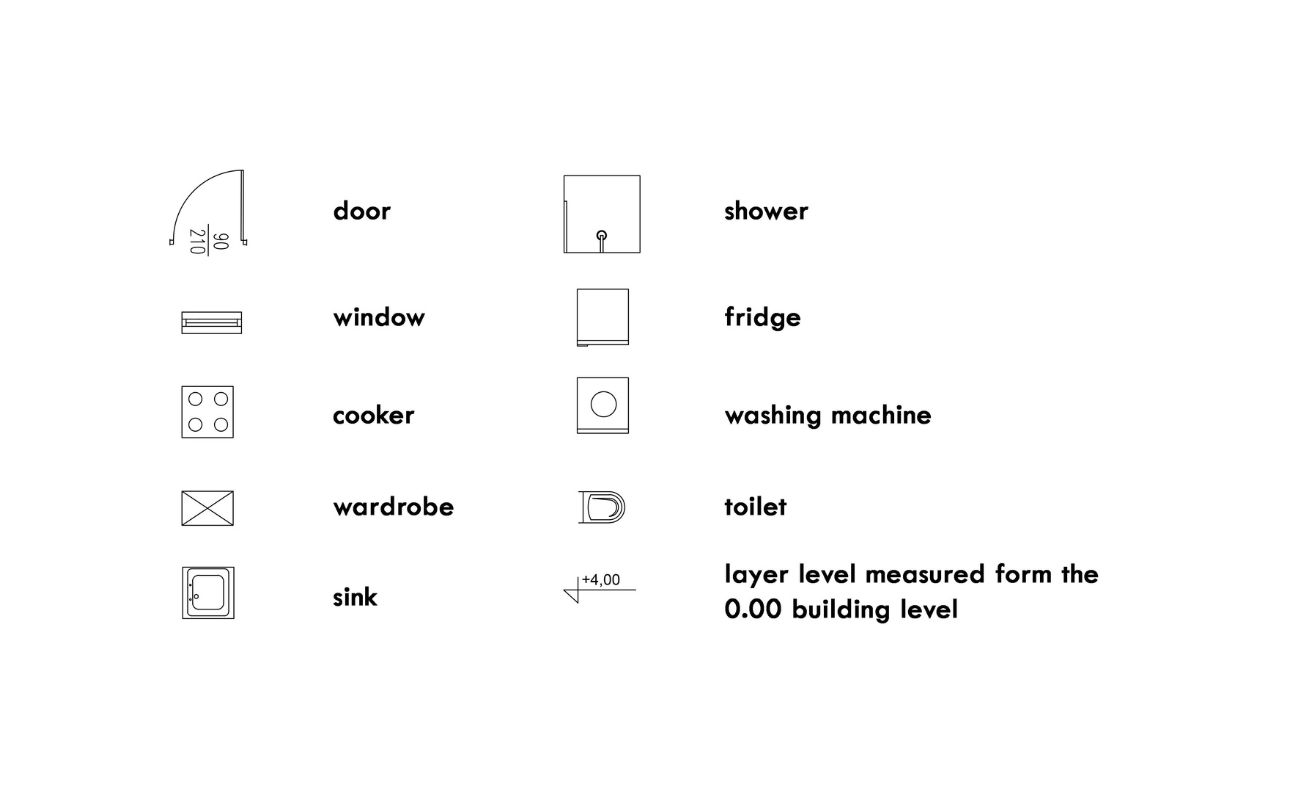
In addition to furniture, fixtures and appliances play a crucial role in the functionality and design of a space. Noting these elements on your floor plan helps to ensure accurate representation and proper placement within each room.
Start by identifying the fixtures and appliances that are essential to your design. This can include items such as sinks, toilets, showers, bathtubs, kitchen appliances, lighting fixtures, and HVAC units.
Measure the dimensions of each fixture or appliance accurately, noting down the width, height, and depth. Consider both the physical size of the items and any required clearances or spacing needed for installation and functionality.
Using the appropriate symbols or shapes for each fixture or appliance, place them in the appropriate location on the floor plan. Ensure that the symbols align with the dimensions and spacing indicated.
For fixtures such as sinks, toilets, and showers, it can be helpful to indicate the plumbing connections and drainage lines. This can be done using dotted lines or specific symbols to represent plumbing fixtures and connections.
For kitchen appliances, indicate the location of electrical outlets and gas connections, if applicable. This helps to ensure proper placement and functionality of the appliances within the space.
Noting fixtures and appliances on the floor plan provides valuable information for both the design phase and the implementation phase. It helps to ensure that the necessary infrastructure is in place and that the fixtures and appliances are positioned correctly to facilitate smooth installation and functionality.
With fixtures and appliances properly noted, we can now move on to the next step – indicating electrical outlets and switches.
Read more: How To Choose A Floor Plan
Indicating Electrical Outlets and Switches
Electrical outlets and switches are essential components of any space, and accurately indicating their placement on a floor plan is crucial for electrical planning and functionality.
Start by identifying the location of electrical outlets and switches within each room. Consider the placement of furniture, appliances, and other elements that may require electrical access.
Measure the distance from the floor to the center of each electrical outlet and switch accurately. Note down these measurements on your floor plan, indicating the height using a small vertical line or symbol.
Use standard electrical symbols to represent outlets and switches on the floor plan. These symbols should be in proportion with the scale of your plan and align with the dimensions indicated.
Place the electrical symbols in the appropriate locations within each room, taking into account factors such as convenience, accessibility, and code requirements.
Consider the electrical wiring and routing when indicating outlets and switches on the floor plan. This includes noting the path of electrical wires and indicating any junction boxes or panels that are relevant to the electrical layout.
Additionally, it can be helpful to label each outlet and switch with a unique identifier or description. This makes it easier to understand and communicate the electrical layout with electricians and contractors.
Indicating electrical outlets and switches on the floor plan helps to ensure proper placement for functionality and aesthetics. It also helps electricians and contractors during the construction phase, as they can reference the plan to install wiring and electrical fixtures accurately.
With outlets and switches properly indicated, we can move on to the next step – adding notes and annotations to the floor plan.
Adding Notes and Annotations
Adding notes and annotations to your floor plan is an important step in providing additional information and clarification about specific elements or design decisions. These notes and annotations serve as a communication tool, helping to convey important details and instructions to contractors, builders, or other stakeholders.
Start by identifying areas or elements within your floor plan that require additional explanation or instruction. This can include information about materials, finishes, specific design features, or special considerations.
Using a text box or a designated area on the floor plan, add notes and annotations to provide detailed information. Use clear and concise language to convey your message effectively.
When adding notes, consider the readability and legibility of the text. Use a font size and style that is easily readable, and ensure that the text is positioned in a logical and unobtrusive manner.
Some examples of useful notes and annotations can include instructions for materials and finishes, details about custom-built elements, lighting requirements, or any specific design specifications that need to be followed during construction.
You can also use annotations to highlight important design considerations, such as low ceilings, structural supports, or areas with unique architectural features.
Annotations can also be used to indicate specific design choices, such as paint colors, flooring types, or any other design decisions that need to be noted and followed during implementation.
Adding notes and annotations helps to provide clarity and ensure that all essential information is readily accessible within the floor plan. It helps streamline the communication process and reduces the chances of misinterpretation or errors during the construction phase.
With notes and annotations added, we can move on to the next step – checking for accuracy.
Checking for Accuracy
Before finalizing your floor plan, it is crucial to thoroughly check for accuracy to ensure that all measurements, dimensions, and annotations are correct. Accuracy is paramount in creating a reliable and functional floor plan that meets your intended design and construction requirements.
Start by reviewing all measurements and dimensions on the floor plan. Double-check that they are accurately represented, properly scaled, and align with the chosen unit of measurement.
Verify that the layout of the rooms, walls, doors, windows, and furniture is consistent with your design intent. Ensure that all elements are correctly positioned and proportionate to each other.
Check that the labels, symbols, and annotations are clear, legible, and placed in appropriate locations. Make sure that they effectively convey the necessary information and instructions.
Refer to any architectural, electrical, or plumbing drawings to cross-check the accuracy of your floor plan. Make sure that all fixtures, appliances, outlets, switches, and other essential elements are correctly indicated.
Consider conducting a visual inspection of the actual space or reviewing professional measurements to validate the accuracy of your floor plan. This can help identify any discrepancies or inconsistencies that need to be addressed.
Additionally, seek feedback from colleagues, design professionals, or other stakeholders to gather different perspectives and ensure comprehensive review.
Keep in mind that errors or inaccuracies in the floor plan can lead to costly and time-consuming issues during construction or renovation. Taking the time to check for accuracy significantly reduces the chances of mistakes and ensures a smooth implementation process.
Once you are confident in the accuracy of your floor plan, you can proceed with confidence to the final stage – completion and implementation.
Conclusion
Dimensioning a floor plan is a critical step in architectural and interior design, ensuring accuracy and functionality. By following a systematic approach, we can create floor plans that accurately represent the space and facilitate effective communication during the construction and renovation process.
We began by understanding the importance of dimensions and their different types, including linear dimensions and area dimensions. We then moved on to selecting the appropriate scale, which determines how the floor plan is represented on paper.
Measuring the area accurately is essential for capturing the exact dimensions of the space. This step enables us to create a realistic floor plan, reflecting the true proportions of the rooms and areas.
Once the area is measured, determining the room layout helps optimize the functionality and flow of the space. By strategically positioning each room, we can create harmonious and efficient designs that meet the desired objectives.
Dimensioning the walls, labeling doors and windows, and adding furniture provide clarity about the size and layout of each room. It helps visualize how furniture and elements will fit within the space, facilitating better decision-making during the design process.
Noting fixtures, appliances, electrical outlets, switches, and adding annotations further enhances the floor plan’s comprehensiveness and ensures that all necessary details are captured for construction and implementation.
Finally, checking for accuracy is imperative to avoid errors and inconsistencies that could lead to complications during the construction phase. Reviewing measurements, dimensions, labels, and annotations minimizes the chances of costly mistakes and ensures the floor plan accurately represents the intended design.
By following these steps and paying close attention to detail, you can create precise floor plans that effectively convey your architectural vision. These floor plans serve as valuable tools for builders, contractors, and other professionals involved in bringing the design to life.
Remember, dimensioning a floor plan is an iterative process. It requires attention to detail, careful measurement, and continuous review to achieve the best results. With diligent effort, you can create accurate floor plans that bring your design ideas to reality and exceed your expectations.
Frequently Asked Questions about How To Dimension A Floor Plan
Was this page helpful?
At Storables.com, we guarantee accurate and reliable information. Our content, validated by Expert Board Contributors, is crafted following stringent Editorial Policies. We're committed to providing you with well-researched, expert-backed insights for all your informational needs.


0 thoughts on “How To Dimension A Floor Plan”