Home>Furniture & Design>Outdoor Furniture>How To Make Outdoor Ice Rink
Outdoor Furniture
How To Make Outdoor Ice Rink
Modified: August 27, 2024
Learn how to create a stunning outdoor ice rink with our expert tips and ideas. Discover the best outdoor furniture and design solutions for your project.
(Many of the links in this article redirect to a specific reviewed product. Your purchase of these products through affiliate links helps to generate commission for Storables.com, at no extra cost. Learn more)
Introduction
Creating an outdoor ice rink is a fantastic way to embrace the winter season and enjoy a classic pastime right in your own backyard. Whether you are an avid ice skater, a hockey enthusiast, or simply looking for a fun and unique outdoor activity, building an ice rink can provide hours of entertainment for family and friends.
In this comprehensive guide, we will walk you through the step-by-step process of constructing your very own outdoor ice rink. From choosing the perfect location to maintaining the ice throughout the season, we will cover everything you need to know to make your ice rink a success.
So, grab your skates, bundle up, and get ready to turn your outdoor space into a winter wonderland with a custom-built ice rink. Let's dive in and explore the exciting world of outdoor ice rink construction!
Key Takeaways:
- Building an outdoor ice rink requires careful planning, including choosing a flat location, preparing the ground, building a sturdy frame, and installing a durable liner to hold the water.
- Regular maintenance, such as clearing snow, smoothing imperfections, and monitoring ice thickness, is crucial to preserving the quality and safety of the outdoor ice rink for winter recreation.
Read more: How To Build An Outdoor Ice Rink
Choosing the Right Location
When it comes to creating an outdoor ice rink, selecting the ideal location is paramount to its success. Before you begin the construction process, carefully assess your outdoor space to determine the most suitable area for your rink.
Here are some key factors to consider when choosing the right location for your outdoor ice rink:
- Flat Surface: Look for a flat and level area in your yard or garden. Uneven terrain can make it challenging to create a smooth and consistent ice surface. If necessary, consider using a leveling tool to prepare the ground before proceeding with the construction.
- Access to Water: Since you will need to fill the rink with water, ensure that the chosen location provides easy access to a water source. This can be a nearby hose or an outdoor water supply. Convenient access to water will simplify the filling process and help maintain the ice at the desired thickness.
- Shading and Sunlight: Take into account the position of the sun throughout the day. Ideally, the location should receive a moderate amount of sunlight to aid in the melting and refreezing of the ice, while also being partially shaded to prevent rapid melting during warmer periods.
- Proximity to Utilities: Consider the proximity to electrical outlets if you plan to incorporate lighting or a small warming hut near the rink. Access to power will facilitate the installation of lighting for evening skating sessions and provide a convenient source of warmth during chilly winter days.
- Safety and Visibility: Ensure that the chosen location allows for clear visibility from your home or other frequently used areas. This will enable you to keep an eye on skaters, especially if children will be using the rink, and promptly address any safety concerns.
By carefully evaluating these factors, you can select a location that is well-suited for your outdoor ice rink and set the stage for a successful construction process.
Preparing the Ground
Before you can begin building your outdoor ice rink, it’s essential to prepare the ground to ensure a stable and level foundation for the ice. Proper ground preparation is crucial for achieving an even and smooth skating surface once the rink is complete.
Here’s a step-by-step guide to preparing the ground for your ice rink:
- Clear the Area: Remove any debris, rocks, or branches from the chosen location. Clearing the area will create a clean and obstacle-free space for constructing the rink.
- Level the Ground: Use a leveling tool, such as a long board or a straight piece of lumber, to assess the evenness of the ground. Fill in any low spots with compacted soil or sand and tamp it down to create a level surface.
- Create a Border: Define the perimeter of the rink by installing boards or plastic barriers around the edges. This border will contain the water when filling the rink and help maintain the shape of the ice surface.
- Secure the Border: Anchor the boards or barriers firmly into the ground to prevent shifting or movement once the rink is filled with water. Use stakes or heavy-duty clips to secure the border in place.
- Consider Drainage: If your location is prone to pooling water or drainage issues, take steps to address these concerns before proceeding. Proper drainage will prevent water from accumulating on the ice surface and ensure a consistently smooth skating experience.
By diligently preparing the ground, you will establish a solid foundation for your outdoor ice rink, setting the stage for the next steps in the construction process. With the groundwork in place, you are one step closer to enjoying the thrill of skating and playing on your very own ice rink.
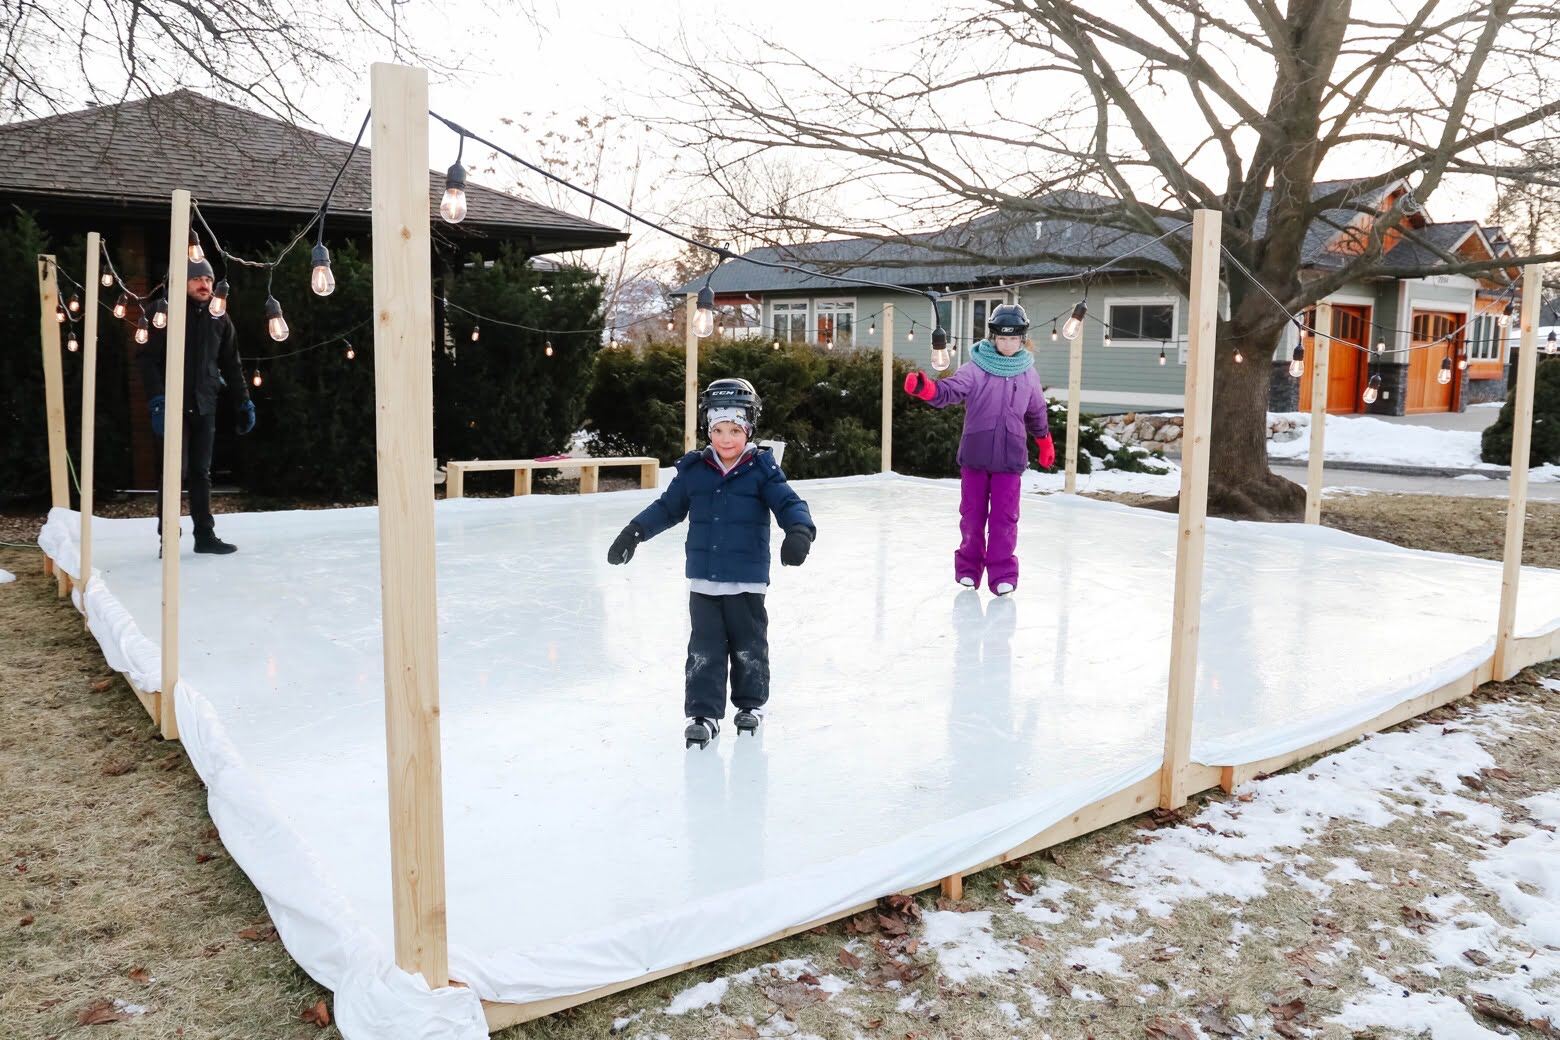
Building the Frame
Once the ground is prepared, the next crucial step in constructing your outdoor ice rink is building the frame. The frame serves as the boundary that contains the water and forms the shape of the rink. By creating a sturdy and well-constructed frame, you can ensure that the ice rink maintains its form and provides a secure skating area.
Follow these steps to build the frame for your outdoor ice rink:
- Assemble the Materials: Gather the necessary materials for the frame, which typically include wooden boards, plastic barriers, or metal stakes. Ensure that the materials are durable and able to withstand exposure to cold temperatures and moisture.
- Measure and Mark: Use measuring tape and stakes to outline the dimensions of the rink. Mark the corners and edges of the frame to guide the placement of the boards or barriers.
- Install the Frame: Position the boards or barriers along the marked perimeter to form the frame of the rink. Secure the pieces together using screws, nails, or interlocking connectors to create a strong and stable structure.
- Check for Stability: Ensure that the frame is securely anchored to the ground and that all components are tightly connected. A stable frame will prevent water from seeping out and help maintain the integrity of the ice surface.
- Smooth Edges: Trim any protruding edges or corners to create a smooth and safe perimeter for the rink. This step will enhance the overall appearance of the rink and reduce the risk of accidental bumps or scrapes during skating activities.
By meticulously constructing the frame, you will establish the boundaries of your outdoor ice rink and prepare the foundation for the next phase of the construction process. With the frame in place, you are one step closer to transforming your outdoor space into a delightful winter skating destination.
When making an outdoor ice rink, choose a level area and use a large plastic liner to contain the water. Smooth the surface with a squeegee to ensure even freezing. Add thin layers of water at a time to build up the ice thickness.
Installing the Liner
With the frame securely in place, the next critical step in creating your outdoor ice rink is installing the liner. The liner serves as a barrier that holds the water in place, allowing it to freeze and form the smooth skating surface that will be enjoyed throughout the winter months.
Follow these steps to properly install the liner for your outdoor ice rink:
- Select a High-Quality Liner: Choose a durable and puncture-resistant liner specifically designed for outdoor ice rinks. The liner should be sized to fit the dimensions of your rink, with ample overlap to ensure complete coverage.
- Unroll the Liner: Carefully unroll the liner inside the frame, ensuring that it extends beyond the edges and corners of the rink. Smooth out any wrinkles or folds to create a flat and even surface.
- Secure the Liner: Use clamps, weights, or boards to secure the edges of the liner along the perimeter of the frame. This will prevent the liner from shifting or moving during the filling process and help maintain its position as water is added.
- Smooth Out Air Pockets: Check for any air pockets or bubbles trapped beneath the liner and gently push them towards the edges to release the air. A smooth and taut liner will contribute to the overall quality of the ice surface.
- Trim Excess Material: Trim any excess liner material along the edges of the frame, leaving a neat and tidy border around the rink. Be sure to leave a sufficient overhang to account for any potential expansion of the ice as it freezes.
By meticulously installing the liner, you will create a watertight barrier that sets the stage for filling the rink and initiating the freezing process. With the liner in place, your outdoor ice rink is ready to be transformed into a winter wonderland for skating, hockey, and endless enjoyment.
Read more: How To Keep Outdoor Ice Rink Frozen
Filling and Freezing the Rink
As the essential components of your outdoor ice rink are in place, it’s time to embark on the exciting process of filling and freezing the rink. This stage marks the transformation of your prepared space into a glistening ice surface, ready to provide hours of enjoyment for skaters of all ages.
Follow these steps to effectively fill and freeze your outdoor ice rink:
- Add Water Gradually: Begin by slowly adding water to the rink, starting from the center and working towards the edges. Gradual filling helps prevent the liner from shifting and ensures an even distribution of water across the surface.
- Monitor the Thickness: As the water accumulates, monitor the thickness of the ice using a measuring tape or ruler. Aim for a minimum ice thickness of 2 to 3 inches, which is suitable for recreational skating and light activities.
- Allow for Freezing Time: Depending on the outdoor temperature, the water will gradually freeze and form a solid ice surface. Be patient and allow sufficient time for the water to freeze completely, typically spanning several days to a week, depending on the weather conditions.
- Assess the Ice Quality: Once the ice has frozen, assess its quality and thickness. Look for any areas that may be thinner or uneven, and consider adding additional layers of water to reinforce these areas and create a uniform surface.
- Test the Surface: Conduct a test skate or slide on the ice to ensure that it is smooth, sturdy, and free from any imperfections. This step will help verify that the ice is suitable for skating and ready to be enjoyed by all who visit your rink.
By carefully filling and freezing the rink, you will witness the remarkable transition of your outdoor space into a captivating ice rink, beckoning skaters to revel in the joys of winter recreation. With the ice now in pristine condition, your outdoor rink is poised to become a focal point of seasonal fun and excitement.
Maintaining the Ice
Once your outdoor ice rink is fully established, it is essential to implement a regular maintenance routine to preserve the quality and integrity of the ice surface. Proper maintenance will ensure that the rink remains safe, smooth, and enjoyable for skating and other recreational activities throughout the winter season.
Consider the following steps to effectively maintain the ice on your outdoor rink:
- Clear Snow and Debris: After snowfall or windy conditions, promptly remove any snow, leaves, or debris from the ice surface using a snow shovel or a specialized ice resurfacer. Keeping the ice clear will prevent uneven melting and preserve its smoothness.
- Smooth Out Imperfections: Use a dedicated ice resurfacer or a smooth, flat board to fill in and smooth out any minor imperfections or divots on the ice surface. This process will enhance the overall quality of the rink and provide a consistent skating experience.
- Monitor and Adjust Thickness: Regularly check the thickness of the ice to ensure it remains within the optimal range. Add additional layers of water as needed to reinforce thin areas and maintain a uniform ice thickness across the rink.
- Address Wear and Tear: Keep an eye out for areas that show signs of wear, such as cracks or chipped ice. Promptly address these issues by applying a thin layer of water to reinforce the affected areas and preserve the structural integrity of the ice.
- Consider Temperature and Sun Exposure: Be mindful of fluctuating temperatures and prolonged exposure to direct sunlight, as these factors can impact the condition of the ice. Adjust the maintenance routine as needed to accommodate changing weather conditions and preserve the quality of the rink.
By implementing a consistent and attentive maintenance regimen, you can uphold the excellence of your outdoor ice rink and ensure that it remains a cherished winter attraction for all who partake in the exhilarating pastime of skating and playing on the ice.
Conclusion
Congratulations on successfully creating your very own outdoor ice rink! Through careful planning, diligent preparation, and dedicated effort, you have transformed your outdoor space into a captivating winter wonderland that promises endless enjoyment for family, friends, and all who appreciate the magic of ice skating.
As you reflect on the journey of constructing your ice rink, remember the key elements that contributed to its success. From choosing the perfect location and preparing the ground to building the frame, installing the liner, and filling the rink, each step played a vital role in bringing your vision to life.
Now, as the ice glistens and beckons with the promise of exhilarating skating adventures, it’s important to maintain the rink with care and attention. Regular upkeep, including clearing snow, smoothing out imperfections, and monitoring the ice thickness, will ensure that your rink remains a pristine and inviting destination for winter recreation.
Embrace the joy of skating under the open sky, the thrill of a friendly hockey match, or the simple pleasure of gliding across the smooth ice. Your outdoor ice rink is a testament to your creativity, determination, and love for the winter season.
So, lace up your skates, gather your loved ones, and revel in the magic of your very own outdoor ice rink. Cherish the laughter, the camaraderie, and the unforgettable moments that unfold on the ice, knowing that your creation has brought warmth and delight to the coldest of seasons.
As the seasons change and the rink eventually yields to the arrival of spring, take pride in the memories and experiences shared on your outdoor ice rink, and look forward to the next opportunity to embark on this enchanting journey once again.
Frequently Asked Questions about How To Make Outdoor Ice Rink
Was this page helpful?
At Storables.com, we guarantee accurate and reliable information. Our content, validated by Expert Board Contributors, is crafted following stringent Editorial Policies. We're committed to providing you with well-researched, expert-backed insights for all your informational needs.


0 thoughts on “How To Make Outdoor Ice Rink”