Furniture
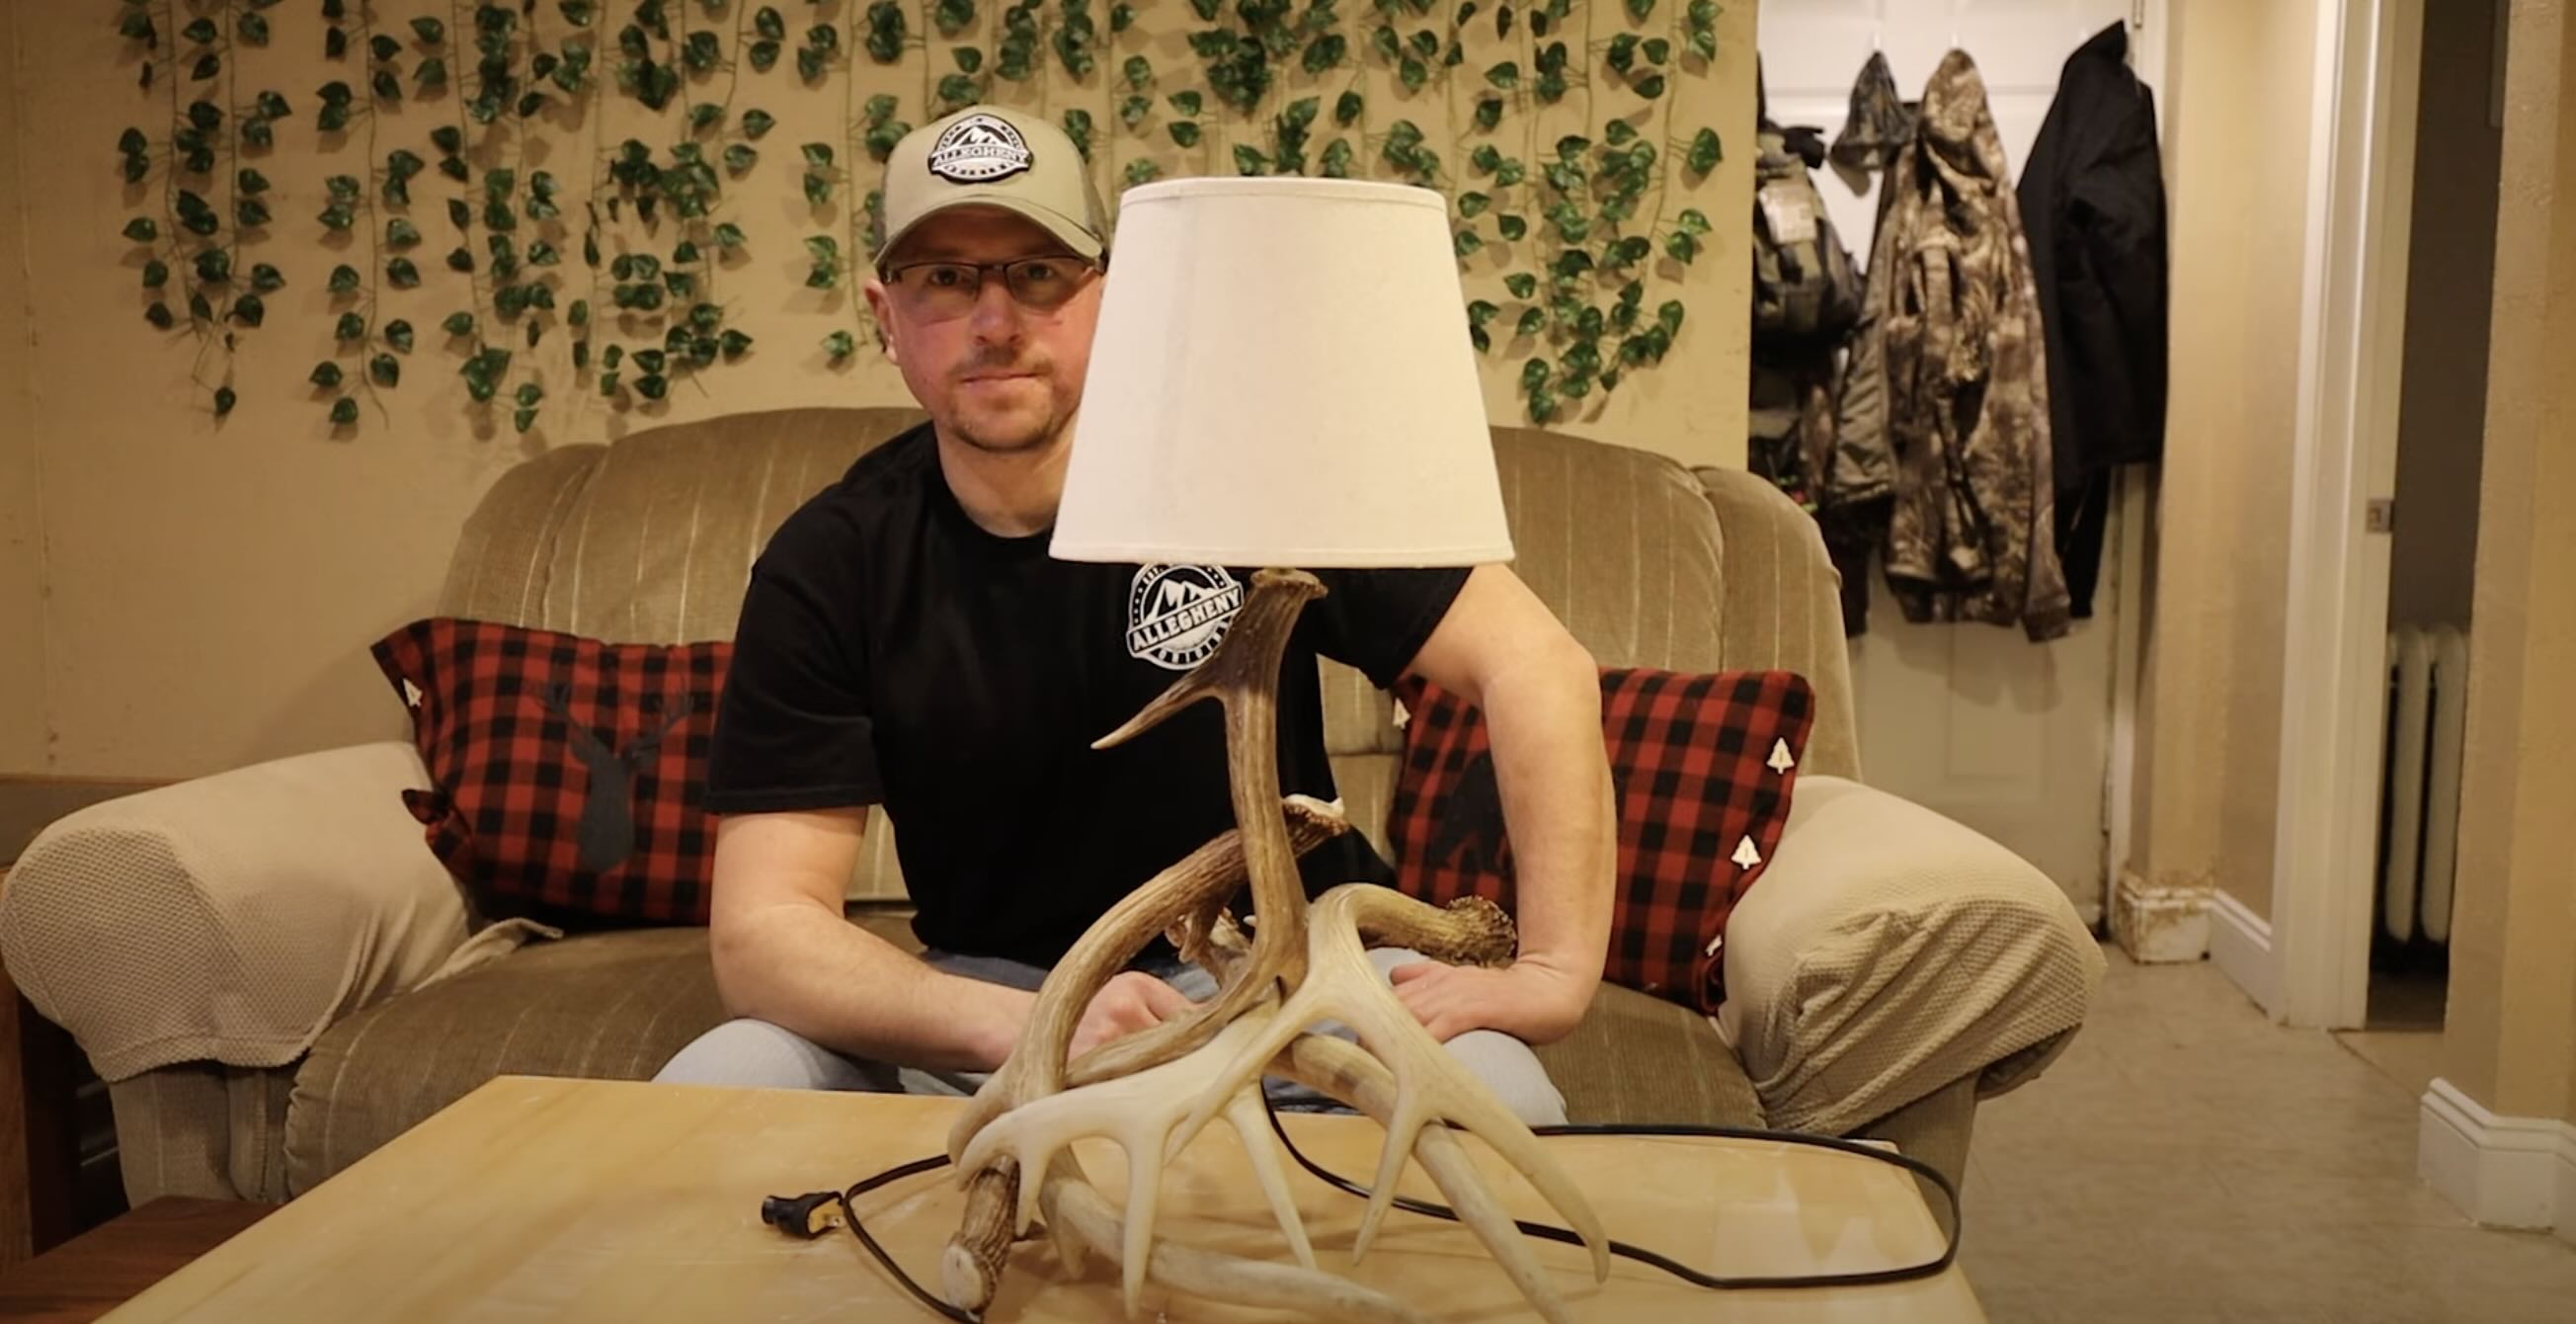
How To Make A Deer Antler Lamp
Modified: August 20, 2024
Looking to add a unique touch to your furniture collection? Learn how to make a stunning deer antler lamp with our step-by-step guide.
(Many of the links in this article redirect to a specific reviewed product. Your purchase of these products through affiliate links helps to generate commission for Storables.com, at no extra cost. Learn more)
Introduction
Welcome to the world of DIY furniture enthusiasts! If you’re looking to add a touch of rustic charm to your home decor, a deer antler lamp can be a unique and eye-catching addition. This article will guide you through the process of creating your very own deer antler lamp, from sourcing the materials to the final assembly. So, roll up your sleeves and let’s get started on this exciting project!
Before we dive in, here’s a quick overview of what to expect. In order to make a deer antler lamp, you will need to acquire deer antlers, prepare them for use, assemble the main frame, wire the lamp, install the lampshade, and add some final touches. Don’t worry if you’re new to DIY or have little experience with furniture-making – this guide will provide you with detailed instructions to help you every step of the way.
Creating your own deer antler lamp offers a range of benefits. Not only does it allow you to showcase your creativity, but it also gives you the opportunity to repurpose natural materials, contributing to a more sustainable lifestyle. Additionally, a deer antler lamp can add a rustic and organic touch to any room, creating a cozy and inviting ambiance.
Before we jump into the project, it’s important to note that sourcing deer antlers should always be done legally and ethically. It’s best to obtain antlers from reputable sources, such as auctions, estate sales, or hunters who are willing to sell or donate their antlers. Avoid using antlers sourced from endangered species or from illegal hunting activities.
Now that we have covered the basics, let’s move on to the first step of the process, which is acquiring deer antlers.
Key Takeaways:
- Embrace your creativity and sustainability by crafting a unique deer antler lamp, adding rustic charm and a cozy ambiance to your home decor while repurposing natural materials.
- From sourcing ethically to assembling and wiring, creating a deer antler lamp hones DIY skills, offering a one-of-a-kind, visually appealing, and functional piece of furniture.
Read more: How To Make Deer Jerky In A Dehydrator
Materials and Tools Needed
Before you begin your deer antler lamp project, it’s essential to gather all the necessary materials and tools. Here’s a list of items you will need:
Materials:
- Deer antlers
- Lamp socket kit
- Lampshade
- Lamp harp
- Lamp base
- Electrical wire
- Decorative accents (optional)
- Wood glue
- Screwdriver
- Electric drill
- Drill bits
- Wire cutters
- Pliers
- Masking tape
- Marker or pencil
- Measuring tape
- Sandpaper
- Protective gloves
These materials will ensure that you have everything you need to successfully create your deer antler lamp. Keep in mind that the quantity of materials required may vary depending on the size and complexity of your lamp design.
Tools:
- Saw
- Utility knife
- Hot glue gun
- Multimeter (optional)
- Wire strippers (optional)
- Paint or stain (optional)
Having these tools on hand will greatly facilitate the process of transforming the deer antlers into a functional lamp. You might already have some of these tools in your toolbox, but make sure you have them readily available for this specific project.
Once you have gathered all the necessary materials and tools, you can move on to the next step: acquiring the deer antlers. It’s important to have everything prepared ahead of time to ensure a smooth and efficient crafting experience.
Step 1: Acquiring Deer Antlers
The first step in creating your deer antler lamp is to acquire deer antlers. There are several different ways to obtain antlers, but it’s important to do so legally and ethically. Here are a few methods you can explore:
Read more: How To Store Deer Jerky
1. Purchase from reputable sources:
Look for reputable sellers, such as auctions, estate sales, or online platforms that specialize in selling antlers. These sources often have a variety of antler sizes and styles to choose from, ensuring that you find the right ones for your lamp.
2. Connect with hunters:
Reach out to hunters in your local area and inquire if they have any antlers they are willing to sell or donate. Hunters often collect antlers as trophies and may be happy to part with them for a fair price or for a good cause. This can be a great way to obtain antlers directly from a sustainable and ethical source.
3. Personal connections:
Ask friends, family, or acquaintances if they have any antlers lying around. Some people may have antlers from past hunting trips or deer they have encountered on their property. You never know who might have a set of antlers they are willing to part with.
4. Community or nature centers:
Check with local community centers, nature centers, or wildlife rehabilitation centers in your area. Sometimes, these organizations receive antlers through donations or as a result of natural deer shedding their antlers. They may be willing to sell or give away some antlers.
Remember, it’s important to always abide by the regulations and guidelines set forth by your local wildlife authority when acquiring antlers. This ensures that you are obtaining them legally and sustainably, without contributing to the illegal trade or endangerment of wildlife.
Once you have acquired your deer antlers, it’s time to move on to the next step: preparing the antlers for use in your lamp project.
Read more: How To Make A Floor Lamp
Step 2: Preparing the Antlers
Now that you have acquired the deer antlers for your lamp project, it’s time to prepare them for use. This step is essential to ensure that the antlers are clean, sturdy, and safe to incorporate into your lamp design. Follow these instructions to properly prepare your antlers:
1. Clean the antlers:
Begin by cleaning the antlers to remove any dirt, debris, or remnants of tissue. Use a soft brush or cloth to gently scrub the antlers, making sure to reach all crevices. You can also rinse them with mild soap and water, but be careful not to soak or submerge the antlers, as this can damage the natural fibers.
2. Trim or sand the antlers (if necessary):
If your antlers are too long or have rough edges, you may need to trim or sand them. Use a saw or utility knife to carefully remove any excess length or uneven parts. Be cautious during this step to avoid any injuries or damage to the antlers. You can also use sandpaper to smooth out any rough surfaces or sharp edges.
3. Optional: Preserve or enhance the antlers:
If you’d like to preserve the natural color and texture of the antlers, you can apply a clear coat or varnish to protect them from wear and damage. Alternatively, if you want to change the color or add a different finish, you can use paint or stain designed for use on natural materials. Make sure to follow the manufacturer’s instructions and allow sufficient drying time before proceeding to the next steps.
Read more: How To Make A Vase Into A Lamp
4. Seal the antlers (optional):
Depending on the desired aesthetics and added stability, you may choose to seal the antlers with wood glue or a similar adhesive. This step can help reinforce the antlers, preventing them from becoming loose or damaged over time. Apply the adhesive carefully and evenly, taking care not to obscure any unique features or patterns on the antlers.
By following these preparation steps, you’ll ensure that your deer antlers are clean, properly sized, and visually appealing. Now, you’re ready to move on to the next step of the process: assembling the main frame of your deer antler lamp.
Step 3: Assembling the Main Frame
With your prepared antlers in hand, it’s time to start assembling the main frame of your deer antler lamp. The main frame serves as the backbone of the lamp and provides stability and structure. Follow these steps to assemble the main frame:
1. Determine the layout:
Arrange the antlers in a way that creates a visually pleasing and balanced design for your lamp. Experiment with different configurations and angles until you find the arrangement that you like. Once you’re satisfied with the layout, mark the position of each antler using a marker or pencil. This will help you remember the desired positioning during the assembly process.
2. Pre-drill holes (if necessary):
Using an electric drill and the appropriate size drill bit, pre-drill holes at the marked positions on the antlers. This step is especially important if you’re planning to attach the antlers to a lamp base or other supporting structure. Pre-drilling helps prevent the antlers from splitting or cracking during installation.
Read more: How To Make A Cordless Lamp
3. Attach the antlers:
With the holes pre-drilled, you can now attach the antlers together using wood glue or another adhesive. Apply a small amount of glue to the joints and press the antlers firmly together. Wipe off any excess glue with a damp cloth to maintain a clean and polished appearance. Allow the glue to dry completely before proceeding.
4. Optional: Reinforce with screws:
If desired, you can reinforce the joints even further by inserting screws through the pre-drilled holes. This provides extra stability and ensures that the antlers are securely held together. Choose screws that are long enough to penetrate through the antlers without protruding out the other side. Use a screwdriver to tighten the screws, taking care not to overtighten and risk damaging the antlers.
5. Stabilize the main frame:
If your antler arrangement requires additional support, you can attach the main frame to a lamp base or a sturdy base of your choice. Use screws or other appropriate hardware to secure the main frame to the base. This step ensures that the lamp remains stable and upright once fully assembled.
By following these steps, you’ll create a sturdy and visually appealing main frame for your deer antler lamp. With the main frame complete, you’re ready to move on to the next step: wiring the lamp.
Step 4: Wiring the Lamp
Now that you have assembled the main frame of your deer antler lamp, it’s time to wire it up and bring it to life. Wiring the lamp involves connecting the electrical components to ensure proper functionality. Follow these steps to wire your deer antler lamp:
Read more: How To Make A Hanging Lamp
1. Prepare the lamp socket kit:
Start by unpacking the lamp socket kit and familiarizing yourself with its components. The kit typically includes a socket, a harp, a finial, a cord set, and other necessary hardware. Make sure all the parts are in good condition and undamaged.
2. Thread the cord through the antlers:
Take the cord from the lamp socket kit and carefully thread it through the antlers of your lamp frame. Begin at the bottom of the lamp and work your way up, making sure the cord remains hidden behind the antlers. Take your time to create a clean and neat appearance.
3. Strip the cord ends:
Once the cord is threaded through the antlers, strip the insulation from the ends of the cord. Use a wire stripper or utility knife to remove about half an inch of the outer insulation, revealing the individual wires underneath. Take care not to damage or expose the inner copper wires.
4. Connect the wires to the socket:
Refer to the instructions provided with your lamp socket kit to identify the proper wiring connections. Typically, there will be two wires: a smooth or non-ribbed wire (often the hot wire) and a ribbed or ridged wire (usually the neutral wire). Follow the instructions to connect these wires to the appropriate terminals on the socket, using the provided screws or other fasteners.
Read more: How To Make A Wood Lamp
5. Secure the socket:
Once the wires are connected, carefully insert the socket into the base of the lamp and secure it according to the instructions. This step ensures that the socket remains stable and securely attached, preventing any potential hazards in the future.
6. Attach the lamp harp and finial:
Next, attach the lamp harp to the socket. The harp supports the lampshade and helps keep it in place. Slide the harp onto the socket and secure it using the appropriate hardware. Then, attach the finial to the top of the harp, adding a decorative touch and completing the wiring process.
7. Optional: Test the lamp:
Before proceeding to the final steps, it’s a good idea to test the lamp for proper functionality. Plug the lamp into a working electrical outlet and switch it on. If the lamp does not turn on or exhibits any issues, double-check the wiring connections and troubleshoot as necessary.
With the lamp successfully wired, you have made significant progress in creating your deer antler lamp. Now, it’s time to move on to the next step: installing the lampshade.
Step 5: Installing the Lampshade
Now that you have your deer antler lamp wired and ready to go, it’s time to add the finishing touch by installing a lampshade. The lampshade not only adds aesthetic appeal but also helps to diffuse the light and create a warm ambiance in your space. Follow these steps to install the lampshade on your deer antler lamp:
Read more: How To Make A Mushroom Lamp
1. Choose the right lampshade:
Consider the style, size, and shape of the lampshade that will complement your deer antler lamp and the overall decor of your space. You can choose from a variety of lampshade designs, ranging from traditional fabric shades to modern and minimalist options. Take measurements to ensure the lampshade will fit properly on your lamp.
2. Attach the lampshade spider fitter:
If your lampshade has a spider fitter, which is a metal frame with adjustable arms, carefully position it on top of the lamp harp. Make sure the spider fitter is level and balanced. Gently squeeze the arms of the spider fitter to secure it onto the harp. The spider fitter should fit snugly, ensuring the lampshade remains steady.
3. Install a UNO fitter or clip-on style (if applicable):
If your lampshade does not have a spider fitter, it may feature a UNO fitter or a clip-on style. For a UNO fitter, simply screw it onto the socket, ensuring it is securely fastened. If your lampshade has a clip-on style, carefully position the clips over the bulb socket or onto the lightbulb itself, ensuring a tight grip.
4. Adjust the lampshade position:
Once the lampshade is attached to the lamp, adjust its position and alignment to ensure it is straight and level. Step back and examine the lamp from different angles to ensure the lampshade is centered and aesthetically pleasing. Take your time to find the perfect positioning before proceeding to the final touches.
Read more: How To Make A Pipe Lamp
5. Secure the lampshade (optional):
If you wish to further secure the lampshade, you can use a finial to hold it in place. A finial is a decorative accessory that screws onto the top of the lampshade, providing stability and preventing the lampshade from accidentally moving or falling off. Choose a finial that complements your lamp style and screw it on tightly.
With the lampshade installed, your deer antler lamp is almost complete. Just a few final touches remain before you can proudly display your homemade creation. Let’s move on to the next and final step: adding the finishing touches.
Step 6: Final Touches
Congratulations! You’re now in the final step of creating your deer antler lamp. It’s time to add those special finishing touches that will make your lamp unique and perfectly suited to your style and space. Here are some ideas for adding those final touches:
1. Decorative accents:
Consider adding decorative accents to enhance the visual appeal of your lamp. You can incorporate elements like feathers, beads, twine, or ribbons to complement the rustic charm of the antlers. Attach these accents using hot glue or craft wire, ensuring they are firmly secured.
2. Paint or stain:
If you want to change the color or finish of the antlers, you can apply paint or stain to achieve the desired look. Use a paintbrush or cloth to apply the paint or stain evenly and let it dry thoroughly before handling. This step allows you to customize the appearance of the antlers to match your decor.
Read more: How To Make A Resin Lamp
3. Base decoration:
Consider decorating the lamp base to add an extra touch of style. You can paint or stain the base to match the antlers or choose a contrasting color for a unique look. Additionally, you can embellish the base with decorative elements such as seashells, stones, or small figurines, further personalizing your lamp.
4. Cord concealment:
If you prefer a clean and organized look, you can use cord concealment techniques to hide the exposed lamp cord. You can purchase cord covers or use adhesive-backed hooks or cable clips to secure the cord along the back of furniture or walls. This technique helps maintain a neat and tidy appearance.
5. Adjust lighting:
Experiment with different lightbulbs to achieve the desired ambiance and brightness. Choose a bulb that complements the lampshade and enhances the overall atmosphere of the room. Consider using dimmable bulbs or adding a dimmer switch to have control over the intensity of the light.
6. Safety considerations:
Make sure your lamp is safely positioned and kept away from flammable materials. Ensure that the lampshade is secure and properly attached to avoid any accidents. Regularly check the lamp for any loose wires or other potential hazards and address them immediately.
With these final touches, your deer antler lamp is complete! Take a step back and admire your handiwork. You’ve transformed a set of deer antlers into a stunning and functional piece of furniture that adds charm and character to your home.
Remember, each deer antler lamp is unique, reflecting your creativity and personal style. Enjoy the pride and satisfaction of creating a one-of-a-kind piece that truly stands out. Now, find the perfect spot to showcase your deer antler lamp, sit back, and bask in the warm and inviting glow it provides.
Thank you for joining us on this DIY journey. We hope you’ve enjoyed creating your deer antler lamp and that it brings you joy for years to come!
Read more: How To Make An Oil Lamp
Conclusion
Congratulations on completing your DIY deer antler lamp! Through each step of the process, from acquiring the antlers to adding the final touches, you have crafted a unique and eye-catching piece of furniture that adds a touch of rustic charm to your home. By repurposing natural materials and showcasing your creativity, you have created a lamp that is both sustainable and visually appealing.
Creating your own deer antler lamp not only allows you to showcase your DIY skills but also gives you the opportunity to personalize your home decor. The process of sourcing, preparing, and assembling the antlers, along with the wiring and installation of the lampshade, required attention to detail and careful craftsmanship. With each step, you honed your furniture-making abilities and created a functional piece of art.
Your deer antler lamp will serve as a focal point in any room, offering a warm and inviting ambiance. The mix of natural elements and unique design adds character to your space, making it feel cozy and welcoming. Whether you choose to display it in your living room, bedroom, or study, your lamp will surely catch the attention of visitors and spark conversations.
Keep in mind that this DIY project can be adapted and customized to suit your preferences and style. Get creative with the antler arrangement, experiment with different lampshade designs, or even add your own artistic embellishments. The possibilities are endless, allowing you to create a truly one-of-a-kind piece that reflects your personality and taste.
Throughout this journey, you have not only created a beautiful piece of furniture but have also honed valuable skills. From woodworking techniques to electrical wiring, you have expanded your DIY repertoire and gained confidence in tackling future projects. The sense of satisfaction that comes from creating something with your own hands is immeasurable, and it’s a testament to your dedication and passion for craftsmanship.
Thank you for joining us on this DIY adventure to create a deer antler lamp. We hope this guide has inspired and empowered you to explore more furniture-making projects in the future. Now, it’s time to bask in the warm glow of your deer antler lamp and enjoy the beauty and uniqueness it brings to your home.
Frequently Asked Questions about How To Make A Deer Antler Lamp
Was this page helpful?
At Storables.com, we guarantee accurate and reliable information. Our content, validated by Expert Board Contributors, is crafted following stringent Editorial Policies. We're committed to providing you with well-researched, expert-backed insights for all your informational needs.

0 thoughts on “How To Make A Deer Antler Lamp”