Home>Furniture>Living Room Furniture>How To Whitewash A Coffee Table
Living Room Furniture
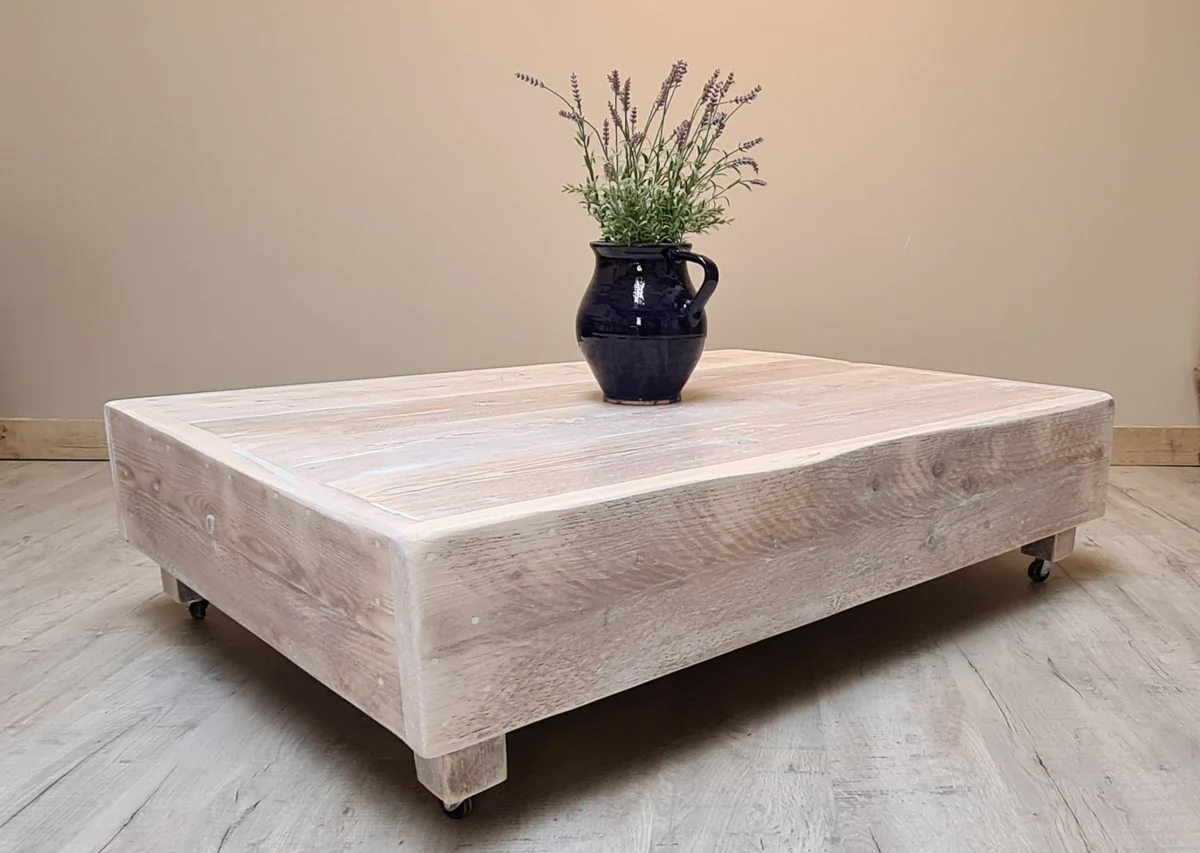
How To Whitewash A Coffee Table
Modified: March 16, 2024
Learn how to easily whitewash your coffee table in your living room with our step-by-step guide. Transform your wooden furniture into a chic and stylish centerpiece.
(Many of the links in this article redirect to a specific reviewed product. Your purchase of these products through affiliate links helps to generate commission for Storables.com, at no extra cost. Learn more)
Introduction
Welcome to the world of living room furniture! A coffee table is a staple in any living room, providing both functionality and style to your space. If you’re looking to give your coffee table a fresh, new look, why not consider whitewashing it? Whitewashing is a popular technique that can transform the appearance of your coffee table, giving it a rustic and shabby chic vibe.
In this article, we will guide you through the step-by-step process of how to whitewash a coffee table. We’ll provide you with a list of materials needed and walk you through each stage, from sanding the surface to applying the final touches. So, roll up your sleeves and get ready to revamp your coffee table into a stunning centerpiece.
Before we proceed, it’s important to note that whitewashing is a technique that involves applying a thin coat of paint or diluted paint to the surface, allowing the wood grain to show through. This creates a beautiful, washed-out effect that adds character to your coffee table. Now, let’s dive into the materials you’ll need for this project.
Key Takeaways:
- Whitewashing a coffee table is a fun DIY project that adds rustic charm to your living room. With simple materials and steps like sanding, applying primer, and whitewashing, you can transform your table into a stunning centerpiece.
- After whitewashing, seal the finish with polyurethane for durability. Add personal touches and care for your table to maintain its beauty. Enjoy the process and impress your guests with your stylish, whitewashed coffee table!
Read more: How To Whitewash A Dining Table
Materials Needed
Before you begin the process of whitewashing your coffee table, make sure you have the following materials on hand:
- Medium-grit sandpaper
- Paint primer
- White paint or white paint wash
- Paintbrush
- Lint-free cloth
- Clear polyurethane sealant
- Painter’s tape (optional)
- Drop cloth or newspaper
The sandpaper is essential for prepping the surface of your coffee table. Look for medium-grit sandpaper, which will help remove any existing finish or rough spots on the wood.
A paint primer is necessary to create a smooth and even base for the whitewash. It helps the paint adhere better and prevents any bleed-through from the wood.
You have the option to use either white paint or a white paint wash for the whitewashing process. White paint is more opaque and will create a solid white finish, while a paint wash will allow more of the wood grain to show through, giving it a softer and more natural look.
A paintbrush is needed to apply the primer and whitewash to the coffee table. You can use either a synthetic bristle brush or a foam brush, depending on your preference.
A lint-free cloth will come in handy for wiping away excess paint or blending the whitewash for a more even finish.
To protect your newly whitewashed coffee table and make it more durable, you’ll need a clear polyurethane sealant. This will add a protective layer that guards against scratches and spills.
If you want to protect certain areas from getting painted, you can use painter’s tape to create clean lines.
Lastly, it’s a good idea to lay down a drop cloth or newspapers to protect your work area from any accidental spills or drips.
Step 1: Sanding the Coffee Table
The first step in whitewashing your coffee table is to sand the surface. Sanding is essential to remove any existing finish, smooth out rough spots, and create a clean and even surface for the primer and paint to adhere to.
Start by using medium-grit sandpaper and sand the entire coffee table, including the top, sides, and legs. Make sure to sand in the direction of the wood grain for the best results. The goal here is to create a slightly roughened surface that will allow the whitewash to adhere better.
As you sand, be sure to pay extra attention to any areas with existing finish, such as varnish or paint. Sanding these areas thoroughly will help ensure that the primer and whitewash will properly bond to the wood.
Once you have sanded the entire coffee table, use a clean cloth or brush to remove any dust or debris. It’s crucial to have a clean surface before moving on to the next step.
Take a moment to inspect the coffee table and feel the surface with your hands. If you come across any rough patches or areas that need further sanding, now is the time to address them. Remember, the smoother the surface, the better the end result.
Once you’re satisfied with the sanding process, it’s time to move on to the next step: applying the primer. This will ensure that the whitewash goes on smoothly and evenly, creating a beautiful finish for your coffee table.
Step 2: Applying the Primer
After sanding the coffee table, the next step is to apply a primer. The primer provides a base layer that helps the paint adhere to the wood and prevents any bleed-through from the wood grain.
Start by stirring the primer to ensure it is well-mixed. Then, using a paintbrush or foam brush, apply an even coat of primer to the entire coffee table, including the top, sides, and legs. Make sure to follow the wood grain while applying the primer for a smooth and consistent finish.
Pay close attention to any crevices or corners, ensuring that the primer reaches all areas. If necessary, use a smaller brush to reach tight spaces or angles.
Allow the primer to dry completely according to the manufacturer’s instructions. This usually takes about 2-4 hours, but it’s best to consult the product label for specific drying times.
Once the primer has fully dried, lightly sand the surface with a fine-grit sandpaper. This step will help create a smoother surface for the whitewash and remove any imperfections or brush strokes left by the primer.
After sanding, wipe away any dust or debris with a clean cloth or brush. This ensures a clean and smooth surface for the next step.
Now that the coffee table is prepped and primed, it’s time to move on to the exciting part: applying the whitewash. This technique will give your coffee table a charming and rustic appearance, adding character to your living room.
Step 3: Mixing the Whitewash Solution
Before you can apply the whitewash to your coffee table, you’ll need to mix the whitewash solution. The whitewash is a diluted form of paint that allows the wood grain to show through, creating a beautiful washed-out effect.
To create the whitewash solution, you’ll need white paint and water. The ratio will depend on the desired level of opacity you want for your coffee table. A general guideline is to start with a 1:1 ratio of paint to water and adjust as needed.
In a mixing container, pour an equal amount of white paint and water. Use a stir stick or brush to thoroughly mix the two together until they are well combined. The consistency should be thin, like a watery paint.
It’s a good idea to test the whitewash solution on a small, inconspicuous area of the coffee table or a scrap piece of wood to ensure you achieve the desired effect.
If the whitewash appears too opaque, add more water to the mixture and stir again. If it appears too thin, add a little more paint and adjust until you reach the desired consistency.
Once you are satisfied with the whitewash solution, it’s time to move on to the next step: applying the whitewash to the coffee table.
Note: If you prefer a more solid white finish rather than a translucent whitewash, you can skip this step and use white paint directly without dilution.
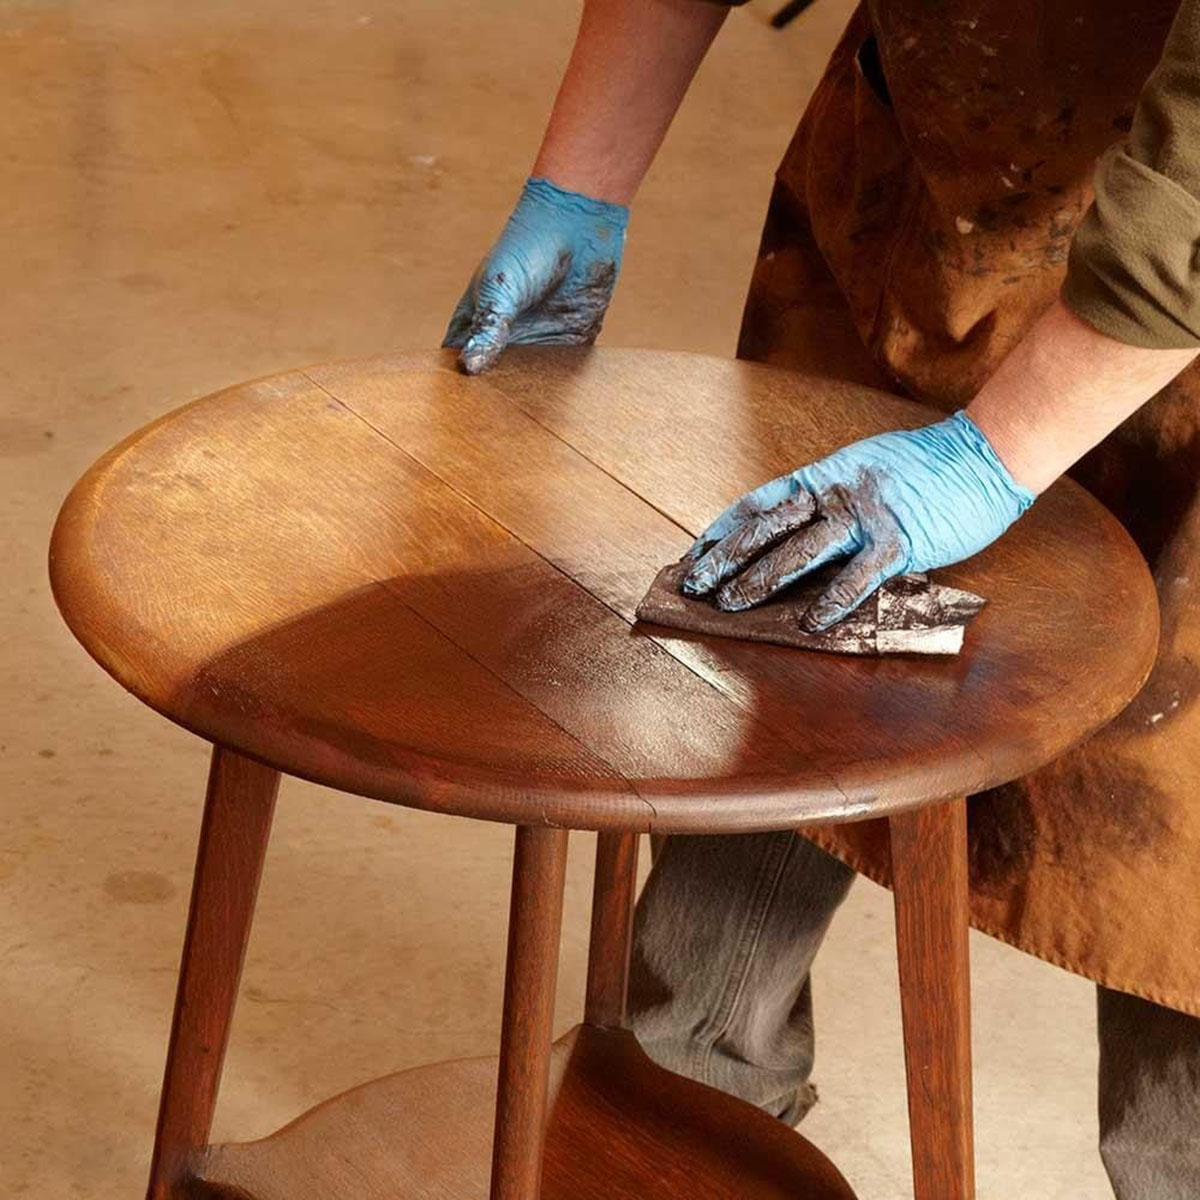
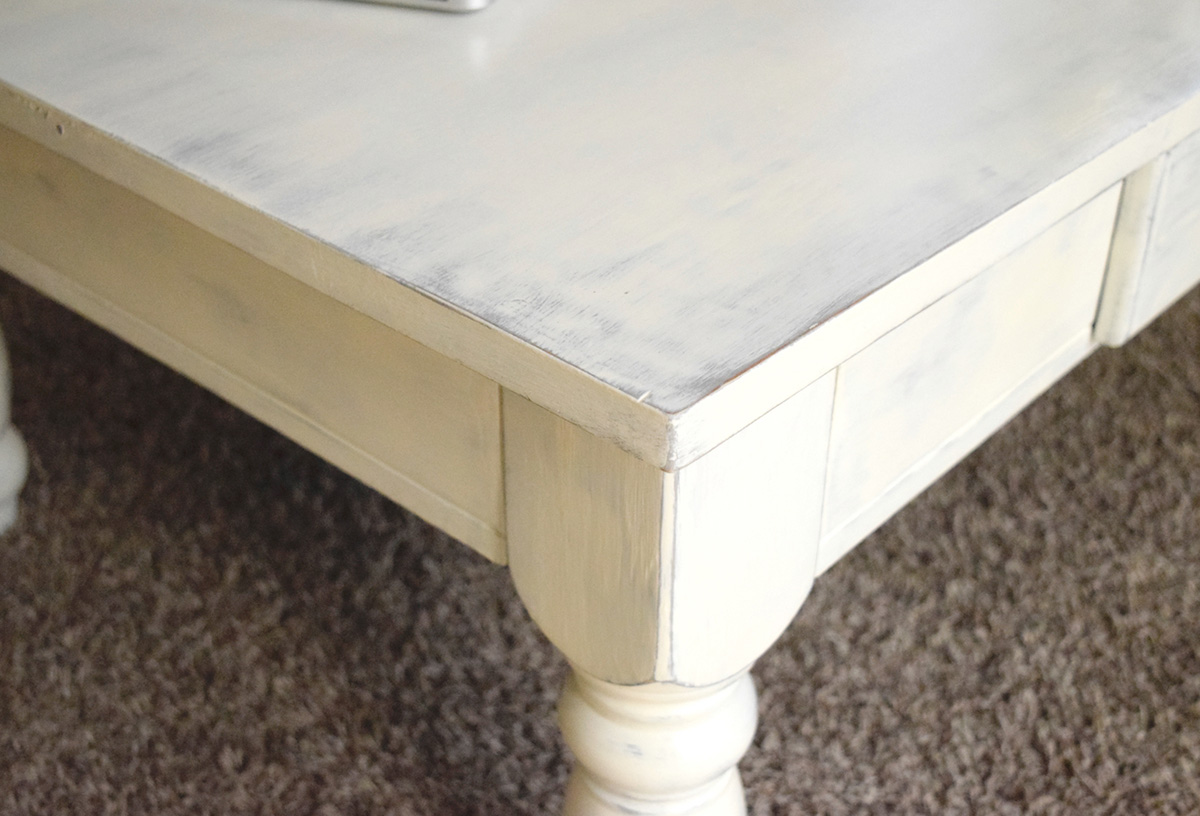
Before whitewashing a coffee table, make sure to sand the surface to remove any existing finish. Apply a mixture of water and white paint, then wipe off excess with a rag for a light, whitewashed look.
Step 4: Applying the Whitewash
Now that you’ve mixed the whitewash solution, it’s time to apply it to your coffee table. This step will give your coffee table that beautifully washed-out appearance, adding character and charm to your living room.
Start by stirring the whitewash mixture to ensure it is well-mixed. Then, using a paintbrush or foam brush, begin applying the whitewash to the coffee table, following the wood grain. Work in small sections at a time, making sure to cover the entire surface, including the top, sides, and legs.
As you apply the whitewash, allow the wood grain to show through by using light, even strokes. This will create a more natural and rustic look. If you prefer a more opaque finish, apply a slightly thicker coat of whitewash.
As you work, be mindful of any drips or excess paint. Use a clean cloth or brush to gently wipe away any drips or blend any uneven areas for a smoother finish.
Continue applying the whitewash to the coffee table until the entire surface is covered. Take breaks as needed to assess the coverage and make any necessary adjustments.
Once you have applied the whitewash to the entire coffee table, step back and evaluate the overall look. If you desire a more intense white-washed effect, wait for the first coat to dry and apply a second coat, following the same process as before.
Allow the whitewash to fully dry according to the manufacturer’s instructions. Typically, it takes about 2-4 hours, but it’s best to consult the product label for specific drying times.
Now that the whitewash is complete, you’re ready to seal and protect the finish to ensure its longevity and durability. This is where the next step comes in: sealing the whitewash.
Step 5: Sealing the Whitewash
After applying the whitewash to your coffee table, it’s important to seal and protect the finish. Sealing the whitewash will not only enhance its durability but also provide a layer of protection against spills, scratches, and everyday wear and tear.
To seal the whitewash, you’ll need a clear polyurethane sealant. This sealant comes in various finishes, such as satin, semi-gloss, or gloss. Choose the finish that best suits your desired look for the coffee table.
Start by ensuring that the whitewash is completely dry. Refer to the manufacturer’s instructions for recommended drying times.
Next, lightly sand the surface of the coffee table to smoothen any imperfections or rough spots that may have occurred during the whitewashing process. Use a fine-grit sandpaper and gently sand in the direction of the wood grain. Wipe away any dust with a clean cloth or brush.
Once the surface is smooth and clean, stir the polyurethane sealant to mix it thoroughly. Then, using a clean brush or foam brush, apply an even coat of the sealant to the entire coffee table, including the top, sides, and legs.
Make sure to follow the manufacturer’s instructions for the application and drying times of the sealant. Typically, you will need to allow the first coat to dry for a specified period before applying additional coats, if desired.
After the first coat is dry, lightly sand the surface again with a fine-grit sandpaper to create a smooth finish. Wipe away any dust or debris with a clean cloth.
Apply a second coat of the polyurethane sealant, following the same process as before. This second coat will provide an added layer of protection and enhance the longevity of the whitewash finish.
Allow the final coat of sealant to dry completely before using the coffee table. This drying time can vary depending on the product, so consult the label for specific instructions.
Congratulations! You have successfully whitewashed and sealed your coffee table. All that’s left to do is add the finishing touches to make it a stunning centerpiece in your living room, which brings us to the final step.
Step 6: Finishing Touches
Now that you’ve whitewashed and sealed your coffee table, it’s time to add some finishing touches to truly make it shine in your living room.
First, assess the overall look of the table. If there are any areas that you feel need touch-ups or additional whitewashing, now is the time to make those adjustments. Use a small brush and apply the whitewash as needed to achieve your desired look.
Once you’re satisfied with the whitewash, consider adding some decorative elements to enhance the table’s visual appeal. This could include placing a tray or a set of coasters on top, adding a vase with fresh flowers, or arranging some decorative items that complement the style of your living room.
In addition to decor, you may want to protect the surface of the coffee table from everyday wear and tear by using coasters or placemats when placing items on it. This will help prevent scratches and spills, ensuring that your beautifully whitewashed table remains in excellent condition.
Maintaining and cleaning your whitewashed coffee table is relatively simple. Use a soft, damp cloth to wipe away any dust or spills. Avoid using harsh chemicals or abrasive cleaners, as they can damage the finish. Regularly dusting the table will help keep it looking its best.
Lastly, don’t forget to enjoy your newly whitewashed coffee table! It adds a touch of charm and elegance to your living room, creating a cozy and inviting space for you and your loved ones to gather around.
Whether you’re enjoying a morning cup of coffee or hosting a game night with friends, your whitewashed coffee table is sure to be a focal point of your living room and a reflection of your personal style.
Congratulations on completing the whitewashing process and adding a fresh and unique look to your living room with a beautifully whitewashed coffee table!
Thank you for following along our step-by-step guide. We hope you found this tutorial helpful and that you enjoy the results of your DIY project.
Conclusion
Whitewashing a coffee table is a fantastic way to breathe new life into your living room furniture. It adds a touch of rustic charm and elegance, transforming a plain coffee table into a stunning centerpiece that enhances the overall decor of your space.
In this guide, we’ve walked you through the step-by-step process of how to whitewash a coffee table. From sanding the surface to applying the whitewash and sealing the finish, each stage contributes to achieving that desired washed-out look.
Remember to start with the proper materials, including sandpaper, primer, white paint or paint wash, brushes, and a clear polyurethane sealant. Take your time during each step to ensure the best results.
By mixing the whitewash solution and applying it in light, even strokes, you’ll create a beautiful translucent finish that allows the wood grain to show through. Sealing the whitewash with a polyurethane sealant provides durability and protection for long-lasting beauty.
Don’t forget to add your personal touch to the coffee table by decorating it with items that complement your living room style. And remember to take proper care of your whitewashed table to maintain its beauty over time.
Whitewashing a coffee table is a creative and fun DIY project that can be enjoyed by beginners and experienced DIY enthusiasts alike. It allows you to add a unique and personalized touch to your living space while breathing new life into an old piece of furniture.
So, go ahead and give it a try. Transform your coffee table into a stylish and eye-catching centerpiece that will impress your guests and make your living room a cozy haven for relaxation and entertainment.
Thank you for joining us on this whitewashing adventure. We hope you’ve enjoyed the process and that your newly whitewashed coffee table brings you joy and satisfaction for years to come.
Frequently Asked Questions about How To Whitewash A Coffee Table
Was this page helpful?
At Storables.com, we guarantee accurate and reliable information. Our content, validated by Expert Board Contributors, is crafted following stringent Editorial Policies. We're committed to providing you with well-researched, expert-backed insights for all your informational needs.


0 thoughts on “How To Whitewash A Coffee Table”