Home>Garden Essentials>How To Germinate Datura Inoxia
Garden Essentials
How To Germinate Datura Inoxia
Modified: March 15, 2024
Want to learn how to germinate Datura Inoxia in your garden? Discover the best techniques and tips in this comprehensive guide. Start growing beautiful Datura Inoxia plants today!
(Many of the links in this article redirect to a specific reviewed product. Your purchase of these products through affiliate links helps to generate commission for Storables.com, at no extra cost. Learn more)
Introduction
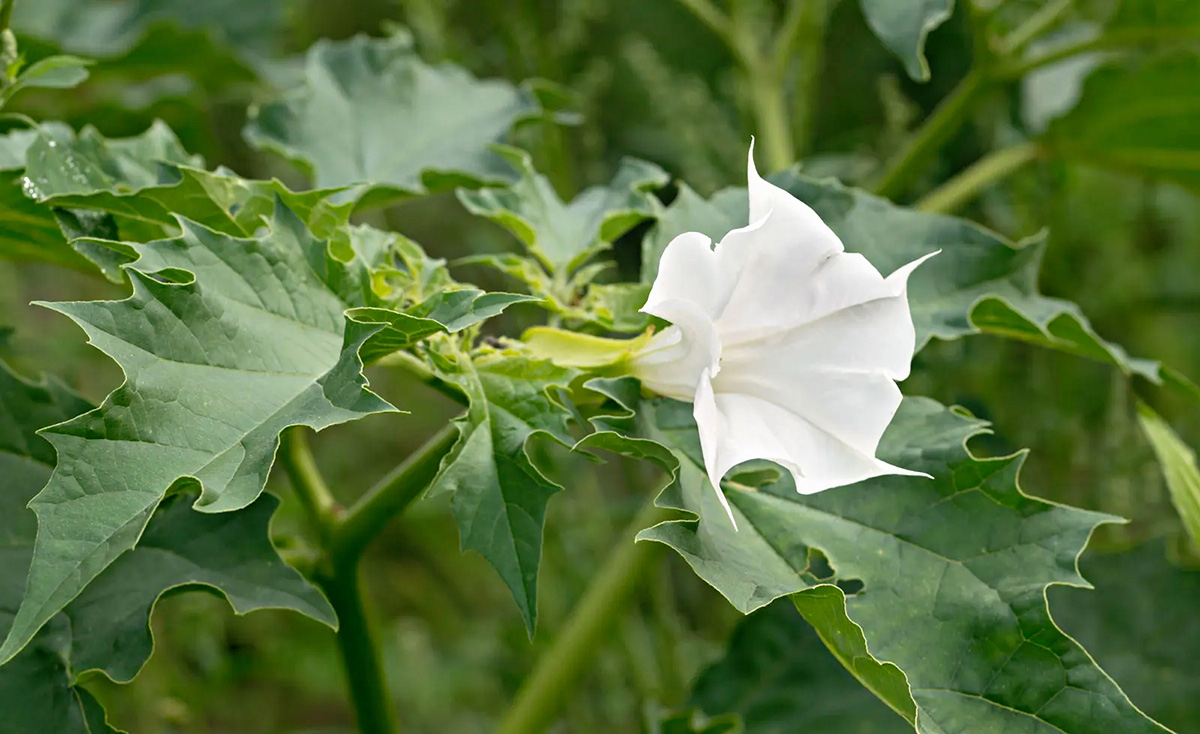
Welcome to the exciting world of gardening! If you have a passion for plants and want to try your hand at germinating Datura Inoxia, you’ve come to the right place. Datura Inoxia, also known as Moonflower or Toloache, is a stunning night-blooming plant that can add a touch of mystique to any garden. In this guide, we will take you through the step-by-step process of germinating Datura Inoxia seeds to help you successfully grow this beautiful plant.
Before we dive into the germination process, it’s essential to understand a little bit about Datura Inoxia. Native to Central and South America, this plant belongs to the Solanaceae family, which includes other well-known plants like tomatoes and potatoes. Datura Inoxia is known for its large, trumpet-shaped flowers that bloom at night, emitting a sweet, intoxicating fragrance.
Now, let’s gather all the materials you will need to begin your germination journey with Datura Inoxia.
Key Takeaways:
- Germinating Datura Inoxia seeds involves collecting, scarifying, soaking, and planting the seeds in a suitable container. Providing optimal growing conditions and monitoring the seeds’ progress are crucial for successful germination.
- Transplanting Datura Inoxia seedlings, if desired, requires careful handling and proper site preparation. With patience and regular care, these stunning night-blooming plants can thrive in your garden.
Read more: When To Plant Datura Seeds
Materials Needed
Before you get started with germinating Datura Inoxia seeds, it’s important to gather all the necessary materials to ensure a smooth and successful process. Here’s a list of the essential items you’ll need:
- Datura Inoxia seeds: Obtain fresh seeds from a reputable source or harvest them from mature Datura Inoxia plants.
- Sharp knife or sandpaper: This will be used for scarifying the seeds, which helps to break the seed coat and promote germination.
- Bowl of water: You’ll need this for soaking the seeds and preparing them for germination.
- Germination container: Use a small pot or a seed tray with drainage holes to create an ideal environment for the seeds to germinate.
- Potting mix: Choose a well-draining potting mix suitable for seed germination. Alternatively, you can create your own mix using a combination of peat moss, perlite, and vermiculite.
- Plant labels: These are helpful for keeping track of different varieties or specific planting dates.
- Clear plastic wrap or a dome: To create a mini greenhouse effect and maintain consistent moisture levels during germination.
- Watering can or spray bottle: Use this to water the seeds gently, keeping the soil moist but not waterlogged.
- Grow lights (optional): If you don’t have access to sufficient sunlight, you can use artificial grow lights to provide the necessary light for seed germination.
Now that you have all the required materials ready, let’s move on to the first step: collecting Datura Inoxia seeds!
Step 1: Collecting Datura Inoxia Seeds
The first step in germinating Datura Inoxia is to collect the seeds. If you already have mature Datura Inoxia plants in your garden, you can harvest the seeds from their dried seed pods. Ensure that the seed pods have turned brown and are fully mature before collecting the seeds.
To collect the seeds:
- Locate the dried seed pods on the Datura Inoxia plant.
- Using a pair of scissors or garden pruners, carefully cut or snap off the seed pods at the base.
- Place the seed pods in a paper bag or envelope to allow them to continue drying.
- Store the paper bag or envelope in a cool, dry place for about two weeks. This will help the seeds fully mature and prepare them for germination.
- After two weeks, gently shake the dried seed pods to release the seeds. You may need to use your fingers or a small knife to break open the pods and collect the seeds.
- Inspect the seeds and discard any that are discolored, shriveled, or damaged.
If you don’t have access to mature Datura Inoxia plants, you can purchase fresh Datura Inoxia seeds from a reputable seed supplier or nursery.
Once you have collected or obtained the Datura Inoxia seeds, it’s time to move on to the next step: scarification.
Step 2: Scarification
Scarification is a process that helps break down the tough outer seed coat of Datura Inoxia seeds, allowing water and air to penetrate and speeding up the germination process. This step is crucial because the seed coat of Datura Inoxia seeds is quite hard and can hinder germination if left intact.
To scarify Datura Inoxia seeds:
- Choose either a sharp knife or sandpaper.
- If using a knife, hold the seed firmly with one hand and make a small incision or nick on the seed coat. Be careful not to cut too deep, as you don’t want to damage the embryo inside.
- If using sandpaper, gently rub the seed against the sandpaper until you see a slight break in the seed coat. The goal is to create small scratches or abrasions rather than completely removing the seed coat.
- Once you have scarified all the seeds, place them in a bowl of water and let them soak for 24 hours. This will further soften the seed coat and aid in germination.
After the scarification process, the Datura Inoxia seeds are now ready for the next step: soaking.
Note: It’s important to wear protective gloves when handling Datura Inoxia seeds, as they can be mildly toxic if ingested or if the sap comes into contact with the skin. Wash your hands thoroughly after working with the seeds.
Step 3: Soaking the Seeds
Soaking the scarified Datura Inoxia seeds is an important step in the germination process. This helps to further soften the seed coat and hydrate the seeds, preparing them for germination. Soaking also helps to kick-start the germination process by imitating the natural conditions in nature when seeds are exposed to rain or moisture.
To soak the Datura Inoxia seeds:
- Take the scarified seeds and place them in a bowl of room temperature water.
- Allow the seeds to soak for approximately 24-48 hours. During this time, the seeds will absorb water and begin to swell.
- Check the seeds occasionally to ensure they remain submerged in water. If necessary, gently agitate the water to ensure even soaking.
- After the soaking period is complete, carefully drain the water from the bowl.
- Now, the Datura Inoxia seeds are ready for planting in the germination container.
Soaking the seeds not only helps with germination but also increases the chances of a higher seedling survival rate. It’s an important step to provide the seeds with the moisture they need to germinate successfully.
Once you have soaked the Datura Inoxia seeds, it’s time to move on to the next step: preparing the germination container.
Read more: How To Germinate A Bean
Step 4: Preparing the Germination Container
Now that you have scarified and soaked the Datura Inoxia seeds, it’s time to prepare the germination container. The germination container will provide the ideal environment for the seeds to germinate and grow into healthy seedlings.
Here are the steps to prepare the germination container:
- Choose a small pot or seed tray with drainage holes to prevent waterlogging.
- Fill the container with a well-draining potting mix. You can use a commercially available seed starting mix or create your own mix using peat moss, perlite, and vermiculite.
- Moisten the potting mix with water until it is evenly damp but not saturated.
- Level the surface of the potting mix, ensuring it is smooth and even.
- If using a seed tray, divide the tray into individual cells or sections using dividers or create small depressions in the potting mix for each seed.
It’s important to choose a germination container that provides enough space for each seed to have room to grow. If using a small pot, you can plant multiple seeds in one container, but make sure to space them out evenly.
After preparing the germination container, you are now ready to move on to the exciting part: planting the Datura Inoxia seeds!
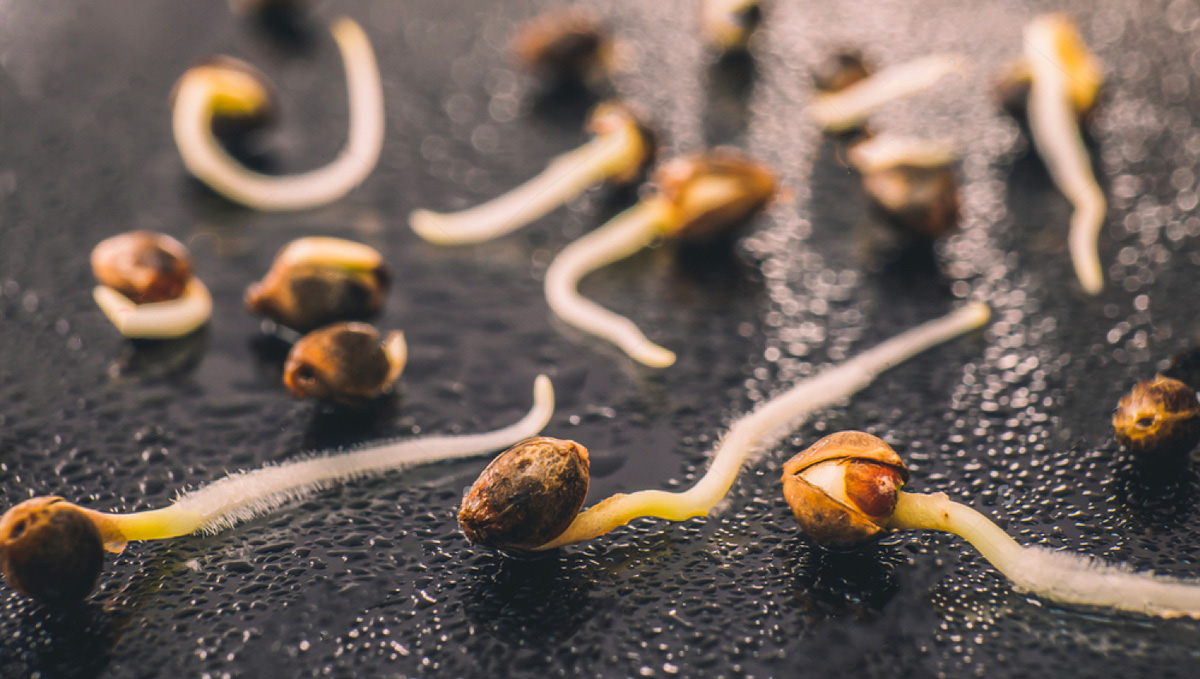
To germinate Datura inoxia seeds, soak them in warm water for 24 hours, then plant them in well-draining soil and keep them in a warm, sunny location. Keep the soil consistently moist but not waterlogged. Germination can take 1-3 weeks.
Step 5: Planting the Seeds
Now that you have prepared the germination container, it’s time to plant the scarified and soaked Datura Inoxia seeds. Proper planting ensures good seed-to-soil contact and provides the seeds with the necessary conditions to sprout and develop into healthy seedlings.
Follow these steps to plant the Datura Inoxia seeds:
- If using a pot or seed tray, make small holes in the potting mix with your finger or a pencil. The holes should be deep enough to accommodate the size of the seeds, usually around 1/4 to 1/2 inch deep.
- Place one seed in each hole and gently cover it with the potting mix. Lightly press the soil down to ensure the seed is in contact with the moist soil.
- If planting multiple seeds in the same container, ensure they are spaced apart to allow room for growth.
- Label each seed or row with plant labels, indicating the variety or date of planting.
- Once you have planted all the seeds, lightly mist the soil with water to settle it around the seeds. Avoid overwatering as it can lead to damping-off disease and rotting of the seeds.
Keep in mind that Datura Inoxia seeds can take anywhere from 1 to 4 weeks to germinate, depending on the conditions and seed quality. Place the germination container in a warm location with ample indirect sunlight. It’s crucial to maintain consistent moisture in the soil, so always monitor and adjust watering as needed.
Congratulations! You have successfully planted the Datura Inoxia seeds. Now, let’s move on to the next step: providing optimal growing conditions for the germinating seeds.
Step 6: Providing Optimal Growing Conditions
To ensure the successful germination and growth of your Datura Inoxia seeds, it’s important to provide them with optimal growing conditions. These conditions include the right amount of light, temperature, humidity, and watering.
Here are the key factors to consider for providing optimal growing conditions:
- Light: Place the germination container in a location that receives bright, indirect sunlight. Datura Inoxia seeds require ample light for germination and subsequent growth. If you don’t have access to sufficient natural sunlight, you can use artificial grow lights positioned at a distance of 6-12 inches above the container.
- Temperature: Maintain a consistent temperature range of 70-80°F (21-27°C) for the Datura Inoxia seeds. This temperature range promotes germination and allows for healthy seedling development. Avoid drastic temperature fluctuations, as it can stress the seedlings.
- Humidity: Maintain a moderately high humidity level of around 60-70% in the vicinity of the germination container. You can achieve this by covering the container with clear plastic wrap or using a dome to create a mini greenhouse effect. This helps retain moisture and create a favorable environment for the seeds to germinate.
- Watering: Keep the soil consistently moist but not waterlogged. It’s important to provide regular, gentle watering to ensure the seeds and seedlings have enough moisture for germination and growth. Use a watering can or spray bottle to water the soil, aiming for even moisture throughout. Avoid overwatering, as it can lead to fungal diseases and root rot.
Regularly monitor the growing conditions, including the moisture level, light exposure, and temperature, to ensure they remain within the optimal range. Adjust as needed to create a conducive environment for the germinating seeds.
Note: Be patient during the germination process, as Datura Inoxia seeds can take several weeks to sprout. Some seeds may germinate earlier than others. Continued care and attention will help you succeed in growing healthy Datura Inoxia seedlings.
With the knowledge of providing optimal growing conditions, let’s move on to the next step: monitoring and caring for the germinating seeds.
Step 7: Monitoring and Caring for the Germinating Seeds
Once you have planted the Datura Inoxia seeds and provided them with optimal growing conditions, it’s important to monitor and care for the germinating seeds to ensure their healthy development into seedlings. Regular attention and care will help you identify any issues early on and take necessary steps to address them.
Here are some tips for monitoring and caring for the germinating seeds:
- Observe: Regularly check the germination container for any signs of germination. The first sprouts usually appear within 1 to 4 weeks, although some seeds may take longer. Keep a record of when each seedling emerges to track their progress.
- Watering: Continue to monitor the moisture level of the soil. Water the germination container as needed, keeping the soil consistently moist but not waterlogged. Avoid letting the soil dry out completely, as this can damage the fragile seedlings.
- Thinning: If multiple seedlings emerge in close proximity, consider thinning them to allow ample space for healthy growth. Gently remove the weaker seedlings, leaving behind the strongest and healthiest ones. Be careful when thinning to avoid disturbing the roots of the remaining seedlings.
- Support: As the seedlings grow, provide optional support, such as bamboo stakes or small plant supports, to prevent them from bending or toppling over.
- Light and Airflow: Ensure that the seedlings receive sufficient light and airflow. If necessary, rotate the germination container to promote even growth and prevent the seedlings from leaning towards the light source.
- Fertilization: Avoid fertilizing the seedlings at this early stage. They have enough nutrients from the seed to sustain initial growth. Wait until the seedlings develop a few sets of true leaves before considering gentle fertilization.
- Patience: Remember that germination and seedling growth can be a slow process. Some seedlings may emerge earlier than others. Be patient and continue to monitor and care for the seedlings as they develop.
By closely observing and caring for the germinating seeds, you give them the best chance to thrive and grow into healthy Datura Inoxia seedlings. Soon, they will be ready for the next step: transplanting (if desired).
Now, with the knowledge of monitoring and caring for the germinating seeds, let’s move on to the optional step of transplanting the seedlings.
Read more: How To Germinate Pecans
Step 8: Transplanting the Seedlings (Optional)
If you have chosen to start your Datura Inoxia seeds in a germination container and would like to transplant the seedlings into larger pots or your garden, this step will guide you through the process. Transplanting gives the seedlings more room to grow and allows them to establish themselves in their final growing location.
Here are the steps for transplanting the Datura Inoxia seedlings:
- Timing: Wait until the seedlings have developed several sets of true leaves and are well-established before transplanting. This typically takes about 4-6 weeks from the germination stage.
- Choose a Location: Select a location in your garden that receives full sunlight or partial shade. Datura Inoxia thrives in well-draining soil and prefers a warm and sunny environment.
- Preparing the Transplant Site: Prepare the planting holes in the garden or larger pots by digging a hole that is slightly larger than the root ball of the seedlings. Space the seedlings at least 18-24 inches apart to allow for their mature size.
- Transplanting Process: Gently remove the seedlings from the germination container, taking care not to damage the roots. Place each seedling in a planting hole and backfill the soil around it, ensuring that the seedling is at the same level it was in the germination container.
- Watering: After transplanting, thoroughly water the seedlings to help them settle into their new location. Continue to provide regular watering to keep the soil evenly moist, especially during dry spells.
- Maintenance: As the seedlings continue to grow, provide support like stakes or cages if needed. Monitor the plants for pests and diseases and take necessary measures to control them.
- Hardening Off: If transplanting the seedlings outdoors, gradually expose them to outdoor conditions over a period of several days to harden them off. Start by placing them in a sheltered spot for a few hours and gradually increase the time and exposure to outdoor conditions.
Transplanting Datura Inoxia seedlings gives them the opportunity to establish strong root systems and flourish in their final growing location. With proper care and maintenance, your seedlings will develop into beautiful and mature Datura Inoxia plants, rewarding you with stunning flowers and their enticing fragrance.
Congratulations! You have completed all the steps from germinating the seeds to optionally transplanting the seedlings. With regular care, your Datura Inoxia plants will thrive and become a highlight in your garden.
Remember to enjoy the journey of gardening and the satisfaction of growing your own Datura Inoxia plants. Happy gardening!
—
Note: Datura Inoxia is a toxic plant if ingested and can cause adverse effects. Avoid contact with the sap and practice caution when handling the plant. Keep it out of reach of children and pets.
Conclusion
Congratulations on successfully learning how to germinate Datura Inoxia seeds! By following the steps outlined in this guide, you have gained the knowledge and skills to grow these stunning night-blooming plants in your own garden.
Datura Inoxia, with its large trumpet-shaped flowers and intoxicating fragrance, adds a touch of beauty and intrigue to any garden. From collecting the seeds to germination, providing optimal growing conditions, and potentially transplanting the seedlings, you have embarked on a rewarding journey as a gardener.
Remember to exercise caution when working with Datura Inoxia, as it is toxic if ingested or if its sap comes into contact with the skin. Take appropriate safety measures and keep the plant out of reach of children and pets.
As you continue to care for your Datura Inoxia plants, observe their growth, and enjoy the magical experience of witnessing their night-time blooms. The process of germinating and nurturing these plants not only brings aesthetic beauty to your garden but also provides a deeper connection with nature and the joy of cultivation.
Whether you choose to grow Datura Inoxia for its decorative appeal or for its cultural and medicinal significance, your efforts will be rewarded with a display of stunning flowers and a sense of accomplishment.
Remember to document your journey, experiment with different techniques, and continue to expand your knowledge of gardening. Share your experiences with fellow gardeners and inspire others to embark on their own gardening adventures.
Thank you for choosing this guide as your resource for germinating Datura Inoxia seeds. Wishing you a successful and fulfilling gardening experience with beautiful and thriving Datura Inoxia plants!
Happy gardening!
Frequently Asked Questions about How To Germinate Datura Inoxia
Was this page helpful?
At Storables.com, we guarantee accurate and reliable information. Our content, validated by Expert Board Contributors, is crafted following stringent Editorial Policies. We're committed to providing you with well-researched, expert-backed insights for all your informational needs.


0 thoughts on “How To Germinate Datura Inoxia”