Home>Garden Essentials>How To Plant Amaranth Seeds
Garden Essentials
How To Plant Amaranth Seeds
Modified: March 15, 2024
Learn how to plant amaranth seeds in your garden and grow beautiful, nutritious plants that will enhance your outdoor space.
(Many of the links in this article redirect to a specific reviewed product. Your purchase of these products through affiliate links helps to generate commission for Storables.com, at no extra cost. Learn more)
Introduction
Amaranth is a versatile and nutritious plant that has been cultivated for centuries. It is not only valued for its vibrant and ornamental qualities but also for its dense nutritional profile. Growing amaranth seeds in your garden can provide you with a bountiful supply of nutritious greens and grains, as well as add a touch of natural beauty to your landscape. In this article, we will explore the various benefits of growing amaranth seeds and discuss the importance of planting them.
Key Takeaways:
- Growing amaranth seeds offers a range of benefits, from providing nutritious greens and grains to adding natural beauty to your garden. It’s a sustainable, environmentally friendly, and visually appealing addition to any landscape.
- Choosing the right seeds, preparing the planting site, and following proper watering and care techniques are essential for successfully growing and harvesting vibrant and nutritious amaranth plants.
Read more: How To Collect Amaranth Seeds
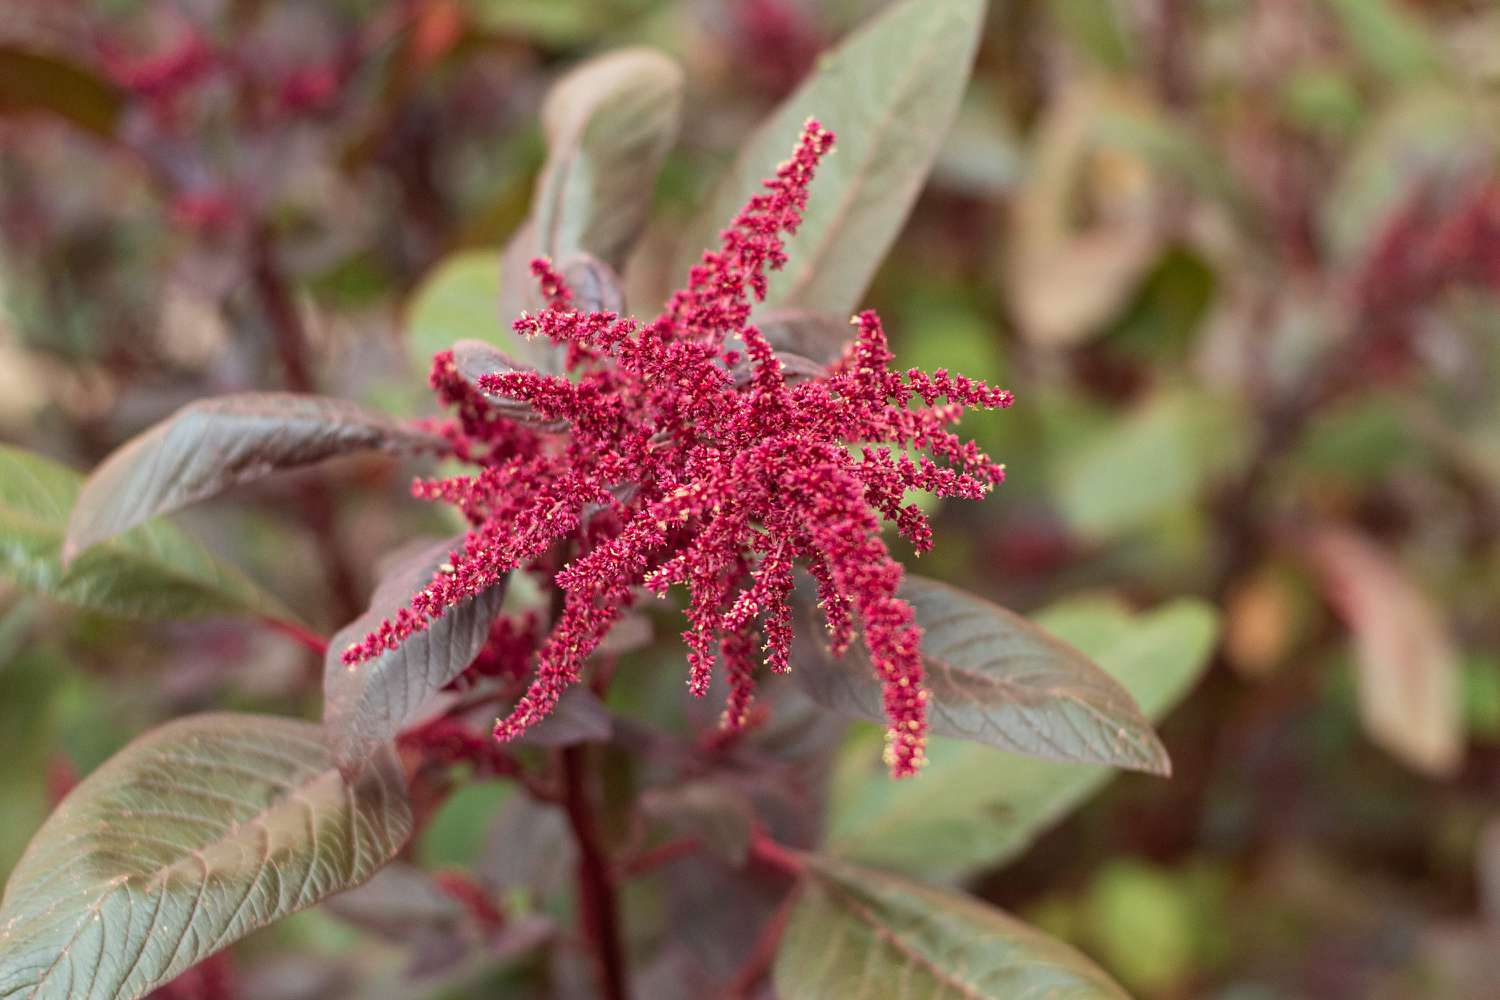
What is Amaranth?
Amaranth is a group of flowering plants that belong to the Amaranthaceae family. It encompasses more than 60 different species, with some being cultivated for their leaves and others for their edible seeds. Amaranth plants are known for their strikingly vibrant flowers, which range from shades of red, pink, and purple to green and even gold. These plants are not only visually appealing but also highly resilient, adaptable to various climates and soil conditions.
Benefits of Growing Amaranth Seeds
There are several compelling reasons to grow amaranth seeds in your garden:
- Nutritional Powerhouse: Amaranth seeds are packed with essential nutrients, including protein, fiber, vitamins, and minerals. They are particularly rich in iron, calcium, magnesium, and phosphorus. Incorporating amaranth seeds into your diet can help boost your overall health and well-being.
- Diverse Culinary Uses: Both the leaves and seeds of amaranth plants are edible. The tender young leaves can be consumed as a leafy green vegetable, similar to spinach or Swiss chard. The seeds can be popped, ground into flour, or cooked to add a nutty flavor and texture to a variety of dishes.
- Sustainable and Environmentally Friendly: Amaranth plants are known for their ability to thrive in diverse conditions without the need for excessive water, pesticides, or fertilizers. They are considered a sustainable crop that can contribute to food security while minimizing environmental impact.
- Ornamental Value: Beyond its nutritional benefits, amaranth is also appreciated for its beauty. The vibrant flowers and striking foliage can enhance the aesthetics of your garden or landscape, adding color and visual interest.
Importance of Planting Amaranth Seeds
Planting amaranth seeds is not only beneficial for your own consumption but also contributes to the preservation and propagation of this ancient crop. By growing amaranth in your garden, you play a role in maintaining biodiversity and promoting sustainable agriculture. Additionally, cultivating amaranth seeds can serve as a learning experience, allowing you to reconnect with nature and gain a deeper understanding of the food you consume.
Now that you understand the numerous benefits of growing amaranth seeds and the importance of planting them, it’s time to delve into the practical steps required for successful cultivation.
Step 1: Choosing the Right Amaranth Seeds
Before you start planting amaranth seeds, it’s important to choose the right variety that suits your needs and growing conditions. Here are some key points to consider:
Read more: How To Use Amaranth Seeds
Understanding Different Varieties of Amaranth Seeds
Amaranth comes in various varieties, each with its unique characteristics and purposes:
- Grain Varieties: These amaranth varieties produce abundant seeds that can be harvested and used as a nutritious grain. They are a great option for those looking to incorporate amaranth into their diet.
- Leafy Varieties: Leafy amaranth varieties are primarily grown for their tender and flavorful leaves. They can be harvested as young greens and used in salads, stir-fries, or sautéed dishes.
- Ornamental Varieties: If you’re looking to add a pop of color to your garden, ornamental amaranth varieties are the way to go. They feature stunning foliage and vibrant flowers, making them a visual delight.
Factors to Consider When Selecting Seeds
When selecting amaranth seeds, keep the following factors in mind:
- Growing Zone: Check your USDA hardiness zone to ensure that the amaranth variety you choose is suitable for your climate. Different varieties thrive in specific temperature ranges and have varying cold or heat tolerance.
- Space Availability: Consider the size of your garden or the available space for growing amaranth. Some varieties are more compact and suitable for smaller gardens, while others require more room to spread out.
- Intended Use: Determine whether you want to grow amaranth for its leaves, seeds, or simply for ornamental purposes. This will help you select the right variety that aligns with your goals.
- Days to Maturity: Take note of the time it takes for the amaranth variety to reach maturity. This information is crucial for planning your planting schedule and harvesting expectations.
Where to Purchase Quality Amaranth Seeds
There are several sources where you can purchase high-quality amaranth seeds:
- Local Nurseries or Garden Centers: Visit local nurseries or garden centers that specialize in selling vegetable or heirloom seeds. They often carry a selection of amaranth seeds, allowing you to choose from different varieties and receive expert advice.
- Online Seed Suppliers: Many reputable online seed suppliers offer a wide range of amaranth seeds. Make sure to research and read reviews to ensure the reliability and quality of the seeds before making a purchase.
- Seed Exchanges or Seed Saving Networks: Explore local seed exchanges or join seed saving networks to connect with other gardeners who might have amaranth seeds to share or trade.
By carefully considering the different varieties of amaranth seeds, taking into account important factors, and purchasing from reliable sources, you can ensure a successful start to your amaranth growing journey.
Step 2: Preparing the Planting Site
Preparing the planting site is crucial to provide the ideal growing conditions for amaranth. Follow these steps to ensure your amaranth seeds thrive:
Read more: How To Germinate A Plant
Ideal Soil Conditions for Growing Amaranth
Amaranth thrives in well-draining soil that is rich in organic matter. Here are the ideal soil conditions for growing amaranth:
- Texture: Amaranth prefers loamy or sandy soil, which allows for proper root development and efficient water drainage.
- pH Level: The optimal soil pH for amaranth is slightly acidic to neutral, ranging from 6.0 to 7.5.
- Organic Matter: Incorporate organic matter, such as compost or well-rotted manure, into the soil to improve its fertility and structure.
- Moisture Retention: Ensure that the soil has good moisture retention capabilities while allowing excess water to drain away. Amaranth plants can tolerate drought conditions but require adequate moisture for optimal growth.
Soil Testing and Preparation
Before planting amaranth seeds, it’s advisable to conduct a soil test to determine the nutrient levels and pH of your soil. Soil testing kits are widely available and easy to use. The results will guide you in making any necessary amendments to the soil.
To prepare the soil for planting:
- Remove Weeds and Debris: Clear the planting area of any weeds, rocks, or debris that may hinder the growth of your amaranth seeds.
- Till the Soil: Dig or till the soil to a depth of 6-8 inches, ensuring that it is loose and crumbly. This helps with root penetration and allows the plants to access essential nutrients.
- Add Organic Matter: Incorporate well-rotted compost or manure into the soil to enrich it with nutrients and improve its structure. Spread a layer of organic matter over the planting area and mix it into the top few inches of soil.
- Level the Soil: Smooth out the soil surface with a rake to create a level and even planting bed. This promotes uniform growth and facilitates irrigation.
Selecting a Suitable Location for Planting
Amaranth plants require full sun to thrive, so it’s crucial to choose a location that receives at least 6 hours of direct sunlight per day. Additionally:
- Avoid Waterlogged Areas: Select a site with good drainage to prevent waterlogging, as excessive moisture can lead to root rot and other plant diseases.
- Consider Wind Exposure: Plant amaranth in a location that is protected from strong winds, as they can damage and uproot the plants.
- Take Space Requirements into Account: Depending on the variety, amaranth plants can grow quite tall and have a spreading habit. Allocate enough space between each plant to allow for proper air circulation and growth.
By following these guidelines and providing the ideal soil conditions, you will establish a favorable environment for your amaranth seeds to flourish.
Step 3: Sowing the Amaranth Seeds
Sowing amaranth seeds properly is essential for healthy plant growth and successful cultivation. Follow these steps to ensure optimal results:
Read more: How To Plant Seed
Best Time to Sow Amaranth Seeds
The timing of sowing amaranth seeds will depend on your climate and the specific variety you are growing. In general, amaranth thrives in warm weather and is highly sensitive to frost. Wait until all risk of frost has passed and soil temperatures have warmed to at least 60°F (15°C) before sowing the seeds. Depending on your region, this may occur in early spring or early summer.
How to Prepare the Seeds for Planting
Prior to planting, it’s advisable to prepare the amaranth seeds to enhance germination rates and seedling vigor:
- Seed Quality: Choose high-quality, viable seeds for optimal germination. Discard any discolored, damaged, or undersized seeds, as they are less likely to sprout successfully.
- Seed Soaking: Some gardeners find that soaking the amaranth seeds in water for 24 hours prior to planting can help increase germination rates.
- Seed Scarification: Amaranth seeds have a tough outer coating that can inhibit germination. To break this dormancy, gently nick or scratch the seed coat using sandpaper or a nail file. This process, known as scarification, allows moisture to penetrate the seed, promoting quicker and more uniform germination.
Techniques for Sowing Amaranth Seeds
There are a few different techniques you can use to sow amaranth seeds:
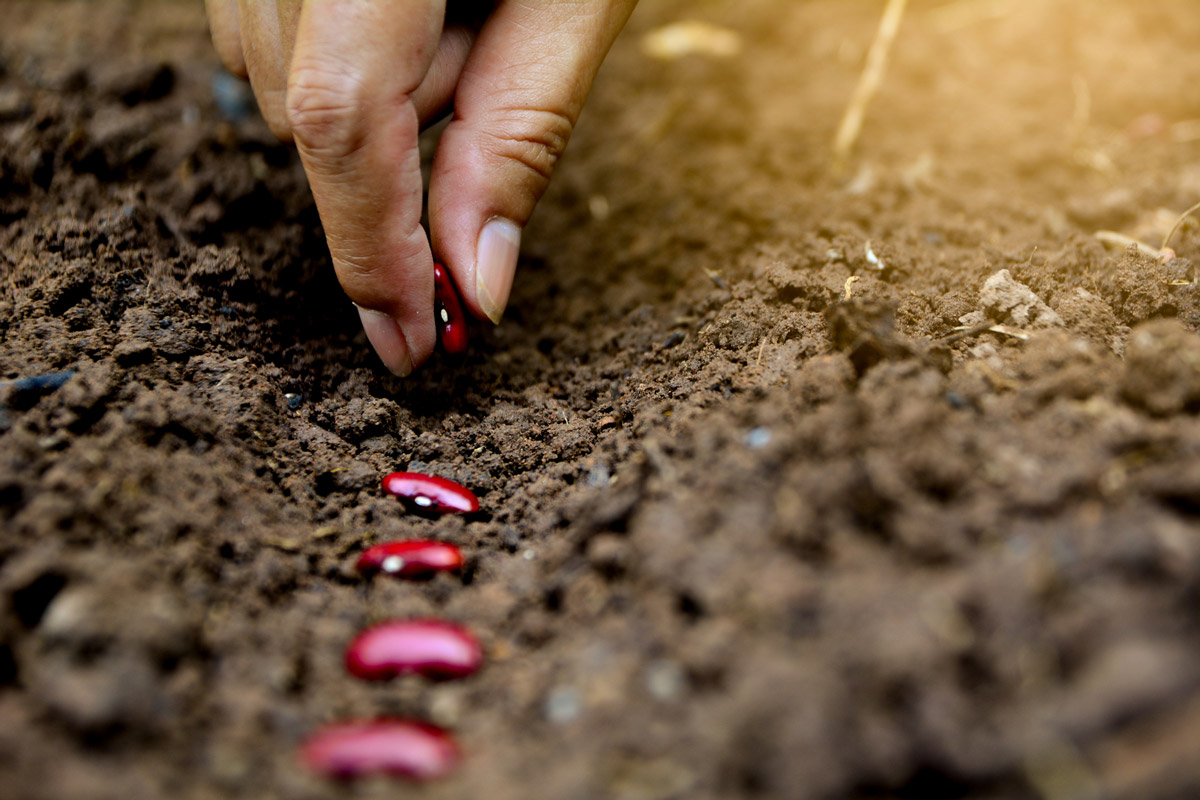
- Direct sowing: Amaranth seeds can be directly sown into the prepared soil. Make shallow furrows or small holes, about ¼ inch deep. Space the holes 12-18 inches apart, depending on the specific variety’s growth habit. Drop a few seeds into each hole and cover them lightly with soil. Water gently to ensure good seed-to-soil contact.
- Transplanting seedlings: Alternatively, you can start amaranth seeds indoors in biodegradable pots, peat pots, or seed trays, about 4-6 weeks before the last frost date. Once the seedlings have grown a few inches tall and all risk of frost has passed, transplant them into the prepared garden bed, spacing them according to the specific variety’s requirements.
Regardless of the sowing technique you choose, it’s important to keep the soil consistently moist but not waterlogged during the germination period. Be patient, as amaranth seeds may take anywhere from 5 to 14 days to germinate, depending on various factors including temperature and soil moisture.
With proper timing and the right techniques for sowing amaranth seeds, you will set the stage for healthy seedlings to emerge and flourish in your garden.
Step 4: Watering and Fertilizing
To ensure the healthy growth and development of your amaranth plants, proper watering and fertilizing techniques are essential. Follow these guidelines to provide the optimal conditions for your amaranth:
Read more: How To Plant Seeds Indoors
Proper Watering Techniques for Amaranth Plants
Amaranth plants require regular watering, especially during dry spells, to maintain appropriate moisture levels in the soil. Here are some tips for watering your amaranth:
- Consistent Moisture: Keep the soil consistently moist, but be cautious not to overwater, as excessive moisture can lead to root rot or other fungal diseases. Aim to water the plants deeply, ensuring that the moisture reaches the root zone.
- Watering Frequency: The frequency of watering will depend on various factors, such as the weather conditions and the soil’s moisture retention capabilities. However, a general guideline is to water amaranth plants thoroughly once or twice a week, particularly during hot and dry periods.
- Mulching: Apply a layer of organic mulch, such as straw or wood chips, around the base of the amaranth plants. This helps retain moisture in the soil, suppresses weed growth, and regulates soil temperature.
- Monitor Plant Needs: Regularly monitor the moisture level of the soil by sticking your finger into the soil. If it feels dry at a depth of two inches, it’s time to water.
Types of Fertilizers for Optimal Growth
Amaranth benefits from regular fertilization to support its growth and development. Consider the following types of fertilizers:
- Organic Fertilizers: Organic options such as compost, well-rotted manure, or worm castings are excellent choices for providing slow-release nutrients to amaranth plants. These natural fertilizers improve soil fertility and promote overall plant health.
- Slow-Release Fertilizers: Slow-release granular fertilizers specifically formulated for vegetable or leafy greens can be applied during the planting phase and throughout the growing season. These fertilizers gradually release nutrients over time, providing a steady supply to the amaranth plants.
- Nitrogen-Rich Fertilizers: Amaranth plants have a high nitrogen requirement for leafy growth. Consider using nitrogen-rich fertilizers, such as blood meal or fish emulsion, to provide an extra boost during the vegetative stage.
Dos and Don’ts of Fertilizing Amaranth Plants
When fertilizing your amaranth plants, consider the following dos and don’ts:
- Do:
- Follow the recommended application rates on the fertilizer packaging.
- Apply fertilizers evenly around the base of the plants, avoiding direct contact with the stems or leaves.
- Water the plants after fertilization to help dissolve and distribute the nutrients into the soil.
- Don’t:
- Exceed the recommended fertilizer application rates, as this can harm the plants or contribute to nutrient imbalances.
- Apply fertilizers when the soil is extremely dry or in extreme weather conditions, as it can lead to fertilizer burn or leaching.
- Over-rely on synthetic fertilizers, as they can negatively impact soil fertility and microbial activity in the long run.
By implementing proper watering techniques and providing the necessary nutrients through appropriate fertilization, you can support the vigorous growth and development of your amaranth plants.
Step 5: Caring for Amaranth Plants
To ensure the health and vitality of your amaranth plants, proper care and maintenance are essential. Follow these guidelines to effectively care for your amaranth:
Read more: How To Plant Wheatgrass Seeds
Common Pests and Diseases Affecting Amaranth Plants
Amaranth plants can be susceptible to certain pests and diseases. Being aware of these potential issues will help you identify and address them promptly. Common pests and diseases that may affect amaranth include:
- Aphids: These small, soft-bodied insects can cluster on new growth, causing stunted growth and distorted leaves.
- Cabbage White Butterfly: The larvae of this butterfly, commonly known as cabbage worms, can feed on the leaves, causing significant damage.
- Leaf Miners: These pests lay eggs on the leaves, and the resulting larvae tunnel into the leaves, leaving visible trails and causing foliage damage.
- Downy Mildew: This fungal disease appears as yellowish or olive green patches on the leaves, often accompanied by a fuzzy growth on the undersides. It thrives in humid conditions.
- Powdery Mildew: Powdery mildew forms a white, powdery coating on the leaves and stems, resulting in reduced plant vigor and decreased yield.
Organic Pest Control Methods
When it comes to controlling pests on your amaranth plants, consider using organic and environmentally friendly methods. Here are a few options:
- Handpicking: Inspect your plants regularly and manually remove any visible pests, such as aphids or cabbage worms, by hand.
- Insecticidal Soap: Use insecticidal soap, which is derived from natural plant oils, to control soft-bodied insects like aphids. Follow the instructions on the product label for proper application.
- Neem Oil: Neem oil is an organic insecticide and fungicide. Dilute it with water according to the instructions and spray it on the affected areas to control a variety of pests and diseases.
- Companion Planting: Consider planting companion plants, such as marigolds or garlic, near your amaranth. These plants naturally repel some common pests.
Pruning and Thinning for Healthier Plants
Pruning and thinning your amaranth plants can promote healthy growth and improve overall plant vitality:
- Pruning: Regularly remove any dead, damaged, or diseased leaves or stems. This enhances airflow and reduces the risk of disease spread.
- Thinning: If your amaranth plants are overcrowded, consider thinning them by gently removing some of the weaker or excess seedlings. This allows for better light penetration and reduces competition for resources.
By staying vigilant against pests and diseases, implementing organic pest control methods, and practicing regular pruning and thinning, you can help your amaranth plants stay healthy and productive throughout the growing season.
Step 6: Harvesting and Storage
Harvesting amaranth seeds at the right time and storing them properly ensures that you can enjoy the fruits of your labor and have a supply for future use. Follow these steps for successful harvesting and storage:
Read more: How To Plant Maple Seeds
When to Harvest Amaranth Seeds
The timing of harvesting amaranth seeds is critical to ensure optimal seed maturity. The seeds should be harvested when they are fully mature and dry on the plant. Keep an eye out for these signs:
- Color Change: As the seeds mature, they will change in color. They will transition from green or light-colored to a darker, deeper shade, such as brown or black.
- Sepal Drying: The sepals, which are the protective coverings around the seeds, will dry and start to crumble or detach easily when touched.
- Flower Disintegration: The petals of the amaranth flowers will dry and disintegrate, leaving only the seed heads behind.
Methods for Harvesting Seeds
Once your amaranth seeds are fully mature, you can use the following methods to harvest them:
- Hand Harvesting: For smaller quantities, you can simply pluck the seed heads from the plants by hand. Hold each seed head over a bag or container and rub or twist it gently to release the seeds.
- Bag Method: For larger quantities, cut the entire seed head from the plant and place it in a paper bag. Hang the bag upside down in a warm, dry, and well-ventilated area. Allow the seed heads to dry completely and then shake or crush them to release the seeds.
- Screen Method: Another option is to hang the entire seed heads or cut branches upside down in a well-ventilated area with a fine mesh screen placed underneath. As the seed heads dry, the seeds will fall through the screen and collect on the surface below.
Storing and Preserving Amaranth Seeds for Future Use
Proper storage is crucial to maintain the viability of your harvested amaranth seeds. Follow these steps to preserve them for future planting:
- Drying: After harvesting the seeds, spread them out in a single layer on a clean and dry surface. Place them in a well-ventilated area away from direct sunlight. Allow the seeds to air-dry for a couple of weeks until they are completely dry and hard.
- Cleaning: Remove any remaining chaff, debris, or plant matter from the seeds. Gently blow or sieve the seeds to separate them from the unwanted particles.
- Storage Containers: Transfer the cleaned and dried seeds to airtight containers, such as glass jars or seed envelopes. Make sure the containers are clean, dry, and labeled with the name and date of the seeds.
- Storage Conditions: Store the seeds in a cool, dark, and dry place, such as a pantry or refrigerator. Protect them from temperature fluctuations, excess moisture, and exposure to light, as these factors can decrease seed viability.
- Seed Viability: Keep in mind that amaranth seeds can remain viable for several years if stored properly. However, it’s recommended to sow the seeds within 2-3 years for better germination rates.
By harvesting the seeds at the right time, using suitable harvesting methods, and properly storing them for future use, you can continue to enjoy the benefits of amaranth and even share your seeds with others.
Conclusion
Planting amaranth seeds can be a rewarding and beneficial endeavor for any garden enthusiast. In this article, we explored the step-by-step process of successfully growing amaranth, from choosing the right seeds to harvesting and storing them for future use. Let’s summarize the key points discussed:
Step 1: Choosing the right amaranth seeds
- Understand the different varieties of amaranth seeds.
- Consider factors such as growing zone, space availability, and intended use when selecting seeds.
- Purchase quality amaranth seeds from local nurseries, garden centers, or reputable online suppliers.
Step 2: Preparing the planting site
- Create ideal soil conditions by ensuring proper texture, pH level, organic matter, and moisture retention.
- Conduct soil testing, remove weeds and debris, till the soil, and level the planting area.
- Select a suitable location that receives at least 6 hours of direct sunlight per day and has good drainage and protection from strong winds.
Step 3: Sowing the amaranth seeds
- Sow amaranth seeds when the risk of frost has passed and soil temperatures have warmed to at least 60°F (15°C).
- Prepare the seeds by ensuring their quality, soaking or scarifying if necessary.
- Use techniques such as direct sowing or transplanting seedlings for successful seed propagation.
Step 4: Watering and fertilizing
- Water amaranth plants consistently, aiming for deep watering once or twice a week, keeping the soil moist but not waterlogged.
- Choose organic fertilizers or slow-release fertilizers for optimal growth.
- Follow proper fertilization techniques and dosages, avoiding excessive use of synthetic fertilizers.
Step 5: Caring for amaranth plants
- Identify common pests and diseases affecting amaranth plants, and employ organic pest control methods such as handpicking, insecticidal soap, and companion planting.
- Regularly prune and thin amaranth plants to promote healthy growth and disease prevention.
Step 6: Harvesting and storage
- Harvest amaranth seeds when they are fully mature and dry on the plant, observing color change and sepals drying.
- Use harvesting methods like hand harvesting, bag method, or screen method.
- Dry the harvested seeds, clean them from debris, and store them in airtight containers in cool, dark, and dry conditions.
Final Tips for Successful Amaranth Seed Planting
Here are a few additional tips to enhance your amaranth seed planting experience:
- Start with a small plot if you are a beginner to gain experience and confidence.
- Rotate the location of your amaranth plants each year to minimize the risk of soil-borne diseases.
- Observe your amaranth plants regularly for any signs of pests, diseases, or nutrient deficiencies, and take immediate action if necessary.
- Consider saving some seeds from your best performing plants for future planting and to preserve genetic diversity.
- Experiment with different amaranth varieties and growing techniques to find what works best for your specific climate and preferences.
By following these guidelines and taking into account the unique characteristics of amaranth seeds and plants, you can successfully grow and harvest this nutritious and vibrant crop in your own garden.
Frequently Asked Questions about How To Plant Amaranth Seeds
Was this page helpful?
At Storables.com, we guarantee accurate and reliable information. Our content, validated by Expert Board Contributors, is crafted following stringent Editorial Policies. We're committed to providing you with well-researched, expert-backed insights for all your informational needs.


0 thoughts on “How To Plant Amaranth Seeds”