Home>Garden Essentials>How To Plant Peach Seeds

Garden Essentials
How To Plant Peach Seeds
Modified: October 18, 2024
Learn how to plant peach seeds in your garden and enjoy delicious homegrown peaches. Follow our step-by-step guide for successful peach tree cultivation.
(Many of the links in this article redirect to a specific reviewed product. Your purchase of these products through affiliate links helps to generate commission for Storables.com, at no extra cost. Learn more)
Introduction
Welcome to the wonderful world of gardening, where you can turn a tiny seed into a thriving plant that produces delicious fruit. If you have ever enjoyed a juicy, sweet peach and wondered how to grow your own, you’ve come to the right place. In this article, we will guide you step-by-step on how to plant peach seeds and nurture them into healthy seedlings.
Planting peach seeds is not only rewarding, but it also allows you to witness the entire growth process of a peach tree right from the beginning. While it may take a little patience and care, the satisfaction of growing your own peaches is truly worth it.
Before we dive into the process, it’s important to note that growing peaches from seeds may not always yield the same quality as the parent tree. This is because most peach varieties are grafted onto rootstocks to ensure consistent fruit quality. However, growing peaches from seeds can still result in unique and tasty fruits, making it an exciting adventure for any gardener.
Now that we have set the expectations, let’s get started on this journey of nurturing peach seeds into thriving peach trees!
Key Takeaways:
- Growing your own peaches from seeds is a rewarding adventure, but be patient as the quality may vary from the parent tree. Enjoy the process and embrace the challenges as opportunities to learn and grow as a gardener.
- When planting peach seeds, gather the right materials, prepare the seeds, and provide proper care. From germination to harvesting, savor the joy of growing your own succulent and flavorful fruits. Happy gardening!
Read more: How To Plant Peach From Seed
Step 1: Gather materials
Before you begin planting peach seeds, it’s important to gather all the necessary materials to ensure a smooth and successful process. Here’s a list of items you’ll need:
- Peaches: Start by selecting fresh and ripe peaches from a local market or your own peach tree if you have one. Choose peaches that are free from disease or damage.
- Knife: You’ll need a sharp knife or a pair of clean scissors to extract the seeds from the peaches.
- Paper towels: Grab a few sheets of paper towels to dry the peach seeds and remove excess moisture.
- Plastic bag or small containers: To store and stratify the seeds, you’ll need a sealable plastic bag or small containers like seed trays or pots.
- Potting soil: Ensure you have a high-quality potting soil mix that is well-draining and rich in organic matter.
- Watering can or spray bottle: A watering can or spray bottle will come in handy for watering the seeds and seedlings without causing any damage.
- Plant markers: To keep track of different varieties or seedlings, use plant markers or labels to identify them.
- Growing containers: Depending on how many seeds you have, you’ll need small pots or trays to plant the peach seeds.
- Grow lights (optional): If you don’t have access to sufficient natural sunlight, you can use artificial grow lights to provide adequate light for your seedlings.
Once you have gathered all the necessary materials, you’ll be well-prepared to embark on your peach seed planting journey. So, let’s move on to the next step and prepare the peach seeds for germination!
Step 2: Preparing the peach seeds
Now that you have all the materials ready, it’s time to prepare the peach seeds for germination. This step is crucial as it helps to improve the chances of successful seed germination. Follow these steps:
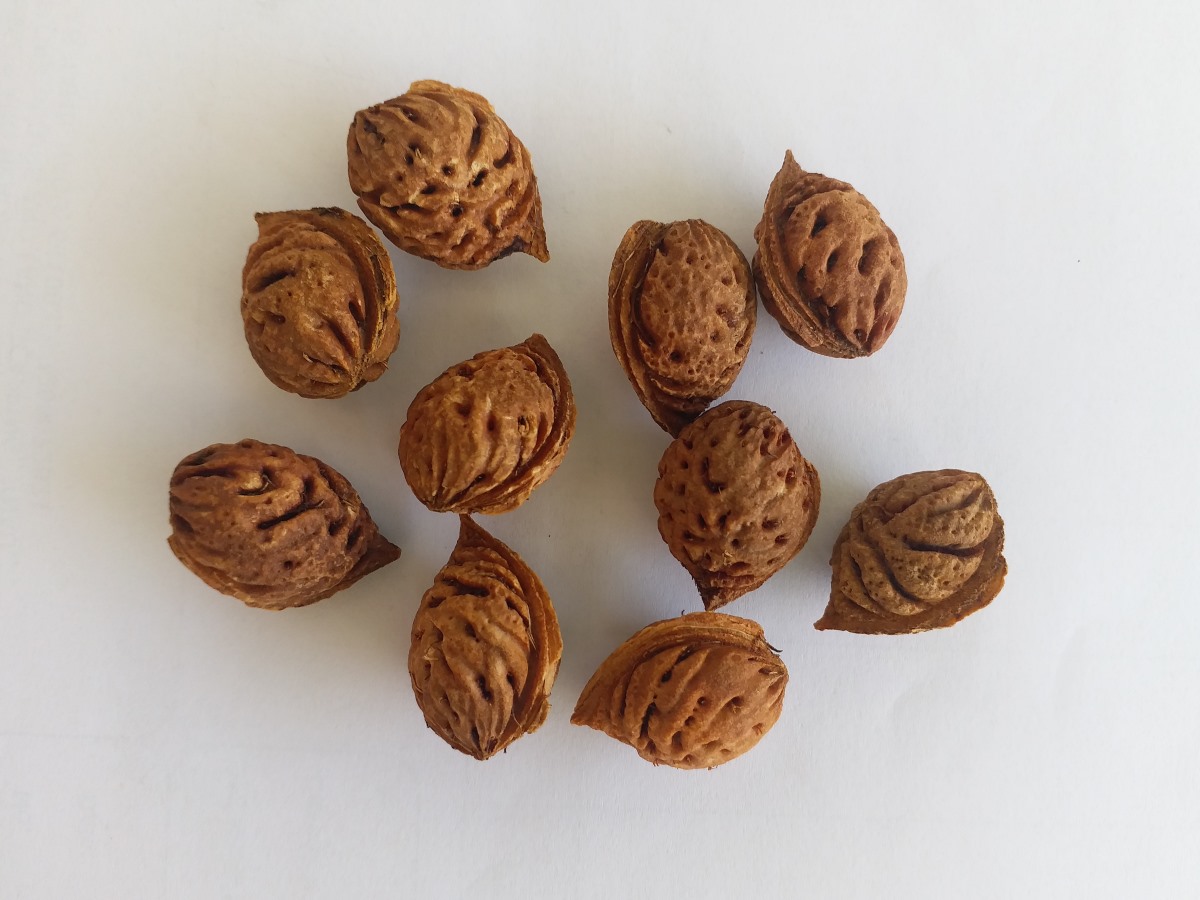
- Extracting the seeds: Carefully cut open the ripe peach and remove the flesh to reveal the seed inside. Gently remove the seed from the peach, making sure to avoid any damage. Rinse the seed under running water to remove any leftover fruit residue.
- Drying the seeds: Grab a few sheets of paper towels and place the peach seeds on them. Allow the seeds to air dry for a day or two. This process helps to remove excess moisture and prevent the growth of mold or fungus.
- Stratification: Peach seeds require a period of cold stratification to break their dormancy and encourage germination. To stratify the seeds, place them in a sealable plastic bag or small containers with some moistened peat moss or vermiculite. Seal the bag or cover the containers and place them in the refrigerator for a period of 8-12 weeks. This mimics the natural winter conditions that peach seeds need to sprout.
- Regularly check on the seeds: While the seeds are in stratification, make sure to check on them periodically. Ensure that the peat moss or vermiculite remains slightly moist. If the medium becomes too dry, lightly mist it with water.
Once the stratification period is over, and the seeds have undergone a simulated winter, they are ready for the next step: germination. In the upcoming step, we’ll guide you on the germination process to help your peach seeds sprout successfully. So, let’s move on to step 3!
Step 3: Germination process
Now that your peach seeds have undergone the cold stratification process, it’s time to kickstart their germination. Follow these steps to ensure successful sprouting:
- Prepare the growing container: Fill small pots or trays with well-draining potting soil, leaving about an inch of space at the top for watering.
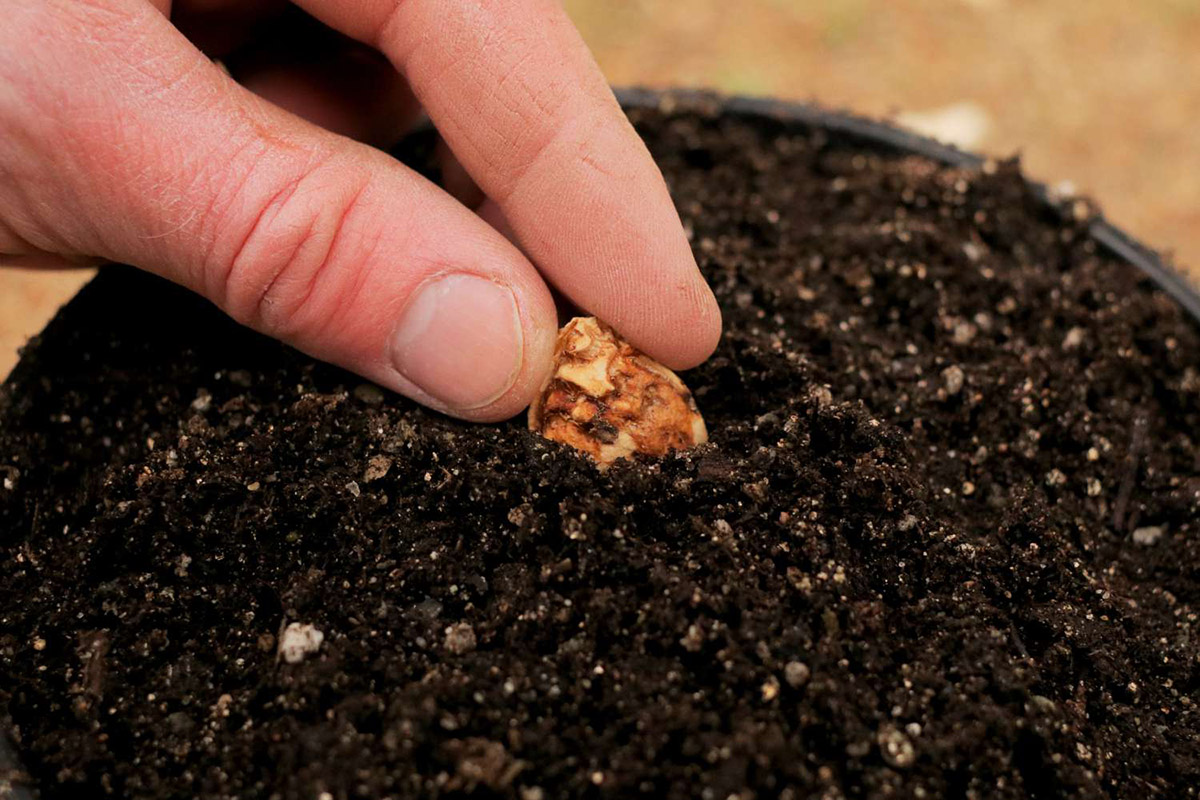
- Planting the seeds: Make a small indentation in the soil, about half an inch deep. Gently place the peach seed in the hole, making sure the pointed end is facing down. Cover the seed with soil and lightly press it down.
- Moisten the soil: Water the planted seeds lightly, ensuring that the soil becomes moist but not waterlogged. Using a watering can or spray bottle can help you control the amount of water you apply.
- Provide warmth and light: Place the growing containers in a warm location, ideally with temperatures around 70-80°F (21-27°C). Peach seeds require warmth to germinate. If needed, you can use a heating mat to provide consistent warmth. Additionally, ensure that the seedlings receive ample sunlight or use grow lights to provide the necessary light for their growth.
- Be patient and diligent: Germination can take anywhere from a couple of weeks to a month or more, so be patient. Keep a close eye on the moisture levels in the soil and adjust watering as needed. Avoid overwatering, as it can lead to root rot.
- Observe the sprouting seeds: Once the seeds start germinating, you’ll notice a small sprout emerging from the soil. This is an exciting milestone! Continue to provide proper care, ensuring the seedlings have enough light, warmth, and water.
As your peach seeds start to sprout and grow, it’s time to move on to the next step: caring for the seedlings. We’ll cover all the essential aspects of nurturing young peach trees in step 4. So, let’s continue our journey to grow healthy and fruitful peaches!
Step 4: Planting the seeds
Now that your peach seedlings have grown and are ready to be planted, it’s time to carefully transplant them into their permanent growing location. Follow these steps to ensure successful planting:
- Choose the right location: Select a spot in your garden that receives full sun, as peach trees thrive in sunny conditions. The soil should be well-draining and rich in organic matter.
- Prepare the planting hole: Dig a hole that is wider and deeper than the root ball of the seedling. Ensure that the hole is large enough to accommodate the roots without crowding them.
- Remove the seedling from the container: Gently tap or squeeze the bottom of the container to loosen the soil and roots. Carefully lift the seedling out of the container, taking care not to damage the fragile roots.
- Planting the seedling: Place the seedling in the planting hole, ensuring that the base of the trunk is level with or slightly above the surrounding soil. Backfill the hole with soil, gently tamping it down to remove any air pockets.
- Water the newly planted seedling: Give the newly planted seedling a thorough watering to settle the soil around the roots. Ensure that the soil is evenly moist but not waterlogged.
- Mulch and support: Apply a layer of organic mulch, such as wood chips or straw, around the base of the seedling. This helps to retain moisture, suppress weeds, and regulate soil temperature. If necessary, provide support such as a stake or trellis to help the young tree establish itself.
- Regular watering and care: In the early stages, it’s important to provide regular water to the newly planted seedling. Keep the soil consistently moist but not waterlogged. Monitor the tree’s growth and provide additional care such as fertilizing and pest control as needed.
By following these steps, you will ensure that your peach seedlings have a strong start in their new location. As they continue to grow, we will cover various aspects of caring for your peach tree in step 5. Let’s move forward and nurture those seedlings into fruitful trees!
Before planting peach seeds, make sure to soak them in water for 24 hours to help with germination. Plant the seeds in well-draining soil and keep them moist. It’s important to be patient, as it can take several years for the tree to produce fruit.
Read more: How To Grow A Peach Seed
Step 5: Caring for seedlings
Now that your peach seedlings are planted in their permanent location, it’s important to provide them with proper care to ensure healthy growth and development. Follow these steps to care for your peach seedlings:
- Watering: Water your peach seedlings regularly, especially during dry spells or hot weather. It’s crucial to keep the soil consistently moist but not waterlogged. Irrigate deeply to encourage deep root growth.
- Fertilizing: Apply a balanced granular fertilizer formulated for fruit trees in early spring and late summer. Follow the instructions on the fertilizer label for proper dosage and application. A well-fed peach tree will produce healthier foliage and more abundant fruit.
- Pruning: Prune your peach seedlings during their dormant period in late winter or early spring. Remove any dead, damaged, or crossing branches to ensure good air circulation and light penetration. Pruning also helps shape the tree and promotes fruit production.
- Thinning: As your peach seedlings begin to bear fruit, thin out excess fruits to prevent overcrowding. Leave a few inches of space between each fruit to promote better size and quality. Thinning also helps reduce the risk of diseases and allows the tree to focus its energy on developing a smaller number of high-quality fruits.
- Pest and disease control: Monitor your peach seedlings regularly for any signs of pests or diseases. Common pests include aphids, peach tree borers, and fruit flies. Use organic methods or appropriate insecticides to manage pest infestations. Additionally, practice good sanitation and remove any fallen leaves or fruits to prevent the spread of diseases.
- Protect from extreme weather: Protect your peach seedlings from extreme weather conditions. Cover the trees with netting or fabric during late frosts or heavy rainstorms. During hot summers, provide shade to prevent sunburn on the fruits and leaves.
By providing proper care and attention to your peach seedlings, you are setting them up for success and ensuring a bountiful harvest. In the next step, we will guide you on how to transplant your well-established peach trees into their permanent home. So, let’s continue our journey to establish strong and fruitful peach trees!
Step 6: Transplanting the seedlings
Once your peach seedlings have grown and established themselves in their containers or temporary location, it may be time to transplant them into their permanent spot in the garden. Follow these steps to ensure a successful transplant:
- Choose the right time: The best time to transplant your peach seedlings is during their dormant period, which is typically in late winter or early spring before new growth begins. This allows the tree to recover and adjust to its new environment before the growing season.
- Prepare the new planting hole: Dig a hole that is wider and deeper than the root ball of the seedling. Ensure that the hole is large enough to accommodate the roots without crowding them.
- Remove the seedling from its container: Gently tap or squeeze the bottom of the container to loosen the soil and roots. Carefully lift the seedling out of the container, taking care not to damage the fragile roots. If the roots are tightly bound, use your fingers or a small tool to loosen them slightly.
- Inspect the roots: Before planting, inspect the roots of the seedling for any signs of damage or disease. Trim away any damaged or excessively long roots using clean and sharp pruning shears.
- Planting the seedling: Place the seedling in the planting hole, making sure that the base of the trunk is level with or slightly above the surrounding soil. Backfill the hole with soil, gently tamping it down to remove any air pockets. Water the seedling thoroughly after planting to settle the soil and provide moisture to the roots.
- Mulch and support: Apply a layer of organic mulch around the base of the tree, leaving a gap around the trunk to prevent moisture buildup. This helps retain soil moisture, suppress weeds, and regulate soil temperature. If necessary, provide support such as a stake or tree guard to protect the young tree from strong winds or wildlife.
- Watering and continued care: After transplanting, water the tree deeply and keep the soil consistently moist, especially during the first growing season. Monitor the tree regularly and provide ongoing care, including fertilization, pruning, and pest control as needed.
Transplanting your peach seedlings may seem daunting, but with proper preparation and care, they can thrive in their new home. In the next step, we’ll explore pruning and maintenance tips to help promote the health and productivity of your peach trees. Let’s continue our journey to create a flourishing peach orchard!
Step 7: Pruning and maintenance tips
Pruning is an essential aspect of maintaining the health, shape, and productivity of your peach trees. Regular pruning helps stimulate new growth, improve air circulation, and enhance fruit production. Follow these pruning and maintenance tips to keep your peach trees in optimal condition:
- Prune during dormancy: The best time to prune your peach trees is during their dormant period in late winter or early spring before new growth begins. This allows the tree to heal wounds faster and minimizes the risk of disease.
- Remove dead or damaged wood: Start by removing any dead, damaged, or diseased branches. Cut these branches back to healthy wood, making clean cuts just above a branch union or bud.
- Thin out crowded branches: Peach trees tend to produce an abundance of branches, which can lead to overcrowding. Thin out branches to allow better light penetration and air circulation. Remove any crossing or inward-growing branches, as well as branches that rub against each other.
- Establish the central leader: If you want to maintain a central leader shape for your peach tree, choose a single, sturdy, and upright branch as the central leader. Remove competing branches that are growing too close to the leader.
- Open up the canopy: Peach trees perform best when their branches are open and well-spaced. Remove any branches that are growing vertically or at narrow angles. Aim for a balanced canopy with an open vase-like structure.
- Prune for fruit production: To encourage fruit production, prune the tips of branches by about one-third. This helps redirect the tree’s energy towards growing fruiting wood and developing larger, healthier peaches.
- Regular maintenance: Throughout the growing season, regularly monitor your peach trees for signs of pests or diseases. Remove any fallen leaves, fruits, or debris to prevent the spread of pathogens. Maintain proper irrigation and fertilization to ensure adequate nutrition for the trees.
- Yearly rejuvenation pruning: As your peach trees age, consider implementing rejuvenation pruning every few years. This involves removing older, unproductive branches to stimulate the growth of new, fruit-bearing wood.
By following these pruning and maintenance tips, you can promote the overall health, productivity, and longevity of your peach trees. In the final step, we’ll cover the much-anticipated topic of harvesting peaches. So, let’s move on and prepare to enjoy the fruits of your labor!
Step 8: Harvesting peaches
After months of care, patience, and anticipation, it’s finally time to enjoy the delicious fruits of your labor. Harvesting peaches at the right time ensures optimal flavor, juiciness, and sweetness. Follow these guidelines to know when and how to harvest your peaches:
- Observe the color: Check the color of the peaches. Depending on the variety, ripe peaches will have a vibrant color, typically yellow, orange, or red, with no sign of green undertones. The blush on the skin may also intensify as they ripen.
- Assess firmness: Gently squeeze the peach to assess its firmness. Ripe peaches should yield slightly to gentle pressure without feeling mushy or overly soft. Avoid picking peaches that are still firm as they won’t develop their full flavor.
- Smell the fragrance: Take a whiff of the peach near the stem end. Ripe peaches will have a sweet and aromatic fragrance, indicating that they are ready to be harvested.
- Timing is crucial: Peaches ripen on the tree, so it’s important to time the harvest correctly. Harvesting too early can result in underripe fruit, while waiting too long may lead to overripe or spoiled peaches.
- Twist and lift: To harvest the peaches, gently twist and lift them from the tree. Avoid pulling or tugging forcefully, as this can damage the fruit or the branch.
- Handle with care: Handle the harvested peaches with care to prevent bruising. Place them gently in a container or basket lined with soft padding, such as towels or straw.
- Storage and consumption: If you plan to consume the peaches immediately, store them at room temperature for a few days to fully ripen. For longer storage, place ripe peaches in the refrigerator to prolong their shelf life and maintain their freshness. Avoid placing unripe peaches in the refrigerator, as this can halt the ripening process.
- Enjoy the fruits of your labor: Once fully ripened, savor the delicious flavor of your homegrown peaches in various ways, from enjoying them fresh to using them in pies, jams, cobblers, or smoothies.
Remember, each peach variety may have slightly different characteristics and ripening times, so it’s important to observe and adjust accordingly. By harvesting peaches at their peak, you’ll experience the true joy of growing your own succulent and flavorful fruits.
Congratulations on successfully growing and harvesting your own peaches! Now that you’ve completed all the steps, take a moment to appreciate your hard work and the rewards it has brought. Happy gardening and enjoy the fruits of your labor!
Read more: How To Germinate Peach Seed
Conclusion
Congratulations! You have completed the journey of planting peach seeds and nurturing them into thriving peach trees. By following the steps outlined in this guide, you now have the knowledge and skills to successfully grow your own peaches and enjoy the bountiful harvest. Gardening is a rewarding experience, and there is nothing quite like savoring the sweetness of homegrown peaches picked fresh from your own tree.
Throughout this process, you have learned the importance of gathering the right materials, preparing the peach seeds, germinating them, planting the seedlings, and providing proper care. From pruning to maintenance, you have gained insights into how to keep your peach trees healthy and productive. And finally, you have discovered the art of harvesting peaches at the perfect moment of ripeness.
Remember, gardening is both an art and a science. You may encounter challenges along the way, such as pests, diseases, or weather fluctuations. Don’t be discouraged – embrace these challenges as opportunities to learn and grow as a gardener.
As you continue your journey with peach trees, don’t forget to share your knowledge and experiences with others. Inspire fellow gardeners and impart your wisdom to future peach enthusiasts. Gardening is a beautiful way to connect with nature, nurture living beings, and enjoy the fruits of your labor – both literally and metaphorically.
So, keep cultivating your green thumb, and may your peach trees flourish for years to come. Happy gardening!
Frequently Asked Questions about How To Plant Peach Seeds
Was this page helpful?
At Storables.com, we guarantee accurate and reliable information. Our content, validated by Expert Board Contributors, is crafted following stringent Editorial Policies. We're committed to providing you with well-researched, expert-backed insights for all your informational needs.


0 thoughts on “How To Plant Peach Seeds”