Home>Garden Essentials>How To Plant Muscadine Seeds
Garden Essentials
How To Plant Muscadine Seeds
Modified: March 16, 2024
Learn how to plant Muscadine seeds in your garden with our step-by-step guide. Get expert tips and advice for a successful harvest.
(Many of the links in this article redirect to a specific reviewed product. Your purchase of these products through affiliate links helps to generate commission for Storables.com, at no extra cost. Learn more)
Introduction
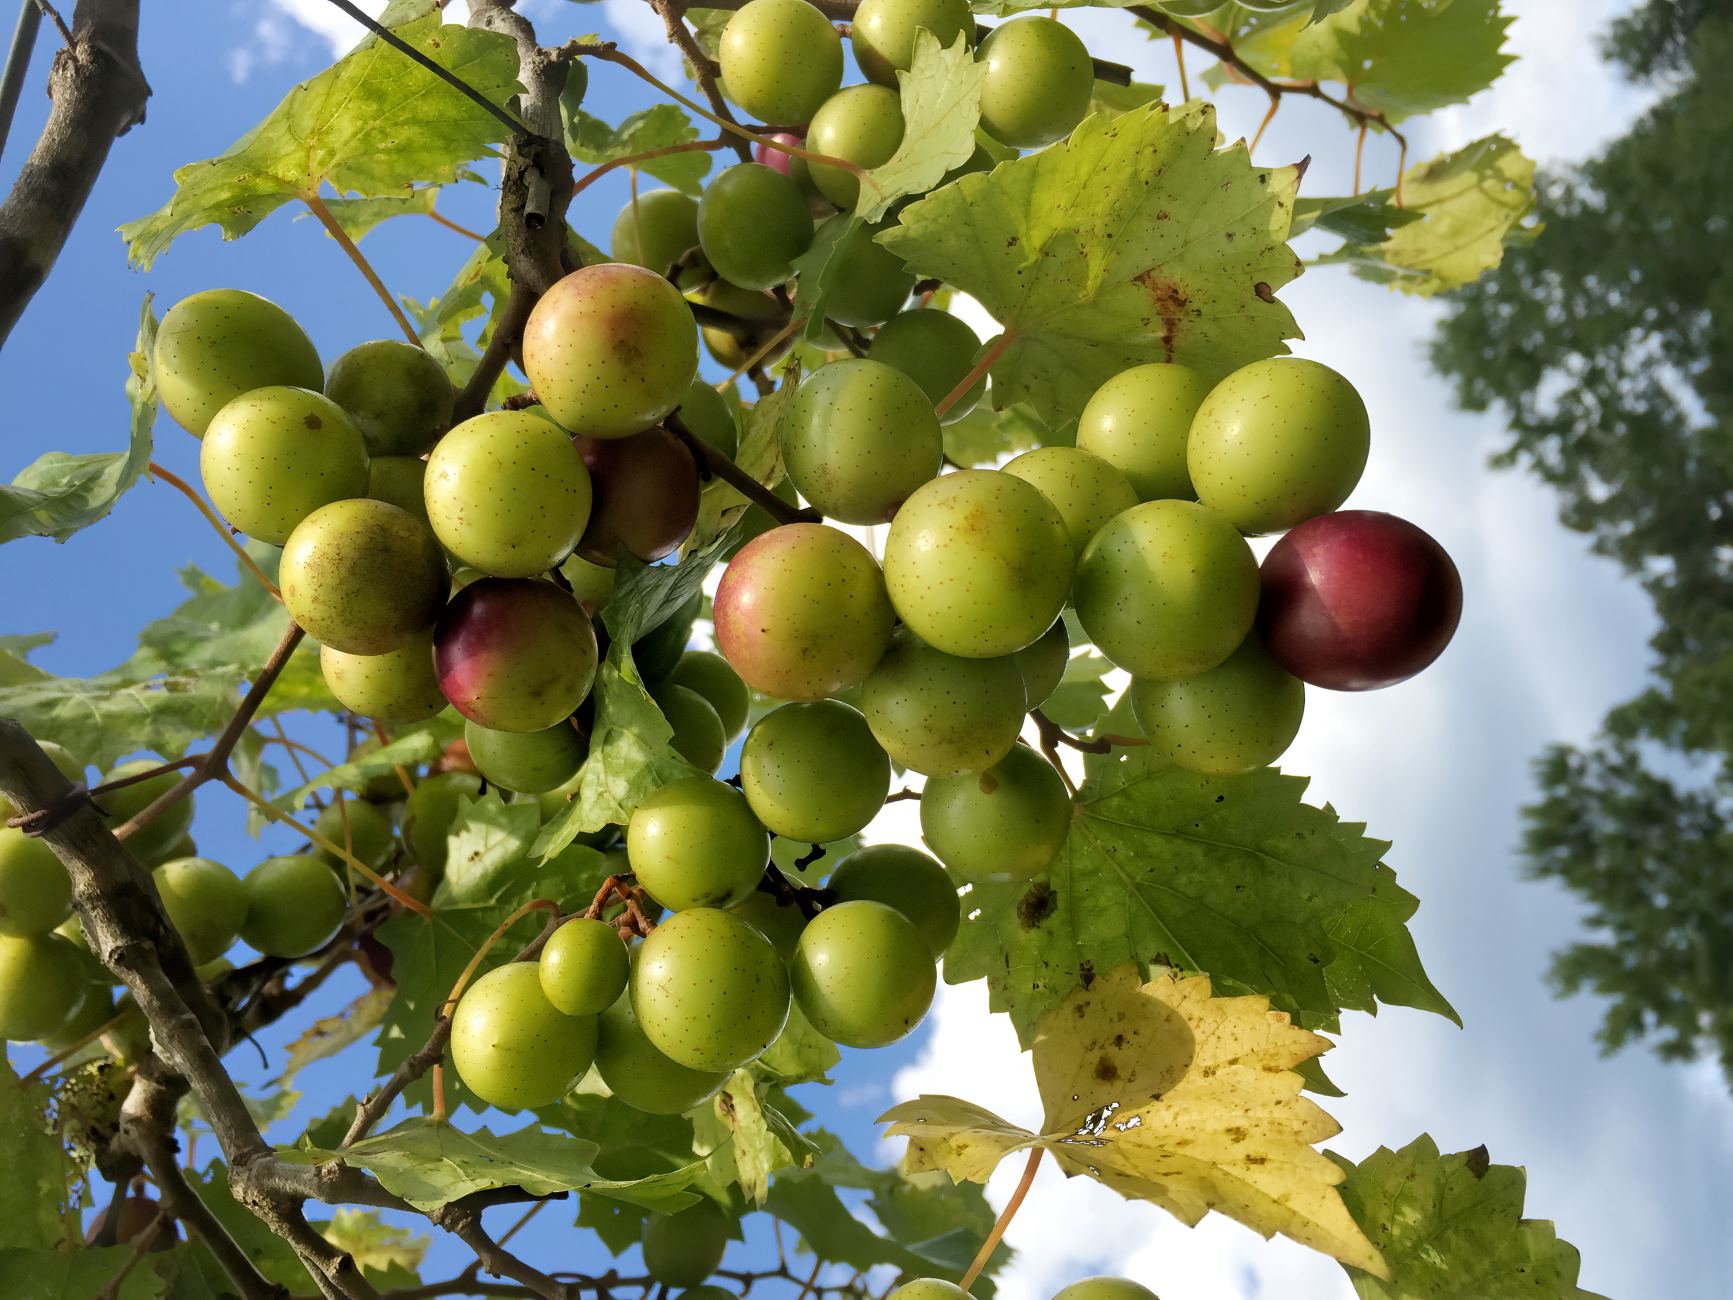
Planting muscadine seeds is an exciting and rewarding endeavor for any gardening enthusiast. Muscadines are a popular grape variety known for their delicious flavor and high nutritional value. Whether you want to grow them for their tasty fruits or as decorative vines in your garden, planting muscadine seeds is a simple and enjoyable process.
In this article, we will guide you through the step-by-step process of planting muscadine seeds. From preparing the seeds to caring for the seedlings, we will cover everything you need to know to set your muscadine plants up for success.
Before we get started, it’s important to note that muscadine seeds require specific conditions to germinate and grow into healthy plants. Patience and dedication are key when it comes to growing muscadines from seeds, as it can take several years for the plants to bear fruit. However, the journey from seed to mature plant is a fulfilling one, and the end result is well worth the wait.
So, let’s get our gardening gloves on and dive into the wonderful world of planting muscadine seeds!
Key Takeaways:
- Growing muscadine seeds requires patience and specific steps like seed preparation, choosing the right location, and providing proper care. It’s a rewarding journey that leads to delicious and nutritious grape harvests.
- To grow muscadine vines successfully, you need to nurture the seedlings with consistent watering, sunlight, and maintenance. Transplanting the mature seedlings to a suitable location is crucial for their survival and fruitful growth.
Read more: How To Store Muscadine Grapes
Step 1: Prepare the Seeds
Before you can start planting muscadine seeds, it’s essential to properly prepare them to increase their chances of germination. Here are the steps to follow:
- Collecting Seeds: Start by collecting fresh muscadine seeds from mature and healthy fruits. Look for fully ripe muscadines with vibrant colors and juicy flesh. Avoid using seeds from hybrid varieties, as they may not produce true-to-type plants.
- Removing Pulp: Once you have collected the muscadine fruits, gently squeeze them to separate the pulp from the seeds. Rinse the seeds under running water to remove any remaining pulp.
- Stratification: Muscadine seeds have a hard outer coating that can inhibit germination. To overcome this, the seeds need a process called stratification. This mimics the natural conditions the seeds would experience in the wild during the winter months. To stratify the seeds, place them in a damp paper towel or sphagnum moss, and then seal them in a plastic bag. Store the bag in the refrigerator for about 90 days to mimic the cold winter conditions.
- Testing for Viability: After the stratification period, it’s a good idea to test the viability of the seeds before planting. Take a few seeds and soak them in a cup of water for 24 hours. If the seeds sink to the bottom, they are likely viable and ready for planting. Discard the seeds that float.
By following these steps, you will ensure that your muscadine seeds are ready to germinate and grow into healthy plants. With the seeds prepared, it’s time to move on to the next step: choosing the planting location.
Step 2: Choose the Planting Location
Choosing the right planting location is crucial for the success of your muscadine plants. Here are some factors to consider when selecting the perfect spot:
- Sunlight: Muscadines thrive in full sun, so choose a location that receives at least 6-8 hours of direct sunlight each day. This will ensure optimal growth and fruit production.
- Soil Drainage: Muscadine plants prefer well-draining soil. Avoid areas with heavy clay or compacted soil as these can lead to poor drainage and root rot. Ideally, the soil should be loamy and rich in organic matter.
- Spacing: Muscadine vines can grow quite large and spread out. Make sure to select a location that provides ample space for the vines to grow without crowding other plants or structures. A trellis, arbor, or fence can provide vertical support for the vines.
- Air Circulation: Good air circulation is essential for preventing diseases and ensuring the overall health of the plants. Choose a location with enough space around the vines for proper air movement.
- Proximity to Other Plants: Muscadine vines are aggressive growers and can quickly take over nearby plants. Keep this in mind when choosing the planting location to prevent overshadowing or crowding of other plants.
It’s important to carefully assess these factors before finalizing the planting location. Taking the time to choose the right spot will greatly contribute to the long-term success of your muscadine plants.
Once you have selected the ideal planting location, it’s time to move on to preparing the soil, which we will cover in Step 3.
Step 3: Prepare the Soil
Preparing the soil is a vital step in ensuring the proper growth and development of your muscadine plants. Good soil preparation provides the plants with the necessary nutrients and drainage they need to thrive. Follow these steps to prepare the soil for planting:
- Clear the Area: Start by clearing the planting area of any weeds, rocks, or debris. This will create a clean and spacious space for your muscadine plants to grow.
- Soil Testing: It’s a good idea to conduct a soil test to determine the pH level and nutrient content of the soil. Muscadines prefer a slightly acidic soil with a pH range of 5.5 to 6.5. Based on the soil test results, you may need to adjust the pH levels by adding lime to raise the pH or sulfur to lower it.
- Amend the Soil: Muscadine plants thrive in well-drained soil that is rich in organic matter. Add compost, well-rotted manure, or other organic materials to the soil to improve its fertility and structure. Work the amendments into the soil to a depth of about 12 inches.
- Provide Drainage: Muscadines require good drainage to prevent waterlogged roots. If your soil is heavy and tends to retain water, consider adding sand or perlite to improve drainage. This will prevent water from pooling around the roots and causing rot.
By preparing the soil properly, you are setting the foundation for healthy growth and development of your muscadine plants. With the soil prepared, it’s time to move on to the exciting part: planting the muscadine seeds, which we will cover in Step 4.
Step 4: Plant the Muscadine Seeds
Now that the seeds are prepared and the soil is ready, it’s time to plant the muscadine seeds. Follow these steps to ensure successful planting:
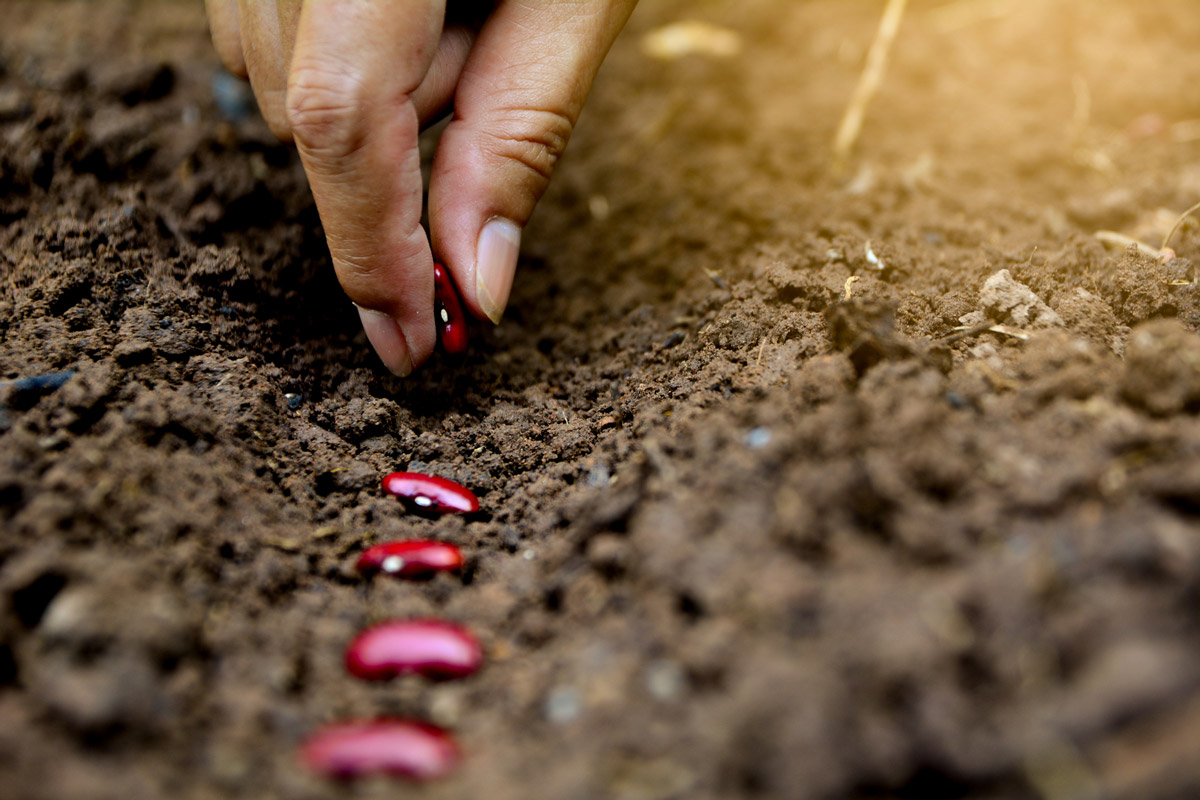
- Digging the Holes: Start by digging holes in the prepared soil. Each hole should be about 1 inch deep and spaced at least 6-8 feet apart. This will allow enough room for the muscadine vines to spread as they grow.
- Planting the Seeds: Place one muscadine seed in each hole and cover it with soil. Be gentle when handling the seeds to avoid damaging them. It’s recommended to plant multiple seeds to increase the chance of germination. You can thin out the weaker seedlings later on.
- Watering: After planting, give the seeds a thorough watering to ensure the soil is evenly moist. This will help initiate the germination process. Avoid overwatering, as it can lead to fungal diseases.
- Labeling: It’s useful to label each planting location to keep track of the different varieties of muscadine seeds you have planted. This will be especially helpful when it comes time to identify the plants.
Remember to provide adequate spacing between the seeds to allow the muscadine vines to grow and spread. Now that the seeds are planted, it’s time to move on to the next step: watering the seeds and providing proper sunlight, which we will cover in Step 5 and 6.
To plant muscadine seeds, soak them in water for 24 hours, then plant them 1 inch deep in well-draining soil. Keep the soil moist and provide a trellis for support as they grow.
Read more: How To Germinate A Plant
Step 5: Water the Seeds
Proper watering is crucial for the germination and early growth of muscadine seeds. Follow these guidelines to ensure the seeds receive adequate moisture:
- Moisture Balance: Muscadine seeds require consistent moisture to germinate, but they should not be waterlogged. The soil should be evenly moist but not soggy. Overwatering can lead to rot and fungal diseases, while underwatering can hinder germination.
- Watering Schedule: Water the seeds regularly, especially during dry periods. Check the moisture level of the soil by inserting your finger about an inch into the soil. If it feels dry, it’s time to water. Aim to keep the soil consistently damp but not overly saturated.
- Watering Technique: Use a gentle watering technique to avoid disturbing the seeds or causing erosion. A watering can or a soft spray attachment on a hose will work well. Water the seeds directly at the base, soaking the soil around them.
- Morning Watering: It’s generally best to water muscadine seeds in the morning. This allows the leaves and soil to dry during the day, reducing the risk of diseases that thrive in damp conditions.
Remember to adjust your watering routine based on the weather conditions and the specific needs of your muscadine seeds. Consistent and appropriate watering will help the seeds germinate and establish healthy roots. In the next step, we will discuss the importance of providing proper sunlight for the growing seedlings.
Step 6: Provide Proper Sunlight
Sunlight is essential for the growth and development of muscadine seedlings. Adequate sunlight ensures that the plants receive the energy they need for photosynthesis and encourages strong and healthy growth. Follow these guidelines to provide proper sunlight to your muscadine seedlings:
- Full Sun Exposure: Muscadine plants thrive in full sun, which means they need at least 6-8 hours of direct sunlight each day. Choose a location for your seedlings where they will receive the maximum amount of sunlight possible.
- Orientation: If you are planting the muscadine seedlings outdoors, consider the orientation of the planting area. South-facing locations are often ideal as they receive the most sunlight throughout the day. Ensure that the seedlings do not get overshadowed by tall structures or trees.
- Protection from Harsh Sun: While muscadine plants love sunlight, intense heat and direct afternoon sun during the hottest months can be detrimental to their growth. Provide some shade or use shade cloth to protect the seedlings during excessively hot periods. This will prevent sunburn and the stress caused by extreme temperatures.
- Monitor Sunlight: Regularly monitor the amount of sunlight received by your muscadine seedlings. If you notice the leaves becoming pale or wilting, it may be a sign of too much or too little sunlight. Adjust their positioning or provide shade accordingly.
Remember, providing the right amount of sunlight is crucial for the overall health and productivity of your muscadine plants. With proper watering and sunlight, your seedlings will be well on their way to becoming strong and vibrant vines. In the next step, we will discuss how to monitor and care for the growing seedlings.
Step 7: Monitor and Care for the Seedlings
As your muscadine seedlings grow, it’s important to monitor their progress and provide them with the necessary care to ensure their healthy development. Here are some essential tasks to keep in mind:
- Watering: Continue to water the seedlings regularly, keeping the soil evenly moist. Adjust the watering frequency based on the weather conditions to prevent under- or over-watering. Be mindful not to let the soil dry out completely.
- Mulching: Apply a layer of organic mulch around the base of the seedlings. Mulching helps retain soil moisture, suppresses weed growth, and regulates soil temperature. Use materials like straw, wood chips, or compost, and keep the mulch about 2-3 inches away from the base of the seedlings to prevent stem rot.
- Weeding: Regularly remove weeds that compete with the seedlings for nutrients and resources. Weeds can hinder the growth of your muscadine plants, so it’s important to keep the growing area clear of them. Be careful not to disturb the seedlings’ roots while weeding.
- Fertilization: Young muscadine seedlings benefit from a balanced fertilizer application. Use a slow-release fertilizer or organic options to provide the necessary nutrients. Follow the manufacturer’s instructions for application rates and frequency. Avoid over-fertilization, as it can lead to excessive foliage growth at the expense of fruit production.
- Pest and Disease Control: Keep an eye out for common pests and diseases that can affect muscadine plants, such as aphids, grapevine leafhoppers, and powdery mildew. Regularly inspect the seedlings and take appropriate measures to control any pests or diseases that may arise. Organic pest control methods include hand-picking pests, using insecticidal soaps, or introducing beneficial insects.
- Pruning: Once the seedlings have grown a few inches, you can start pruning them to encourage branching and promote a strong structure. Trim off any weak or damaged branches and maintain a balanced framework by removing excessive growth. Pruning will help the seedlings develop into well-shaped and productive vines.
By monitoring and caring for your muscadine seedlings, you will ensure their healthy growth and increase their chances of yielding a bountiful harvest. With proper maintenance, your seedlings will transform into resilient and productive muscadine vines. In the next step, we will discuss transplanting the seedlings as they mature.
Step 8: Transplanting the Seedlings
As your muscadine seedlings mature, they will eventually outgrow their initial planting location and need to be transplanted to their permanent spot. Here’s how to successfully transplant your muscadine seedlings:
- Timing: Wait until the seedlings are at least one year old before transplanting them. This gives them time to develop a strong root system and increases their chances of survival.
- Choose a Location: Select a well-drained area with full sun exposure for transplanting the muscadine seedlings. Make sure the soil pH is within the range of 5.5 to 6.5, and the spot provides ample space for the mature vines to grow and spread.
- Prepare the Planting Hole: Dig a hole that is wide and deep enough to accommodate the root ball of the seedling. Loosen the soil around the hole to encourage proper root penetration.
- Remove the Seedling: Gently remove the muscadine seedling from its current container, taking care not to damage the roots. If the plant is in a biodegradable pot, you can leave it intact and plant it directly into the hole.
- Planting: Place the seedling into the prepared hole, ensuring that the top of the root ball is level with or slightly above the soil surface. Backfill the hole with soil, gently firming it around the roots. Water the newly transplanted seedling thoroughly to settle the soil.
- Provide Support: Muscadine vines require support to climb and grow. Install a trellis, arbor, or fence near the transplant site to provide a structure for the vine to cling to as it grows.
- Post-Transplant Care: After transplanting, continue to water the seedling regularly and monitor its growth. Apply mulch around the base to help retain soil moisture and control weeds. Keep an eye out for any signs of stress or nutrient deficiencies, and address them promptly.
- Training and Pruning: As the transplanted muscadine vine grows, train it along the support structure and perform regular pruning to shape the vine and promote fruit production. Follow proper pruning techniques and guidelines to maintain a healthy and productive vine.
Transplanting can be a critical stage for the survival and establishment of muscadine seedlings. By practicing proper techniques and providing necessary care, you’ll ensure the successful growth of your muscadine vines. Congratulations, you’ve completed all the steps to grow muscadine plants from seeds!
Read more: How To Plant Seed
Conclusion
Congratulations on successfully learning how to plant muscadine seeds! By following the steps outlined in this guide, you now have the knowledge and tools to grow your own muscadine vines from seeds. It’s a journey that requires patience, dedication, and love for gardening, but the rewards are sweet.
From preparing the seeds and choosing the right planting location to providing proper care, sunlight, and water, you have gained a comprehensive understanding of how to nurture muscadine seedlings into thriving vines. Remember to monitor their growth, address any issues, and continue pruning and training the vines as they mature.
In time, your muscadine vines will flourish, providing you with abundant clusters of delicious, juicy grapes. Muscadines are not only a delight to the taste buds but also pack a nutritional punch, offering a rich source of antioxidants and vitamins.
As you embark on your muscadine-growing adventure, don’t be afraid to experiment and try different varieties of muscadines. Each grape variety has its own unique flavor profile and characteristics, adding diversity to your garden and your palate.
Whether you’re planning to enjoy the fruits fresh from the vine, make homemade jams and jellies, or use the grapes in other culinary creations, growing your own muscadine vines is a rewarding and fulfilling experience.
Remember to share your newfound knowledge with other gardening enthusiasts and spread the joy of growing muscadines from seeds. Enjoy the process, embrace the beauty of nature, and savor the journey as you watch your muscadine seeds transform into lush vines, bearing the fruits of your labor.
Happy gardening!
Frequently Asked Questions about How To Plant Muscadine Seeds
Was this page helpful?
At Storables.com, we guarantee accurate and reliable information. Our content, validated by Expert Board Contributors, is crafted following stringent Editorial Policies. We're committed to providing you with well-researched, expert-backed insights for all your informational needs.


0 thoughts on “How To Plant Muscadine Seeds”