Home>Garden Essentials>How To Plant Seeds In Egg Cartons
Garden Essentials
How To Plant Seeds In Egg Cartons
Modified: September 1, 2024
Learn how to plant seeds in egg cartons for your garden and start growing your own beautiful plants.
(Many of the links in this article redirect to a specific reviewed product. Your purchase of these products through affiliate links helps to generate commission for Storables.com, at no extra cost. Learn more)
Introduction
Welcome to the world of gardening! If you’re a beginner or simply looking for a fun and practical way to start your plants from seeds, planting them in egg cartons can be a great option. Not only is it a sustainable and affordable choice, but it also allows for easy seedling transplanting when the time comes.
In this article, we will guide you through the process of planting seeds in egg cartons. From choosing the right seeds to providing proper care, we’ll cover all the necessary steps to ensure successful growth and healthy plants. So, let’s get started!
Before we delve into the details, let’s take a look at the materials you’ll need for this project.
Key Takeaways:
- Start your garden journey by planting seeds in egg cartons. It’s affordable, sustainable, and a fun way to grow healthy plants from scratch.
- Choose the right seeds, provide proper care, and watch your seedlings flourish into a beautiful garden. Happy gardening!
Read more: How To Use Egg Cartons To Start Seeds
Materials Needed
Before you begin planting seeds in egg cartons, gather the following materials:
- Egg Cartons: You’ll need empty egg cartons made of durable material such as cardboard. Make sure they are clean and without any residue.
- Seeds: Choose the seeds of the plants you wish to grow. Consider factors such as the climate, sunlight requirement, and your gardening goals.
- Seed Starting Mix: This is a light and airy soil mix specifically formulated for seed germination. You can purchase it from a garden center or make your own by combining equal parts of peat moss, vermiculite, and perlite.
- Watering Can or Spray Bottle: Use a watering can with a fine-spray nozzle or a spray bottle to provide moisture evenly without dislodging the seeds.
- Marker or Labels: It’s essential to label your egg cartons to identify the seeds you’ve planted. You can use a marker or stick labels onto the cartons.
- Plastic Wrap: To create a greenhouse-like environment for your seeds, have some plastic wrap or a clear plastic bag on hand.
- Grow Lights or Sunny Window: Adequate light is crucial for healthy seedling growth. If you don’t have a sunny window, invest in grow lights to provide artificial light.
- Optional: Seedling Tray: If you want a more organized setup, you can use a seedling tray to hold multiple egg cartons at once.
- Gardening Gloves: It’s always a good idea to protect your hands while working in the garden. Choose a pair of gardening gloves that are comfortable and durable.
Now that you have all the necessary materials, let’s move on to the step-by-step process of planting the seeds in egg cartons.
Step 1: Choosing the Right Seeds
The first step in planting seeds in egg cartons is selecting the right seeds for your garden. Consider the following factors to make informed choices:
- Climate: Take into account your local climate and growing conditions. Choose seeds that are suitable for your region’s temperature, humidity, and seasonal variations. Some plants thrive in warm climates, while others prefer cooler environments.
- Space: Consider the amount of space you have available for gardening. If you have limited space, choose seeds of plants that are compact or can be grown vertically, such as herbs or dwarf varieties.
- Sunlight Requirements: Different plants require varying levels of sunlight. Evaluate the amount of sunlight your garden receives throughout the day and choose seeds accordingly: full sun (6-8 hours), partial sun (4-6 hours), or shade (less than 4 hours).
- Garden Goals: Determine your garden goals. Do you want to grow vegetables, flowers, or a mix of both? Consider factors such as your culinary preferences, aesthetic preferences, and the time and effort required to care for different types of plants.
- Personal Preference: Ultimately, select seeds based on your personal preference. Choose plants that you enjoy and will be excited to care for and harvest once they mature.
Research each plant’s specific care requirements, growth habit, and potential challenges before making a final decision. Consider consulting with local nurseries or experienced gardeners for recommendations tailored to your area’s unique conditions.
Now that you have chosen your seeds, let’s move on to preparing the egg cartons for planting.
Step 2: Preparing the Egg Cartons
Preparing the egg cartons before planting is essential to ensure a healthy and conducive environment for seed germination. Follow these steps to prepare the egg cartons:
- Clean the Egg Cartons: Start by cleaning the egg cartons to remove any leftover residue or dirt. Rinse them with water and allow them to dry completely.
- Cut the Lid: If your egg carton has a lid, cut it off using a pair of scissors or a utility knife. This step ensures proper air circulation and prevents moisture buildup within the carton.
- Make Drainage Holes: Using a small nail or a skewer, poke a few drainage holes in each section of the egg carton. These holes will allow excess water to drain out, preventing waterlogging and promoting healthy root growth.
Once you have prepared the egg cartons, it’s time to fill them with soil before planting the seeds. Let’s move on to the next step.
Step 3: Filling the Egg Cartons with Soil
Now that your egg cartons are prepared, it’s time to fill them with soil. Follow these steps to ensure proper soil preparation:
- Choose the Right Soil: Use a high-quality seed starting mix for filling the egg cartons. This type of soil is lighter and provides better drainage and aeration for the delicate roots of the seedlings.
- Moisten the Soil: Before filling the egg cartons, moisten the seed starting mix slightly. Add water gradually and mix it well until the soil is evenly moist but not soggy. Excess moisture can lead to damping-off disease and hinder seed germination.
- Fill the Cups: Gently fill each cup of the egg cartons with the moistened seed starting mix, leaving a small gap at the top. Smooth the surface lightly with your fingers to create a level surface for planting.
- Compact the Soil: Use the bottom of a small, clean container or your fingers to lightly press down on the soil in each cup. This step helps eliminate air gaps and ensures good seed-to-soil contact for successful germination.
Once you have filled the egg cartons with soil, it’s time to proceed to the exciting step of planting the seeds. Let’s move on to the next step.
When planting seeds in egg cartons, make sure to poke holes in the bottom of each compartment for drainage. Fill each compartment with potting soil and plant the seeds according to the instructions on the seed packet. Keep the soil moist and place the cartons in a sunny spot to encourage growth.
Read more: How To Store Fresh Eggs In Carton
Step 4: Planting the Seeds
Now that your egg cartons are filled with soil, it’s time to plant the seeds. Follow these steps to ensure proper seed planting:
- Read Seed Packet Instructions: Start by referring to the instructions on the seed packets. These instructions provide valuable information about seed planting depth, spacing, and any specific requirements for each plant variety.
- Make Small Indentations: Use your finger or a pencil to make small indentations in the soil of each egg carton cup. The depth of the indentations should correspond to the recommended planting depth provided on the seed packet.
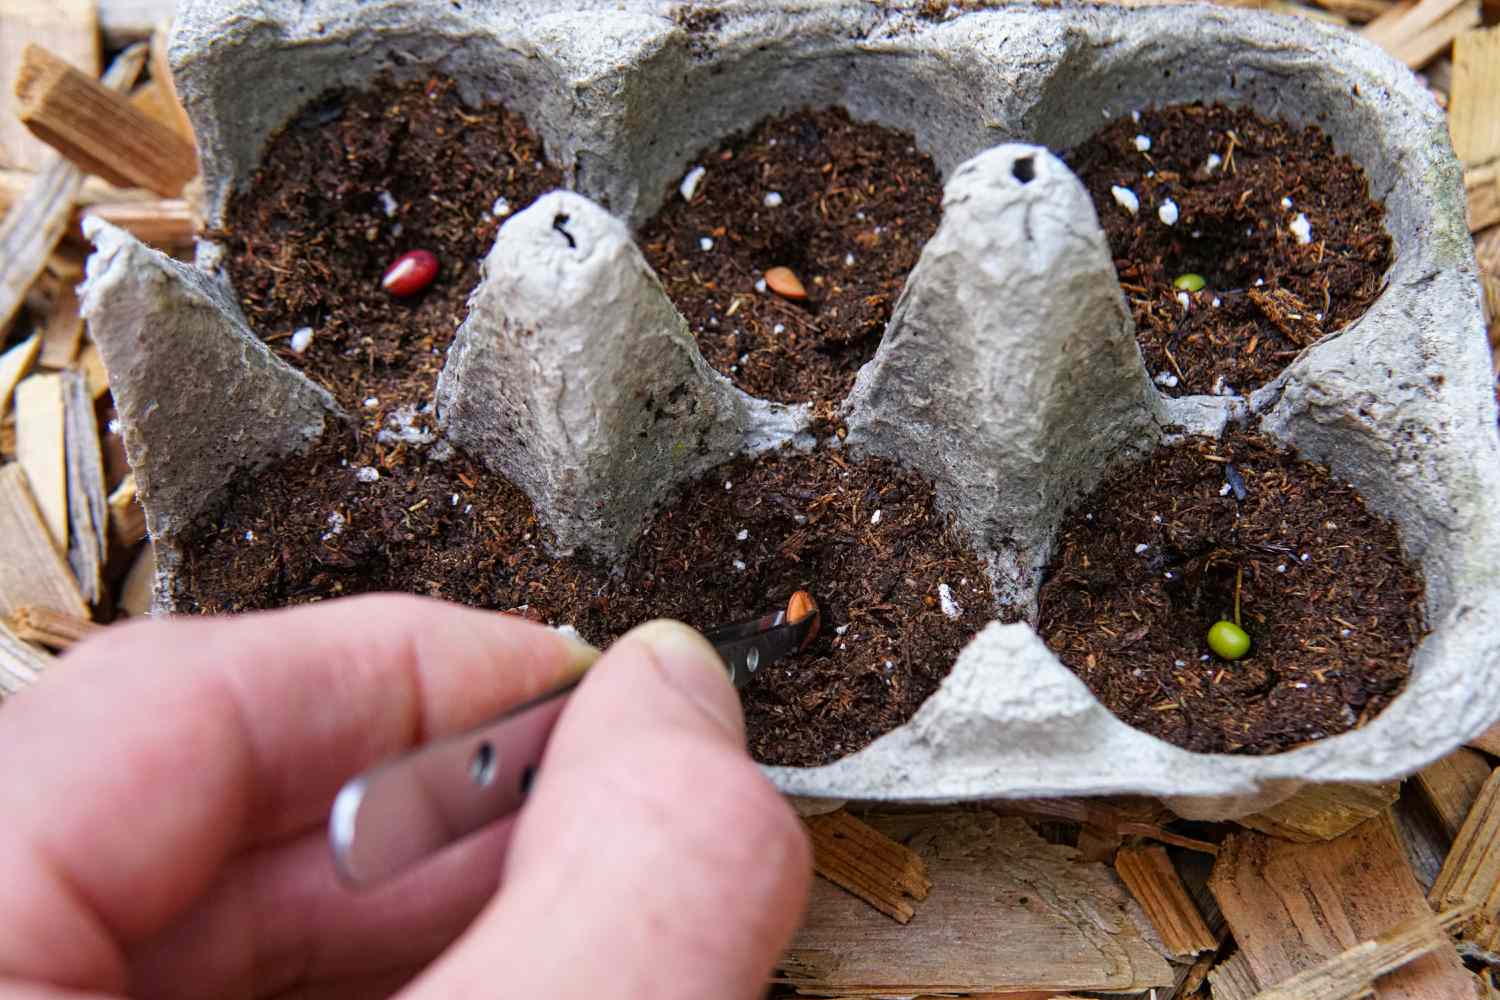
- Place Seeds in Indentations: Carefully place one or two seeds in each indentation. If the seeds are tiny, you can sprinkle them lightly over the soil surface and gently press them down.
- Cover and Label: Once the seeds are in place, lightly cover them with a thin layer of soil or vermiculite as instructed on the seed packet. This will provide them with the necessary insulation to germinate. Don’t forget to label the egg cartons with the name of the plant for easy identification.
- Mist with Water: Finally, give your newly planted seeds a gentle misting of water using a spray bottle or a fine-spray watering can. This will ensure the seeds are evenly moistened without disturbing them.
Remember to follow the specific instructions for each type of seed you plant. Some seeds may require pre-soaking, stratification, or other treatments to enhance germination. Now that your seeds are planted, it’s time to provide the necessary care for their optimal growth. Let’s move on to the next step.
Step 5: Providing Adequate Water and Light
Now that your seeds are planted, it’s crucial to provide them with adequate water and light to support their growth. Here’s how you can ensure proper conditions:
- Watering: It’s essential to keep the soil evenly moist, but not waterlogged. Check the moisture level regularly by gently touching the soil. If it feels dry, water the egg cartons from the bottom by placing them in a tray filled with water for a few minutes. Alternatively, you can use a spray bottle or a watering can with a fine-spray nozzle to mist the soil surface. Avoid overwatering, as it can lead to root rot and other issues.
- Light: Seedlings require adequate light for healthy growth. Place the egg cartons in a location that receives bright, indirect sunlight or use grow lights if sunlight is limited. Aim to provide at least 12-16 hours of light per day. Adjust the distance between the light source and the seedlings to prevent them from becoming leggy or sunburned.
- Temperature: Maintain a consistent temperature for optimal seedling growth. Most seeds germinate best at temperatures between 60°F and 75°F (15°C and 24°C). Avoid exposing the seedlings to extreme temperature fluctuations or drafts that can stress or damage them.
- Rotate the Cartons: To promote even growth and prevent the seedlings from leaning towards the light source, rotate the egg cartons daily. This will ensure all sides of the seedlings receive equal exposure to light.
- Monitor and Adjust: Regularly monitor the moisture level, light intensity, and temperature in the area where the seedlings are kept. Adjust the watering and lighting as needed to create the ideal conditions for healthy growth.
By providing the right amount of water and sufficient light, you’ll give your seedlings the best chance at thriving. Now let’s move on to the next step, which involves transferring the seedlings to the garden.
Step 6: Transferring Seedlings to the Garden
Once your seedlings have grown and are strong enough, it’s time to transplant them into the garden. Follow these steps to ensure a successful transition:
- Harden Off the Seedlings: Before transplanting, gradually expose the seedlings to outdoor conditions to acclimate them. Start by placing them outdoors in a sheltered spot for a few hours each day, gradually increasing the time and exposure to sunlight over the course of a week. This process helps the seedlings adjust to temperature, wind, and other outdoor factors.
- Choose the Right Location: Select a suitable spot in your garden for the seedlings. Consider the plant’s sun and shade preferences, soil requirements, and spacing recommendations. Ensure the area has well-draining soil and sufficient space for the plants to grow and spread.
- Prepare the Soil: Prepare the planting area by loosening the soil and removing any weeds or debris. Add compost or organic matter to improve soil fertility and drainage if needed.
- Transplant Carefully: Gently remove the seedlings from the egg cartons, being careful not to damage their delicate roots. Dig a hole in the prepared soil that is slightly larger than the root ball of each seedling. Place the seedling in the hole, gently firming the soil around it to eliminate air pockets. Space the seedlings according to the recommended spacing for each specific plant.
- Water the Seedlings: After transplanting, thoroughly water the seedlings to help them establish their roots in the new soil. Give them a deep watering, ensuring the surrounding soil is moist but not waterlogged.
- Mulch and Provide Support: Apply a layer of organic mulch around the base of the seedlings to help retain moisture, suppress weeds, and regulate soil temperature. If needed, provide support such as stakes or cages to taller plants to prevent them from bending or breaking as they grow.
- Monitor and Maintain: Keep a close eye on your transplanted seedlings. Water them regularly, ensuring the soil remains consistently moist but not saturated. Protect them from pests, diseases, and harsh weather conditions as necessary. Continue providing proper care and maintenance to encourage healthy growth and a successful garden.
Following these steps will help your seedlings adjust to their new home in the garden and thrive in their new surroundings. Now, let’s move on to the final step, which involves caring for the young plants.
Step 7: Caring for the Young Plants
Once your seedlings are transplanted into the garden, it’s essential to provide ongoing care to ensure their healthy growth and development. Follow these steps to care for your young plants:
- Watering: Water the plants regularly, keeping the soil evenly moist. Avoid overwatering, as it can lead to root rot. Water at the base of the plants to minimize moisture on the leaves, which can cause diseases.
- Fertilizing: Depending on the plant’s nutritional needs, apply a balanced organic fertilizer or compost around the base of the plants. Follow the package instructions for the appropriate timing and dosage, or consult with a gardening expert.
- Weeding: Regularly check for and remove any weeds that compete with your young plants for nutrients, water, and sunlight. Weeding will help keep your garden beds clean and allow your plants to thrive.
- Pruning and Training: As your plants grow, prune them if necessary to remove dead or damaged leaves, encourage branching, or shape their growth. For vining plants or those that benefit from support, use stakes, trellises, or cages to keep them upright and prevent sprawling.
- Pest and Disease Control: Monitor your plants for any signs of pests or diseases. Identify and respond to issues promptly by using organic pest control methods or seeking guidance from a local gardening expert. Regularly inspecting your plants will help you catch and address problems early on.
- Harvesting: Monitor the growth of your plants and harvest the mature fruits, vegetables, or flowers according to their specific harvesting guidelines. Regular harvesting encourages continuous production and prevents plants from becoming overcrowded.
- Observing and Enjoying: Take the time to observe and appreciate the growth and beauty of your young plants. Note any successes or challenges you encounter along the way. Embrace the learning experience and enjoy the fulfillment that comes from nurturing a garden.
By providing consistent care and attention, your young plants will thrive and reward you with a bountiful garden. Remember to adjust your care routine based on the specific needs of each plant and the conditions of your garden. With time and experience, you will develop a green thumb and enjoy the fruits of your gardening efforts.
Congratulations on successfully planting seeds in egg cartons and nurturing your young plants! Happy gardening!
Read more: How To Store Eggs Without Carton
Conclusion
Planting seeds in egg cartons is a satisfying and cost-effective way to start your garden from scratch. By following the steps outlined in this article, you can successfully grow healthy seedlings and transition them to your garden with confidence. From choosing the right seeds to providing adequate water, light, and care, each step plays a crucial role in the success of your plants.
Remember, gardening is a learning process, and with each planting season, you’ll gain valuable experience and knowledge. Embrace the joy and satisfaction of watching your seedlings grow into thriving plants, and don’t be afraid to experiment and try new things in your garden.
Whether you’re growing vegetables, herbs, or flowers, the process of planting seeds in egg cartons allows you to connect with nature and nurture life from the earliest stages. It’s a wonderful way to introduce children or beginners to the world of gardening and foster a greater appreciation for the natural world.
So gather your materials, select your seeds, and embark on your gardening journey. Enjoy the process of planting, caring for, and watching your young plants flourish. Through patience, observation, and dedication, you’ll witness the transformation of tiny seeds into thriving plants, creating a rewarding and beautiful garden for all to enjoy.
Happy gardening!
Frequently Asked Questions about How To Plant Seeds In Egg Cartons
Was this page helpful?
At Storables.com, we guarantee accurate and reliable information. Our content, validated by Expert Board Contributors, is crafted following stringent Editorial Policies. We're committed to providing you with well-researched, expert-backed insights for all your informational needs.


0 thoughts on “How To Plant Seeds In Egg Cartons”