Home>Gardening & Outdoor>Outdoor Entertaining>How To Build A Hexagon Picnic Table
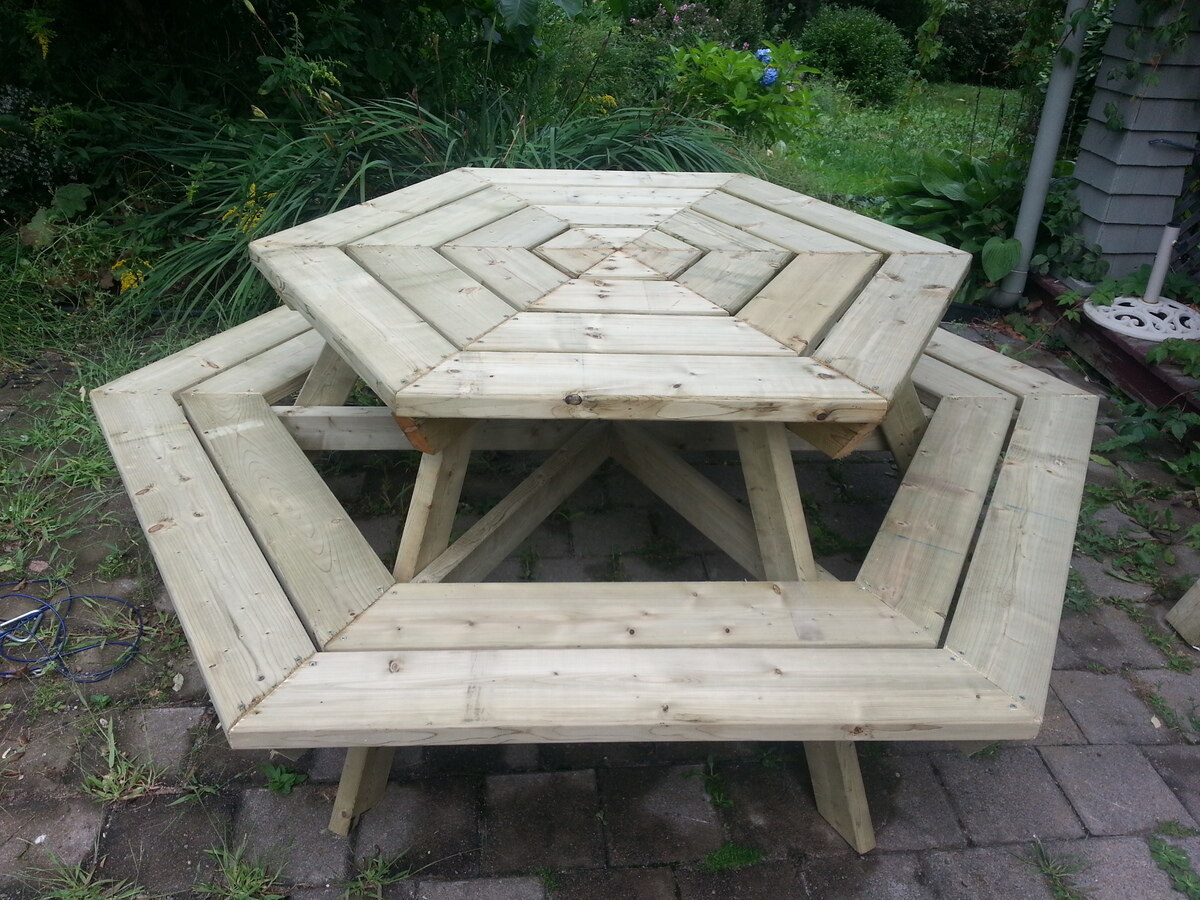

Outdoor Entertaining
How To Build A Hexagon Picnic Table
Modified: March 24, 2024
Learn how to build a hexagon picnic table for your outdoor entertaining needs. Step-by-step instructions for a unique and functional addition to your outdoor space.
(Many of the links in this article redirect to a specific reviewed product. Your purchase of these products through affiliate links helps to generate commission for Storables.com, at no extra cost. Learn more)
Introduction
Welcome to the world of outdoor entertaining! Whether you're hosting a neighborhood barbecue, a family reunion, or simply enjoying a sunny day with your loved ones, having a sturdy and stylish picnic table can elevate the experience. In this guide, we'll delve into the rewarding process of building a hexagon picnic table from scratch. Not only will this project add a unique focal point to your outdoor space, but it will also provide a gathering place for countless memories to come.
Picture this: a beautifully crafted hexagon picnic table nestled in your backyard, surrounded by the laughter of friends and the aroma of grilled delicacies. With its six-sided design, this table offers ample seating and a charming aesthetic that sets it apart from traditional rectangular models. By taking on this DIY endeavor, you have the opportunity to customize the table to your preferences, whether that entails choosing the perfect wood finish or adding personalized touches to make it uniquely yours.
Throughout this guide, we'll explore each step of the construction process in detail, from selecting the right materials and tools to sanding and finishing the table. Even if you're new to woodworking, fear not! With a bit of patience and a willingness to learn, you'll find that building a hexagon picnic table can be an immensely gratifying and achievable undertaking.
As we embark on this journey together, envision the joy of sharing meals, playing games, and basking in the great outdoors around your custom-crafted picnic table. So, roll up your sleeves, gather your tools, and let's dive into the art of creating a gathering place that will be cherished for years to come.
Key Takeaways:
- Building a hexagon picnic table is a rewarding DIY project that creates a unique and inviting outdoor gathering space for friends and family to enjoy meals and make lasting memories.
- By carefully cutting, assembling, and finishing the table, you can create a durable and visually appealing centerpiece that adds warmth and hospitality to your outdoor entertaining area.
Read more: How To Build A Picnic Style Dining Table
Materials and Tools
Before diving into the construction process, it's essential to gather the necessary materials and tools. By ensuring that you have everything at your disposal, you can streamline the building process and minimize interruptions. Here's a comprehensive list of what you'll need:
Materials:
- Pressure-treated lumber or cedar boards
- Wood screws
- Wood glue
- Waterproof wood sealer or outdoor wood stain
- Wood filler
- Sandpaper (medium and fine grit)
- Wood finish of your choice
Tools:
- Measuring tape
- Circular saw or miter saw
- Drill with screwdriver bits
- Clamps
- Square
- Sandpaper block or orbital sander
- Paintbrushes or paint sprayer
- Safety goggles
- Ear protection
- Dust mask
When selecting the lumber for your picnic table, opt for pressure-treated wood or cedar, as these materials are durable and weather-resistant, ensuring the longevity of your creation. Additionally, gathering the right tools, such as a circular saw, drill, and clamps, will empower you to make precise cuts, secure joints, and add finishing touches with ease.
By equipping yourself with high-quality materials and reliable tools, you'll set the stage for a successful and enjoyable construction journey. With everything in place, you're ready to move on to the next step: cutting the wood for your hexagon picnic table.
Cutting the Wood
Now that you have your materials and tools assembled, it’s time to roll up your sleeves and begin the construction process. The first step in building your hexagon picnic table is cutting the wood to the required dimensions. This stage is crucial, as precise cuts will lay the foundation for a sturdy and visually appealing table. Here’s a detailed breakdown of the cutting process:
Read more: How To Build An Octagon Picnic Table
1. Measure and Mark:
Using a measuring tape and a square, carefully measure and mark the lumber according to the dimensions specified in your blueprint or plans. It’s essential to double-check your measurements to ensure accuracy before making any cuts.
2. Cutting the Tabletop and Benches:
With the measurements in place, use a circular saw or miter saw to make straight and clean cuts on the tabletop and bench boards. Take your time and exercise caution to achieve smooth edges and uniform lengths.
3. Angled Cuts for the Hexagon Shape:
Since a hexagon has six equal sides, you’ll need to make precise angled cuts to create the tabletop and bench shapes. This may require adjusting the bevel angle on your saw to achieve the desired hexagonal configuration.
As you progress through the cutting phase, remember that patience and precision are key. Take the time to ensure that each piece of lumber is cut to the exact dimensions required for your hexagon picnic table. By doing so, you’ll lay the groundwork for a seamless assembly process and a professional-quality finished product.
With the wood cut to perfection, you’re now ready to move on to the next phase of the construction journey: assembling the tabletop. This is where your vision begins to take shape, and the excitement of seeing your hexagon picnic table come to life truly sets in.
Building the Tabletop
As you transition from cutting the wood to assembling the components, the tabletop serves as the focal point of your hexagon picnic table. This is where friends and family will gather for meals, games, and heartfelt conversations, making it essential to construct a sturdy and visually appealing surface. Here’s a step-by-step guide to building the tabletop:
Read more: How To Sew A Hexagon Quilt
1. Lay Out the Tabletop Boards:
Begin by arranging the cut tabletop boards in the desired hexagonal configuration. Ensure that the edges align seamlessly, creating a uniform and symmetrical shape.
2. Secure the Boards:
Using wood glue and screws, fasten the tabletop boards together. Apply a thin, even layer of wood glue along the edges before carefully aligning and attaching the boards. Then, drive screws through the boards to reinforce the joints and enhance the table’s stability.
3. Reinforce the Underside:
To further fortify the tabletop, consider attaching additional support beams or braces to the underside of the assembled boards. This will help distribute weight evenly and prevent warping over time.
4. Sand the Surface:
Once the tabletop is assembled, use medium-grit sandpaper to smooth the surface and eliminate any rough edges or imperfections. This preparatory step sets the stage for a flawless finish and ensures a comfortable dining and gathering experience.
Read more: How To Build A Picnic Table Bench
5. Apply a Protective Finish:
To safeguard the tabletop from outdoor elements and enhance its natural beauty, apply a waterproof wood sealer or outdoor wood stain. Opt for a finish that complements your outdoor aesthetic while providing long-lasting protection against moisture, UV rays, and general wear and tear.
By following these steps, you’ll transform a collection of lumber into a stunning and resilient tabletop that forms the heart of your hexagon picnic table. With the tabletop complete, you’re ready to proceed to the next phase: assembling the benches. This brings you one step closer to bringing your vision to life and creating a cherished gathering place in your outdoor haven.
Assembling the Benches
With the tabletop in place, it’s time to focus on the seating elements of your hexagon picnic table. The benches not only complement the table aesthetically but also provide comfortable and inviting seating for your guests. Here’s a comprehensive guide to assembling the benches:
1. Prepare the Bench Boards:
Lay out the pre-cut bench boards in the desired configuration, ensuring that they form a seamless hexagonal shape. Take the time to arrange the boards evenly, creating a visually balanced and structurally sound seating area.
2. Secure the Bench Boards:
Similar to the tabletop assembly process, use wood glue and screws to secure the bench boards together. Apply a thin, even layer of wood glue along the edges of the boards before fastening them with screws to create sturdy and reliable bench seating.
Read more: How To Build A Picnic Table From Pallets
3. Reinforce the Bench Supports:
To enhance the stability and weight-bearing capacity of the benches, consider adding support beams or braces underneath the assembled boards. Reinforcing the benches in this manner will contribute to their longevity and ensure a safe and comfortable seating experience for your guests.
4. Sand and Finish the Benches:
Once the benches are assembled, use medium-grit sandpaper to smooth the surfaces and eliminate any rough edges. This preparatory step sets the stage for a flawless finish and ensures that the benches are comfortable and splinter-free. Apply a matching wood finish or stain to the benches, harmonizing them with the tabletop and completing the cohesive look of your hexagon picnic table ensemble.
By following these steps, you’ll transform a collection of bench boards into a stylish and durable seating area that perfectly complements the tabletop. With the benches assembled and finished, you’re now ready to move on to the next phase: attaching the legs. This pivotal step brings you closer to completing your custom-crafted hexagon picnic table, creating a welcoming space for outdoor dining, socializing, and relaxation.
Attaching the Legs
As you progress through the construction of your hexagon picnic table, attaching the legs marks a significant step toward bringing the entire structure together. The legs provide essential support and stability, anchoring the tabletop and benches to create a functional and inviting outdoor gathering place. Here’s a detailed guide to attaching the legs:
1. Position the Tabletop and Benches:
Carefully position the assembled tabletop and benches in the desired location, ensuring that they form a cohesive and harmonious hexagonal configuration. This step allows you to visualize the final placement of the table and ensure that the legs are attached accurately.
Read more: How To Build A Console Table
2. Attach the Leg Braces:
Begin by attaching the leg braces to the underside of the tabletop and benches. These braces provide crucial reinforcement and distribute the weight evenly, contributing to the overall stability and longevity of the picnic table. Secure the leg braces using wood screws and ensure that they are aligned parallel to the tabletop and benches.
3. Install the Legs:
With the leg braces in place, it’s time to install the legs themselves. Position each leg at the designated corner of the tabletop or bench, aligning them carefully to ensure a level and uniform appearance. Secure the legs to the tabletop and benches by driving screws through the leg braces into the legs, creating a robust and reliable connection.
4. Check for Stability:
Once the legs are attached, carefully test the stability of the picnic table. Apply gentle pressure to different areas of the tabletop and benches to ensure that the legs are securely fastened and that the entire structure is level and wobble-free. Making any necessary adjustments at this stage will contribute to the overall functionality and safety of the table.
5. Finishing Touches:
With the legs securely attached, take a moment to inspect the entire picnic table assembly. Ensure that all screws are tightened, and the table is level and stable. This is also an opportune time to apply any final touches, such as decorative elements or additional weatherproofing, to enhance the table’s visual appeal and resilience.
By following these steps, you’ll transform a collection of individual components into a unified and robust hexagon picnic table. With the legs securely attached, you’re now ready to move on to the final phase: sanding and finishing. This brings you one step closer to completing your custom-crafted outdoor centerpiece, ready to host countless gatherings and cherished moments for years to come.
Read more: How To Build A Modern Coffee Table
Sanding and Finishing
As you near the completion of your hexagon picnic table, the sanding and finishing phase adds the final touches that elevate the table’s visual appeal and ensure its durability in outdoor settings. This crucial stage not only enhances the table’s aesthetic charm but also contributes to its long-term resilience. Here’s a comprehensive guide to sanding and finishing your custom-crafted picnic table:
1. Sanding the Wood:
Begin by sanding the entire surface of the picnic table, including the tabletop, benches, and legs. Start with medium-grit sandpaper to smooth any rough edges, imperfections, or uneven surfaces. Follow up with fine-grit sandpaper to achieve a silky-smooth finish that is both visually pleasing and splinter-free.
2. Rounded Edges and Corners:
Pay special attention to rounding the edges and corners of the tabletop and benches. This not only enhances the table’s safety and comfort but also adds a touch of refinement to the overall design. Use the sandpaper to gently round off the edges, creating a pleasing tactile experience for anyone seated at the table.
3. Apply a Protective Finish:
Once the sanding is complete, it’s time to apply a protective finish to the picnic table. Choose a high-quality outdoor wood sealer or stain that offers UV protection, water resistance, and durability. Apply the finish evenly using a paintbrush or paint sprayer, ensuring comprehensive coverage of the entire table surface.
Read more: How To Build An Outdoor Dining Table
4. Multiple Coats for Longevity:
To maximize the table’s longevity and protection against outdoor elements, consider applying multiple coats of the chosen wood finish. Each additional coat enhances the table’s resistance to moisture, UV rays, and general wear and tear, ensuring that your custom-crafted picnic table remains vibrant and resilient for years to come.
5. Final Inspection:
Once the finishing coats have been applied, take a moment to inspect the entire picnic table assembly. Ensure that the finish is even and free of drips or imperfections. This is also an opportune time to address any last-minute touch-ups and ensure that the table is ready to take its place as the centerpiece of your outdoor entertaining space.
By following these steps, you’ll transform a collection of lumber and hardware into a stunning and durable hexagon picnic table that is ready to grace your outdoor gatherings with its timeless charm. With the sanding and finishing phase complete, you can now step back and admire your custom creation, knowing that it will be a source of joy and togetherness for years to come.
Conclusion
Congratulations on successfully crafting your very own hexagon picnic table! The journey from selecting the materials to sanding and finishing has culminated in the creation of a versatile and inviting outdoor centerpiece. As you stand back and admire your handiwork, envision the countless gatherings, meals, and memories that will unfold around this custom-crafted table. Your dedication to this project has resulted in a functional and aesthetically pleasing addition to your outdoor space.
Building a hexagon picnic table is not just about assembling wood and hardware; it’s about creating a focal point for laughter, conversation, and connection. The unique hexagonal design sets your table apart, offering ample seating and a visually striking presence that invites people to come together and enjoy the great outdoors.
As you reflect on the construction process, remember the satisfaction of making precise cuts, securing joints, and applying the finishing touches. Each step was a testament to your craftsmanship and dedication to creating a durable and beautiful piece of outdoor furniture.
Now, as you envision the table in use, picture the joy of sharing meals with loved ones, hosting outdoor game nights, or simply relaxing in the sunshine. Your hexagon picnic table is more than just a piece of furniture – it’s a symbol of hospitality and warmth, beckoning friends and family to gather and create lasting memories.
Remember that your custom-crafted picnic table is a reflection of your creativity and commitment to enhancing your outdoor living space. Embrace the pride that comes with completing a DIY project that will be enjoyed for years to come.
So, as you prepare to welcome guests, fire up the grill, or simply unwind in the fresh air, take a moment to appreciate the craftsmanship, care, and attention to detail that have gone into creating your very own hexagon picnic table. May it be a source of joy, camarader and cherished moments for all who gather around it.
Frequently Asked Questions about How To Build A Hexagon Picnic Table
Was this page helpful?
At Storables.com, we guarantee accurate and reliable information. Our content, validated by Expert Board Contributors, is crafted following stringent Editorial Policies. We're committed to providing you with well-researched, expert-backed insights for all your informational needs.






0 thoughts on “How To Build A Hexagon Picnic Table”