Home>Gardening & Outdoor>Outdoor Structures>How To Build A 10×20 Shed
Outdoor Structures
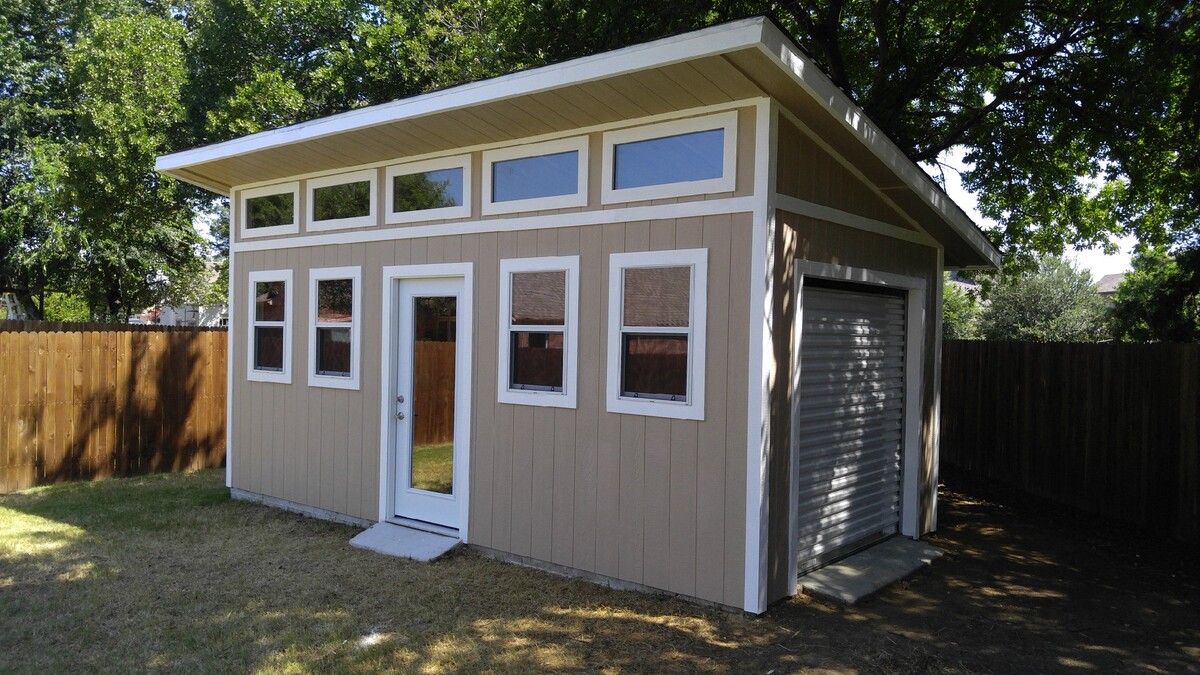
How To Build A 10×20 Shed
Modified: October 20, 2024
Learn how to build a durable 10x20 shed for your outdoor space with our comprehensive guide. Discover expert tips and techniques for constructing outdoor structures.
(Many of the links in this article redirect to a specific reviewed product. Your purchase of these products through affiliate links helps to generate commission for Storables.com, at no extra cost. Learn more)
Introduction
Are you in need of some extra storage space or a workshop for your DIY projects? Building a 10×20 shed might be the perfect solution. Whether you're a seasoned DIY enthusiast or a newcomer to the world of construction, this comprehensive guide will walk you through the process of constructing a sturdy and functional outdoor structure. From planning and preparation to adding the finishing touches, you'll gain valuable insights into every step of the construction process.
Constructing a shed can be a rewarding endeavor, providing you with a dedicated space to organize your tools, store outdoor equipment, or unleash your creativity in a peaceful environment. As we delve into the intricacies of building a 10×20 shed, you'll discover the importance of careful planning, the significance of selecting the right materials, and the satisfaction of witnessing your vision take shape before your eyes.
Throughout this guide, we'll explore the essential considerations for choosing the ideal location for your shed, obtaining the necessary permits, and gathering the materials and tools required for the construction process. You'll learn about building a solid foundation to ensure the longevity of your shed, constructing a durable frame, and installing the roof and siding to protect your belongings from the elements.
Additionally, we'll delve into the process of adding doors and windows to enhance accessibility and natural light within the shed, as well as the finishing touches that will transform your structure into a functional and aesthetically pleasing addition to your property. By the end of this journey, you'll be equipped with the knowledge and confidence to embark on your own 10×20 shed construction project.
So, roll up your sleeves, gather your enthusiasm, and let's embark on this exciting and fulfilling endeavor together. Whether you're aiming to declutter your living space, unleash your creativity, or simply expand your storage options, building a 10×20 shed is a venture that promises both practical benefits and a sense of accomplishment. Let's get started!
Key Takeaways:
- Planning and preparation are crucial when building a 10×20 shed. Consider the shed’s purpose, budget, timeframe, and local building codes to ensure a smooth and successful construction journey.
- Choosing the right location and obtaining necessary permits are essential steps in building a 10×20 shed. Prioritize accessibility, ground stability, sunlight exposure, and compliance with local regulations for a durable and functional outdoor structure.
Read more: How Build A Shed
Planning and Preparation
Embarking on a 10×20 shed construction project requires meticulous planning and thorough preparation to ensure a smooth and successful endeavor. Before picking up a hammer or saw, take the time to consider the following crucial aspects that will lay the groundwork for your construction journey.
- Design Considerations: Begin by envisioning the purpose of your shed. Will it primarily serve as a storage space, a workshop, or a combination of both? Determining the shed’s intended use will influence its design, layout, and the features you’ll incorporate.
- Budgeting: Establish a realistic budget for the project, factoring in expenses for materials, tools, permits, and any professional assistance you may require. A well-defined budget will guide your decisions and help prevent overspending.
- Timeframe: Consider the time you can dedicate to the construction process. Assessing your availability will aid in setting realistic timelines and milestones, ensuring that the project progresses smoothly without unnecessary delays.
- Building Codes and Regulations: Familiarize yourself with local building codes and regulations governing the construction of sheds. Understanding these requirements is essential for obtaining permits and ensuring that your shed complies with legal standards.
Once you’ve contemplated these fundamental aspects, it’s time to translate your vision into a tangible plan. Sketch out the shed’s layout, including the dimensions, window and door placements, and any additional features you intend to incorporate. This blueprint will serve as a valuable reference throughout the construction process, guiding your actions and ensuring that your vision is accurately realized.
Moreover, consider the environmental factors that may impact your shed, such as sunlight exposure, prevailing winds, and drainage patterns. Selecting the optimal location for your shed based on these considerations will contribute to its longevity and functionality.
By dedicating ample time to planning and preparation, you’ll set the stage for a successful and gratifying construction experience. The next steps will delve into the process of choosing the right location for your shed and navigating the process of obtaining the necessary permits to bring your vision to life.
Choosing the Right Location
When embarking on the construction of a 10×20 shed, selecting the optimal location is a pivotal decision that significantly influences the shed’s functionality, longevity, and visual appeal. Consider the following factors to guide your choice of placement:
- Accessibility: Choose a location that provides convenient access to the shed. This facilitates the transportation of materials during construction and ensures practical usage of the shed once completed.
- Ground Stability: Assess the stability and levelness of the ground where the shed will be situated. A flat, well-drained area minimizes the need for extensive groundwork and promotes the structural integrity of the shed.
- Sunlight Exposure: Consider the path of the sun throughout the day and the seasons. Position the shed to maximize natural light while minimizing excessive exposure to intense sunlight, which can cause overheating and potential damage to stored items.
- Landscaping and Aesthetics: Integrate the shed harmoniously into your property’s landscape. Consider how the shed’s placement complements the overall aesthetics of your outdoor space, taking into account visual appeal and potential landscaping enhancements.
- Zoning Regulations: Familiarize yourself with local zoning regulations and any restrictions pertaining to shed placement. Adhering to these guidelines is essential for a smooth permit acquisition process and ensures compliance with legal requirements.
By carefully evaluating these considerations, you’ll be equipped to make an informed decision regarding the location of your 10×20 shed. Once the ideal placement is identified, you can proceed with confidence, knowing that your shed will be positioned optimally to fulfill its intended purpose and withstand the test of time.
Obtaining the Necessary Permits
Before commencing the construction of your 10×20 shed, it’s crucial to navigate the process of obtaining the required permits. Local building codes and regulations typically mandate obtaining permits for the construction of outdoor structures, ensuring compliance with safety standards and zoning requirements. Here’s a comprehensive guide to help you navigate the permit acquisition process:
- Research Local Regulations: Begin by researching the specific permit requirements and regulations governing shed construction in your locality. Contact your local building department or visit their website to access the necessary information.
- Permit Application: Once you’ve familiarized yourself with the permit requirements, acquire the relevant application forms from the building department. These forms typically require details about the shed’s dimensions, location, construction materials, and other pertinent information.
- Site Plan Submission: Prepare a site plan or blueprint of the proposed shed location, illustrating its dimensions, proximity to property lines, and existing structures. This plan is often required as part of the permit application to demonstrate compliance with zoning regulations.
- Fee Payment: Be prepared to pay the necessary permit fees, which vary based on the shed’s size and your location. Ensure that you understand the fee structure and make the payments as stipulated by the building department.
- Inspections: Following permit approval and throughout the construction process, anticipate inspections by local authorities to verify compliance with building codes and regulations. Adhering to the approved plans and maintaining open communication with inspectors is essential to ensure a smooth inspection process.
It’s important to approach the permit acquisition process diligently, as non-compliance can result in costly repercussions and hinder the completion of your shed. By proactively addressing the permit requirements and engaging with local authorities, you’ll pave the way for a seamless and compliant construction journey.
As you navigate the permit acquisition process, maintain open communication with the building department, seek clarification on any unclear requirements, and ensure that your application and site plan accurately reflect your intentions. By approaching this process meticulously, you’ll lay a solid foundation for the construction of your 10×20 shed, setting the stage for a successful and compliant project.
Gathering Materials and Tools
With the planning phase complete and the necessary permits obtained, the next crucial step in building your 10×20 shed is gathering the materials and tools essential for the construction process. This phase demands careful consideration and meticulous preparation to ensure that you have everything required to bring your shed to fruition.
Materials: Begin by compiling a comprehensive list of materials needed for the shed’s construction. This typically includes lumber for framing, sheathing, roofing materials, siding, fasteners, and any additional components such as doors, windows, and trim. Opt for high-quality materials that align with your budget and the shed’s intended use, prioritizing durability and longevity.
Tools: Equally important is assembling a collection of tools necessary for the construction process. Essential tools may include a circular saw, hammer, level, tape measure, power drill, framing square, and a ladder, among others. Assess the specific requirements of your shed’s design and construction methods to ensure that you have the appropriate tools at your disposal.
While it’s essential to procure the primary materials and tools, don’t overlook the significance of safety equipment. Protective gear such as gloves, safety goggles, and hearing protection are crucial for ensuring a safe and secure construction environment.
Consider the possibility of renting or borrowing specialized tools that may be required for specific tasks, especially if they are not frequently used. This approach can help optimize your resource allocation and prevent unnecessary expenses on tools with limited future utility.
Furthermore, explore the option of sourcing materials from reputable suppliers, comparing prices, and evaluating delivery options to streamline the procurement process. By obtaining all necessary materials and tools in advance, you’ll minimize disruptions during the construction phase and ensure a seamless progression from groundwork to the finishing touches.
As you embark on the process of gathering materials and tools, meticulous planning and attention to detail will be instrumental in setting the stage for a successful and rewarding construction journey. With these foundational elements in place, you’re ready to transition to the next phase: building the foundation of your 10×20 shed.
Read more: How To Build A Shed
Building the Foundation
The foundation of your 10×20 shed serves as the bedrock upon which the entire structure rests, providing stability, durability, and protection against ground moisture. Constructing a solid foundation is a critical initial step that sets the stage for the shed’s structural integrity and longevity. Here’s a comprehensive guide to building a robust foundation for your shed:
Site Preparation: Begin by clearing and leveling the ground where the shed will be situated. Remove any vegetation, rocks, or debris, and use a shovel and rake to ensure the area is uniformly level. This preparatory step is essential for establishing a stable base for the foundation.
Foundation Type: Select the most suitable foundation type based on your shed’s design, local climate, and soil composition. Common options include concrete slab foundations, concrete pier foundations, and pressure-treated wood skids placed on a gravel bed. Each type offers distinct advantages, and your choice should align with your specific requirements and local building codes.
Construction Process: If opting for a concrete foundation, excavate the area to the required depth, construct formwork to contain the concrete, and pour and level the concrete to create a smooth and level surface. For pier foundations, dig holes at designated intervals, insert concrete footings, and install pressure-treated posts or piers to support the shed’s structure.
Moisture Protection: Implement measures to safeguard the foundation against moisture infiltration. This may include applying a waterproof membrane or sealant to the concrete foundation or incorporating a vapor barrier beneath the wooden floor structure to mitigate the effects of ground moisture.
Anchor Points: Integrate anchor points into the foundation to secure the shed and prevent displacement during inclement weather. Anchor bolts or straps are commonly used to fasten the shed’s frame to the foundation, enhancing its resistance to external forces.
Throughout the foundation construction process, prioritize precision and adherence to the approved plans and local building codes. Regularly assess the levelness and alignment of the foundation components to ensure a solid and uniform base for the subsequent stages of shed construction.
By meticulously executing the foundation construction, you’ll establish a reliable base that forms the cornerstone of your 10×20 shed. With the foundation in place, you’re poised to progress to the next phase: constructing the frame of your outdoor structure.
When building a 10×20 shed, make sure to carefully level the ground before starting construction. A level foundation will ensure the shed is stable and prevents any future issues with the structure.
Constructing the Frame
As you transition from building the foundation to the next phase of shed construction, the process of constructing the frame marks a pivotal step in bringing your 10×20 shed to life. The frame serves as the skeletal structure, providing support, defining the shed’s shape, and laying the groundwork for the installation of walls, roof, and doors. Here’s a comprehensive guide to constructing the frame of your shed:
Material Preparation: Begin by organizing the lumber and framing materials according to the shed’s blueprint and design specifications. Cut the lumber to the required dimensions using a saw, ensuring precision and uniformity to facilitate seamless assembly.
Framing Components: The frame typically comprises wall studs, top and bottom plates, headers, and joists, depending on the shed’s design. Assemble these components according to the blueprint, ensuring that corners are square and joints are securely fastened to form a rigid and stable framework.
Wall Assembly: Construct the individual wall sections on a level surface, securing the studs, plates, and headers with appropriate fasteners. Once assembled, raise the walls into position, aligning them with the designated markings on the foundation and ensuring plumbness and alignment.
Roof Trusses or Rafters: Depending on your shed’s design, install prefabricated roof trusses or construct rafters on-site to form the roof structure. Position the trusses or rafters atop the walls, securing them in place to create the framework for the shed’s roof.
Structural Integrity: Throughout the frame construction process, prioritize structural integrity and stability. Regularly assess the alignment, bracing, and fastening of the frame components to ensure a robust and secure structure that can withstand external forces and support the shed’s entire weight.
As you progress through the frame construction phase, meticulous attention to detail and adherence to the shed’s design specifications are paramount. By conscientiously executing each step of the frame assembly, you’ll lay the groundwork for the subsequent stages of shed construction, bringing your vision closer to realization.
With the frame in place, the next phase will focus on installing the roof and siding, further transforming the skeletal structure into a weather-resistant and functional outdoor space.
Installing the Roof and Siding
As your 10×20 shed takes shape, the installation of the roof and siding represents a significant stride toward completing the structure and fortifying it against the elements. This phase involves integrating protective coverings that safeguard the shed’s interior and exterior while contributing to its visual appeal. Here’s a comprehensive guide to installing the roof and siding of your shed:
Roofing Materials: Select roofing materials that align with your shed’s design, local climate, and durability requirements. Common options include asphalt shingles, metal roofing panels, or cedar shakes, each offering distinct aesthetic and functional characteristics.
Roof Installation: Begin by laying a waterproof underlayment over the roof sheathing to shield the shed from moisture. Install the chosen roofing material according to the manufacturer’s guidelines, ensuring proper overlap, fastening, and alignment to create a weather-resistant and visually appealing roof surface.
Siding Selection: Choose siding materials that harmonize with your property’s aesthetics and provide robust protection against the elements. Options range from vinyl and wood siding to fiber cement panels, offering diverse textures and colors to enhance the shed’s exterior appeal.
Siding Application: Install the siding in accordance with the shed’s design, ensuring that it is securely fastened and aligned to create a seamless and protective exterior surface. Pay attention to corner details, trim installation, and proper sealing to prevent water infiltration and enhance the siding’s longevity.
Flashing and Trim: Integrate flashing components at roof intersections, valleys, and penetrations to prevent water intrusion and fortify vulnerable areas. Additionally, install trim elements around windows, doors, and corners to provide a polished and cohesive finish to the shed’s exterior.
Throughout the roof and siding installation process, prioritize meticulous craftsmanship and attention to detail to ensure a durable and visually appealing finish. Regularly assess the alignment, fastening, and weatherproofing of the roofing and siding components to fortify the shed against environmental elements.
As the roof and siding take shape, your 10×20 shed evolves from a skeletal frame to a weather-resistant and visually captivating outdoor structure. With these protective coverings in place, the next phase will focus on adding doors and windows to enhance accessibility and natural light within the shed.
Adding Doors and Windows
As your 10×20 shed nears completion, the addition of doors and windows infuses functionality, accessibility, and natural light into the structure, transforming it into a welcoming and versatile space. This phase involves integrating these essential components with precision and attention to detail, enhancing the shed’s usability and aesthetic appeal. Here’s a comprehensive guide to adding doors and windows to your shed:
Door Selection: Choose a door that aligns with your shed’s design, functionality, and security requirements. Options include single or double doors, sliding doors, and overhead garage-style doors, each offering distinct benefits in terms of accessibility and aesthetics.
Door Installation: Position the door within the designated opening, ensuring that it is plumb, level, and securely anchored to the frame. Install appropriate weather sealing to prevent drafts and moisture infiltration, enhancing the shed’s interior comfort and protection against the elements.
Window Selection: Select windows that complement the shed’s design, provide adequate ventilation, and maximize natural light. Consider factors such as window size, style, and energy efficiency to enhance the shed’s visual appeal and interior ambiance.
Window Installation: Securely install the windows within the prepared openings, ensuring proper alignment, sealing, and weatherproofing. Integrate flashing around the window perimeters to prevent water intrusion and enhance the shed’s resilience against external elements.
Hardware and Security: Install durable and secure hardware for doors and windows, prioritizing functionality and longevity. Consider adding locks, handles, and latches to safeguard the shed’s contents and enhance its security.
Throughout the installation of doors and windows, meticulous attention to alignment, weatherproofing, and functionality is crucial to ensure a seamless and durable finish. Regularly assess the operation of doors and windows, verifying that they open, close, and seal effectively to optimize the shed’s usability and protection.
As doors and windows are integrated into the shed, the structure evolves into a functional and inviting space, ready to accommodate your storage, workshop, or recreational needs. With these essential components in place, the final phase will focus on adding finishing touches to enhance the shed’s aesthetic appeal and usability.
Read more: How To Build A Bar Shed
Finishing Touches
As the construction of your 10×20 shed nears completion, the addition of finishing touches elevates its visual appeal, functionality, and overall ambiance. This phase involves integrating details that enhance the shed’s aesthetics, usability, and durability, culminating in a polished and inviting outdoor structure. Here’s a comprehensive guide to adding finishing touches to your shed:
Interior Organization: Integrate shelving, storage racks, and workbenches to optimize the shed’s interior space. Organize tools, equipment, and supplies to maximize functionality and accessibility, creating a well-arranged and efficient workspace or storage area.
Interior Finishes: Consider adding interior finishes such as paint or stain to the walls and ceiling, enhancing the shed’s visual appeal and protecting the surfaces from wear and moisture. Opt for finishes that complement the shed’s design and contribute to a welcoming and well-maintained interior environment.
Exterior Enhancements: Add exterior elements such as trim details, decorative accents, or landscaping features to harmonize the shed with its surroundings. Incorporate pathways, plantings, or exterior lighting to create an inviting and integrated outdoor space.
Ventilation and Insulation: Assess the shed’s ventilation and insulation requirements, integrating vents to promote air circulation and prevent moisture buildup. Consider insulating the shed to regulate interior temperatures and enhance comfort, especially if it serves as a workshop or hobby space.
Lighting and Electrical: Install lighting fixtures and electrical outlets to illuminate the shed’s interior and facilitate the use of power tools or equipment. Ensure that electrical installations comply with safety standards and local building codes to create a safe and functional environment.
Exterior Sealing and Maintenance: Apply sealants or protective coatings to the exterior surfaces, including the roof, siding, and trim, to enhance their resilience against weathering and prolong their lifespan. Regular maintenance, such as cleaning gutters and inspecting for wear, will preserve the shed’s structural integrity and visual appeal over time.
By meticulously attending to these finishing touches, you’ll transform your 10×20 shed into a cohesive, functional, and visually captivating outdoor space. Each detail contributes to the shed’s overall appeal and usability, reflecting your craftsmanship and attention to creating a well-crafted and enduring structure.
With the completion of these finishing touches, your 10×20 shed stands as a testament to your dedication and vision, ready to serve as a reliable storage space, workshop, or retreat within your property. As you admire the fruits of your labor, take pride in the transformative journey from blueprint to a fully realized outdoor structure.
Conclusion
Congratulations on successfully completing the construction of your 10×20 shed! This journey has been a testament to your dedication, craftsmanship, and vision, culminating in the transformation of raw materials into a functional and visually captivating outdoor structure. As you reflect on this rewarding endeavor, consider the invaluable skills and insights you’ve gained throughout the construction process.
Building a shed is more than a construction project; it’s a journey that fosters creativity, problem-solving, and a profound sense of accomplishment. From the initial planning and preparation to the meticulous execution of each construction phase, you’ve demonstrated resilience, attention to detail, and a commitment to creating a space that enhances your property and serves your specific needs.
As you stand within the completed shed, envision the myriad possibilities it offers. Whether it’s a sanctuary for pursuing hobbies and DIY projects, a meticulously organized storage space, or a tranquil retreat within your property, your shed embodies versatility and functionality. It stands as a testament to your ability to envision, plan, and bring to fruition a tangible and enduring addition to your environment.
Moreover, the construction of your 10×20 shed has fostered a deeper connection to your property, allowing you to shape and personalize your outdoor space according to your preferences and practical requirements. The shed represents more than a structure; it embodies the embodiment of your creativity, resourcefulness, and dedication to enhancing your living environment.
As you embark on future projects or endeavors, carry forward the lessons and experiences gained from this construction journey. The skills, problem-solving acumen, and attention to detail cultivated during the construction of your shed will undoubtedly serve you well in future endeavors, both within and beyond the realm of construction and DIY projects.
With your 10×20 shed now standing as a testament to your craftsmanship and vision, take a moment to celebrate this significant achievement. Whether you’re admiring the shed’s exterior, organizing its interior, or simply enjoying the sense of fulfillment it brings, your shed represents a tangible manifestation of your dedication and ingenuity.
As you continue to shape and enhance your living environment, may the construction of your 10×20 shed serve as a source of inspiration, empowerment, and a reminder of the transformative impact of dedication and vision. Embrace the possibilities it offers and the memories it will create, knowing that it stands as a testament to your creativity and determination.
Frequently Asked Questions about How To Build A 10x20 Shed
Was this page helpful?
At Storables.com, we guarantee accurate and reliable information. Our content, validated by Expert Board Contributors, is crafted following stringent Editorial Policies. We're committed to providing you with well-researched, expert-backed insights for all your informational needs.


0 thoughts on “How To Build A 10×20 Shed”