Home>diy>Architecture & Design>How To Draw A Closet On A Floor Plan
Architecture & Design
How To Draw A Closet On A Floor Plan
Modified: August 16, 2024
Learn how to draw a closet on a floor plan with our easy step-by-step guide. Perfect for architecture design enthusiasts looking to optimize their space.
(Many of the links in this article redirect to a specific reviewed product. Your purchase of these products through affiliate links helps to generate commission for Storables.com, at no extra cost. Learn more)
Introduction
When designing a floor plan for your home or a specific room, it is important to plan out the placement and layout of various elements, including closets. A well-designed closet not only provides ample storage space but also adds functionality and organization to the room. Drawing a closet on a floor plan may seem like a daunting task, but with a few simple steps, you can create an accurate representation of your dream closet.
In this article, we will guide you through the process of drawing a closet on a floor plan, ensuring that you can effectively communicate your vision to architects, contractors, or interior designers. Whether you’re planning a custom walk-in closet or a simple reach-in closet, this step-by-step guide will help you create a clear and detailed representation of your desired space.
Before we dive into the specifics, it is important to note that there are various software tools available that can assist you in creating detailed floor plans. However, for the purpose of this article, we will focus on the manual process using pen and paper or a basic drawing software.
So, grab your tools and let’s get started on creating the perfect closet design!
Key Takeaways:
- Designing a closet on a floor plan involves determining scale, adding walls, doors, and windows, outlining the closet’s location, drawing its shape, indicating dimensions, and including shelves and hanging rods for optimal functionality and organization.
- By following a step-by-step approach to drawing a closet on a floor plan, you can effectively communicate your design vision, balance creativity with practicality, and pave the way for a successful construction or installation process that brings your dream closet to life.
Read more: How To Draw An Evacuation Floor Plan
Step 1: Determine the scale
The first step in drawing a closet on a floor plan is to determine the scale of your drawing. The scale is a ratio that represents the relationship between the measurements on the drawing and the actual measurements of the room. This ensures that the floor plan accurately reflects the size and dimensions of the space.
To determine the scale, you need to consider the size of the paper or the drawing software you are using. For example, if you are using a standard 8.5 x 11-inch paper, you might choose a scale of 1/4 inch equals 1 foot. This means that every 1/4 inch on your drawing represents 1 foot in real life.
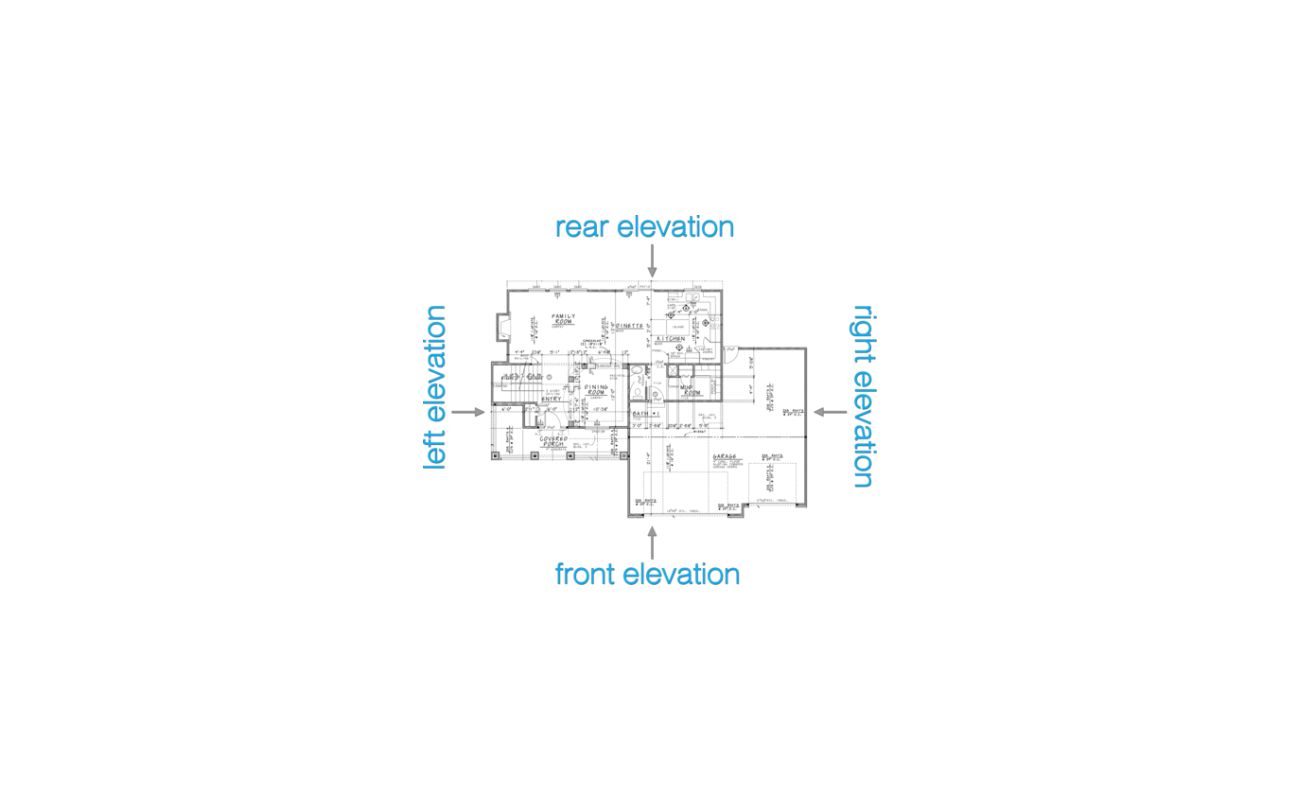
Once you have decided on the scale, you can start by drawing the outline of the room on your paper or drawing software. Use a ruler to create straight lines and ensure accuracy. Remember to include any existing walls, doors, and windows in your drawing.
Keep in mind that the scale you choose will depend on the size of the room and the level of detail you want to include. For larger rooms or complex designs, you might need to use a smaller scale to fit everything on the paper. On the other hand, for smaller rooms or simpler designs, a larger scale may be more appropriate.
By determining the scale at the beginning, you lay the foundation for a precise and well-proportioned floor plan. This will help you accurately position the closet and other elements within the room.
Now that you have set the scale and drawn the outline of the room, you’re ready to move on to the next step: adding walls to your floor plan.
Step 2: Start with the walls
Now that you have established the scale and the outline of the room, it’s time to add the walls to your floor plan. The walls will serve as the foundation for your closet design and provide a clear visual representation of the room’s layout.
You can start by drawing straight lines to represent the walls of the room. Use your ruler to ensure that the lines are straight and accurately aligned with the outline of the room. Remember to maintain the scale you determined in the previous step.
When drawing the walls, it’s important to consider their thickness. Most walls in residential buildings have a standard thickness of around 4 to 6 inches. You can indicate the thickness by drawing parallel lines on either side of the wall lines, representing the exterior and interior surfaces.
If there are existing walls in the room, make sure to accurately represent them in your floor plan. If you’re working on a new construction project, you have the freedom to design the walls according to your preferences and the structural requirements of the building.
Once the walls are in place, you can add any architectural features such as columns, niches, or alcoves that might exist in the room. These details will further enhance the realism and accuracy of your floor plan.
Remember to label each wall with a letter or number for easy reference. This will come in handy when you start adding other elements to the floor plan.
With the walls in place, your floor plan is starting to take shape. In the next step, we will focus on adding doors and windows to complete the overall layout of the room.
Step 3: Add doors and windows
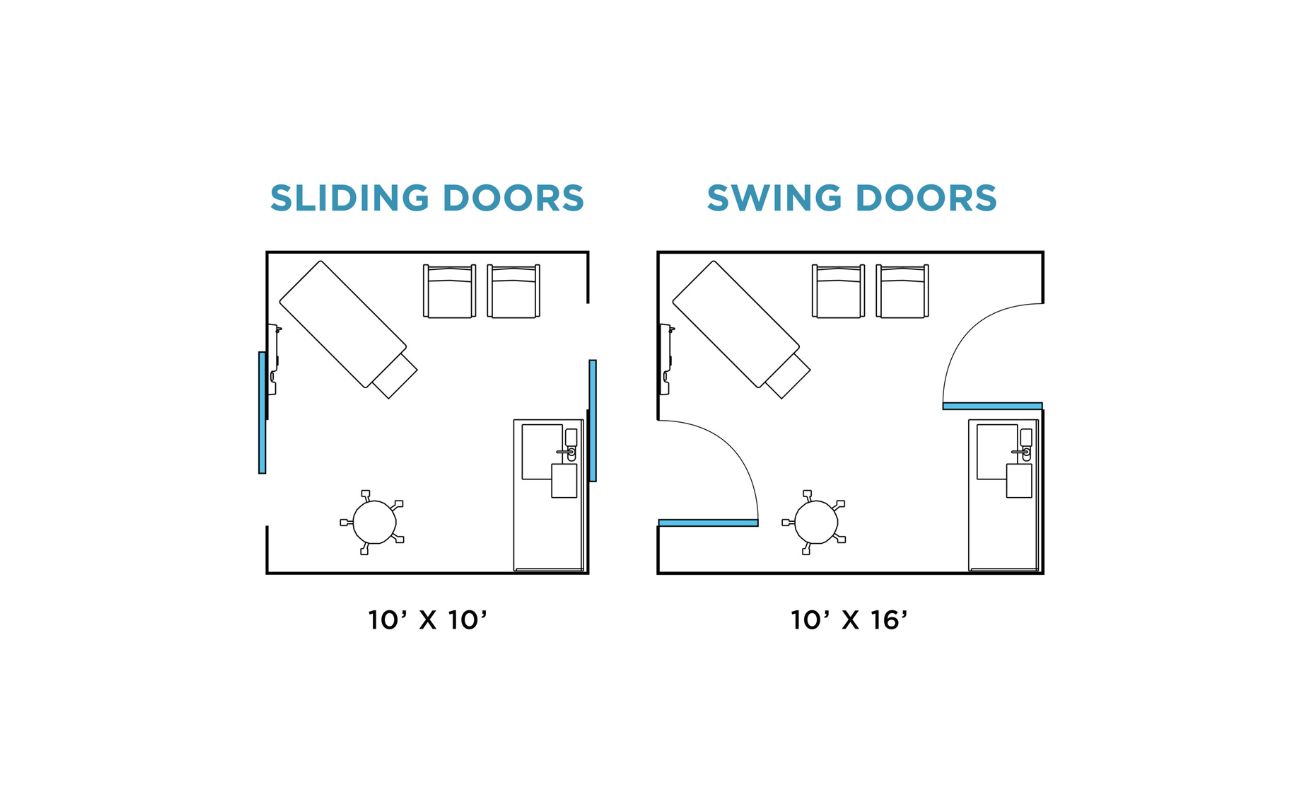
Now that the walls are in place, it’s time to add the doors and windows to your floor plan. Doors and windows not only provide access and ventilation to the room but also play a crucial role in determining the layout and functionality of your closet.
Start by identifying the locations where you want to place doors and windows in the room. Consider factors such as natural light, airflow, and the overall flow of the space. Common locations for windows include exterior walls, while doors are typically placed along hallway walls or as entrance points to the room.
When adding doors, draw a straight line to represent the door opening. Make sure to consider the standard size of doors for residential buildings, which is typically around 80 inches in height and 36 inches in width. Label each door according to its corresponding room or area it leads to.
For windows, draw a rectangle shape that represents the opening. Consider the size and style of windows that are appropriate for the room and align with your design preferences. Label the windows accordingly for easy identification.
Including doors and windows in your floor plan will give you a better sense of the room’s layout and how it will function in relation to the closet. This step also allows you to plan the placement of the closet in consideration of any architectural elements or restrictions posed by the doors and windows.
With the doors and windows in place, your floor plan is becoming more detailed and complete. In the next step, we will focus on outlining the exact location of the closet within the room.
Step 4: Outline the closet’s location
Now that the walls, doors, and windows are added to your floor plan, it’s time to outline the exact location of the closet within the room. This step is crucial as it determines how the closet will fit into the overall layout and helps you visualize the space it will occupy.
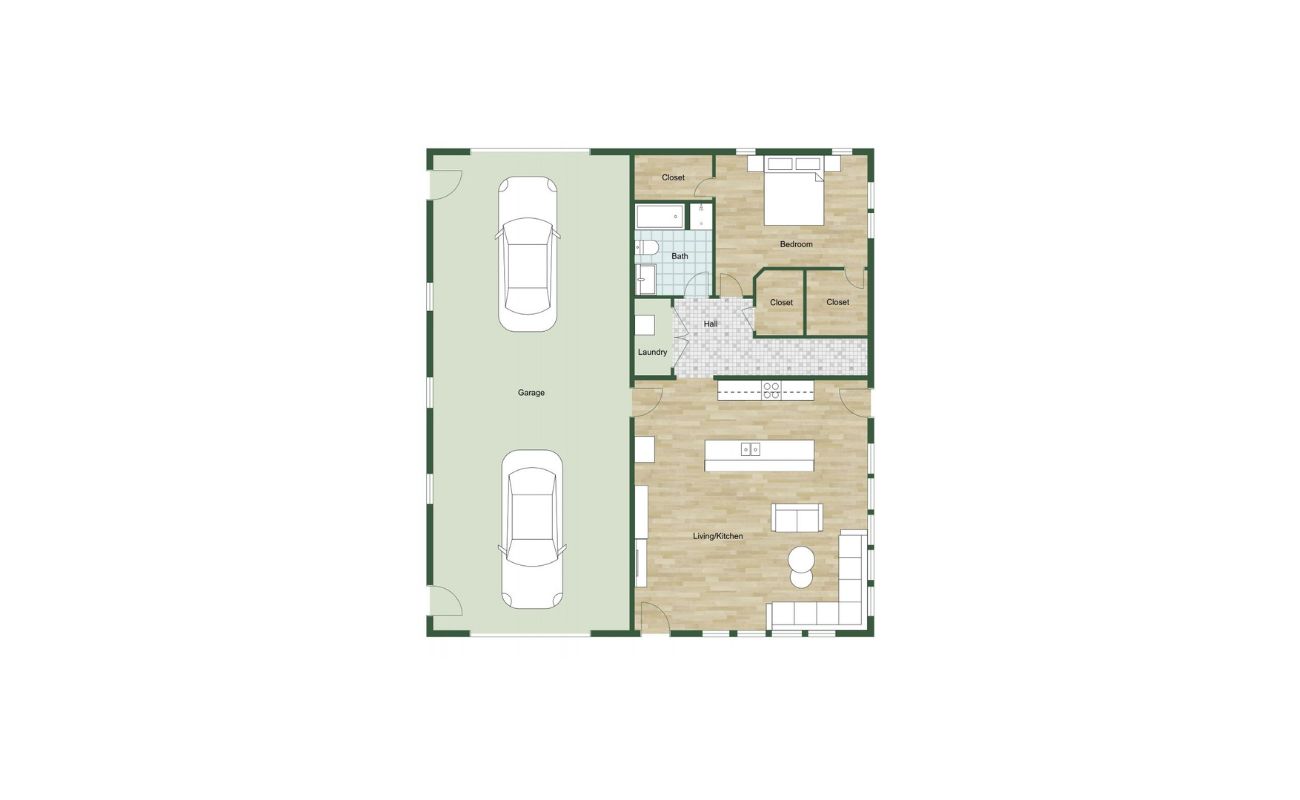
Start by deciding on the general area where you want the closet to be situated. Consider factors such as accessibility, natural flow, and the overall purpose of the room. For example, if you’re designing a bedroom closet, it’s common to place it near the entrance for easy access.
Once you have determined the general location, use your ruler to draw a rectangle or square shape to represent the footprint of the closet. Ensure that the dimensions of the closet align with your desired size and functionality.
Consider factors such as the amount of space you need for hanging clothes, shelving units, and any additional features like drawers or shoe racks. Keeping the scale in mind, make sure that the closet fits comfortably within the allocated space without encroaching on other elements in the room.
As you outline the closet’s location, be mindful of any restrictions imposed by the walls, doors, or windows. Ensure that there is enough clearance for the doors to open and that the closet does not obstruct any natural light sources or obstruct pathways within the room.
By clearly outlining the location of the closet within the room, you can ensure that it integrates seamlessly into the overall design and offers maximum functionality. With the closet’s location defined, it’s time to move on to the next step: drawing the actual shape of the closet.
When drawing a closet on a floor plan, use a straight edge to create the walls and indicate the swing direction of the door. Be sure to accurately measure the dimensions of the closet to scale.
Read more: How To Draw A Door In A Floor Plan
Step 5: Draw the closet shape
Now that you have outlined the location of the closet within the room, it’s time to draw the actual shape of the closet. This step will give you a clear visual representation of the closet’s design and ensure that it fits seamlessly into the overall floor plan.
Start by considering the type of closet you want to create. Is it a walk-in closet, a reach-in closet, or a custom-built closet? The type of closet will determine the shape and layout you need to draw.
For a rectangular-shaped walk-in closet, use your ruler to draw straight lines that connect to the walls and follow the outline of the closet’s location. This will create a rectangular shape that represents the walls of the closet. Make sure to maintain the scale you established earlier.
If you’re designing a reach-in closet, draw a rectangular shape in the designated area. In this case, you only need to draw one wall of the closet, as the other three walls will be the existing walls of the room.
For a custom-built closet, consider the specific shape and dimensions you want to incorporate. It could be a curved shape, an L-shape, or any unique design that suits your needs. Use freehand drawing or a compass and protractor to create the desired shape.
As you draw the closet shape, also take into consideration any architectural elements or obstructions, such as columns or window sills, that may affect the closet’s design and layout.
Remember to label the closet with a clear identifier, such as “Closet” or the name of the room it belongs to. This will help easily differentiate it from other elements on the floor plan.
With the closet shape drawn, you’re one step closer to creating a detailed floor plan that accurately represents your vision. In the next step, we will focus on indicating the dimensions of the closet.
Step 6: Indicate the closet dimensions
Now that you have drawn the shape of the closet, it’s important to indicate the dimensions of the closet to ensure accuracy and provide a clear understanding of its size. Indicating the dimensions will also help when it comes time to build or install the closet.
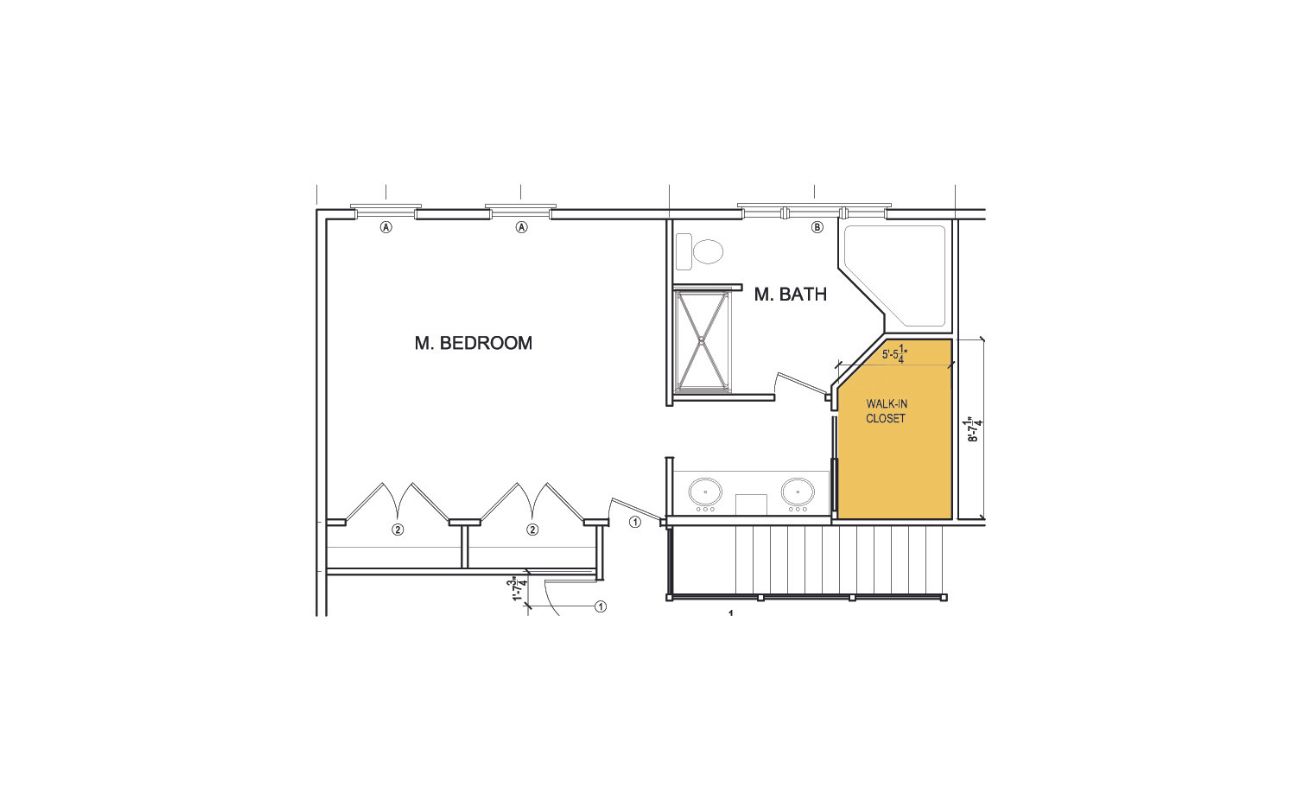
Using your ruler, measure each side of the closet and mark the measurements along the corresponding lines. For example, if one side of the closet measures 5 feet, use your ruler to draw a line and label it as “5ft”. Repeat this process for each side of the closet, including the depth and height if applicable.
When indicating the dimensions, consider using different line styles or colors to differentiate them from the outline of the closet shape. This will make it easier for others to interpret the floor plan.
If your closet has any unique features, such as recessed areas or angled walls, be sure to measure and indicate those dimensions as well. These details are essential in accurately representing the closet design.
In addition to the dimensions of the overall closet shape, you may also want to include the dimensions of specific closet components, such as shelves, hanging rods, or storage units. This level of detail can be helpful when discussing your design with contractors or when planning the organization of your belongings within the closet.
By indicating the closet dimensions, you ensure that everyone involved in the project has a clear understanding of the size and layout of the closet. This step brings your floor plan closer to reality and facilitates the next steps of the design and construction process.
Now that you have the dimensions outlined, let’s move on to the next step: including shelves and hanging rods in your closet design.
Step 7: Include shelves and hanging rods
Now that you have the basic structure of the closet outlined and the dimensions indicated, it’s time to add the essential components that will maximize its functionality and organization. This step focuses on including shelves and hanging rods, which are integral to any well-designed closet.
Start by deciding the placement and quantity of shelves within the closet. Consider your storage needs and the items you plan to store on the shelves. Use your ruler to draw horizontal lines within the closet shape to represent the shelves. Make sure to align them with the dimensions and evenly space them for a balanced design.
Next, add the hanging rods that will provide space to hang clothing items. Determine the appropriate height for the hanging rods based on the type of clothing you intend to store. Use your ruler to draw vertical lines within the closet shape, indicating the location and length of the hanging rods.
When adding shelves and hanging rods, be mindful of the dimensions you previously indicated. Ensure that they fit within the boundaries of the closet shape and do not extend beyond the walls or obstruct any doors or windows. This attention to detail will ensure a functional and aesthetically pleasing closet design.
In addition to shelves and hanging rods, you may also want to consider incorporating other storage solutions such as drawers, shoe racks, or specialized compartments. These additional features can further optimize the organization and efficiency of your closet.
By including shelves and hanging rods, you complete the layout of the closet and provide a clear visual representation of its purpose and functionality. The next step will involve labeling the various components of the closet on your floor plan.
Step 8: Label the closet
As you near the end of the process of drawing a closet on a floor plan, it’s important to label the various components of the closet to provide clarity and ensure that everyone understands its layout. Labeling allows for easy reference and communication, especially when discussing the design with architects, contractors, or interior designers.
Start by labeling the overall closet itself. Use a clear and concise label, such as “Closet” or “Wardrobe,” to identify the space within the floor plan. This will help differentiate it from other elements in the room.
Next, label each specific component of the closet, such as shelves, hanging rods, or storage units. This will help indicate their purpose and provide a clear understanding of how the closet is organized.
If you have customized the closet design with additional features or unique storage solutions, make sure to label those as well. This will help others grasp the functionality and intended use of each element.
Consider using a consistent labeling system throughout your floor plan, such as utilizing numbered labels or color-coded labels. This will enhance the readability and ensure that the labeling remains organized and coherent.
Make sure to use clear and legible handwriting, or if using a digital drawing software, choose a readable font size and style that is easy to understand.
Labeling the closet and its components is the final touch in creating a comprehensive floor plan. It ensures that everyone involved in the project can easily understand and interpret the design intent.
Now that you have successfully labeled the closet, you have completed the process of drawing a closet on a floor plan. Your detailed and well-designed floor plan will serve as an essential tool in communicating your vision and guiding the construction or installation process of your dream closet.
So grab your floor plan, share it with the professionals, and watch your dream closet become a reality!
Read more: How To Draw A Shower On A Floor Plan
Conclusion
Designing a closet and incorporating it into a floor plan may seem like a complex task, but by following a step-by-step approach, you can create a detailed and accurate representation of your ideal closet. Drawing a closet on a floor plan allows you to visualize the space, consider the layout, and communicate your design intent effectively.
In this article, we have guided you through the process of drawing a closet on a floor plan, starting with determining the scale and outlining the walls of the room. We then moved on to adding doors and windows, outlining the location of the closet, and drawing its shape. Indicating the dimensions of the closet and including shelves and hanging rods further enhanced the functionality and organization of the design. Finally, labeling each element of the closet provided clarity and ease of communication.
Remember, when drawing a closet on a floor plan, it is important to strike a balance between accurate representation and creative design. Incorporate your personal style and preferences while ensuring the practicality and functionality of the space.
Whether you are working with pen and paper or using drawing software, the process remains the same. Take your time to plan and sketch, ensuring that the dimensions and layout align with your vision. Consider the scale of the drawing and embrace creativity in presenting the details.
A well-designed and efficiently organized closet can transform a room and enhance your daily routine. By investing time in drawing a closet on a floor plan, you are paving the way for a successful construction or installation process that brings your dream closet to life.
So, go ahead and use this step-by-step guide to design your perfect closet. Visualize, plan, and communicate your vision effectively, and soon enough, you’ll have a functional and stylish closet that caters to your specific needs.
Now that you've mastered drawing a closet on a floor plan, why not deepen your understanding of the very foundation of room layouts? Delving into what a floor plan really encapsulates will certainly refine your architectural skills. On top of that, if you're enthusiastic about customizing spaces, our guide on designing closets will provide practical insights to tailor any area to suit specific needs. Both articles offer valuable knowledge that complements your newfound drafting abilities!
Frequently Asked Questions about How To Draw A Closet On A Floor Plan
Was this page helpful?
At Storables.com, we guarantee accurate and reliable information. Our content, validated by Expert Board Contributors, is crafted following stringent Editorial Policies. We're committed to providing you with well-researched, expert-backed insights for all your informational needs.


0 thoughts on “How To Draw A Closet On A Floor Plan”