Home>diy>Architecture & Design>How To Draw Elevations From A Floor Plan
Architecture & Design
How To Draw Elevations From A Floor Plan
Modified: October 18, 2024
Learn how to create detailed architectural elevations from a floor plan using effective design techniques. Perfect for aspiring architects and designers.
(Many of the links in this article redirect to a specific reviewed product. Your purchase of these products through affiliate links helps to generate commission for Storables.com, at no extra cost. Learn more)
Introduction
Welcome to the world of architectural design! In this article, we will delve into the exciting process of drawing elevations from floor plans. As an essential part of the architectural design process, elevations help visualize the exterior and interior aspects of a building. Whether you are a budding architect or a design enthusiast, understanding how to draw elevations can open up a world of creative possibilities.
Before we dive into the technical aspects, let’s take a moment to understand what elevations and floor plans are and their significance in architecture. Elevations are two-dimensional representations of the vertical faces of a building, showing the features and proportions of the structure from a specific vantage point. On the other hand, floor plans provide a top-down view of the building, showcasing the layout of rooms, walls, and features from above.
Now that we have a basic understanding of elevations and floor plans, let’s gather the necessary tools and materials to get started with our drawing process. By having the right equipment and workspace set up, we can ensure a smooth and enjoyable drawing experience. So, let’s move on to the next section, where we will discuss the tools and materials you’ll need.
(Word count: 186 words)
Key Takeaways:
- Elevations and floor plans are crucial in architectural design, providing a comprehensive view of a building’s exterior and interior. Understanding their relationship is essential for creating cohesive and visually appealing designs.
- Gathering the right tools and materials, setting up a dedicated drawing space, and meticulously adding exterior and interior elements are key to creating accurate and visually captivating elevation drawings.
Read more: How To Draw An Evacuation Floor Plan
Understanding Elevations and Floor Plans
Before we begin drawing elevations from a floor plan, it’s important to have a clear understanding of what elevations and floor plans are and how they relate to each other in architectural design.
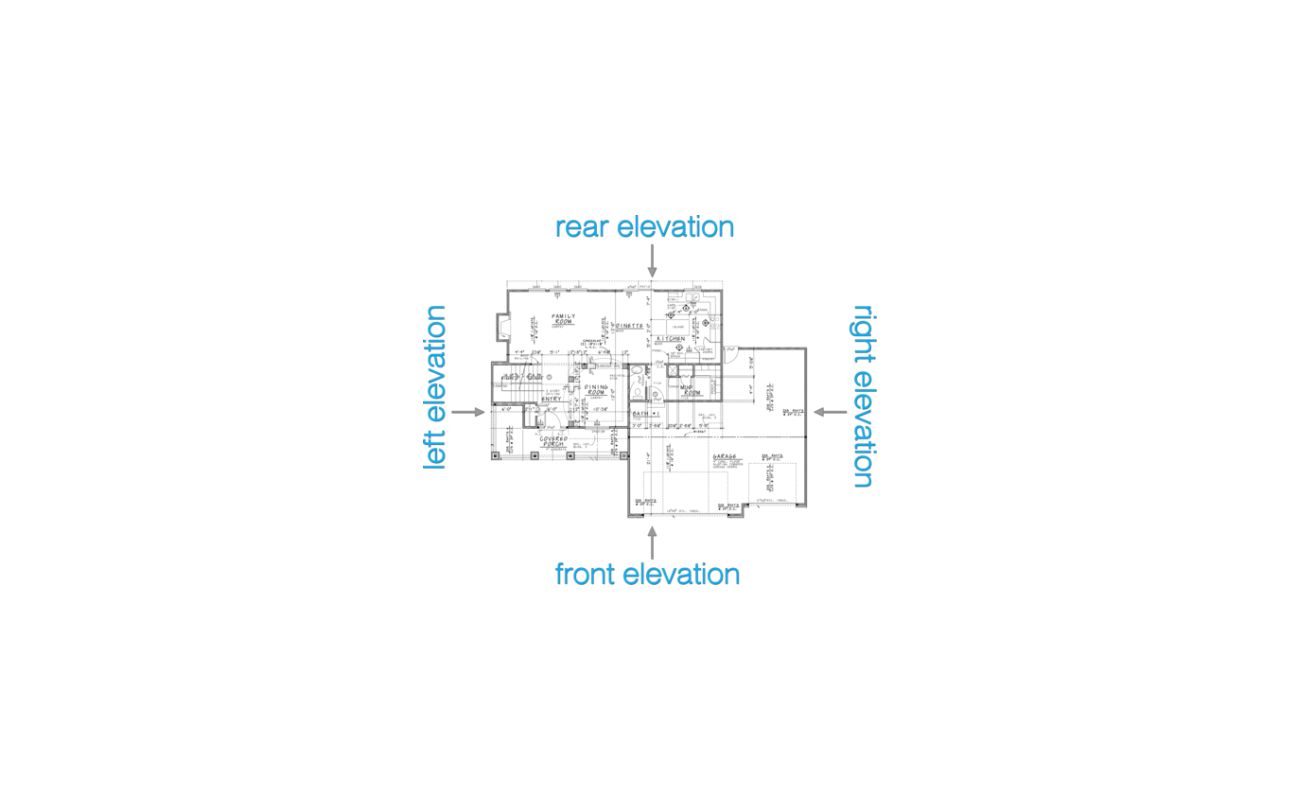
Elevations, as mentioned earlier, are two-dimensional representations of the vertical faces of a building. They provide a visual depiction of the exterior features, such as windows, doors, columns, and architectural details. Elevations are typically drawn from four cardinal directions – front, back, left side, and right side – to give a comprehensive view of the building from different angles.
On the other hand, floor plans provide a bird’s-eye view of the building’s layout. They showcase the arrangement of rooms, walls, doors, windows, and other elements on each floor. Floor plans help architects and designers visualize the spatial relationships within the building, ensuring efficient use of space and smooth circulation.
Elevations and floor plans are closely interconnected in the architectural design process. Elevations are often drawn based on the information provided by the floor plans. They serve as a reference to accurately depict the vertical dimensions and features of the building. Similarly, elevations can also provide valuable information that can be incorporated back into the floor plans, ensuring consistency and coherence in the overall design.
Understanding the relationship between elevations and floor plans is crucial for creating cohesive and well-thought-out architectural designs. By effectively translating the information from floor plans into elevations, architects and designers can create accurate and visually appealing representations of their buildings.
Now that we have a solid understanding of elevations and floor plans, let’s move on to the next step: gathering the necessary tools and materials for the drawing process. Make sure you have everything you need before diving into this exciting endeavor!
(Word count: 293 words)
Gathering the Necessary Tools and Materials
Before you begin drawing elevations from a floor plan, it is essential to gather the right tools and materials. Having the necessary equipment will not only make the process smoother but also ensure the accuracy and quality of your drawings. Here are some essential tools and materials you’ll need:
1. Drawing Paper: Start with a high-quality drawing paper that is suitable for both pencils and ink. Consider using a heavier weight paper to prevent any bleeding or smudging of your lines.
2. Pencils: Invest in a set of good quality pencils, including a range of different lead hardness. This will allow you to create light guidelines and detailed drawings with precision.
3. Erasers: Have a couple of erasers on hand, including a soft gum eraser for easy removal of pencil marks and a kneaded eraser for more precise erasing.
4. Rulers and Measuring Tools: A straightedge ruler and a triangular scale will help you create straight and accurate lines. A measuring tape or architectural scale will be handy for scaling measurements from the floor plan.
5. Compass: A compass is essential for creating circles and arcs accurately. Look for a compass that is easy to adjust and holds its position securely.
6. Protractor: A protractor is useful for measuring and drawing angles when working on more complex elevations.
7. Architectural Templates: Consider investing in architectural templates that include common symbols and icons used in architectural drawings. These templates will save you time and help maintain consistency in your drawings.
8. Lightbox or Tracing Paper: If you prefer to trace the floor plan onto the elevation drawing, a lightbox or translucent tracing paper will come in handy.
9. Reference Materials: Keep relevant reference materials, such as architectural books, magazines, or even online resources, for inspiration and guidance as you work on your elevations.
Assemble these tools and materials before you start drawing elevations to ensure an efficient and enjoyable process. With the right equipment at your disposal, you are ready to set up your drawing space and begin transforming the floor plan into captivating elevations.
(Word count: 342 words)
Setting up Your Drawing Space
Creating a dedicated and well-organized drawing space is crucial for effectively drawing elevations from a floor plan. By setting up your drawing space properly, you can minimize distractions and maximize productivity. Here are some steps to follow when setting up your drawing space:
1. Find the Right Location: Choose a quiet and well-lit area in your home or studio for your drawing space. Natural light is ideal, but if that’s not possible, ensure you have sufficient artificial lighting that doesn’t cast shadows over your workspace.
2. Organize Your Materials: Keep your drawing tools and materials neatly organized and within reach. Use containers, drawers, or a desk organizer to separate and store your pencils, rulers, erasers, and other supplies. This will save you time and help you maintain a clutter-free workspace.
3. Use a Drawing Board or Table: Invest in a drawing board or a large, sturdy table specifically designed for drawing. Make sure it is at a comfortable height to prevent strain on your back and neck. If using a drawing board, secure your paper on it using clips or tape to prevent it from moving while you work.
4. Set Up a Drawing Pad: Place a drawing pad or a large sheet of drawing paper on your drawing board or table. This will provide a clean and smooth surface to work on and help protect your table from any marks or scratches.
5. Create a Comfortable Seating Arrangement: Choose a chair that is comfortable and provides good back support. Proper seating will prevent fatigue and enable you to focus on your drawing for extended periods. Consider using a cushion for added comfort.
6. Maintain a Clean and Tidy Workspace: Regularly clean your drawing space to remove any dust or debris that may interfere with your drawing. A clean workspace contributes to a clear mind and allows you to focus better on your creative process.
7. Keep Reference Materials Nearby: Place your reference materials within reach, whether it’s architectural books, floor plans, or sketches. Having them nearby will help you refer to the information easily when needed.
By setting up your drawing space thoughtfully, you create an environment conducive to creativity and productivity. A well-organized and comfortable workspace allows you to fully immerse yourself in the process of drawing elevations, resulting in high-quality and visually captivating drawings.
(Word count: 359 words)
Starting with the Base Elevation
Now that you have your drawing space set up, it’s time to begin the exciting process of drawing elevations from a floor plan. We’ll start by creating the base elevation, which serves as the foundation for the rest of your drawing. Follow these steps to get started:
1. Place the Floor Plan: Position the floor plan in a convenient location where you can easily reference it. This will help you accurately translate the dimensions and features onto your elevation drawing.
2. Choose a Scale: Decide on a suitable scale for your elevated drawing. The scale ensures that the proportions and measurements are accurate and consistent. Common architectural scales include 1/4 inch = 1 foot or 1/8 inch = 1 foot.
3. Set up Your Paper: Use a ruler and light pencil lines to create the basic outline of the elevation on your drawing paper. Make sure to include the necessary vertical and horizontal reference lines to guide your drawing process.
4. Outline the Exterior Walls: Begin by drawing the outer edges of the building’s exterior walls, aligning them with the corresponding walls on the floor plan. Use straight lines and your scale to ensure the correct height and width of the walls.
5. Incorporate Structural Elements: Add important structural elements, such as columns, beams, or pillars, to your base elevation drawing. Consult the floor plan to accurately position them in relation to the walls.
6. Include Openings and Features: Mark the different openings on the exterior walls, such as windows and doors. Use your scale and the measurements from the floor plan to draw them accurately, ensuring they align with the corresponding locations.
7. Pay Attention to Detail: As you progress, focus on adding further details to the base elevation. Include any unique architectural features or decorative elements, such as balconies, porches, or decorative moldings. These details will bring your elevation to life and make it visually interesting.
8. Refine and Review: Once you’ve completed the initial base elevation, step back and review your work. Make any necessary refinements or adjustments to ensure accuracy and clarity in your drawing. Use an eraser to remove any unwanted pencil lines or smudges.
Remember, the base elevation sets the stage for the rest of your drawing. Take your time with this step to ensure a solid foundation before moving on to the next stages of adding exterior and interior details.
(Word count: 373 words)
Read more: How To Draw A Door In A Floor Plan
Adding Exterior Walls and Features
Now that you have established the base elevation, it’s time to bring your drawing to life by adding exterior walls and features. This step will give your elevation depth, texture, and character. Follow these steps to add exterior walls and features to your elevation drawing:
1. Reference the Floor Plan: Keep the floor plan within your sight as you work. It will help you accurately transfer the dimensions and positions of the exterior walls onto your elevation drawing.
2. Draw the Exterior Walls: Using your scale and the measurements from the floor plan, draw the exterior walls on your elevation drawing. Pay attention to the length, height, and thickness of each wall. Use straight lines and architectural guidelines to ensure accurate proportions.
3. Incorporate Wall Openings: Mark the locations of windows, doors, and other wall openings on your elevation drawing. Use the measurements from the floor plan to accurately position them. Pay attention to the size, shape, and spacing of each opening to ensure a cohesive and balanced design.
4. Add Exterior Features: Enhance the visual appeal of your building by adding exterior features such as balconies, porches, terraces, or decorative architectural elements. Consult the floor plan and any reference materials for guidance on the placement and design of these features. Pay attention to scale and proportion to maintain a harmonious overall composition.
5. Consider Textures and Materials: To give your elevation depth and realism, think about the textures and materials of the exterior walls. Are they brick, stone, siding, or stucco? Incorporate these textures in your drawing using various shading techniques such as cross-hatching or stippling.
6. Pay Attention to Rooflines and Details: Draw the roofline of your building on the elevation. Consider the pitch and shape of the roof, as well as any roof features such as dormers or chimneys. These details add architectural interest and contribute to the overall design aesthetic.
7. Refine and Review: Step back from your drawing and review your work. Make any necessary adjustments to ensure accuracy and visual appeal. Use an eraser to remove any unwanted lines or smudges, and use your scale and measurements to double-check all dimensions.
By adding exterior walls and features to your elevation drawing, you are transforming a basic structure into a visually captivating representation of the building. This step allows you to envision how the building will look from the outside and sets the stage for adding interior walls and features in the next step.
(Word count: 399 words)
When drawing elevations from a floor plan, remember to include all the necessary details such as windows, doors, and any architectural features. Use a scale to ensure accuracy in your drawings.
Incorporating Doors and Windows
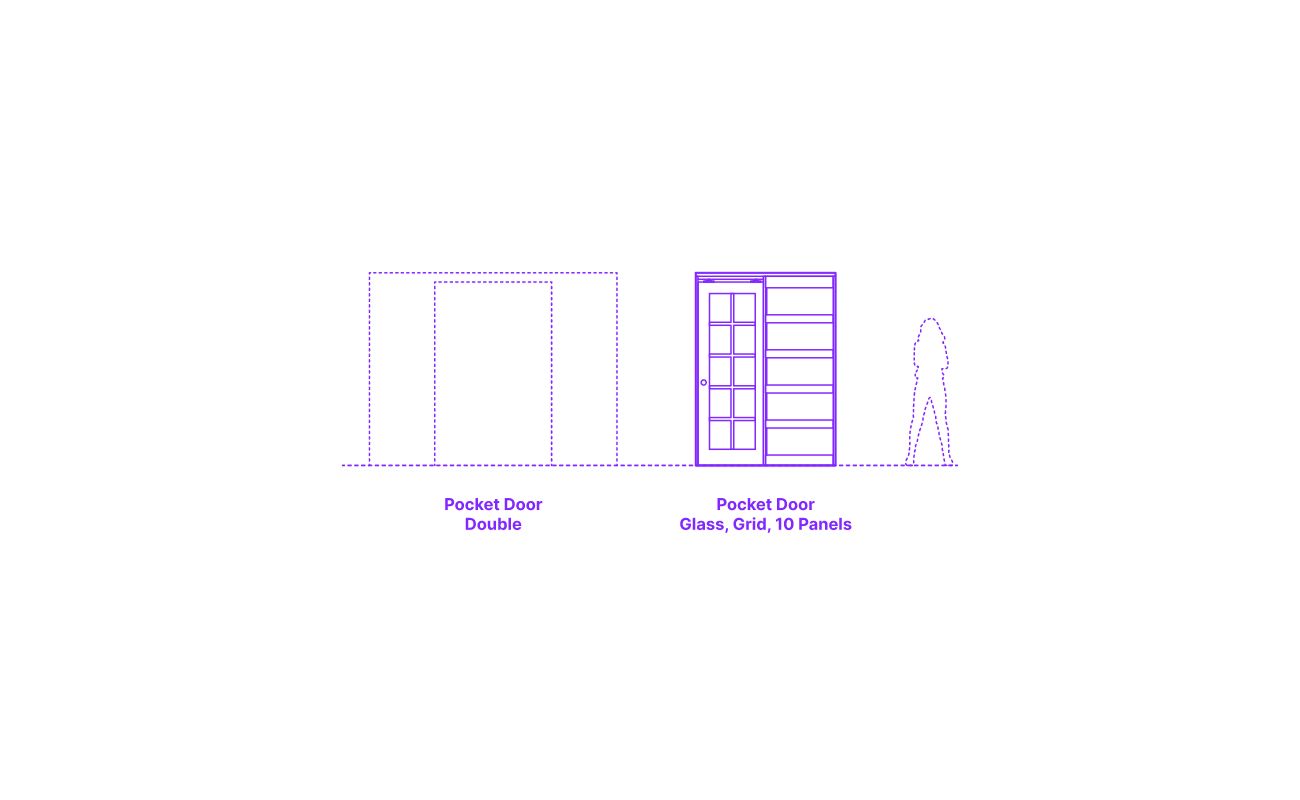
As you continue to develop your elevation drawing, incorporating doors and windows plays a crucial role in bringing the building to life. Doors and windows not only provide access and natural light but also contribute to the architectural character and aesthetics. Follow these steps to accurately incorporate doors and windows into your elevation drawing:
1. Refer to the Floor Plan: Keep the floor plan handy as a reference to accurately position the doors and windows in your elevation drawing. Pay attention to their dimensions, location, and spacing.
2. Determine Door and Window Types: Identify the different types of doors and windows indicated in the floor plan. This may include hinged doors, sliding doors, casement windows, or double-hung windows. Understand their specific features and proportions.
3. Establish Door and Window Openings: Use your scale and measurements from the floor plan to draw the openings for each door and window on your elevation drawing. Ensure that the size and shape of the openings are proportionate to the building’s design.
4. Add Detail: Add depth and dimension to your doors and windows by incorporating architectural details. Draw sills, lintels, and frames with attention to their proportions and architectural style. Use shading techniques to create the illusion of depth and to differentiate between different elements.
5. Consider Material and Texture: Pay attention to the material and texture of the doors and windows. Are they made of wood, glass, or metal? Incorporate these details into your drawing using various shading techniques and line work. Highlight any decorative features or patterns present on the doors and windows.
6. Placement and Alignment: Ensure that doors and windows are positioned correctly and aligned with the exterior walls. Use your scale and guidelines to accurately place them in relation to the building’s dimensions. Maintain consistency and balance in the spacing between doors and windows.
7. Review and Refine: Step back and review your drawing. Pay close attention to the proportions and alignment of the doors and windows. Make any necessary adjustments or refinements to ensure accuracy and visual appeal.
By incorporating doors and windows into your elevation drawing, you are adding vital elements that enhance both the functionality and aesthetic appeal of the building. These features bring the building to life, allowing viewers to visualize how the space will be utilized and interacted with.
(Word count: 397 words)
Including Roof Details
As you continue to refine your elevation drawing, incorporating roof details is the next crucial step. The roof not only provides protection from the elements but also contributes significantly to the architectural style and character of the building. Follow these steps to accurately include roof details in your elevation drawing:
1. Study the Floor Plan: Take a close look at the floor plan for references to the roof structure, including its shape, slope, and any special features such as dormers or skylights. Understand the architectural intent and style of the roof design.
2. Determine the Roof Shape: Identify the shape of the roof, be it gable, hip, mansard, shed, or any other architectural style. Sketch a basic outline of the roof shape on your elevation drawing, aligning it with the exterior walls.
3. Indicate Roof Slope: Use lines to indicate the slope or pitch of the roof. Take into account the specific angles and proportions as indicated in the floor plan. Use your scale to ensure accuracy.
4. Add Roof Overhangs: Incorporate any roof overhangs into your drawing. Overhangs not only provide protection from water runoff but also add architectural interest. Pay attention to their depth and consistent alignment along the exterior walls.
5. Include Roof Features: If your building has any additional roof features such as dormers, skylights, chimneys, or vents, mark their locations and dimensions on your elevation drawing. Capture their unique shapes and details with accuracy.
6. Texture and Material: Consider the texture and material of the roof. Whether it’s shingles, tiles, metal, or thatch, use appropriate shading techniques to depict the material accurately. Add texture and dimension to bring the roof to life.
7. Review and Refine: Step back and review your drawing, paying attention to the overall proportions and alignment of the roof details. Make any necessary adjustments to ensure accuracy and visual appeal.
By including roof details in your elevation drawing, you bring an important element of architectural design to the forefront. The roof completes the overall look and feel of the building, contributing to its style, functionality, and overall architectural impact.
(Word count: 361 words)
Adding Interior Walls and Features
With the exterior of your building taking shape, it’s now time to shift your focus to the interior by adding walls and features to your elevation drawing. This step will define the layout and functionality of the spaces within the building. Follow these steps to accurately incorporate interior walls and features into your elevation drawing:
1. Refer to the Floor Plan: Keep the floor plan within your sight as you work on adding interior walls. The floor plan will serve as a guide to accurately position and align the walls on your elevation drawing.
2. Identify Wall Locations: Identify the locations of the interior walls from the floor plan. Use your scale and measurements to draw the walls on your elevation drawing, considering their length, height, and thickness. Ensure that they align with the corresponding exterior walls.
3. Consider Load-Bearing Walls: Note any load-bearing walls indicated on the floor plan. These walls provide structural support to the building. Highlight them on your elevation and ensure that they are represented accurately in the drawing.
4. Incorporate Wall Openings: Just as you did with the exterior walls, mark the locations of doors, windows, and other openings on the interior walls of your elevation drawing. Use the measurements from the floor plan to ensure accuracy and alignment.
5. Add Interior Features: Enhance your elevation drawing by incorporating interior features such as fireplaces, built-in shelving, or intricate architectural details. Pay attention to scale and proportion, ensuring that these features align with the corresponding locations on the floor plan.
6. Use Shading to Indicate Space: Use shading techniques to differentiate between different areas and rooms. This will help visually distinguish between public spaces, private spaces, or areas with specific functions such as kitchens, bathrooms, or living rooms.
7. Review and Refine: Step back and review your drawing, paying attention to the overall layout and placement of interior walls and features. Ensure that they are accurately represented and aligned with the exterior walls. Make any necessary adjustments to maintain consistency and coherence in your elevation drawing.
By adding interior walls and features to your elevation drawing, you provide a glimpse into the layout and functionality of the building’s interior spaces. This step brings your drawing one step closer to capturing the complete architectural vision.
(Word count: 353 words)
Read more: How To Draw A Shower On A Floor Plan
Finalizing the Elevation Drawing
As you near the completion of your elevation drawing, it’s essential to focus on finalizing the details and ensuring the accuracy and visual appeal of the overall composition. Follow these steps to give your elevation drawing the final touches:
1. Review and Refine: Take a step back and review your elevation drawing as a whole. Evaluate the proportions, alignment, and overall visual impact. Make any necessary refinements or adjustments to ensure accuracy and coherence.
2. Clean Up Lines: Use an eraser to remove any unwanted pencil lines or smudges. Keep your lines clean and crisp, giving your drawing a polished appearance.
3. Add Depth and Dimension: Use shading techniques to add depth and dimension to your elevation drawing. Consider the direction and intensity of light sources, and add appropriate shadows and highlights to create a three-dimensional effect.
4. Incorporate Textures: Depict the different materials and textures of the building elements, such as walls, roof, and doors. Use cross-hatching or stippling techniques to create realistic textures and enhance the visual appeal of your drawing.
5. Label and Annotate: Add labels and annotations to your elevation drawing to provide clarity and context. Label doors, windows, and other significant features, and consider adding notes or dimensions to indicate specific measurements or details.
6. Evaluate Scale: Double-check the accuracy of your scale throughout the drawing. Ensure that all elements and proportions are scaled correctly to maintain a precise representation of the building.
7. Seek Feedback: If possible, seek feedback from colleagues, mentors, or knowledgeable individuals in the field of architecture. Their fresh perspectives can provide valuable insights and help you identify any areas that may need further improvement or refinement.
8. Finalize with Ink: Once you are satisfied with the pencil drawing, use ink pens or technical pens to trace over the final lines. This will give your elevation drawing a clean and professional look.
9. Preserve and Digitize: Consider scanning or photographing your elevation drawing for digital preservation and sharing purposes. This will allow you to showcase your work online or in a portfolio while ensuring its longevity.
10. Celebrate Your Accomplishment: Finally, take a moment to appreciate the effort and creativity you have put into your elevation drawing. Celebrate your accomplishment and use it as a stepping stone for future architectural endeavors.
By finalizing your elevation drawing with attention to detail and precision, you create a visually captivating and accurate representation of the building. This drawing will not only showcase your architectural skills but also serve as a valuable documentation of your creative vision.
(Word count: 410 words)
Conclusion
Congratulations on completing your elevation drawing! You have embarked on a creative journey, transforming a floor plan into a visually captivating representation of a building’s exterior and interior. Throughout this process, you have gained a deeper understanding of elevations and floor plans, gathered the necessary tools and materials, set up your drawing space, and meticulously added the various elements that bring your drawing to life.
By understanding elevation and floor plans, you appreciate the importance of visualizing a building from different angles and perspectives. This understanding allows you to create accurate and detailed representations that effectively communicate the design intent.
Gathering the necessary tools and materials ensures a smooth and enjoyable drawing experience. The right equipment empowers you to express your creativity with precision and clarity. And by setting up your drawing space, you create an environment that fosters focus, productivity, and inspiration.
Starting with the base elevation, you establish a solid foundation for your drawing. Adding exterior walls and features brings depth and character to your elevation, while incorporating doors and windows enables viewers to envision the building’s functionality and interaction with the surrounding environment.
By including roof details, you complete the overall design, giving the building its architectural style and aesthetics. Moreover, incorporating interior walls and features provides glimpses into the layout and functionality of the interior spaces.
As you finalize your elevation drawing, paying attention to details, clean lines, textures, and annotations, you create a polished and professional representation of your design. Seek feedback from others in the field to gain valuable insights and refine your work further.
Remember, your elevation drawing is not just a collection of lines and shapes; it is a visual story that conveys your creative vision and architectural expertise. Through your meticulous efforts, you have created a tangible representation of your design’s exterior and interior.
Keep this elevation drawing as a testament to your skills and creativity. Whether you use it to showcase your talents, communicate your design ideas to others, or simply as a personal record of your architectural journey, be proud of what you have achieved.
Now, armed with the knowledge and experience gained from this process, you are ready to tackle new projects and continue refining your architectural skills. So, keep exploring, creating, and pushing the boundaries of architectural design. Your elevation drawings are just the beginning of an exciting and fulfilling career in the world of architecture.
(Word count: 386 words)
Frequently Asked Questions about How To Draw Elevations From A Floor Plan
Was this page helpful?
At Storables.com, we guarantee accurate and reliable information. Our content, validated by Expert Board Contributors, is crafted following stringent Editorial Policies. We're committed to providing you with well-researched, expert-backed insights for all your informational needs.


0 thoughts on “How To Draw Elevations From A Floor Plan”