Home>diy>Architecture & Design>How To Draw A Pocket Door On A Floor Plan
Architecture & Design
How To Draw A Pocket Door On A Floor Plan
Modified: May 6, 2024
Learn how to draw a pocket door on a floor plan with this step-by-step guide. Perfect for architecture and design enthusiasts.
(Many of the links in this article redirect to a specific reviewed product. Your purchase of these products through affiliate links helps to generate commission for Storables.com, at no extra cost. Learn more)
Introduction
When it comes to designing a floor plan, one important element to consider is the placement of doors. While traditional doors can take up valuable space in a room, a practical solution is to incorporate pocket doors into your design.
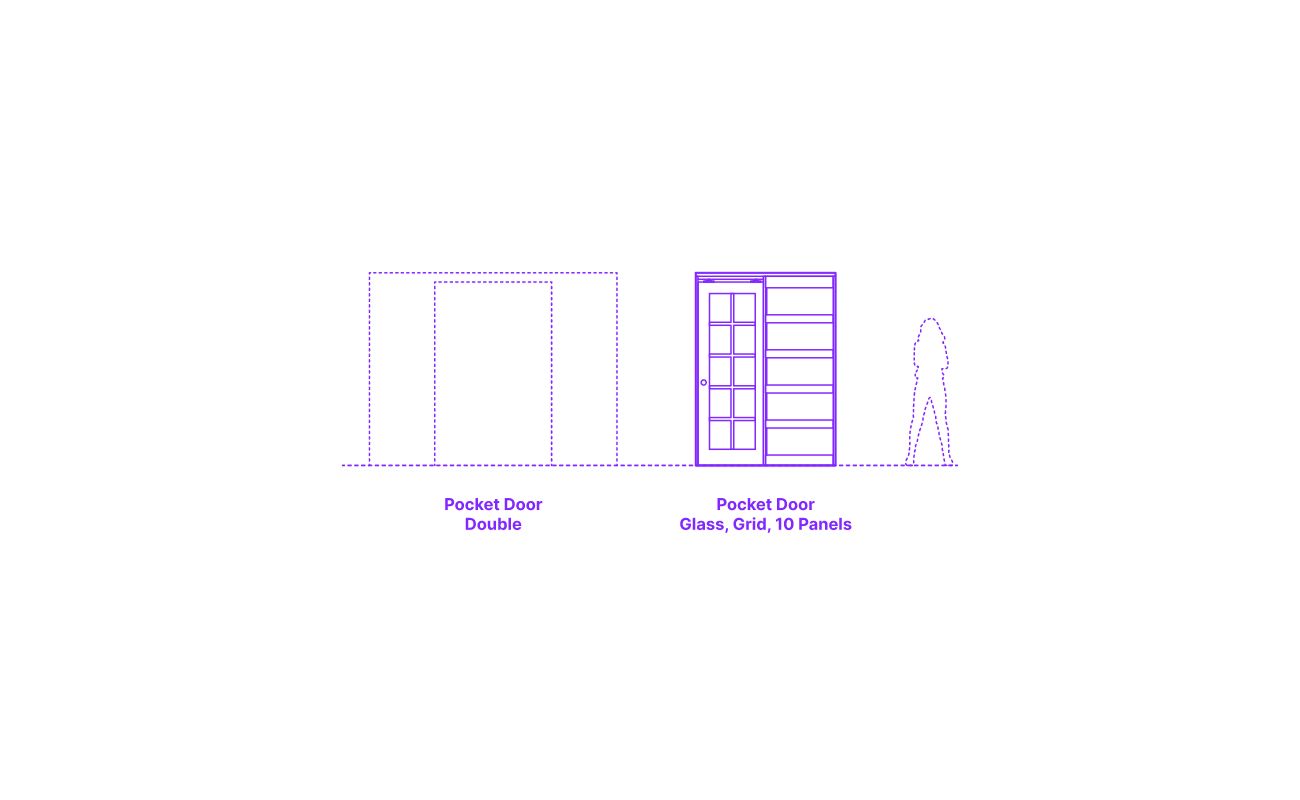
A pocket door is a type of sliding door that slides into a hidden compartment within the wall, creating a seamless and space-saving solution. These doors are not only functional but also add a touch of elegance and sophistication to any space.
In this article, we will guide you through the process of drawing a pocket door on a floor plan. Whether you are an architect, designer, or simply someone looking to modify your current floor plan, this step-by-step guide will ensure that you can accurately incorporate a pocket door into your design.
So, let’s dive in and discover the steps involved in drawing a pocket door on a floor plan.
Key Takeaways:
- Incorporating pocket doors in a floor plan saves space and adds elegance. Follow the steps to accurately draw and integrate pocket doors, optimizing functionality and style.
- Consider functionality, flow, and clearance when choosing the location of a pocket door. Precise measurements and attention to detail ensure a seamless integration into the design.
Read more: How To Draw A Door In A Floor Plan
Step 1: Identify the Location of the Pocket Door
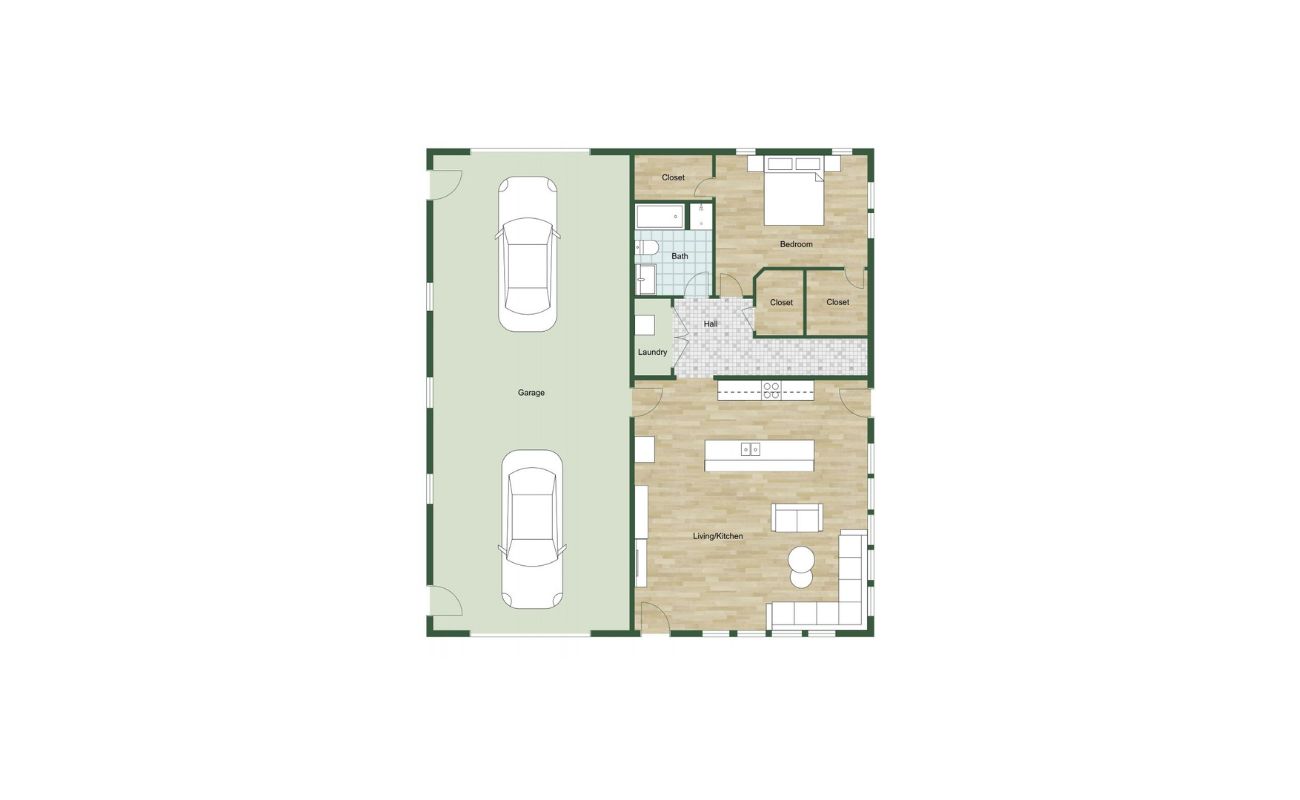
The first step in drawing a pocket door on a floor plan is to identify the location where you want to install the door. Consider the purpose and flow of the space, as well as any architectural or design considerations.
Take into account factors such as privacy, convenience, and accessibility when choosing the location of your pocket door. You may want to place it between two rooms to create a division, or use it to separate a kitchen from a dining area.
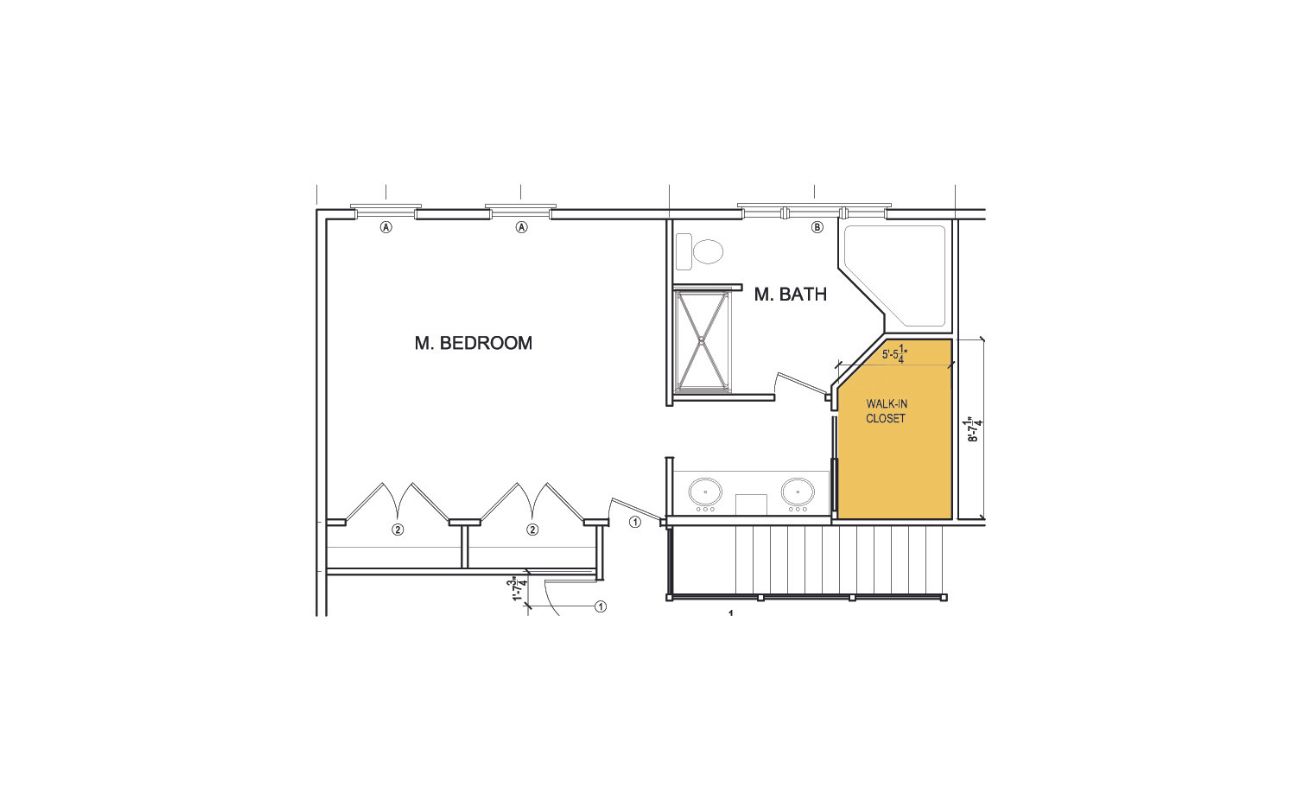
It’s important to remember that pocket doors require a sufficient amount of wall space to accommodate the hidden compartment. Ensure that there is enough clearance for the door to slide smoothly into the wall without any obstructions.
Once you have determined the ideal location for your pocket door, mark it on the floor plan using a pencil or digital drawing tool. This will serve as a reference point for the following steps.
Remember that the location of the pocket door will impact the overall layout and functionality of the space. So, take your time and carefully consider its placement before moving on to the next step.
Step 2: Measure the Opening Width
After identifying the location of the pocket door, the next step is to measure the width of the opening. This measurement is crucial for determining the size of the pocket door that you will need.
Using a tape measure, measure the width of the opening from one side of the wall to the other. It’s important to take accurate measurements to ensure that the pocket door fits perfectly into the space.
When measuring, consider any trim or molding that may be present around the opening. Measure from the inside edge of the trim on one side to the inside edge of the trim on the other side.
It’s advisable to take multiple measurements at different points along the width of the opening to account for any irregularities in the wall. This will help you ensure that the door fits properly and opens and closes smoothly.
Write down the measurements, and double-check them to ensure accuracy. It’s always a good idea to have a second person verify the measurements to eliminate any errors or discrepancies.
Once you have the width measurement, you can proceed to the next step, which is determining the size of the pocket door that will fit the opening perfectly.
Step 3: Determine the Door Size
After measuring the width of the opening, the next step is to determine the size of the pocket door that will fit perfectly into the space. To determine the door size, you need to consider the width, height, and thickness of the door.
First, let’s start with the width. The width of the pocket door should be slightly smaller than the measured opening width. This allows the door to slide smoothly into the hidden compartment within the wall. Typically, the width of the pocket door is about 2 inches less than the measured opening width.
Next, let’s move on to the height. Measure the height of the opening from the floor to the top of the opening, taking into account the flooring material and any clearance needed for the door to slide. The height of the pocket door should be slightly taller than the measured opening height to allow for proper installation and operation.
Lastly, consider the thickness of the door. Standard pocket doors have a thickness of around 1 ⅜ inches, but this can vary depending on personal preference or building codes. Ensure that the thickness of the door is compatible with the size of the pocket door frame and that it fits within the wall cavity properly.
Take note of these measurements as they will be essential when drawing the pocket door on the floor plan. You can use these measurements to create accurate representations of the door and ensure that it fits seamlessly into your design.
With the door size determined, you’re now ready to move on to the next step and draw the opening on the floor plan.
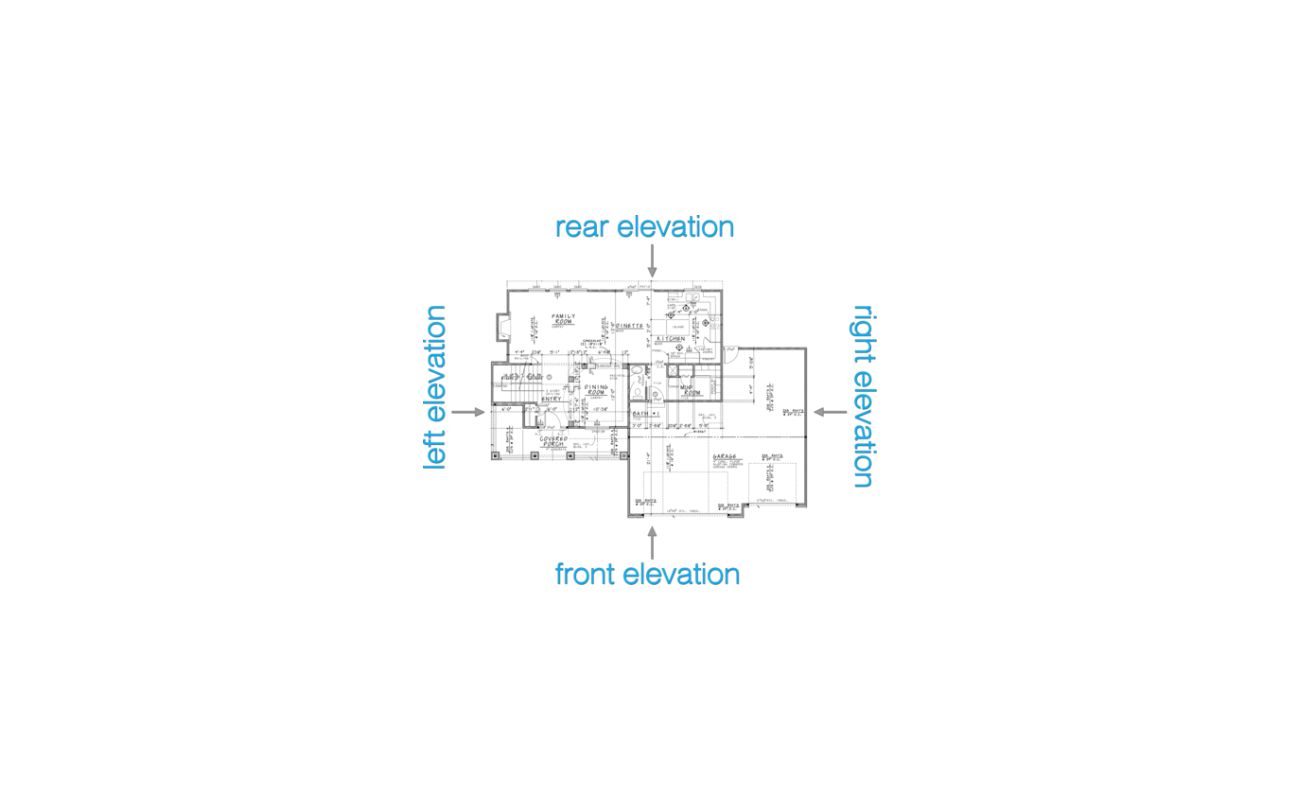
Step 4: Draw the Opening on the Floor Plan
Now that you have identified the location and determined the size of your pocket door, it’s time to draw the opening on the floor plan.
Start by referring to your floor plan and locate the area where the pocket door will be installed. Using a pencil or digital drawing tool, draw a rectangle that represents the width and height of the opening. Make sure that the dimensions of the rectangle match the measurements you took earlier.
To accurately represent the pocket door, you can use a dashed line or a different color for the outline of the rectangle. This will distinguish it from other doors or walls on the floor plan.
Take into account any additional elements that will be affected by the pocket door, such as walls, windows, or furniture. Adjust the position of these elements on the floor plan as needed to accommodate the new opening.
By drawing the opening on the floor plan, you will have a visual representation of where the pocket door will be located within the space. This will help you assess the overall flow and functionality of the room, allowing for any necessary revisions or adjustments.
With the opening drawn on the floor plan, you can now move on to the next step and add the swing direction to your pocket door.
When drawing a pocket door on a floor plan, use a dashed line to represent the path of the door as it slides into the wall, and make sure to indicate the direction in which the door slides.
Read more: How To Draw A Sliding Door On A Floor Plan
Step 5: Add the Swing Direction
Adding the swing direction to your pocket door on the floor plan is an essential step in the design process. It helps to visualize how the door will operate and interact with the surrounding space.
To determine the swing direction of the pocket door, imagine yourself standing outside the room or area where the door is located. Consider which way the door would swing when opened.
Typically, pocket doors swing into the wall cavity when opened. This means that the door will slide into the hidden compartment within the wall, disappearing from view. However, it’s important to ensure that there is enough clearance for the door to slide and that it doesn’t collide with any obstacles or furniture.
On the floor plan, indicate the swing direction by drawing an arc or arrow that represents the direction in which the door will swing when opened. This will serve as a visual guide for understanding the door’s movement within the space.
Adding the swing direction allows you to visualize how the pocket door will function and how it will impact the surrounding furniture and layout of the room. It also helps to ensure that there is enough room for the door to operate smoothly.
With the swing direction added, you’re now one step closer to completing the floor plan representation of your pocket door. The next step is to label the pocket door for clarity and reference.
Step 6: Label the Pocket Door
Labeling the pocket door on the floor plan is an important step to clearly identify and differentiate it from other elements in the design. It helps to ensure that everyone involved in the project understands the purpose and location of the pocket door.
To label the pocket door, start by placing a text box or label next to the drawn opening. Inside the label, write “Pocket Door” or use any other descriptive term that accurately represents the door.
Include any additional details or specifications about the door, such as the door size, material, or any specific requirements or preferences. This information will provide further clarity and guidance during the construction or remodeling process.
Make sure that the label is clear and legible, using a font size and style that is easily readable on the floor plan. Consider using bold or larger text for the label to ensure that it stands out and is easily noticeable.
By labeling the pocket door, you create a clear reference point for anyone viewing the floor plan. It helps to avoid any confusion or misunderstandings about the presence and functionality of the pocket door.
With the pocket door labeled, you’re now ready to move on to the final step of including any additional details or specifications on the floor plan.
Step 7: Include any Additional Details
In the final step of drawing a pocket door on a floor plan, it’s important to include any additional details or specifications that are relevant to the design and installation of the door.
Consider factors such as the type of pocket door hardware you plan to use, such as handles or locks. Indicate their placement on the floor plan, ensuring that they align with the door opening and are easily accessible.
If there are any special considerations for the pocket door, such as soundproofing or fire-rated requirements, make a note of them on the floor plan. This will help ensure that the necessary measures are taken during the construction or remodeling process.
Additionally, if there are any specific materials or finishes you plan to use for the pocket door, such as glass panels or decorative trim, note them on the floor plan. This will serve as a reminder and reference point for the desired aesthetics of the door.
Include any relevant notes or comments that provide further instructions or guidance for the installation of the pocket door. This can include information about the track system, wall construction, or any other specific details that are important for a successful installation.
By including these additional details on the floor plan, you ensure that all aspects of the pocket door design and installation are accounted for. It serves as a comprehensive reference for both you and the construction team, ensuring a smooth and successful implementation of the pocket door.
With all the necessary details included, you have successfully completed the process of drawing a pocket door on a floor plan. This comprehensive representation will guide you throughout the construction or remodeling process, helping you turn your design vision into reality.
Conclusion
Incorporating a pocket door into your floor plan can be a practical and stylish solution to save space and enhance the functionality of a room. By following the steps outlined in this article, you can accurately draw a pocket door on your floor plan, ensuring a seamless integration into your design.
From identifying the location of the pocket door to determining the door size, drawing the opening, adding the swing direction, and labeling the door, each step plays a crucial role in creating an accurate representation of the pocket door on the floor plan.
Remember to consider the functionality, flow, and clearance requirements when choosing the location of your pocket door. Take precise measurements to determine the size of the door and ensure it fits perfectly within the opening.
When adding the swing direction, visualize how the door will operate and make sure there is enough clearance for smooth movement. Finally, label the pocket door and include any additional details or specifications to provide clarity and guidance throughout the construction process.
By following these steps and paying attention to the details, you can successfully incorporate a pocket door into your floor plan, enhancing the efficiency and aesthetics of your space.
So, whether you’re an architect, designer, or someone looking to modify your floor plan, don’t hesitate to explore the benefits of pocket doors. With proper planning and execution, these doors can transform your space while optimizing functionality and style.
Now, armed with the knowledge gained from this article, you can confidently take the next steps in bringing your pocket door design to life. Good luck on your project!
Ready to expand your understanding of home design? If you're curious about the basic elements of architectural drawings, our article on what a floor plan is will clarify all your doubts. Additionally, for those who enjoy practical DIY home improvements, learning how to install a towel bar in a wall with a pocket door can upgrade your skills and add functionality to your spaces. Dive into these reads to enhance your knowledge and tackle new projects with confidence!
Frequently Asked Questions about How To Draw A Pocket Door On A Floor Plan
Was this page helpful?
At Storables.com, we guarantee accurate and reliable information. Our content, validated by Expert Board Contributors, is crafted following stringent Editorial Policies. We're committed to providing you with well-researched, expert-backed insights for all your informational needs.


0 thoughts on “How To Draw A Pocket Door On A Floor Plan”