Home>diy>Architecture & Design>How To Draw A Sliding Door On A Floor Plan
Architecture & Design
How To Draw A Sliding Door On A Floor Plan
Modified: May 6, 2024
Learn how to draw a sliding door on a floor plan with our expert architecture design tips. Enhance your design skills and create functional spaces efficiently.
(Many of the links in this article redirect to a specific reviewed product. Your purchase of these products through affiliate links helps to generate commission for Storables.com, at no extra cost. Learn more)
Introduction
When it comes to designing architectural floor plans, it is essential to pay attention to every detail, including the placement and design of doors. Sliding doors are a popular choice for modern architecture due to their space-saving nature and sleek appearance. Drawing a sliding door on a floor plan may seem challenging, but with a step-by-step approach and the right techniques, it can be easily achieved.
In this article, we will guide you through the process of drawing a sliding door on a floor plan. Whether you are an aspiring architect, a design enthusiast, or a homeowner looking to renovate, this guide will equip you with the necessary knowledge and skills to create accurate and visually appealing floor plans.
Before we dive into the steps, let’s take a look at the materials you will need for this project.
Key Takeaways:
- Master the art of drawing sliding doors on floor plans with precision and accuracy using essential materials, step-by-step guidance, and attention to detail for visually appealing architectural designs.
- Incorporating sliding doors into floor plans enhances aesthetics and functionality, offering space-saving benefits and improved traffic flow, making them a valuable addition to modern architectural designs.
Read more: How To Draw A Door In A Floor Plan
Materials Needed
Before you begin drawing a sliding door on a floor plan, make sure you have the following materials:
- Pencil: A good quality pencil will allow you to make precise lines and easily erase any mistakes.
- Eraser: You’ll need a soft eraser to correct any errors or smudges on the floor plan.
- Ruler: A straight and sturdy ruler is essential for drawing straight lines and measuring distances accurately.
- Architectural scale: An architectural scale will help you maintain the correct proportions while drawing the sliding door on the floor plan.
- Graph paper or grid paper: Using graph paper or grid paper with premarked squares will make it easier to draw the floor plan to scale.
- Reference images: It’s always helpful to have reference images of sliding doors to get an idea of the design and details you want to incorporate into your floor plan.
Once you have gathered these materials, you are ready to begin drawing a sliding door on your floor plan.
Step 1: Start with the Floor Plan
The first step in drawing a sliding door on a floor plan is to have the floor plan itself. If you don’t have a floor plan yet, you can either create one from scratch or use an existing floor plan as a starting point.
If you are creating a floor plan from scratch, begin by sketching out the walls and basic layout of the space. Use your ruler and pencil to draw straight lines for the walls, ensuring that they are proportional to the actual dimensions of the room.
If you are using an existing floor plan, make sure to have a clean copy of it on graph or grid paper. This will make it easier to maintain accurate proportions and measurements as you add the sliding door.
Keep in mind that the scale of the floor plan should match the scale of the sliding door you plan to draw. This will ensure that the door fits proportionally within the space and doesn’t appear too large or too small.
Once you are satisfied with the floor plan’s layout and proportions, move on to the next step: determining the desired size and placement of the sliding door.
Step 2: Determine the Desired Size and Placement of the Sliding Door
Before you start drawing the sliding door on the floor plan, it’s essential to determine the size and placement of the door. This step is crucial in ensuring that the door fits seamlessly into the overall design of the space.
Take into consideration the function of the room, the traffic flow, and any specific requirements or preferences you have for the sliding door. Measure the width and height of the opening where you plan to install the door, keeping in mind the standard sizes available for sliding doors.
Next, decide on the placement of the sliding door within the room. Consider factors such as accessibility, privacy, and the overall layout of the space. Keep in mind that sliding doors require enough clearance area to slide open and closed smoothly.
Once you have determined the size and placement, mark these measurements on your floor plan using your ruler and pencil. Use your architectural scale to ensure accurate proportions and dimensions.
Now that you have the basic information and measurements, you can move on to drawing the rough outline of the sliding door on the floor plan.
Step 3: Draw the Rough Outline of the Sliding Door
Now that you have determined the size and placement of the sliding door, it’s time to draw the rough outline on the floor plan. This step will give you a visual representation of where the door will be located and how it will fit within the overall layout of the space.
Start by using your pencil and ruler to draw a straight line representing the bottom edge of the sliding door. Make sure the length of the line matches the width of the door opening you measured earlier.
Next, draw two vertical lines from each end of the bottom line to represent the sides of the door. The height of these lines should correspond to the height of the door opening. Ensure that the lines are parallel and evenly spaced.
Now, draw a horizontal line across the top to close the outline of the sliding door. Again, make sure the length of this line matches the width of the door opening.
If the door has a frame, you can add additional lines within the outline to represent the frame details. Use reference images to guide you in drawing the frame accurately.
Remember, at this stage, the focus is on creating a rough outline, so don’t worry about adding too many details. The primary goal is to visualize the position and size of the sliding door within the floor plan.
Once you are satisfied with the rough outline, it’s time to move on to adding the details of the sliding door.
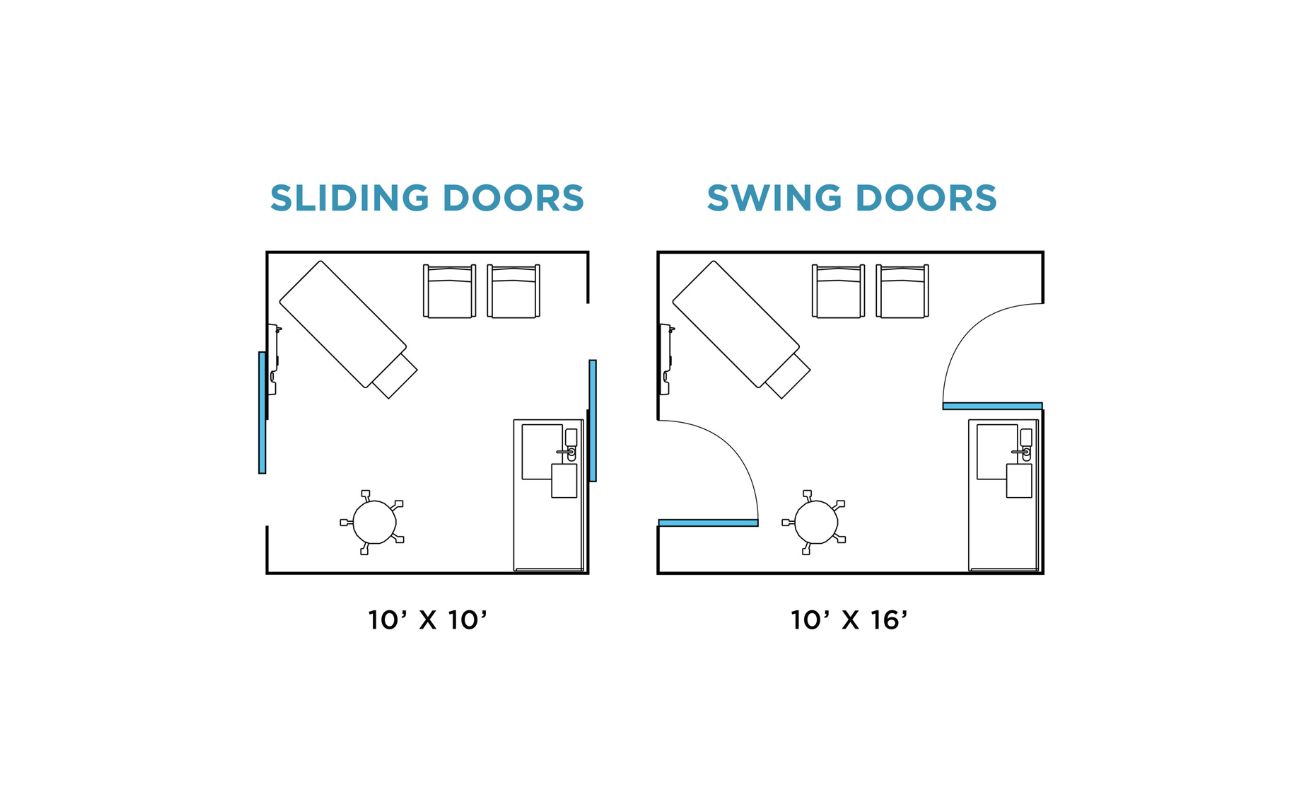
When drawing a sliding door on a floor plan, use a dashed line to represent the path of the door as it slides open and closed. This will differentiate it from regular swing doors.
Read more: How To Draw A Garage Door On A Floor Plan
Step 4: Add the Details of the Sliding Door
With the rough outline of the sliding door in place, it’s time to add the details that will bring it to life on the floor plan. These details will help accurately depict the design and features of the sliding door.
Start by adding the vertical lines within the rough outline to represent the panels of the sliding door. The number of panels will depend on the specific design and style of the door. Use your ruler to ensure that the lines are straight and evenly spaced.
If the sliding door has handles or knobs, make sure to add them as well. Draw small circles or rectangles at the appropriate location on the panels to represent the handles or knobs. Again, refer to reference images or the specific design of the sliding door you are drawing.
Include any additional details such as glass inserts, decorative patterns, or trim along the edges of the door. These details will enhance the visual accuracy and aesthetics of the sliding door on the floor plan.
Remember to use light and precise pencil strokes to add these details. You can always erase and make adjustments as needed until you are satisfied with the final depiction of the sliding door.
Once you have added all the necessary details, it’s time to label the sliding door on the floor plan.
Step 5: Label the Sliding Door
Now that you have drawn the sliding door with all its details, it’s important to label it on the floor plan to provide clarity and understanding. Adding labels will make it easier for others to interpret the floor plan and identify the presence of a sliding door.
Using your pencil or a fine-tip pen, write the word “Sliding Door” next to the drawing of the door. Place the label close to the door and ensure it is clearly legible. You can also indicate the dimensions of the door, including the width and height, if necessary.
If there are any specific notes or instructions related to the sliding door, you can add them as additional labels or annotations on the floor plan. For example, if the sliding door is soundproof or has a locking mechanism, it’s helpful to mention these details.
Make sure the labels are neat and easy to read, as they provide important information about the sliding door and how it functions within the space.
Now that you have labeled the sliding door on the floor plan, it’s time to double-check the accuracy of the drawing before finalizing it.
Step 6: Double Check the Accuracy of the Drawing
Before you finalize the drawing of the sliding door on the floor plan, it’s crucial to double-check its accuracy to ensure it aligns with the actual dimensions and specifications.
Start by reviewing the measurements you initially took for the size and placement of the sliding door. Compare these measurements with the dimensions you have drawn on the floor plan. Make any necessary adjustments to ensure they match.
Next, examine the details of the sliding door, such as the panels, handles, and any other features you have included. Compare them to your reference images or the design you are basing the drawing on. Make sure the details are accurate and in the appropriate locations.
Verify that the sliding door is correctly placed within the floor plan and consider how it interacts with the surrounding elements, such as walls, windows, and furniture. Adjust the position if needed to create a cohesive and functional layout.
Once you are satisfied with the accuracy of the drawing, go over the labels and annotations you added earlier. Check for any misspellings or unclear information. Make revisions as necessary to ensure the labels are concise and informative.
Finally, review the entire floor plan with the sliding door drawing to ensure it represents your design intentions accurately. Take a step back and examine the overall composition and flow of the space, considering how the sliding door contributes to the overall aesthetics and functionality.
If you are satisfied with the accuracy of the drawing and the placement of the sliding door, you can consider it finalized. Congratulations! You have successfully drawn a sliding door on a floor plan.
Close the process by taking a moment to appreciate your work and the effort you put into creating an accurate depiction of the sliding door. Your well-executed drawing will serve as a useful reference for yourself, clients, or contractors involved in the architectural project.
With this comprehensive guide, you now have the knowledge and skills to confidently draw a sliding door on a floor plan. Whether you are an architect, designer, or simply passionate about architecture, this skill will allow you to create visually appealing and functional designs.
Conclusion
Drawing a sliding door on a floor plan may initially seem daunting, but with the right approach and attention to detail, it can be an enjoyable and rewarding process. By following the step-by-step instructions outlined in this guide, you have learned how to accurately and effectively incorporate a sliding door into your floor plan.
Starting with a well-defined floor plan, you determined the desired size and placement of the sliding door, ensuring it aligns with the overall design and functionality of the space. You then drew a rough outline of the door, gradually adding details like panels, handles, and decorative elements to bring it to life.
Labeling the sliding door on the floor plan provided clarity and made it easier for others to understand and interpret the design. Finally, you double-checked the accuracy of the drawing, ensuring that the dimensions, details, and placement of the sliding door were correct.
By mastering the art of drawing sliding doors on floor plans, you have gained a valuable skill that can significantly enhance your architectural designs. Sliding doors not only contribute to the aesthetics of a space but also offer practical benefits such as space-saving and improved traffic flow.
Remember to utilize reference images, take accurate measurements, and pay attention to the specific details of the sliding door you are drawing. These elements will ensure that your floor plan accurately represents the sliding door and allows for seamless integration into the final architectural project.
So, whether you are designing a residential property, commercial space, or remodeling an existing structure, incorporating sliding doors into your floor plan will add a touch of modernity and functionality.
Now, armed with the knowledge and skills gained from this guide, you can confidently create stunning floor plans that showcase the elegance and versatility of sliding doors. Happy designing!
Now that you've mastered drawing a sliding door on a floor plan, why not expand your design skillset even further? Our next guide will walk you through creating precise and detailed CAD drawings. This skill is invaluable for anyone looking to delve deeper into architectural and engineering designs. With easy-to-follow instructions, you'll be drafting like a pro in no time. Don't miss out on this opportunity to refine your technical drawing capabilities!
Frequently Asked Questions about How To Draw A Sliding Door On A Floor Plan
Was this page helpful?
At Storables.com, we guarantee accurate and reliable information. Our content, validated by Expert Board Contributors, is crafted following stringent Editorial Policies. We're committed to providing you with well-researched, expert-backed insights for all your informational needs.


0 thoughts on “How To Draw A Sliding Door On A Floor Plan”