Home>diy>Architecture & Design>How To Draw An Evacuation Floor Plan
Architecture & Design
How To Draw An Evacuation Floor Plan
Modified: January 4, 2024
Learn how to create an efficient and comprehensive evacuation floor plan with our step-by-step guide. Our architecture design expertise ensures optimal safety measures.
(Many of the links in this article redirect to a specific reviewed product. Your purchase of these products through affiliate links helps to generate commission for Storables.com, at no extra cost. Learn more)
Introduction
When it comes to emergency preparedness, having a well-designed evacuation floor plan is crucial. Whether you are a building owner, facilities manager, or simply a concerned individual, understanding how to create an effective evacuation floor plan can make all the difference in ensuring the safety and well-being of occupants.
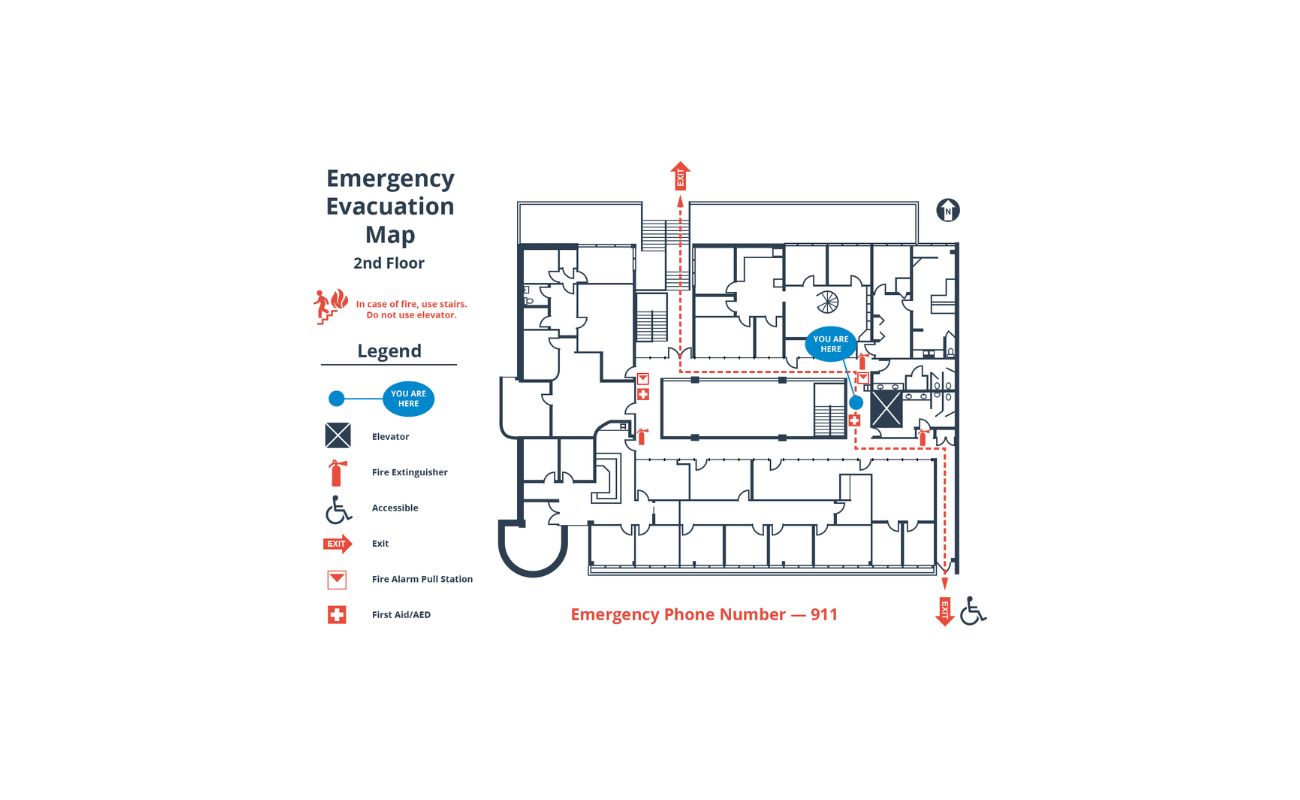
An evacuation floor plan is a visual representation of a building’s layout that highlights exit routes, emergency features, assembly points, and safe zones. It serves as a vital tool in emergencies such as fires, natural disasters, or other unforeseen situations where evacuation becomes necessary.
Creating an evacuation floor plan requires careful consideration of various factors, including the size and layout of the building, the number of occupants, and the location of emergency equipment. By following a systematic approach, you can create a comprehensive and effective evacuation floor plan that minimizes confusion and maximizes safety.
In this article, we will guide you through the step-by-step process of creating an evacuation floor plan. From gathering necessary information to finalizing the plan, we will cover all the essential elements to help you design an evacuation floor plan that meets your specific needs.
So, let’s dive in and explore how you can draw an evacuation floor plan to ensure the safety of everyone in a building!
Key Takeaways:
- Creating an effective evacuation floor plan involves gathering accurate information, measuring the floor plan with precision, and identifying exit routes and emergency features. Designating assembly points and safe zones is crucial for ensuring the safety of all occupants.
- Adding clear symbols and labels to the evacuation floor plan enhances visual communication during emergencies. Regularly reviewing and finalizing the plan, as well as ensuring compliance with regulations, are essential steps in creating a comprehensive and reliable evacuation strategy.
Read more: How To Draw A Door In A Floor Plan
Step 1: Gather Necessary Information
Before you begin creating an evacuation floor plan, it’s important to gather all the necessary information to ensure accuracy and completeness. This step sets the foundation for the entire process and helps you understand the unique requirements of the building and its occupants.
Here are some key pieces of information you need to collect:
- Building Layout and Dimensions: Obtain the architectural plans or blueprints of the building to understand its layout, including the number of floors, rooms, corridors, and stairwells. Measure the dimensions of each area accurately to create a scaled floor plan.
- Occupancy Limits and Regulatory Requirements: Determine the maximum occupancy of the building and any specific requirements mandated by local building codes and fire safety regulations. This information helps you allocate adequate space for evacuation routes and assembly points.
- Location of Emergency Equipment: Identify the placement of emergency equipment such as fire extinguishers, emergency exits, fire alarms, and automatic sprinkler systems. This information ensures that the evacuation floor plan includes clear markings for these crucial elements.
- Accessible Entrances and Exits: Consider the accessibility needs of individuals with disabilities and ensure that the evacuation floor plan includes designated accessible entrances, exits, and evacuation routes.
- Hazards and Obstacles: Assess the building for potential hazards or obstacles that may impede evacuation, such as stairwells blocked by clutter or narrow hallways. Take note of these areas and plan alternative escape routes, if necessary.
- Special Considerations: Take into account any unique factors specific to the building or its occupants, such as the presence of hazardous materials or the layout of high-security areas. These considerations may require additional measures in the evacuation floor plan.
Gathering this information is crucial for creating an evacuation floor plan that aligns with the specific needs and requirements of the building. It ensures that you have a solid understanding of the layout, potential hazards, and safety measures that need to be incorporated into the plan.
Once you’ve collected all the necessary information, you’re ready to move on to the next step: measuring and sketching the floor plan.
Step 2: Measure and Sketch the Floor Plan
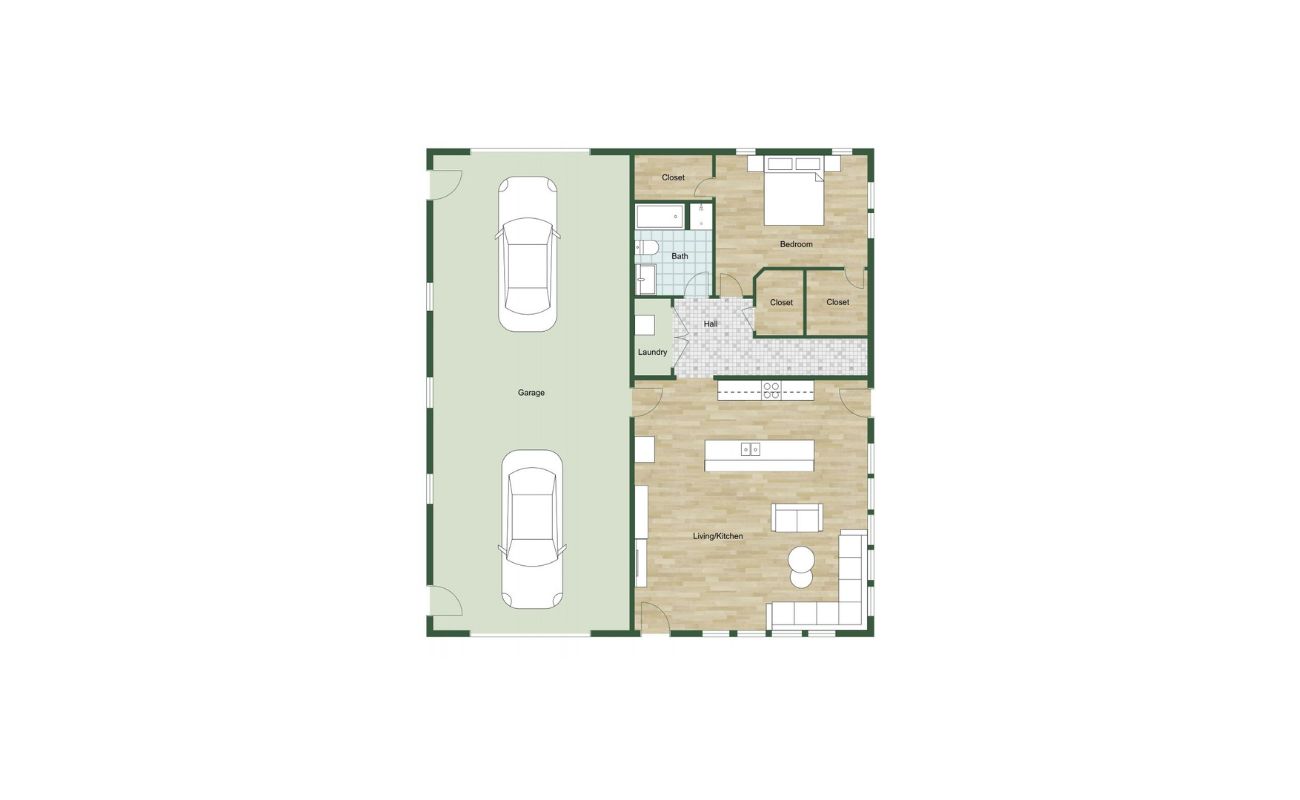
With the necessary information gathered, it’s time to measure and sketch the floor plan of the building. This step involves creating an accurate representation of the layout, including the dimensions and positioning of rooms, corridors, and other significant elements.
Follow these steps to measure and sketch the floor plan effectively:
- Measure the Dimensions: Use a measuring tape or laser measuring tool to measure the length and width of each room, corridor, and other relevant areas. Note down these measurements accurately, as they will serve as the basis for creating a scaled floor plan.
- Create a Scale: Determine a suitable scale for your floor plan to ensure that it fits on paper or a digital platform. Common scales for floor plans include 1:50 or 1:100, where 1 unit on the plan is equivalent to 50 or 100 units in real life, respectively.
- Sketch the Walls and Doors: Using a pencil or digital drawing tool, start by sketching the external walls of the building. Then, proceed to draw the interior walls, including any partition walls that separate rooms. Include doors and windows in their respective positions.
- Position Stairwells and Exits: Locate and mark the positions of stairwells, emergency exits, and fire escape routes. These elements are crucial for a successful evacuation and should be clearly visible on the floor plan.
- Indicate Room Numbers and Labels: Assign room numbers or labels to each area on the floor plan. This helps in identifying specific rooms during an emergency and facilitates communication with emergency responders.
- Add Furniture and Fixtures: If applicable, add furniture and fixtures to the floor plan to provide a more realistic representation of the space. However, keep in mind that the focus should be on creating clear evacuation routes rather than intricate details of decor.
As you measure and sketch the floor plan, aim for accuracy and consistency. Double-check your measurements and ensure that the proportions are correct based on the chosen scale. Take your time to create a clean and legible floor plan that will serve as a reliable guide during emergencies.
After completing the sketch, you are now ready to proceed to the next step: identifying exit routes and emergency features.
Step 3: Identify Exit Routes and Emergency Features
Now that you have a scaled floor plan, it’s time to identify the exit routes and emergency features within the building. This step involves determining the best paths for evacuation and locating important safety elements that assist in a smooth and safe evacuation process.
Follow these guidelines to effectively identify exit routes and emergency features:
- Identify Primary Exit Routes: Determine the main exit routes that occupants would typically use during an evacuation. These routes are usually the shortest and most direct paths to safety. Mark them clearly on the floor plan, using arrows to indicate the direction of travel.
- Designate Secondary Exit Routes: In addition to the primary exit routes, identify alternative or secondary routes. These routes come into play if the primary routes are blocked or unsafe. Ensure that these secondary routes are accessible and sufficiently marked on the floor plan.
- Highlight Emergency Exits: Locate and mark all emergency exits on the floor plan. These exits may include doors that lead to stairwells, exterior doors, or designated emergency exit doors. Clearly label these exits and include information on how to access them, such as “Push Bar to Open” or “Use Stairs Only.”
- Mark Fire Safety Equipment: Identify and mark the locations of fire safety equipment, such as fire extinguishers, fire alarms, and sprinkler systems. Highlight these features on the floor plan with appropriate symbols or labels to ensure they are easily visible during an emergency.
- Include Evacuation Aids: Take into account any evacuation aids that may be available within the building, such as evacuation chairs or evacuation slides. Clearly identify their locations on the floor plan and provide additional information on how to use them, if necessary.
- Consider Accessibility Needs: Pay attention to the accessibility requirements of individuals with disabilities. Make sure that exit routes and emergency features are accessible to all occupants. If ramps or other accommodations are necessary, indicate them on the floor plan and include details on their usage.
By identifying exit routes and emergency features, you provide crucial information for occupants to navigate to safety during an emergency. Having clear markings on the evacuation floor plan helps eliminate confusion and ensures a swift and orderly evacuation process.
Once you have identified the exit routes and emergency features, it’s time to move on to step 4: Designating assembly points and safe zones.
When drawing an evacuation floor plan, be sure to include all exits, emergency equipment locations, and evacuation routes. Label each area clearly for easy reference in case of an emergency.
Step 4: Designate Assembly Points and Safe Zones
During an emergency evacuation, it is essential to have designated assembly points and safe zones where occupants can gather and await further instructions or assistance. These areas provide a sense of organization and ensure that everyone is accounted for. In this step, you will determine and mark the assembly points and safe zones on the evacuation floor plan.
Consider the following steps when designating assembly points and safe zones:
- Identify Suitable Locations: Assess the surroundings of the building and find areas that are safe and easily accessible for assembly points. These areas may include open spaces, parking lots, fields, or other designated zones away from the building and potential hazards.
- Designate Primary Assembly Points: Choose primary assembly points based on the layout of the building and its occupancy capacity. These locations should be easily identifiable and have enough space to accommodate all occupants safely. Mark them on the evacuation floor plan with distinct symbols or labels.
- Assign Secondary Assembly Points: In the event that the primary assembly points are inaccessible or compromised, designate alternate or secondary assembly points. These locations should be strategically chosen to ensure safety and convenience for occupants. Indicate them clearly on the evacuation floor plan.
- Consider Safety Zones: Identify safe zones within the building where occupants can seek refuge in case immediate evacuation is not possible or advisable. These areas should be structurally sound and provide protection from fire, smoke, or other hazards. Mark them on the floor plan to aid emergency responders.
- Include Information and Instructions: Provide clear instructions on the evacuation floor plan about what individuals should do at assembly points and safe zones. Include information about staying calm, checking in with a designated personnel, and following any additional protocols specific to the building or organization.
- Account for Accessibility: Ensure that all chosen assembly points and safe zones are accessible to individuals with disabilities. Consider the availability of ramps, accessible paths, or other accommodations that may be required. Indicate these accessibility features on the evacuation floor plan.
By designating assembly points and safe zones, you create designated areas where occupants can regroup, receive further instructions, and ensure that no one is left behind during an emergency evacuation. These areas provide a sense of order and help emergency personnel in accounting for everyone’s safety.
With assembly points and safe zones marked on the evacuation floor plan, you are now ready to move on to step 5: Adding symbols and labels for clear communication during an emergency.
Read more: How To Draw A Shower On A Floor Plan
Step 5: Add Symbols and Labels
In order to effectively communicate important information during an emergency, it is crucial to add symbols and labels to the evacuation floor plan. These visual cues enhance understanding and enable quick decision-making for occupants and emergency responders. In this step, you will incorporate symbols and labels to convey essential information on the floor plan.
Follow these guidelines when adding symbols and labels:
- Exit Signs: Use universally recognized symbols for exit signs, such as an arrow pointing towards an open doorway. Place these symbols above or next to each emergency exit for easy identification.
- Emergency Equipment: Utilize symbols or icons to represent fire extinguishers, fire alarms, emergency lights, and any other safety equipment. Clearly label these symbols to indicate their specific locations.
- Assembly Points: Use distinctive symbols or markers to represent primary and secondary assembly points. Label them accordingly and provide additional instructions on how to gather at these locations.
- Safe Zones: Mark safe zones on the floor plan with a recognizable symbol, such as a shield or cross. Clearly label these areas to indicate their purpose and emphasize that occupants should seek refuge there if needed.
- Accessibility Features: Indicate ramps, accessible entrances/exits, and other accessibility features with appropriate symbols or labels. Consider incorporating the International Symbol of Accessibility (ISA) for wheelchair accessibility.
- Room Labels: Clearly label each room or area on the floor plan to assist emergency responders in locating specific areas quickly. Use numbers or names that align with the building’s directory or naming conventions.
- Additional Instructions: Include text labels or notes on the floor plan to provide specific instructions or important information related to evacuation procedures, such as “Stay low in case of smoke” or “Do not use elevators during an evacuation.”
When adding symbols and labels, keep in mind that they should be clear, concise, and easily understood by a wide range of individuals. Avoid cluttering the floor plan with excessive text or symbols, as it may lead to confusion during an emergency situation.
By incorporating symbols and labels on the evacuation floor plan, you enhance visual communication and provide occupants and emergency responders with essential information to navigate the building safely.
Now that you have added symbols and labels, you are ready for the next step: reviewing and finalizing the evacuation floor plan.
Step 6: Review and Finalize the Evacuation Floor Plan
Once you have completed the previous steps and added all necessary elements to the evacuation floor plan, it’s time to review and finalize it. This step ensures that the floor plan is accurate, clear, and ready for implementation during an emergency situation.
Follow these guidelines when reviewing and finalizing the evacuation floor plan:
- Accuracy Check: Double-check all measurements, dimensions, and symbols on the floor plan to ensure accuracy. Make sure that the scale is correct and all elements are properly scaled and aligned.
- Clarity and Legibility: Verify that all symbols, labels, and text on the floor plan are clear and legible. Ensure that there is sufficient contrast between the text and background and that the font size is easily readable, both in print and digital formats.
- Consistency: Ensure that symbols, labels, and formatting are consistent throughout the entire evacuation floor plan. This consistency helps with quick and intuitive comprehension during an emergency.
- Compliance with Regulations: Review the evacuation floor plan to ensure that it adheres to local building codes and fire safety regulations. Verify that all required elements, such as emergency exits and fire safety equipment, are included and accurately represented.
- Collaboration: Share the evacuation floor plan with relevant stakeholders, such as building owners, tenants, facilities managers, and safety personnel, for their input and feedback. Incorporate any necessary revisions or suggestions to ensure a comprehensive and reliable plan.
- Distribution: Once finalized, distribute copies of the evacuation floor plan to all relevant parties. Ensure that the plan is easily accessible to occupants, prominently displayed in common areas, and stored digitally for ease of reference.
By thoroughly reviewing and finalizing the evacuation floor plan, you can be confident that it is an accurate, comprehensive, and effective tool for emergency preparedness. Regularly revisit and reassess the plan to accommodate any changes in the building layout or occupancy, and update it accordingly.
Remember, the evacuation floor plan is a dynamic document that should be regularly reviewed, communicated to occupants, and practiced during drills. It serves as a vital guide in times of crisis and plays a crucial role in ensuring the safety and well-being of everyone within the building.
Congratulations! You have successfully completed all the steps to create an effective evacuation floor plan. By following this comprehensive process, you have equipped yourself with the knowledge and tools to design a plan that can save lives and minimize chaos during emergencies.
Stay prepared, stay safe!
Conclusion
Designing an evacuation floor plan is a critical step in ensuring the safety and well-being of occupants during emergencies. By following a systematic approach and incorporating key elements, you can create a comprehensive and effective evacuation floor plan that guides occupants to safety.
Throughout this article, we have explored the step-by-step process of creating an evacuation floor plan. From gathering necessary information and measuring the floor plan to identifying exit routes and emergency features, designating assembly points and safe zones, adding symbols and labels, and reviewing and finalizing the plan, each step plays a crucial role in the overall effectiveness of the plan.
Remember to gather accurate information about the building’s layout, occupancy limits, exit routes, and emergency equipment. Measure and sketch the floor plan with precision, incorporating symbols and labels to clearly communicate important elements. Designate assembly points and safe zones that are easily accessible and consider the needs of individuals with disabilities. Finally, review and finalize the plan to ensure accuracy and compliance with regulations.
An evacuation floor plan is not a one-time creation, but an evolving document that should be regularly updated, communicated to occupants, and practiced during emergency drills. It is essential to raise awareness about the plan, educate occupants on evacuation procedures, and keep the plan easily accessible in case of emergencies.
By creating and implementing a well-designed evacuation floor plan, you empower occupants to respond effectively and efficiently during crises. It provides them with clear guidance and helps emergency responders locate and assist those in need. Together, we can work towards creating safer environments and protecting lives.
Stay vigilant, stay prepared, and remember that a well-designed evacuation floor plan can make all the difference in ensuring the safety and well-being of everyone within a building.
Frequently Asked Questions about How To Draw An Evacuation Floor Plan
Was this page helpful?
At Storables.com, we guarantee accurate and reliable information. Our content, validated by Expert Board Contributors, is crafted following stringent Editorial Policies. We're committed to providing you with well-researched, expert-backed insights for all your informational needs.


0 thoughts on “How To Draw An Evacuation Floor Plan”