Home>Gardening & Outdoor>Outdoor Structures>How To Extend An RV Awning
Outdoor Structures
How To Extend An RV Awning
Modified: February 18, 2024
Learn how to extend your RV awning for outdoor shade and comfort. Follow our step-by-step guide for extending outdoor structures with ease.
(Many of the links in this article redirect to a specific reviewed product. Your purchase of these products through affiliate links helps to generate commission for Storables.com, at no extra cost. Learn more)
Introduction
Extending the awning of your RV can significantly enhance your outdoor experience, providing shade and protection from the elements. Whether you're looking to create a cozy outdoor living space or shield yourself from the sun's rays, extending your RV awning is a practical and rewarding endeavor. In this comprehensive guide, we will walk you through the step-by-step process of extending an RV awning, allowing you to enjoy the great outdoors in comfort and style.
Extending an RV awning requires careful preparation, precise measurements, and proper installation techniques. By following the outlined steps, you can ensure that the process is executed smoothly and efficiently, resulting in a well-extended and secure awning. Additionally, understanding the nuances of extending an RV awning can help you maintain the longevity and functionality of this essential outdoor structure.
Whether you're a seasoned RV enthusiast or a novice adventurer, learning how to extend an RV awning is a valuable skill that can elevate your outdoor escapades. From creating a shaded area for outdoor dining to providing a sheltered spot for relaxation, an extended RV awning opens up a world of possibilities for enjoying the natural beauty of your surroundings.
So, let's embark on this journey together as we delve into the intricacies of extending an RV awning. With the right tools, a bit of patience, and a willingness to learn, you'll soon be basking in the comfort and convenience of your extended RV awning. Let's get started!
Key Takeaways:
- Enjoy the great outdoors in comfort and style by extending your RV awning. Follow the step-by-step guide for a seamless process and create a shaded oasis for relaxation and outdoor dining.
- Master the art of extending an RV awning to elevate your outdoor experiences. Create a versatile and functional outdoor living space, providing shade, protection, and a cozy retreat for outdoor activities.
Read more: How To Fix An RV Awning
Step 1: Gather necessary tools and materials
Before embarking on the process of extending your RV awning, it's essential to gather the necessary tools and materials to ensure a smooth and efficient operation. Here's a comprehensive list of items you'll need:
Tools:
- Measuring Tape: Accurate measurements are crucial for a precise fit of the awning fabric.
- Ladder: A sturdy ladder will facilitate safe access to the RV awning for installation and adjustments.
- Screwdriver and Drill: These tools will be required for securing the awning fabric and making any necessary adjustments to the awning mechanism.
- Utility Knife: A sharp utility knife will be used for cutting the awning fabric to the required dimensions.
- Cleaning Supplies: It's important to have cleaning materials on hand to ensure the awning and its components are free from dirt and debris before installation.
Materials:
- Awning Fabric: Ensure you have the correct size and type of fabric for your RV awning, considering factors such as color, material durability, and UV protection.
- Awning Rail Lubricant: This will help in smoothly extending and retracting the awning.
- Fasteners and Screws: Depending on the type of RV awning, you may need specific fasteners and screws for securing the fabric and other components.
- Awning Repair Tape: Having this on hand can be useful for quick fixes or temporary repairs if the awning fabric gets damaged.
- Protective Gear: Safety should always be a priority, so ensure you have gloves and safety glasses to protect yourself during the installation process.
By gathering these essential tools and materials, you'll be well-prepared to proceed with the subsequent steps of extending your RV awning. This careful preparation will contribute to a successful and satisfying outcome, allowing you to enjoy the benefits of an extended RV awning with confidence and peace of mind.
Step 2: Prepare the RV awning
Preparing the RV awning is a crucial step that sets the foundation for a successful extension process. Before proceeding with the installation of the new fabric, it's essential to ensure that the existing awning is clean, free from damage, and in proper working condition. Here's a detailed breakdown of the preparatory measures involved in getting the RV awning ready for the next phase:
-
Inspect the Awning Mechanism: Begin by carefully examining the awning mechanism to check for any signs of wear, rust, or mechanical issues. Ensure that the arms, roller tube, and support brackets are structurally sound and functioning correctly. Any defects or malfunctions should be addressed before proceeding further.
-
Clean the Awning Fabric: Thoroughly clean the existing awning fabric using a mild detergent, a soft brush, and water. Pay close attention to any areas with stubborn stains or accumulated dirt. Rinse the fabric completely and allow it to dry before proceeding. A clean surface is essential for ensuring a smooth and secure attachment of the new fabric.
-
Lubricate Moving Parts: Apply a suitable awning rail lubricant to the roller tube and awning arms to ensure smooth and effortless extension and retraction of the awning. Proper lubrication minimizes friction and reduces the risk of damage to the new fabric during operation.
-
Check for Structural Integrity: Inspect the awning rail, ensuring that it is securely fastened to the RV and free from any signs of damage or corrosion. Additionally, examine the awning arms and support brackets to verify their stability and structural integrity. Any loose or damaged components should be addressed promptly.
-
Remove Obstructions: Clear the area surrounding the RV awning to create a safe and unobstructed workspace. Remove any debris, branches, or other potential obstructions that could interfere with the installation process or cause damage to the new fabric.
By meticulously preparing the RV awning, you can lay the groundwork for a seamless and successful extension process. This proactive approach not only ensures the structural integrity and functionality of the awning but also contributes to the longevity and performance of the newly installed fabric. With the awning properly prepared, you are now ready to proceed to the next steps of extending the RV awning, bringing you closer to enjoying the enhanced outdoor living space and protection it provides.
Read more: How To Retract An RV Awning
Step 3: Measure and cut the awning fabric
Accurate measurement and precise cutting of the awning fabric are critical steps in ensuring a proper fit and a visually appealing extension of the RV awning. Here's a detailed breakdown of the process involved in measuring and cutting the fabric:
-
Measure the Awning Length: Begin by measuring the length of the existing awning fabric from end to end. Use a reliable measuring tape to obtain precise measurements, ensuring that the fabric is fully extended during the measurement process. It's essential to record the exact length, as this will serve as a reference for cutting the new fabric to the appropriate size.
-
Determine the Width: Next, measure the width of the awning fabric, taking into account any additional fabric that wraps around the roller tube. This measurement should encompass the entire width of the fabric, including any hemmed edges or attachment points to the roller tube and awning arms.
-
Add Seam Allowance: When cutting the new fabric, it's important to include a seam allowance to facilitate secure attachment and prevent fraying. Typically, a seam allowance of 1-2 inches is recommended to ensure a clean and durable edge for the fabric.
-
Mark and Cut the Fabric: Using the measurements obtained, mark the new fabric with chalk or fabric-friendly markers, indicating the precise cutting lines. Exercise caution and precision during the cutting process to ensure straight and even edges. A sharp utility knife or fabric scissors can be used to cut the fabric along the marked lines, maintaining a steady hand to achieve clean and accurate cuts.
-
Double-Check Measurements: After cutting the fabric to size, double-check the measurements to verify accuracy and alignment with the dimensions of the RV awning. This additional step helps to identify any discrepancies and allows for adjustments before proceeding to the installation phase.
-
Inspect the Cut Edges: Once the fabric is cut to the required dimensions, inspect the cut edges to ensure they are free from fraying or unevenness. If necessary, carefully trim any stray threads or uneven sections to achieve a neat and professional finish.
By meticulously measuring and cutting the awning fabric, you can ensure a precise and tailored fit that enhances the aesthetic appeal and functionality of the extended RV awning. These meticulous preparations set the stage for the subsequent steps of attaching the fabric to the awning roller and securing it to the RV, bringing you closer to the realization of an extended RV awning that provides shade, comfort, and protection during your outdoor adventures.
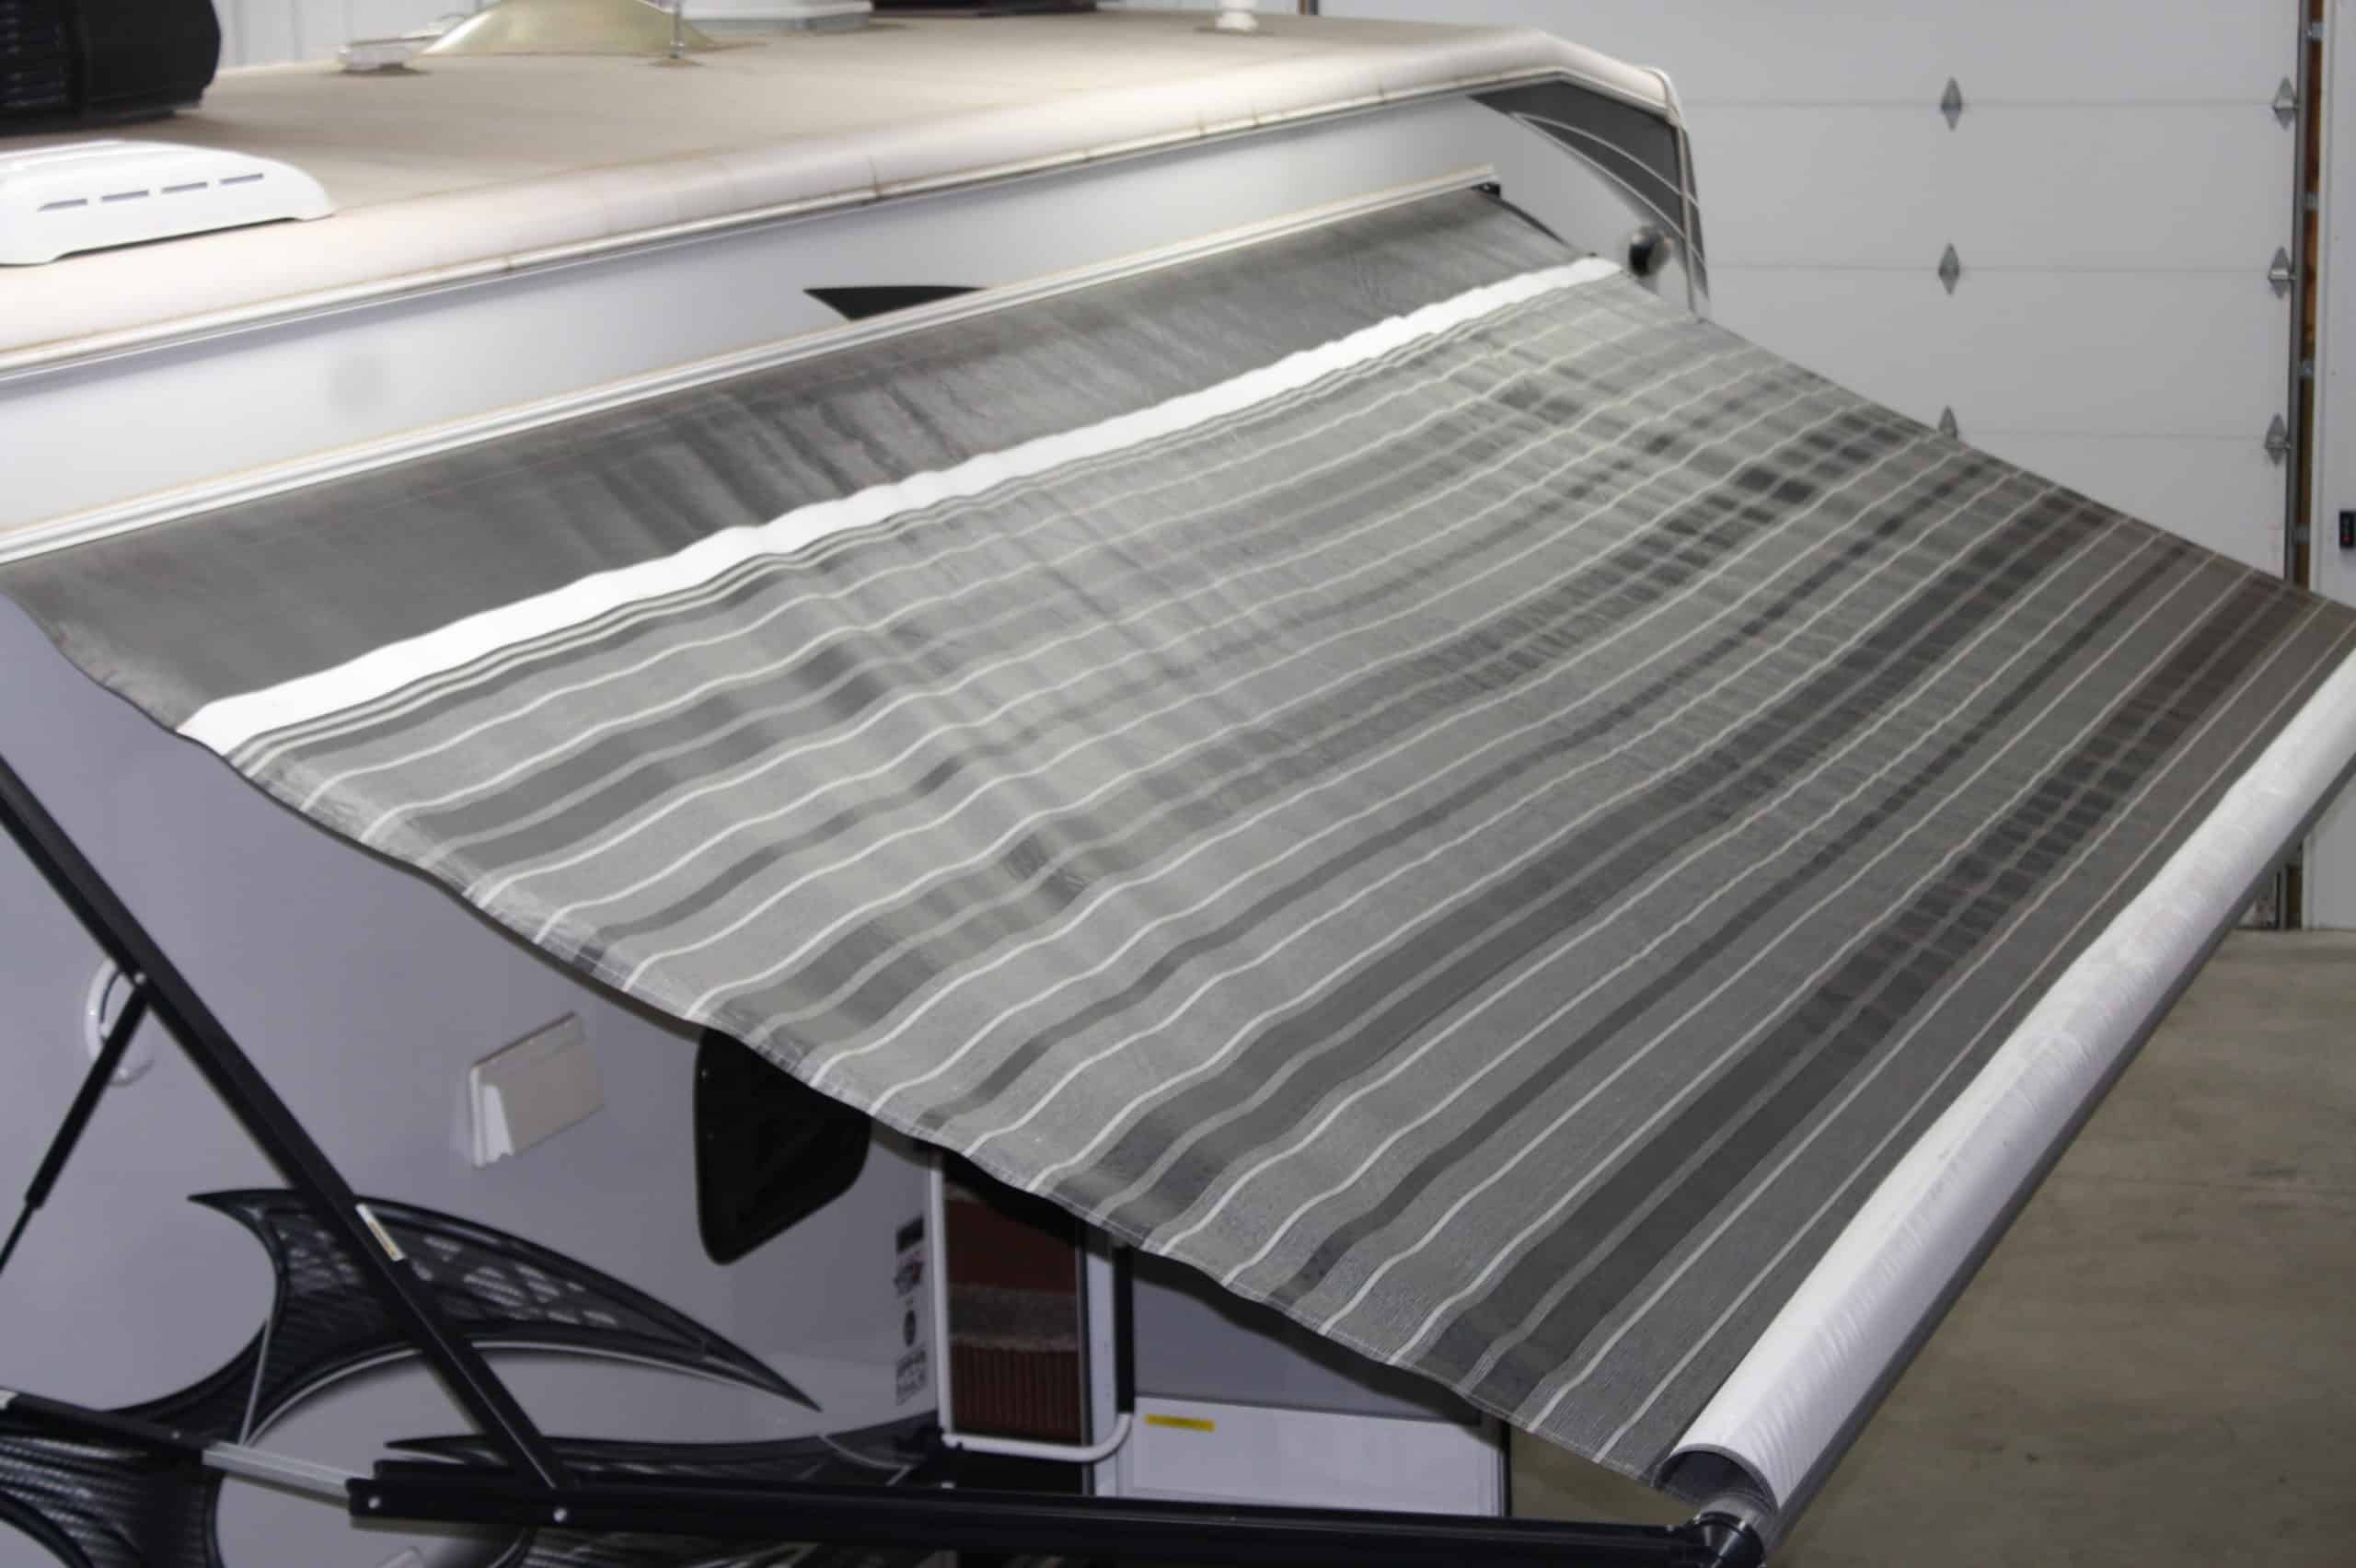
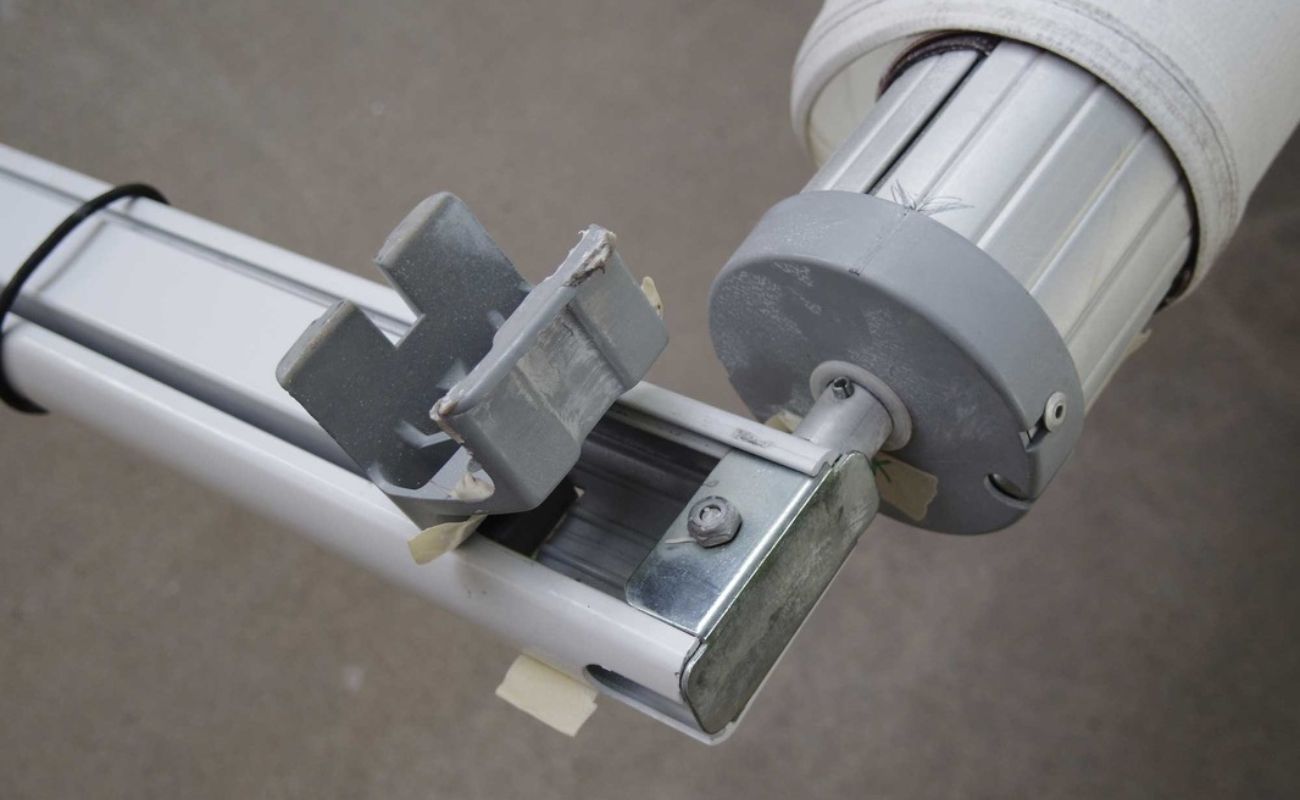
Step 4: Attach the fabric to the awning roller
Attaching the fabric to the awning roller is a pivotal step in the process of extending an RV awning, as it directly impacts the functionality and appearance of the extended structure. Here's a detailed breakdown of the procedure involved in securely attaching the fabric to the awning roller:
-
Positioning the Fabric: Begin by positioning the cut fabric at the designated attachment point on the awning roller. Ensure that the fabric is aligned evenly and smoothly, with the bottom edge positioned to facilitate proper tension and a clean appearance when extended.
-
Securing the Fabric: With the assistance of a partner or using a secure support mechanism, carefully attach the fabric to the awning roller. Depending on the specific design of the awning, this may involve sliding the fabric into a designated channel, utilizing integrated fastening mechanisms, or employing manual attachment methods.
-
Ensuring Tautness: As the fabric is attached to the awning roller, pay close attention to the level of tautness. It's essential to achieve a balanced level of tension across the fabric to prevent sagging or excessive strain on the roller mechanism. Adjust the positioning and tension as needed to achieve a smooth and taut fit.
-
Verifying Alignment: Double-check the alignment of the fabric to ensure that it is centered and evenly distributed along the length of the awning roller. This meticulous attention to detail contributes to a visually appealing and structurally sound extension of the RV awning.
-
Testing the Extension: Once the fabric is securely attached to the awning roller, test the extension and retraction of the awning to ensure smooth operation. Verify that the fabric moves evenly and without resistance, confirming that it is properly aligned and secured to the roller mechanism.
-
Making Adjustments: If any irregularities or issues are observed during the testing phase, make necessary adjustments to the fabric attachment and tension. This may involve repositioning the fabric, fine-tuning the tension, or addressing any potential obstructions that affect the smooth operation of the awning.
By meticulously following these steps and ensuring a secure and precise attachment of the fabric to the awning roller, you can lay the groundwork for a well-extended RV awning that enhances your outdoor experience. This meticulous attention to detail contributes to the longevity, functionality, and visual appeal of the extended RV awning, allowing you to enjoy the benefits of shade, comfort, and protection during your outdoor escapades.
Step 5: Secure the fabric to the RV
Securing the fabric to the RV is a critical step in the process of extending an RV awning, as it ensures stability, longevity, and proper functionality of the extended structure. Here's a detailed breakdown of the procedure involved in securely fastening the fabric to the RV:
-
Positioning and Alignment: Begin by carefully positioning the extended fabric along the RV, ensuring that it is evenly aligned and centered. Proper alignment is essential for achieving a visually appealing and structurally sound extension of the RV awning.
-
Attachment Points: Identify the designated attachment points on the RV where the fabric will be secured. These attachment points may include awning arms, support brackets, or other designated areas specifically designed for securing the awning fabric.
-
Fastening the Fabric: Utilize the appropriate fastening mechanisms or hardware to secure the fabric to the designated attachment points on the RV. This may involve using screws, bolts, or other fasteners that are compatible with the RV's structure and the type of awning being installed.
-
Ensuring Tension and Stability: As the fabric is secured to the RV, pay close attention to the level of tension and stability. It's crucial to achieve a balanced level of tension across the fabric to prevent sagging and ensure that it can withstand outdoor elements such as wind and rain.
-
Verifying Security: Double-check the security of the fabric attachment, ensuring that it is firmly fastened and resistant to movement or displacement. This meticulous verification process is essential for guaranteeing the long-term durability and performance of the extended RV awning.
-
Testing Stability: Once the fabric is securely fastened to the RV, conduct a stability test by gently tugging and applying light pressure to the fabric. This test helps to confirm the effectiveness of the attachment and ensures that the fabric remains firmly in place under normal usage conditions.
By meticulously following these steps and ensuring a secure and precise attachment of the fabric to the RV, you can establish a robust and reliable extension of the RV awning. This meticulous attention to detail contributes to the longevity, functionality, and visual appeal of the extended RV awning, allowing you to enjoy the benefits of shade, comfort, and protection during your outdoor escapades.
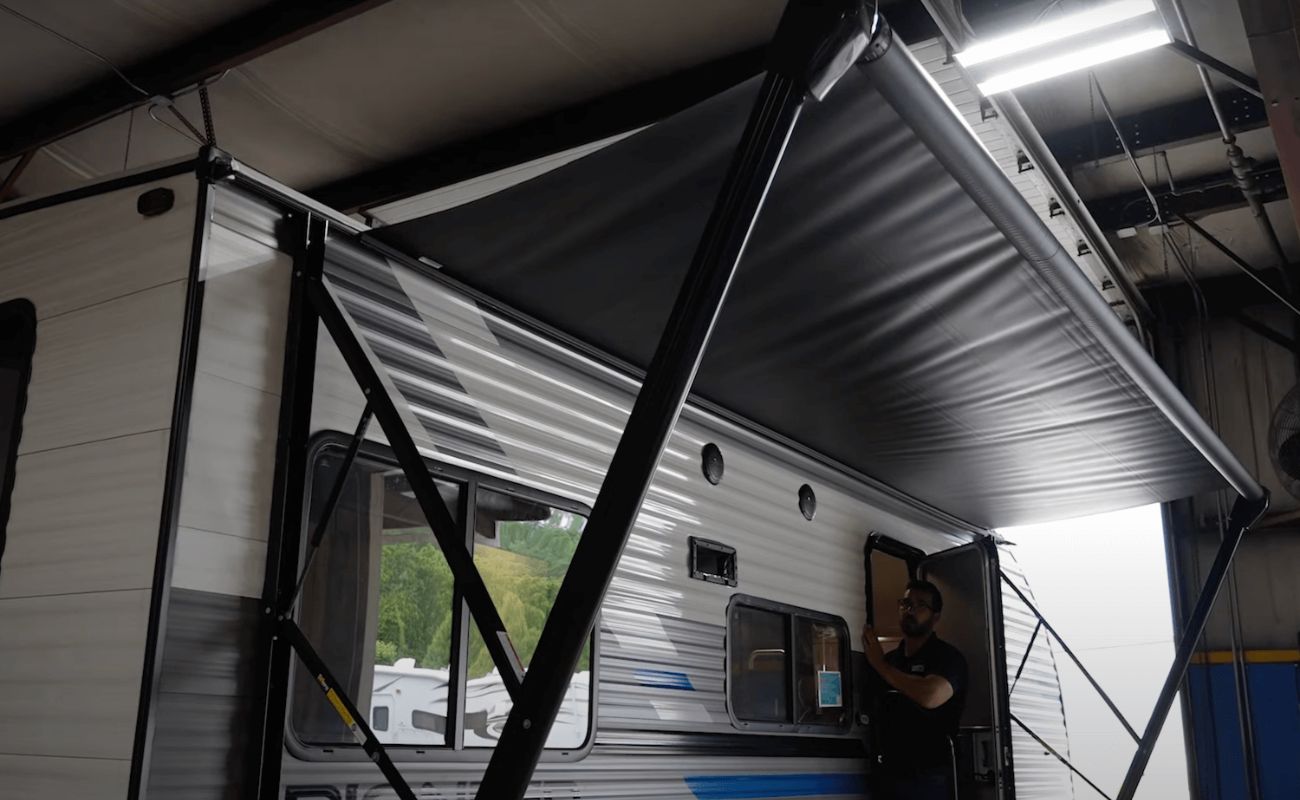
Step 6: Test the extended RV awning
After completing the installation and securing the fabric, it's crucial to conduct a comprehensive test of the extended RV awning to ensure its functionality, stability, and overall performance. This final step serves as a critical validation of the installation process and allows for any necessary adjustments before putting the awning to practical use.
Read more: How To Adjust An RV Awning
Extension and Retraction Test
Begin by extending the RV awning using the designated mechanism or controls. Observe the extension process carefully, ensuring that the fabric moves smoothly and evenly along the roller without any signs of binding or resistance. As the awning reaches its fully extended position, verify that it maintains a taut and even appearance, free from sagging or uneven tension.
Once the awning is fully extended, retract it back into its storage position to assess the retraction process. Confirm that the fabric retracts evenly and without difficulty, aligning neatly onto the roller without bunching or misalignment. This comprehensive extension and retraction test help to validate the proper functioning of the awning mechanism and the secure attachment of the fabric.
Stability and Wind Resistance Test
To evaluate the stability of the extended RV awning, subject it to a simulated wind resistance test. Apply gentle pressure to the fabric and observe its response to determine its ability to withstand light to moderate wind conditions. Additionally, consider conducting this test on a slightly windy day to assess the awning's performance under realistic outdoor conditions.
During the wind resistance test, pay close attention to the attachment points, fabric tension, and overall stability of the extended awning. Any signs of excessive movement, flapping, or instability may indicate the need for adjustments to enhance the awning's resistance to outdoor elements.
Visual Inspection
Conduct a thorough visual inspection of the extended RV awning from various angles to assess its appearance, alignment, and overall condition. Verify that the fabric is evenly tensioned, free from wrinkles or creases, and visually appealing when extended. Additionally, inspect the attachment points, fasteners, and fabric edges to ensure that they are secure and free from any signs of damage or wear.
Functional Assessment
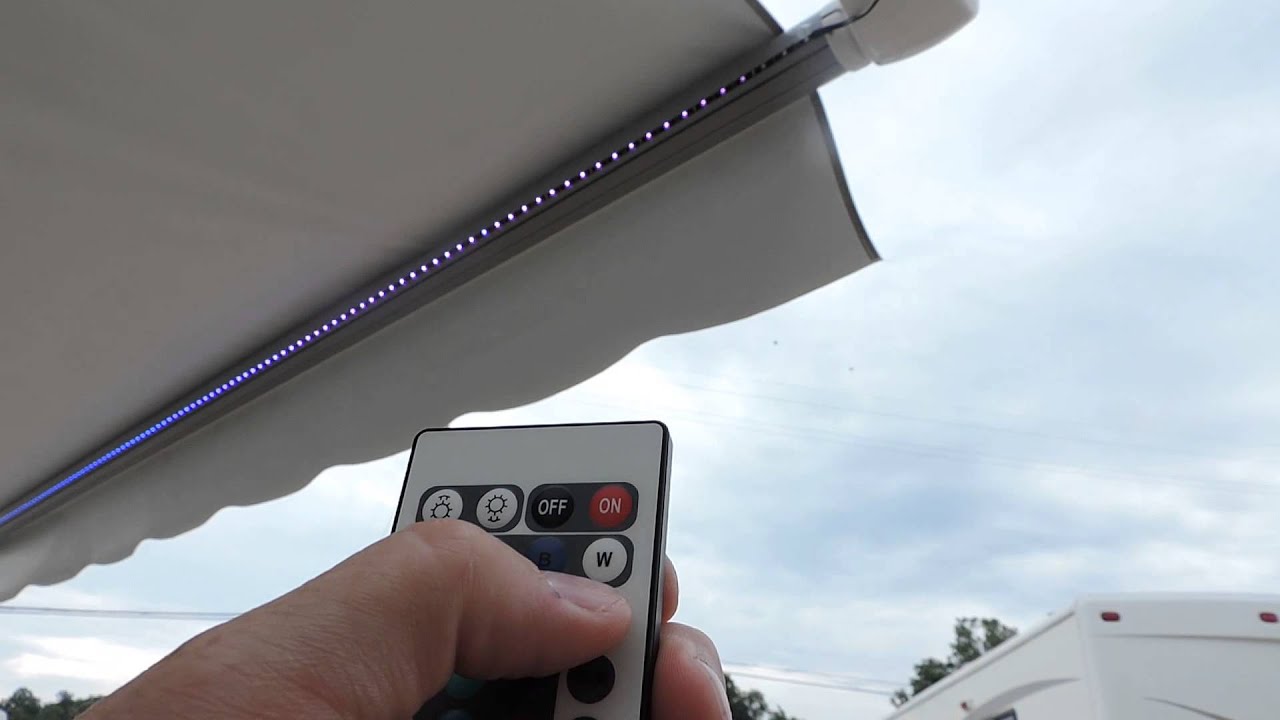
Test the functionality of any additional features or accessories integrated into the RV awning, such as LED lighting, wind sensors, or manual adjustment mechanisms. Verify that these features operate as intended and contribute to the overall convenience and usability of the extended awning.
By meticulously conducting these tests and assessments, you can ensure that the extended RV awning meets the highest standards of functionality, stability, and visual appeal. Any identified issues or areas for improvement can be promptly addressed, allowing you to enjoy the enhanced outdoor living space and protection provided by your meticulously extended RV awning.
When extending an RV awning, make sure to check for any obstructions or low-hanging branches to avoid damage. Always secure the awning properly to prevent it from being damaged by wind.
Read more: How To Install An Awning On An RV
Conclusion
In conclusion, the process of extending an RV awning encompasses a series of meticulous steps that culminate in the creation of a versatile and functional outdoor living space. By following the comprehensive guide outlined in this article, RV enthusiasts and outdoor adventurers can embark on the journey of extending their RV awnings with confidence and precision.
The careful preparation, precise measurements, and secure installation techniques detailed in the preceding steps are essential for ensuring the longevity, functionality, and visual appeal of the extended RV awning. From gathering the necessary tools and materials to conducting comprehensive tests of the installed awning, each step contributes to the seamless and successful extension of this essential outdoor structure.
Extending an RV awning not only enhances the comfort and convenience of outdoor activities but also provides a shaded retreat from the sun's rays and protection from light rain. The extended awning creates an inviting space for outdoor dining, relaxation, and socializing, allowing individuals and families to make the most of their outdoor adventures.
Furthermore, the meticulous attention to detail and the validation of the installation process through comprehensive testing ensure that the extended RV awning can withstand outdoor elements, including wind resistance and varying weather conditions. This robust and reliable extension of the RV awning contributes to the overall enjoyment and safety of outdoor experiences, whether at campsites, parks, or remote natural settings.
By mastering the art of extending an RV awning, outdoor enthusiasts can elevate their camping, road-tripping, and outdoor leisure experiences, creating a comfortable and inviting outdoor environment that complements the natural beauty of their surroundings. The extended RV awning serves as a versatile and practical addition to the RV lifestyle, offering a shaded oasis for relaxation, entertainment, and enjoyment of the great outdoors.
In essence, the process of extending an RV awning is a rewarding endeavor that empowers individuals to customize their outdoor living space, enhance their comfort, and embrace the freedom of outdoor exploration. With the knowledge and skills gained from this guide, adventurers can confidently extend their RV awnings, unlocking a world of possibilities for outdoor leisure and relaxation.
Frequently Asked Questions about How To Extend An RV Awning
Was this page helpful?
At Storables.com, we guarantee accurate and reliable information. Our content, validated by Expert Board Contributors, is crafted following stringent Editorial Policies. We're committed to providing you with well-researched, expert-backed insights for all your informational needs.

0 thoughts on “How To Extend An RV Awning”