Home>Gardening & Outdoor>Outdoor Structures>How To Repair An RV Awning Spring
Outdoor Structures
How To Repair An RV Awning Spring
Modified: March 2, 2024
Learn how to repair an RV awning spring and keep your outdoor structures in top condition with our step-by-step guide. Get expert tips and tricks now!
(Many of the links in this article redirect to a specific reviewed product. Your purchase of these products through affiliate links helps to generate commission for Storables.com, at no extra cost. Learn more)
Introduction
Welcome to the world of RV adventures! Owning an RV opens up a realm of possibilities for exploring the great outdoors, creating unforgettable memories, and enjoying the comforts of home while on the road. One essential component of any RV is the awning, which provides shade, protection from the elements, and an inviting outdoor space. However, like any mechanical system, RV awnings require maintenance and occasional repairs to ensure they function optimally.
In this guide, we will delve into the intricacies of repairing an RV awning spring. The awning spring plays a crucial role in the functionality of the awning, as it facilitates smooth extension and retraction of the fabric. Over time, due to exposure to the elements and regular usage, the spring may encounter wear and tear, leading to issues such as difficulty in retracting the awning or uneven extension.
Fear not, as we embark on this journey of understanding and repairing the RV awning spring, you will gain the knowledge and confidence to tackle this task with ease. Whether you are a seasoned RV enthusiast or a novice embarking on your first outdoor adventure, learning the ins and outs of RV maintenance empowers you to keep your home on wheels in top-notch condition.
So, grab your toolbox, put on your DIY hat, and let's dive into the world of RV awning spring repair. By the end of this guide, you will be equipped with the know-how to troubleshoot, repair, and maintain your RV awning spring, ensuring many more enjoyable outdoor experiences in the years to come.
Key Takeaways:
- Repairing an RV awning spring involves safety precautions, fabric removal, spring assessment, repair, fabric reattachment, and thorough testing. It’s a hands-on process that ensures a smooth and reliable awning operation for outdoor adventures.
- Understanding the awning spring’s role, gathering tools, and following step-by-step repair instructions empowers RV owners to maintain and optimize their outdoor experience. It’s a journey of resourcefulness, resilience, and commitment to RV care.
Read more: How To Fix An RV Awning
Understanding the RV Awning Spring
Before delving into the repair process, it’s essential to grasp the fundamental role of the RV awning spring. The awning spring is a critical component that enables the smooth extension and retraction of the awning fabric. It operates on a tension-based mechanism, storing energy when the awning is retracted and releasing it to extend the fabric when needed.
RV awning springs come in various types, including torsion springs and extension springs, each with its unique characteristics and mechanisms. Torsion springs are commonly found in retractable awnings and operate by twisting to store energy, while extension springs extend and contract to facilitate the movement of the awning fabric.
Understanding the type of spring in your RV awning is crucial for the repair process, as it dictates the specific repair techniques and precautions to be taken. Additionally, familiarizing yourself with the signs of a faulty awning spring, such as difficulty in retracting the awning, uneven extension, or visible wear and tear, allows for timely intervention to prevent further damage.
Moreover, comprehending the anatomy of the awning assembly, including the roller tube, fabric, and support arms, provides a holistic view of how the spring interacts with these components. This knowledge serves as a foundation for troubleshooting and pinpointing the root cause of any issues affecting the awning’s functionality.
By gaining insight into the intricacies of the RV awning spring, you are better equipped to approach the repair process with confidence and precision. With this understanding in mind, let’s proceed to gather the necessary tools and materials for repairing the RV awning spring.
Tools and Materials Needed
Before embarking on the repair of your RV awning spring, it’s essential to gather the necessary tools and materials to ensure a smooth and efficient repair process. Here’s a comprehensive list of items you will need:
Tools:
- Adjustable wrench
- Screwdriver set (flathead and Phillips)
- Socket set
- Rubber mallet
- Needle-nose pliers
- Protective gloves and eyewear
- Tape measure
- Wire brush
- Step ladder or platform (if necessary for reaching the awning)
Materials:
- Replacement spring (if the existing spring is damaged beyond repair)
- Lubricant suitable for awning components
- Clean rags or towels
- Rust-inhibiting spray or solution
- Protective tarp or ground cover
- Penetrating oil (for stubborn or rusted components)
Having these tools and materials at your disposal ensures that you are well-prepared to address various aspects of the repair process, from disassembly and assessment to actual spring repair and reassembly. Additionally, safety should always be a priority, so don’t forget to wear protective gear, including gloves and eyewear, to shield yourself from potential hazards during the repair.
With the tools and materials gathered, you are now ready to proceed with the first step of the repair process: safety precautions. Taking the time to implement safety measures sets the stage for a successful and secure repair experience.
Read more: How To Retract An RV Awning
Step 1: Safety Precautions
Prior to initiating any repair work on your RV awning spring, it’s crucial to prioritize safety to prevent accidents and ensure a smooth repair process. Here are essential safety precautions to observe:
1. Power and Energy Isolation:
Before commencing the repair, ensure that all power sources to the RV are disconnected. This includes retracting the awning and turning off any electrical components that may pose a hazard during the repair process. Additionally, if your RV is equipped with a motorized awning, follow the manufacturer’s guidelines for disabling the power source and engaging any manual override mechanisms.
2. Stabilization and Support:
To prevent unexpected movement or shifting of the RV, ensure that it is parked on a level surface and securely stabilized using leveling jacks or blocks. This provides a stable working environment and minimizes the risk of the RV shifting during the repair.
3. Personal Protective Equipment (PPE):
Wear appropriate personal protective equipment, including gloves and eyewear, to safeguard against potential injuries from sharp edges, debris, or chemical agents such as lubricants and rust inhibitors used during the repair.
Read more: How To Adjust An RV Awning
4. Height and Ladder Safety:
If accessing the awning requires the use of a ladder or elevated platform, ensure that it is set up on stable ground, and adhere to ladder safety guidelines. Always maintain three points of contact when ascending or descending the ladder, and never overextend your reach while working at heights.
5. Work Area Clearance:
Clear the work area of any obstacles, tripping hazards, or clutter that may impede your movement or pose a safety risk during the repair. This includes ensuring ample space around the awning assembly to maneuver and perform the necessary repair tasks.
By adhering to these safety precautions, you establish a secure working environment and minimize the likelihood of accidents or mishaps during the repair process. Once safety measures are in place, you can proceed with confidence to the next step: removing the awning fabric to access the spring assembly.
Step 2: Removing the Awning Fabric
With safety measures in place, the next crucial step in repairing the RV awning spring is to remove the awning fabric to gain access to the spring assembly. This process allows for a thorough assessment of the spring and facilitates its repair or replacement. Here’s a detailed guide on how to remove the awning fabric:
1. Retract the Awning:
If the awning is extended, carefully retract it according to the manufacturer’s instructions. Ensure that the fabric is evenly and fully retracted to provide ample clearance for the subsequent steps.
Read more: How To Extend An RV Awning
2. Support the Awning:
Once retracted, secure the awning in place using the appropriate support mechanisms, such as awning arms or braces, to prevent it from unexpectedly extending during the removal process.
3. Locate the Fabric Fasteners:
Identify the fasteners securing the awning fabric to the roller tube. These may be in the form of screws, bolts, or fabric retaining mechanisms, depending on the awning model.
4. Loosen and Remove Fasteners:
Using the appropriate tools from your toolkit, carefully loosen and remove the fasteners that secure the awning fabric to the roller tube. Take care to keep track of the fasteners and store them in a secure location for reassembly.
5. Detach the Fabric:
With the fasteners removed, gently detach the awning fabric from the roller tube, ensuring that it is free from any remaining attachments. Exercise caution to prevent any sudden unrolling or movement of the fabric during this process.
Read more: How To Install An Awning On An RV
6. Secure and Store the Fabric:
Once detached, carefully roll and secure the awning fabric to prevent damage or unravelling. Consider using straps or ties to keep the fabric neatly bundled during the repair process. Store the fabric in a clean and dry location to protect it from dirt or damage.
By following these steps, you can effectively remove the awning fabric, granting access to the spring assembly for assessment and repair. With the fabric safely removed, you are ready to proceed to the next phase: locating and assessing the RV awning spring.
Step 3: Locating and Assessing the Spring
With the awning fabric successfully removed, the next pivotal stage in repairing the RV awning spring is to locate and assess the condition of the spring assembly. This step allows for a comprehensive evaluation of the spring’s functionality, identifying any signs of wear, damage, or misalignment. Here’s a detailed guide on how to locate and assess the RV awning spring:
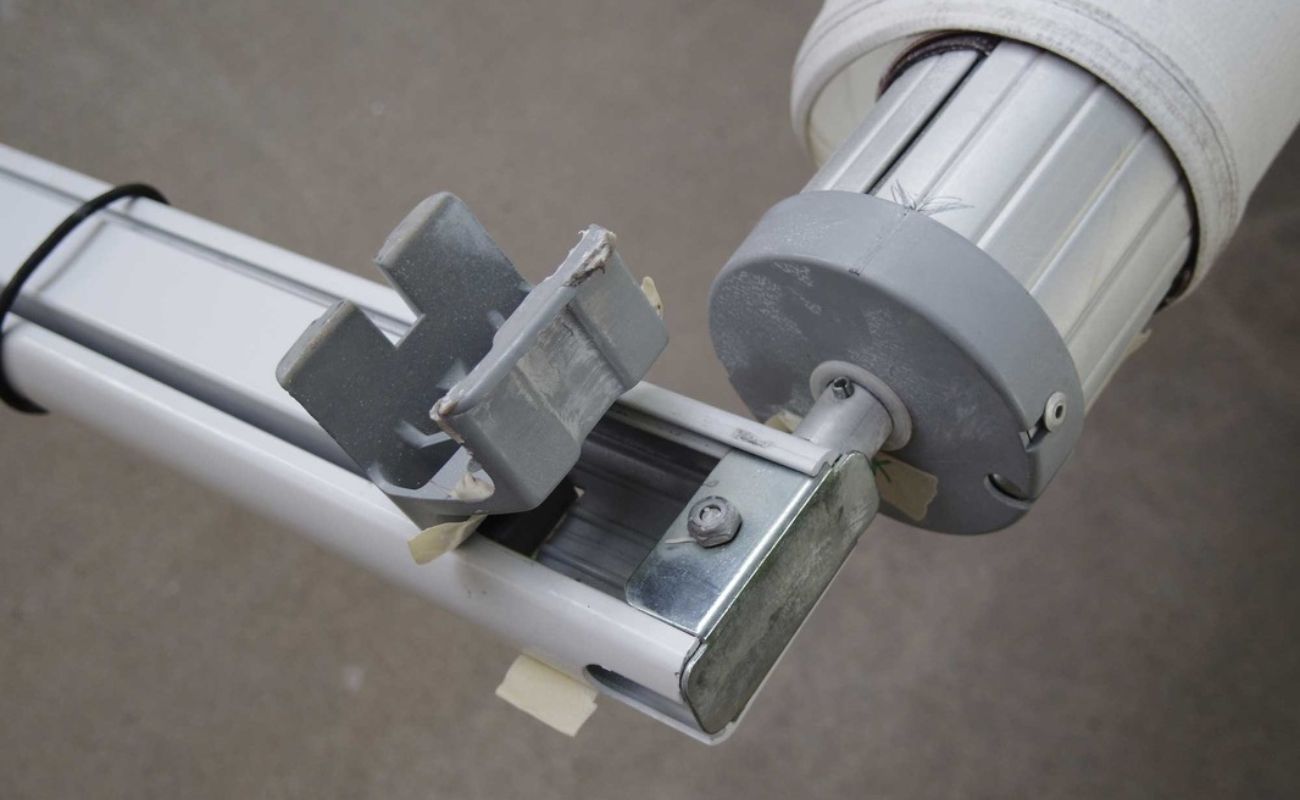
1. Identify the Spring Housing:
Begin by locating the housing or casing that encloses the awning spring. This is typically situated near the roller tube and is secured within the awning assembly structure.
2. Inspect the Spring Assembly:
Carefully examine the spring assembly for any visible signs of wear, corrosion, or damage. Pay close attention to the spring coils, end fittings, and mounting points to assess their condition.
Read more: How To Replace Fabric On An RV Awning
3. Check for Tension and Alignment:
Assess the tension of the spring by observing its position and evaluating any slack or over-tensioning. Additionally, ensure that the spring is aligned correctly within its housing and that there are no obstructions impeding its movement.
4. Evaluate Spring Movement:
Test the movement of the spring by gently extending and retracting the awning assembly. Observe the spring’s response and note any irregularities, such as resistance, uneven extension, or audible creaking or grinding noises.
5. Assess End Fittings and Fastenings:
Inspect the end fittings and fastenings that secure the spring within its housing. Verify that they are intact, free from damage, and securely anchored to prevent any potential hazards or malfunctions.
6. Document Findings:
Take note of your observations and document the condition of the spring assembly, including any areas requiring repair or potential replacement. This documentation serves as a reference for the subsequent repair steps and informs the necessary course of action.
By diligently locating and assessing the RV awning spring, you gain valuable insights into its condition and functionality, laying the groundwork for the subsequent repair process. With a comprehensive understanding of the spring’s status, you are poised to embark on the next phase: repairing the spring to restore optimal functionality to your RV awning.
Read more: How To Replace RV Awning Struts
Step 4: Repairing the Spring
Having assessed the condition of the RV awning spring, the next critical phase involves repairing the spring to address any identified issues and restore its optimal functionality. The repair process may encompass various tasks, ranging from lubrication and realignment to spring replacement, depending on the spring’s condition. Here’s a comprehensive guide on how to repair the RV awning spring:
1. Lubrication and Maintenance:
If the spring exhibits signs of stiffness or resistance during movement, applying a suitable awning lubricant can help restore smooth operation. Apply the lubricant to the spring coils and pivot points as per the manufacturer’s recommendations to enhance the spring’s functionality.
2. Spring Realignment:
In cases where the spring is misaligned within its housing, carefully adjust its position to ensure proper alignment and tension. Take caution to avoid over-tightening or misaligning the spring, as this can impact its performance and longevity.
3. Spring Tension Adjustment:
If the spring’s tension is compromised, follow the manufacturer’s guidelines for adjusting the tension to the appropriate level. This may involve tightening or loosening the spring to achieve the desired tension for smooth extension and retraction of the awning fabric.
Read more: How To Install Led Strip Lights On RV Awning
4. Spring Replacement:
In instances where the spring is severely damaged, corroded, or beyond repair, consider replacing it with a suitable replacement spring. Refer to the RV awning’s manual or seek professional guidance to select the correct replacement spring that aligns with the awning’s specifications.
5. Secure End Fittings and Fastenings:
Ensure that the end fittings and fastenings securing the spring within its housing are securely tightened and free from damage. Replace any worn or damaged fittings to maintain the integrity and safety of the spring assembly.
6. Test Spring Functionality:
After completing the repair tasks, test the functionality of the spring by extending and retracting the awning assembly. Observe the spring’s response and verify that it operates smoothly and evenly without any resistance or irregularities.
By diligently executing the repair tasks, you can effectively address any issues affecting the RV awning spring, restoring its functionality and ensuring reliable operation. With the spring repaired, you are now prepared to proceed to the subsequent step: reattaching the awning fabric to complete the repair process.
Step 5: Reattaching the Awning Fabric
With the RV awning spring repaired and fully functional, the next crucial phase involves reattaching the awning fabric to the roller tube, completing the repair process. Proper reattachment ensures that the fabric operates smoothly in conjunction with the repaired spring, restoring the awning to its optimal condition. Here’s a comprehensive guide on how to reattach the awning fabric:
Read also: 15 Unbelievable Rv Solar Panel For 2025
1. Unroll the Fabric:
Carefully unroll the awning fabric, ensuring that it is free from any tangles or obstructions. Lay it out evenly to prepare for reattachment to the roller tube.
2. Position the Fabric:
Align the awning fabric with the roller tube, ensuring that it is centered and evenly positioned for reattachment. Take care to prevent any twists or uneven distribution of the fabric along the length of the roller tube.
3. Secure the Fabric Fasteners:
Using the appropriate fasteners and tools, reattach the awning fabric to the roller tube. Follow the manufacturer’s guidelines for securing the fabric, ensuring that the fasteners are tightened securely to prevent slippage or detachment during operation.
4. Tension the Fabric:
If applicable, adjust the tension settings on the roller tube to ensure that the awning fabric is taut and evenly distributed when extended. Proper tensioning prevents sagging and ensures a smooth extension and retraction of the fabric.
Read more: What Is An Awning
5. Test Fabric Operation:
Extend and retract the awning to test the fabric’s operation in conjunction with the repaired spring. Verify that the fabric extends uniformly and retracts smoothly, indicating successful reattachment and compatibility with the repaired spring.
6. Inspect and Adjust:
Thoroughly inspect the reattached fabric for any signs of misalignment, wrinkles, or tension irregularities. Make any necessary adjustments to ensure that the fabric operates seamlessly and exhibits a uniform appearance when extended.
By meticulously reattaching the awning fabric, you complete the repair process, ensuring that the fabric operates harmoniously with the repaired spring, restoring the awning to its fully functional state. With the fabric securely reattached, you are now ready to proceed to the final step: testing the repair to validate the successful restoration of your RV awning.
Step 6: Testing the Repair
As the repair process nears completion, it is crucial to perform a comprehensive test to validate the successful restoration of your RV awning. Testing the repair ensures that the awning, including the spring and fabric, operates seamlessly and reliably, providing confidence in its functionality for future outdoor adventures. Here’s a detailed guide on how to test the repair of your RV awning:
1. Extension and Retraction:
Initiate the test by extending the awning to its full length, observing the smoothness and uniformity of the extension process. Verify that the fabric extends evenly without any resistance or jerky movements, indicating the proper functionality of the repaired spring.
Read more: How To Sew An Awning
2. Partial Extension Test:
Test the awning’s partial extension capability by retracting it partially and then extending it once more. This test ensures that the spring and fabric operate harmoniously, allowing for incremental adjustments and smooth retraction without any irregularities.
3. Wind and Tension Test:
Assess the awning’s resilience to gentle wind or breeze by observing its stability and the fabric’s ability to remain taut. Additionally, verify that the tension settings, if adjustable, maintain the fabric’s tautness without sagging or excessive slack.
4. Repeated Extension and Retraction:
Perform multiple cycles of extending and retracting the awning to simulate real-world usage scenarios. Observe the consistency of operation and verify that the repaired spring and reattached fabric maintain their smooth functionality throughout the test.
5. Visual Inspection:
Thoroughly inspect the entire awning assembly, including the spring, fabric, and fasteners, for any signs of abnormalities or malfunctions. Look for any unexpected movements, unusual sounds, or visible wear during the testing process.
Read more: How Much To Replace Garage Door Spring
6. Final Adjustment and Maintenance:
Based on the test observations, make any final adjustments to the tension, alignment, or lubrication to optimize the awning’s functionality. Additionally, consider implementing a regular maintenance schedule to preserve the awning’s performance and longevity.
By conducting a rigorous test of the repair, you ensure that the RV awning, including the spring and fabric, operates flawlessly, providing peace of mind and reliability for your outdoor excursions. With the successful completion of the testing phase, you can confidently conclude the repair process, knowing that your RV awning is restored to its optimal condition.
Conclusion
Congratulations on successfully navigating the intricate process of repairing your RV awning spring! By embarking on this repair journey, you have demonstrated a commendable commitment to maintaining and optimizing your RV’s essential components, ensuring that your outdoor adventures are enriched with comfort and functionality.
Throughout this comprehensive guide, we’ve explored the pivotal steps involved in repairing the RV awning spring, from understanding its fundamental role to executing the repair and conducting thorough testing. By delving into the intricacies of the awning spring and fabric, you’ve gained valuable insights and practical skills that empower you to address maintenance and repair tasks with confidence.
By prioritizing safety precautions, gathering the necessary tools and materials, and meticulously executing each step of the repair process, you’ve not only restored the functionality of your RV awning but also cultivated a deeper understanding of the mechanical systems that enrich your outdoor experiences.
As you conclude this repair endeavor, it’s essential to carry forward the spirit of proactive maintenance and care for your RV. Regular inspections, timely repairs, and proactive measures to preserve the awning’s integrity will ensure that it continues to enhance your outdoor adventures for years to come.
Remember, the knowledge and skills you’ve acquired in repairing the RV awning spring extend beyond this specific task. They embody a mindset of resourcefulness, resilience, and a hands-on approach to maintaining the cherished components of your RV.
As you bask in the satisfaction of a successfully repaired RV awning, may your future outdoor escapades be imbued with comfort, convenience, and the enduring joy of exploration. Your dedication to preserving and optimizing your RV’s functionality is a testament to the spirit of adventure and the unwavering commitment to creating lasting memories on the open road.
Here’s to many more unforgettable journeys, made even more delightful by the reliable and meticulously maintained RV awning that stands as a testament to your dedication and expertise.
Frequently Asked Questions about How To Repair An RV Awning Spring
Was this page helpful?
At Storables.com, we guarantee accurate and reliable information. Our content, validated by Expert Board Contributors, is crafted following stringent Editorial Policies. We're committed to providing you with well-researched, expert-backed insights for all your informational needs.

0 thoughts on “How To Repair An RV Awning Spring”