Home>Gardening & Outdoor>Outdoor Structures>How To Install Shed Door Hinges
Outdoor Structures
How To Install Shed Door Hinges
Modified: August 27, 2024
Learn how to install shed door hinges for your outdoor structures with our step-by-step guide. Get expert tips and advice on outdoor structure maintenance.
(Many of the links in this article redirect to a specific reviewed product. Your purchase of these products through affiliate links helps to generate commission for Storables.com, at no extra cost. Learn more)
Introduction
So, you've finally decided to install shed door hinges. Congratulations! This simple yet crucial task can significantly enhance the functionality and aesthetics of your shed. Whether you're a seasoned DIY enthusiast or just starting to explore the world of outdoor structures, learning how to install shed door hinges is a valuable skill that can save you time and money in the long run.
In this comprehensive guide, we'll walk you through the step-by-step process of installing shed door hinges with precision and confidence. From gathering the necessary tools and materials to adjusting the hinges for seamless operation, we've got you covered. By the end of this tutorial, you'll have the knowledge and skills to tackle this project with ease, ensuring that your shed door operates smoothly and securely.
But before we dive into the nitty-gritty details, let's take a moment to understand the significance of shed door hinges. These humble yet essential components play a pivotal role in maintaining the structural integrity of your shed while allowing for smooth opening and closing. By installing high-quality hinges correctly, you can ensure that your shed door functions optimally, providing convenient access to your tools, equipment, or whatever treasures lie within.
So, grab your tools, put on your DIY cap, and let's embark on this rewarding journey of installing shed door hinges. Whether you're revamping an old shed or customizing a new one, this guide will equip you with the knowledge and confidence to tackle this project like a pro. Let's get started!
Key Takeaways:
- Master the art of installing shed door hinges with precision and confidence, ensuring smooth functionality and secure operation for your outdoor structure.
- From gathering tools to adjusting hinges, this guide equips you with valuable DIY skills to enhance your shed’s practicality and your craftsmanship.
Read more: How To Mount Hinges On A Shed Door
Tools and Materials Needed
Before you begin the installation process, it’s essential to gather the necessary tools and materials to ensure a smooth and efficient workflow. Here’s a comprehensive list of what you’ll need:
Tools:
- Screwdriver (electric or manual)
- Tape measure
- Pencil or marker
- Drill
- Chisel
- Hammer
- Level
- Adjustable wrench
- Safety goggles
- Gloves
Materials:
- High-quality shed door hinges (consider the size and weight of your shed door)
- Screws (appropriate length for the hinges and your shed door material)
- Wood filler (if applicable)
- Paint or stain (if you plan to finish the hinges for added protection and aesthetics)
Having these tools and materials on hand will streamline the installation process and ensure that you’re well-prepared to tackle any challenges that may arise. Additionally, it’s important to prioritize safety by wearing protective gear, especially when using power tools and handling heavy materials. With everything in place, you’re ready to move on to the next steps of preparing the shed door for hinge installation.
Preparing the Shed Door
Before diving into the installation of shed door hinges, it’s crucial to prepare the shed door to ensure a seamless and secure fit. Here’s a step-by-step guide to preparing the shed door for hinge installation:
Read more: How To Install Hinges On Cabinet Doors
1. Assess the Door and Frame:
Begin by carefully examining the shed door and frame. Ensure that the door is clean and free of any debris or obstructions that could impede the installation process. Additionally, check the frame for any irregularities or damage that may need to be addressed before proceeding.
2. Determine Hinge Placement:
Based on the size and weight of your shed door, determine the appropriate placement of the hinges. Typically, three hinges are recommended for optimal support and stability. Use a tape measure and pencil to mark the precise locations for the hinges on the door and frame, ensuring that they align correctly.
3. Pre-Drill Screw Holes:
Using a drill bit that matches the size of the screws, pre-drill pilot holes for the hinge screws. This step is essential for preventing wood splitting and ensuring that the screws will securely fasten the hinges to the door and frame without causing damage.
4. Chisel Mortises (If Necessary):
If you’re installing inset hinges that require mortises, use a chisel to carefully carve out the recessed areas on the door and frame. Take precise measurements and exercise caution to create clean and accurate mortises that accommodate the hinges perfectly.
Read more: Troubleshooting Door Hinge Problems
5. Test Fit the Hinges:
Prior to attaching the hinges with screws, perform a test fit to ensure that they align properly and allow the door to open and close smoothly. Make any necessary adjustments to the hinge placement or mortises to achieve the ideal fit before proceeding.
By meticulously preparing the shed door for hinge installation, you’ll lay the foundation for a successful and durable outcome. Taking the time to assess, measure, and test fit the hinges will contribute to the overall functionality and longevity of your shed door. With the door primed and ready, you’re now equipped to move on to the next crucial step: installing the hinges.
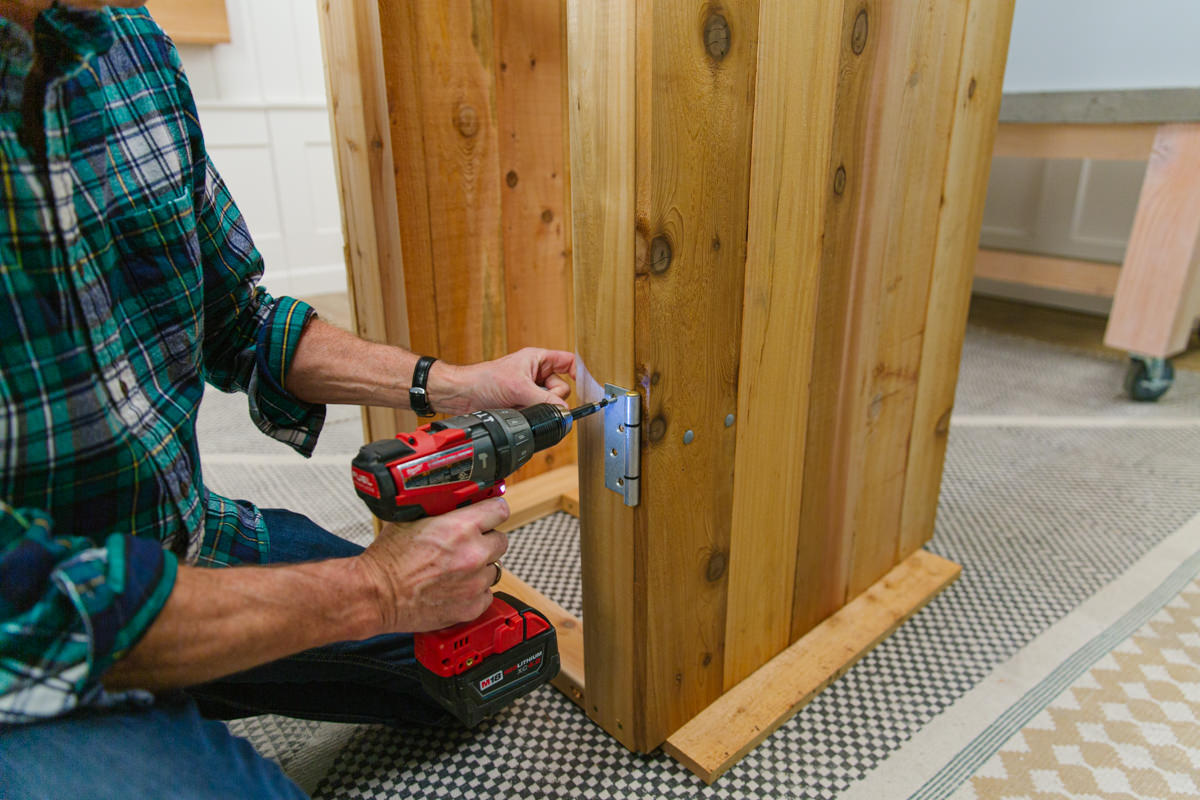
Installing the Hinges
With the shed door properly prepared, it’s time to embark on the pivotal stage of installing the hinges. This step-by-step process will guide you through the precise installation of shed door hinges, ensuring a secure and reliable attachment that facilitates smooth door operation.
1. Align the Hinges:
Begin by aligning the hinges with the pre-marked locations on the shed door and frame. Ensure that the hinges are positioned accurately, maintaining uniform spacing and alignment to support the weight of the door effectively.
2. Secure the Hinges with Screws:
Using the appropriate screws for the job, fasten the hinges to the shed door and frame. Start by securing the screws in the pre-drilled pilot holes, gradually tightening them to achieve a firm and stable attachment. Exercise caution to avoid over-tightening, which could strip the screws or compromise the integrity of the hinges.
Read more: How To Fix A Storm Door Hinge
3. Check for Smooth Movement:
After attaching the hinges, carefully test the door’s movement to ensure that it opens and closes smoothly without any obstructions or misalignments. If you encounter any issues, such as resistance or uneven movement, revisit the hinge attachment and make necessary adjustments to optimize the door’s operation.
4. Verify Stability and Alignment:
Inspect the hinges to confirm that they are securely fastened and provide stable support for the shed door. Additionally, check the alignment of the door within the frame to ensure that it closes flush and maintains proper clearance on all sides.
5. Apply Finishing Touches (Optional):
If desired, consider applying a protective finish, such as paint or stain, to the installed hinges. This additional step can enhance the durability of the hinges, safeguarding them against environmental elements and adding a touch of aesthetic appeal to your shed door.
By meticulously executing the installation of shed door hinges, you’ll establish a foundation for optimal functionality and longevity. With the hinges securely in place, your shed door is poised to deliver reliable performance and effortless operation. As you transition to the final phase of this process, it’s essential to ensure that the hinges are properly adjusted to maximize their effectiveness. Let’s explore the crucial step of adjusting the hinges to fine-tune the door’s functionality.
Adjusting the Hinges
Once the shed door hinges are securely installed, it’s essential to fine-tune their alignment and operation through the adjustment process. This critical step ensures that the door opens and closes smoothly while maintaining proper clearance and alignment within the frame. Here’s a detailed guide to adjusting the hinges for optimal functionality:
Read more: How To Fix A Cabinet Door Hinge
1. Evaluate the Door’s Movement:
Open and close the shed door to assess its movement and alignment within the frame. Pay attention to any areas of resistance, uneven gaps, or misalignment that may require adjustment. This initial evaluation will guide your approach to fine-tuning the hinges.
2. Loosen Hinge Screws:
To facilitate hinge adjustment, carefully loosen the screws that secure the hinges to the shed door and frame. Avoid removing the screws entirely, as you’ll need them in place to maintain hinge positioning while making adjustments.
3. Align the Door:
With the hinge screws loosened, gently manipulate the door’s position to achieve optimal alignment within the frame. Ensure that the door closes flush and maintains uniform clearance along all edges. This step may require gradual adjustments and repeated testing to achieve the desired alignment.
4. Tighten Hinge Screws:
Once the door is properly aligned within the frame, carefully tighten the hinge screws to secure the adjusted position. Exercise caution to maintain the door’s alignment while ensuring that the hinges are firmly attached to support its weight and movement.
Read more: How To Install Vinyl Siding On A Shed Door
5. Test the Door’s Operation:
After adjusting and securing the hinges, thoroughly test the shed door’s operation to confirm that it opens and closes smoothly without any obstructions or misalignments. Pay close attention to the door’s movement and alignment, making further adjustments if necessary to optimize its functionality.
By meticulously adjusting the hinges, you’ll fine-tune the shed door’s operation, ensuring seamless movement and proper alignment within the frame. This critical step enhances the overall functionality and longevity of the door, contributing to a secure and reliable structure for your outdoor storage needs. With the hinges adjusted to perfection, your shed door is ready to serve its purpose with efficiency and ease.
Conclusion
Congratulations on mastering the art of installing shed door hinges! By following this comprehensive guide, you’ve gained valuable insights and practical skills that will serve you well in your DIY endeavors. As you reflect on the journey from gathering tools and materials to meticulously adjusting the hinges, it’s clear that attention to detail and precision are key ingredients for a successful outcome.
With the shed door hinges expertly installed and adjusted, your outdoor structure is now equipped with a vital component that ensures smooth functionality and secure operation. Whether you’re storing gardening tools, outdoor equipment, or creating a cozy workshop, the reliability of your shed door hinges will play a crucial role in safeguarding your belongings and facilitating convenient access.
As you admire your handiwork, take pride in the knowledge that you’ve not only enhanced the practicality of your shed but also honed your DIY skills. The ability to tackle essential projects like installing shed door hinges empowers you to take control of your outdoor space, infusing it with personalized touches and functional enhancements.
Remember, the journey doesn’t end here. As you embark on future DIY projects and explore the world of outdoor structures, the expertise you’ve gained from this experience will continue to guide you. Whether it’s building a pergola, constructing a deck, or revamping your garden shed, the confidence and proficiency you’ve acquired will be invaluable assets.
So, as you bid farewell to this chapter of your DIY adventure, carry forward the spirit of craftsmanship and the joy of transforming ideas into tangible, functional realities. Your newfound expertise in installing shed door hinges is just the beginning of a fulfilling journey filled with creativity, innovation, and the satisfaction of mastering new skills.
Now, go forth and let your DIY spirit soar, knowing that you have the knowledge and capability to turn every project into a resounding success. Happy crafting!
Frequently Asked Questions about How To Install Shed Door Hinges
Was this page helpful?
At Storables.com, we guarantee accurate and reliable information. Our content, validated by Expert Board Contributors, is crafted following stringent Editorial Policies. We're committed to providing you with well-researched, expert-backed insights for all your informational needs.


0 thoughts on “How To Install Shed Door Hinges”