Home>Gardening & Outdoor>Outdoor Structures>How To Refelt A Shed Roof
Outdoor Structures
How To Refelt A Shed Roof
Modified: August 27, 2024
Learn how to refelt a shed roof with our step-by-step guide for outdoor structures. Keep your shed protected and looking great!
(Many of the links in this article redirect to a specific reviewed product. Your purchase of these products through affiliate links helps to generate commission for Storables.com, at no extra cost. Learn more)
Introduction
So, your shed has been a reliable storage space for years, weathering storms and sheltering your outdoor essentials. But lately, you’ve noticed that the roof is showing signs of wear and tear. Perhaps the felt has started to crack, tear, or even come loose in places. It’s time to give your shed a little TLC by refelting the roof.
Refelting a shed roof may seem like a daunting task, but with the right materials, a bit of elbow grease, and a can-do attitude, it’s a project that you can tackle with confidence. Not only will a fresh layer of felt enhance the aesthetic appeal of your shed, but it will also provide essential protection against the elements, ensuring that your belongings stay safe and dry.
In this comprehensive guide, we’ll walk you through the step-by-step process of refelting your shed roof. From gathering the necessary materials to inspecting the roof deck and installing the new felt, we’ve got you covered. So, roll up your sleeves, put on your DIY hat, and let’s revitalize your shed by giving its roof a much-needed makeover.
Key Takeaways:
- Refelting a shed roof is a DIY project that requires careful preparation, thorough inspection, and precise installation. By following the step-by-step process, you can revitalize your shed and protect your outdoor belongings effectively.
- Proper maintenance and periodic inspections are essential for prolonging the longevity of a shed roof. By staying proactive and addressing signs of wear promptly, you can preserve its protective capabilities and add renewed charm to your outdoor space.
Read more: How To Roof A Flat Roof Shed
Materials Needed
Before diving into the refelting process, it’s essential to gather all the necessary materials. Here’s a rundown of what you’ll need:
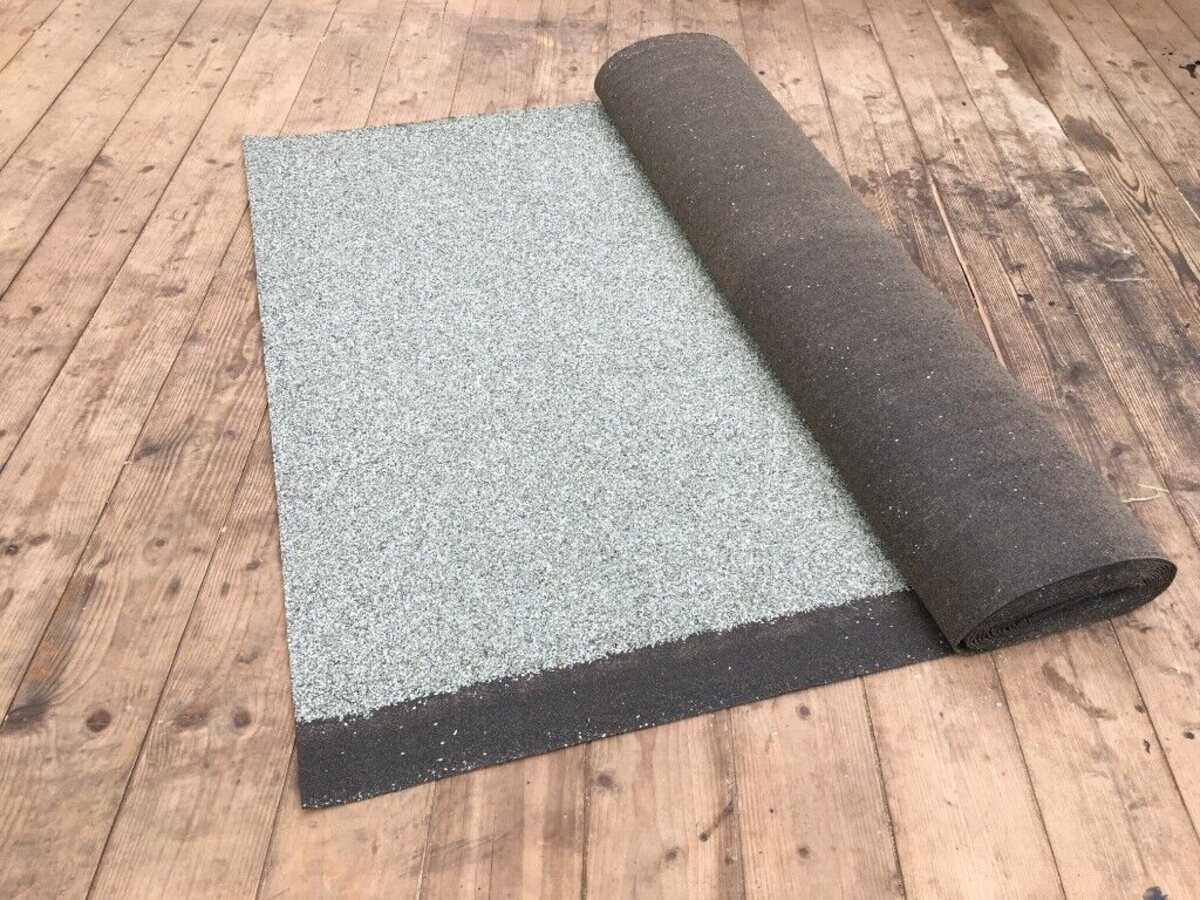
1. Roofing Felt:
Opt for high-quality roofing felt that is durable and weather-resistant. Ensure that the dimensions match the size of your shed roof to provide adequate coverage.
2. Roofing Nails:
Choose galvanized or stainless steel roofing nails to secure the new felt to the roof deck effectively.
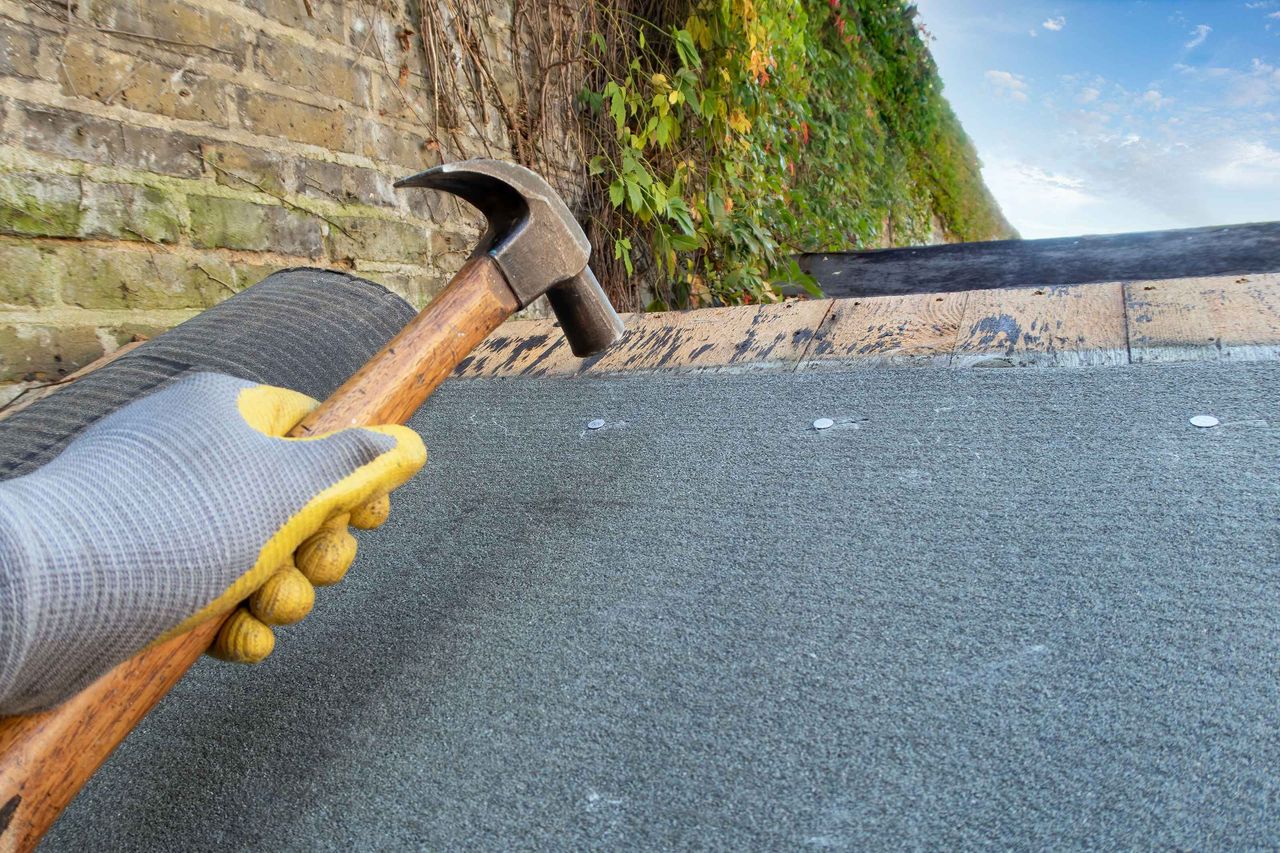
3. Hammer:
A sturdy hammer will be your trusty companion for driving in the roofing nails with precision.
Read more: How To Tie A Shed Roof Into An Existing Roof
4. Utility Knife:
You’ll need a sharp utility knife for cutting the roofing felt to the appropriate size and making precise adjustments during installation.
5. Ladder:
Ensure you have a stable and secure ladder that allows safe access to the shed roof.
6. Safety Gear:
Wear protective gloves, safety goggles, and sturdy footwear to safeguard yourself during the refelting process.
7. Roofing Adhesive (Optional):
Depending on the specific requirements of your shed roof, roofing adhesive may be necessary to provide additional reinforcement for the felt.
Read more: How To Attach Shed Roof To Existing Roof
8. Roofing Cement (Optional):
If your shed roof has specific areas that require sealing, roofing cement can be used to ensure watertight protection.
By ensuring that you have all these materials on hand, you’ll be well-prepared to undertake the refelting project efficiently and effectively.
Preparing the Shed Roof
Before you begin the process of refelting the shed roof, it’s crucial to prepare the area and ensure that you have a clean and stable foundation for the new felt. Here’s how to get started:
1. Clear the Surrounding Area:
Remove any debris, such as leaves, branches, or dirt, from the roof and its immediate surroundings. This will create a safe and clutter-free workspace for the refelting project.
2. Inspect the Roof Structure:
Take a close look at the overall condition of the roof structure. Check for any signs of damage, such as rotting wood or weakened supports. It’s essential to address any structural issues before proceeding with the refelting process to ensure the long-term integrity of the shed.
Read more: How To Install A Shed Roof
3. Assess the Existing Felt:
Examine the current felt on the shed roof. Look for areas of wear, tear, or damage, and take note of any sections that may require special attention during the refelting process. Understanding the condition of the existing felt will guide your approach to removing and replacing it.
4. Plan for Weather Conditions:
Check the weather forecast before embarking on the refelting project. Aim for a clear, dry day to ensure optimal conditions for working on the shed roof. Avoid undertaking the project during rainy or windy weather, as this can compromise the effectiveness of the refelting process.
5. Secure Necessary Permits:
Depending on your local regulations and the scope of the refelting project, you may need to obtain permits or approvals. Ensure that you have met any necessary requirements before proceeding with the work to avoid potential complications down the line.
By thoroughly preparing the shed roof and its surroundings, you’ll set the stage for a smooth and successful refelting endeavor, allowing you to proceed with confidence and precision.
Removing the Old Felt
With the shed roof prepared and the necessary materials at your disposal, it’s time to bid farewell to the old, worn-out felt. Here’s a step-by-step guide to removing the existing felt:
Read more: How To Build A Roof For A Shed
1. Start at the Edge:
Using a utility knife, carefully cut along the edge of the shed roof to loosen the old felt. Begin at a corner or an edge for easier access and maneuverability.
2. Work in Sections:
Divide the roof into manageable sections and gradually peel back the old felt. Exercise caution to avoid tearing or damaging the underlying roof deck during this process.
3. Discard the Old Felt:
As you remove the old felt, gather it into manageable bundles for disposal. Ensure that the work area remains tidy and free of debris to facilitate the next stages of the refelting project.
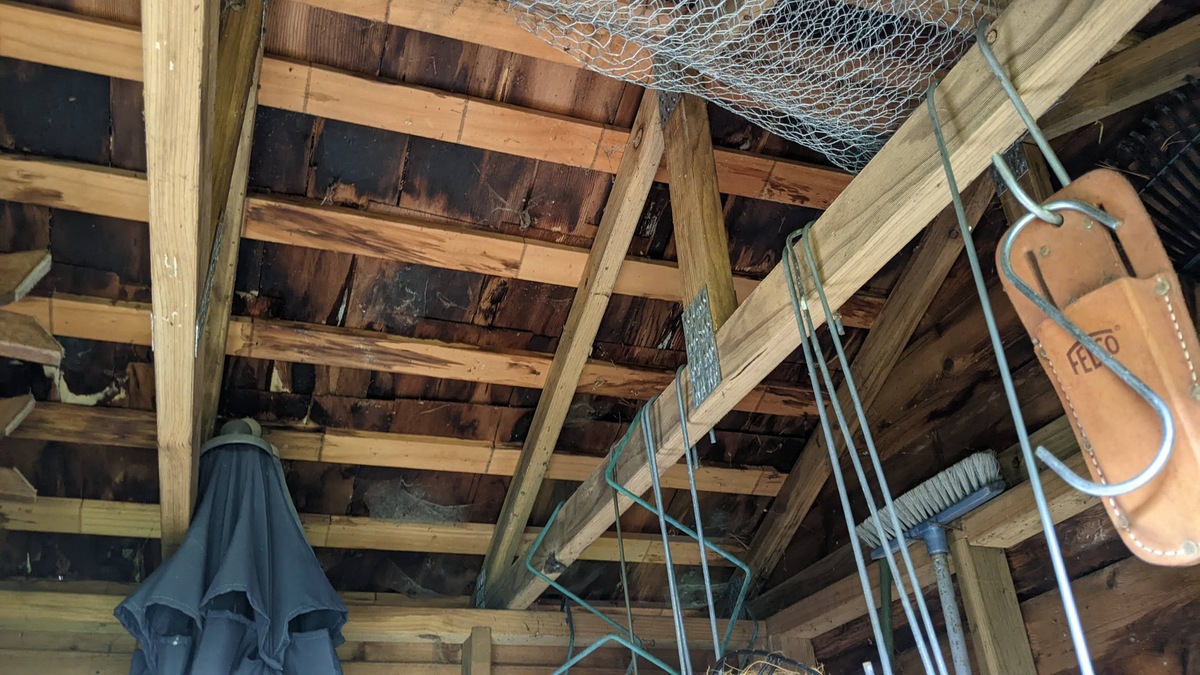
4. Inspect the Roof Deck:
Once the old felt has been removed, take the opportunity to thoroughly inspect the roof deck. Look for any signs of damage, moisture, or areas that may require repair or reinforcement before installing the new felt.
Read more: How To Patch A Shed Roof
5. Clean the Surface:
Remove any residual adhesive, debris, or protruding nails from the roof deck. A clean and smooth surface will provide a solid foundation for the new felt and contribute to a professional-quality finish.
6. Address Any Issues:
If you encounter any issues, such as rotting wood or compromised sections of the roof deck, take the necessary steps to address these concerns before proceeding. It’s essential to ensure that the roof deck is in optimal condition to support the new felt effectively.
By methodically removing the old felt and attending to the condition of the roof deck, you’ll pave the way for a seamless transition to the next phase of the refelting process, setting the stage for a rejuvenated and resilient shed roof.
Inspecting the Roof Deck
Once the old felt has been removed, it’s crucial to conduct a thorough inspection of the roof deck to assess its condition and address any potential issues. Here’s how to approach this critical step:
1. Assess Structural Integrity:
Examine the overall structural integrity of the roof deck. Look for signs of rot, decay, or damage that may compromise the stability and support it provides to the shed roof. Address any structural concerns promptly to ensure a solid foundation for the new felt.
Read more: How To Fix A Shed Roof
2. Check for Moisture Intrusion:
Inspect the roof deck for any indications of moisture intrusion or water damage. Stains, discoloration, or soft spots may signify underlying issues that need to be remedied before proceeding with the refelting process.
3. Address Wood Rot:
If you encounter areas of wood rot or decay, take the necessary steps to replace or reinforce the affected sections. It’s essential to eradicate any compromised wood to prevent further deterioration and ensure the long-term durability of the shed roof.
4. Reinforce Weak Areas:
Identify any weak or compromised areas of the roof deck and reinforce them as needed. This may involve adding additional support or replacing damaged sections to fortify the structural integrity of the roof deck.
5. Ensure Proper Ventilation:
Verify that the roof deck is adequately ventilated to prevent moisture buildup and promote airflow. Proper ventilation is essential for preserving the condition of the roof deck and mitigating potential issues in the future.
Read more: How To Seal A Shed Roof
6. Apply Protective Treatments (Optional):
If desired, consider applying protective treatments or sealants to the roof deck to enhance its resistance to moisture, decay, and environmental elements. Consult with a professional or follow product guidelines for appropriate application methods.
By conducting a comprehensive inspection of the roof deck and addressing any underlying concerns, you’ll fortify the foundation of the shed roof, ensuring that it is well-prepared to receive the new felt and withstand the elements for years to come.
Installing the New Felt
With the roof deck inspected and any necessary repairs or reinforcements completed, it’s time to embark on the installation of the new felt. This phase of the refelting process requires precision and attention to detail to ensure a secure and weather-resistant finish. Here’s a comprehensive guide to installing the new felt on your shed roof:
1. Measure and Cut the Felt:
Unroll the roofing felt and measure it to fit the dimensions of the shed roof. Use a utility knife to cut the felt to the appropriate size, allowing for a slight overhang to facilitate effective water drainage.
2. Position the Felt:
Carefully position the cut felt onto the roof deck, ensuring that it is aligned and centered. Take care to smooth out any wrinkles or creases to achieve a snug and uniform fit across the entire surface of the roof.
Read more: What Plywood For Shed Roof
3. Secure the Felt:
Using roofing nails and a hammer, secure the edges of the felt to the roof deck. Space the nails evenly along the perimeter of the felt, maintaining a secure hold without causing damage or distortion to the material.
4. Overlap Seams (If Applicable):
If multiple sections of roofing felt are required to cover the entire shed roof, ensure that the seams are properly overlapped and sealed. This will prevent water infiltration and reinforce the protective barrier provided by the new felt.
5. Trim Excess Felt:
Once the felt is securely in place, trim any excess material along the edges of the roof to achieve a clean and professional finish. Use a utility knife to make precise cuts, ensuring that the overhang is uniform and visually appealing.
6. Apply Adhesive or Cement (If Necessary):
If your specific refelting project requires the use of roofing adhesive or cement, apply these materials as directed to reinforce the attachment of the felt and seal any vulnerable areas effectively.
By following these steps with care and precision, you’ll successfully install the new felt, revitalizing the shed roof with a resilient and visually appealing protective layer that will safeguard your belongings for years to come.
Read more: What To Use For Shed Roof
Securing the Felt
Securing the newly installed felt is a critical step in ensuring that it provides reliable protection and withstands the rigors of the elements. Properly securing the felt will contribute to the longevity and resilience of the shed roof. Here’s a detailed guide to effectively secure the felt in place:
1. Verify Nail Placement:
Inspect the placement of the roofing nails to ensure that they are evenly spaced and securely fastened without causing damage to the felt. Confirm that the nails penetrate the roof deck, anchoring the felt firmly in position.
2. Check for Tightness:
Gently tug on the edges and corners of the felt to verify that it is taut and securely affixed to the roof deck. Any areas of slack or looseness should be addressed promptly to maintain a uniform and snug fit across the entire surface of the shed roof.
3. Address Lifting or Flapping:
If any sections of the felt exhibit lifting or flapping, resecure them with additional roofing nails as needed. Ensuring that the felt lies flat and smooth will prevent potential water infiltration and maintain the integrity of the protective barrier.
Read more: How To Build A Lean To Roof On A Shed
4. Inspect Seam Overlaps:
If multiple sections of felt were utilized to cover the entire shed roof, carefully inspect the seam overlaps to verify that they are securely bonded and effectively sealed. Address any gaps or vulnerabilities to fortify the continuity of the protective layer.
5. Apply Additional Adhesive (If Necessary):
If your refelting project necessitates the use of roofing adhesive, apply it as directed to reinforce the adhesion of the felt to the roof deck. Pay particular attention to vulnerable areas and seam overlaps to enhance the watertight seal.
6. Trim Excess Material:
Trim any remaining excess felt along the edges of the shed roof, ensuring a neat and uniform appearance. Use a utility knife to make precise cuts, creating a clean and professional finish that enhances the overall aesthetic appeal of the refelted roof.
By meticulously securing the felt and attending to any potential areas of concern, you’ll fortify the protective capabilities of the shed roof, ensuring that it is well-equipped to endure the elements and safeguard your belongings with unwavering reliability.
Conclusion
Congratulations! You’ve successfully revitalized your shed by refelting its roof, enhancing its durability and visual appeal. By embarking on this DIY project, you’ve not only extended the lifespan of your shed but also fortified its ability to protect your outdoor essentials from the elements. As you wrap up the refelting process, take a moment to reflect on the transformation and the resilient shelter you’ve provided for your belongings.
As you admire the newly refelted roof, it’s important to recognize the significance of proper maintenance and periodic inspections. By staying proactive and addressing any signs of wear or damage promptly, you can prolong the longevity of the shed roof and preserve its protective capabilities for years to come.
Remember, a well-maintained shed not only serves as a practical storage space but also contributes to the overall aesthetic of your outdoor environment. Your efforts in refelting the shed roof have not only bolstered its functionality but have also added a touch of renewed charm to your outdoor space.
As you conclude this project, take pride in the accomplishment and the care you’ve invested in preserving a key element of your outdoor infrastructure. Whether it’s a garden shed, a workshop, or a storage unit, a well-maintained and resilient roof is a testament to your dedication to creating a functional and inviting outdoor environment.
Now, with the refelting project complete, take a moment to enjoy the fruits of your labor. Step back, admire your handiwork, and revel in the satisfaction of knowing that your shed is now equipped to weather the elements and stand the test of time.
So, here’s to your newly refelted shed roof – a symbol of resilience, craftsmanship, and the enduring spirit of DIY ingenuity. May it continue to shelter and safeguard your outdoor treasures for years to come.
Frequently Asked Questions about How To Refelt A Shed Roof
Was this page helpful?
At Storables.com, we guarantee accurate and reliable information. Our content, validated by Expert Board Contributors, is crafted following stringent Editorial Policies. We're committed to providing you with well-researched, expert-backed insights for all your informational needs.
0 thoughts on “How To Refelt A Shed Roof”