Home>Home Maintenance>How Long Does It Take To Clean A Dryer Vent
Home Maintenance
How Long Does It Take To Clean A Dryer Vent
Modified: August 28, 2024
Discover how long it takes to clean a dryer vent and ensure efficient home maintenance with our expert tips and advice.
(Many of the links in this article redirect to a specific reviewed product. Your purchase of these products through affiliate links helps to generate commission for Storables.com, at no extra cost. Learn more)
Introduction
Welcome to the world of home maintenance, where proper care and upkeep can make all the difference in the functionality and longevity of your appliances. One often-overlooked aspect of home maintenance is the regular cleaning of dryer vents. While it may not be the most glamorous task, keeping your dryer vent clean is crucial for the efficient operation of your appliance and even your safety.
In this article, we will explore the importance of cleaning dryer vents, signs of a clogged vent, the tools needed for cleaning, and provide you with a step-by-step guide for effectively cleaning your dryer vent. We will also share some tips and tricks to make the process easier, discuss how frequently you should clean your dryer vent, and weigh the pros and cons of professional cleaning versus a DIY approach. Lastly, we will highlight common mistakes to avoid during the cleaning process.
So, if you’re ready to dive into the world of dryer vent maintenance, let’s get started!
Key Takeaways:
- Regularly cleaning your dryer vent is crucial for preventing fires, improving efficiency, and ensuring safety for your home and family.
- By following the step-by-step guide and tips provided, you can effectively clean your dryer vent, maintain optimal performance, and reduce the risk of fire hazards.
Read more: How Long Does It Take To Clean A Carpet
Importance of Cleaning Dryer Vents
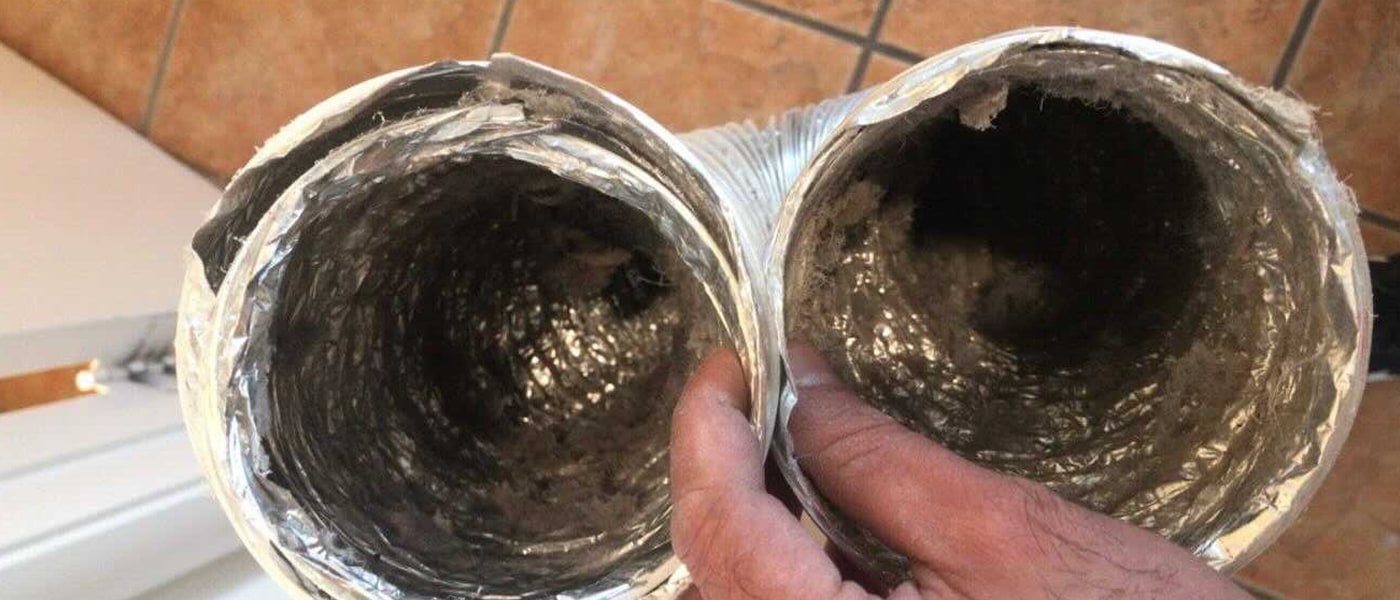
Regularly cleaning your dryer vents is not just a matter of convenience; it is vital for several reasons. First and foremost, a clogged dryer vent can be a fire hazard. When lint and debris accumulate in the vent, they can obstruct the airflow, causing the dryer to overheat. This excessive heat can ignite the flammable materials, resulting in a devastating fire.
In fact, according to the U.S. Fire Administration, dryer fires account for an estimated 2,900 residential fires, causing an average of 5 deaths, 100 injuries, and $35 million in property damage each year. These alarming statistics emphasize the need for regular dryer vent cleaning as a preventive measure against potential fires.
Besides reducing the risk of fire, cleaning your dryer vent can also improve the efficiency and performance of your appliance. When the vent is clogged, the hot air produced by the dryer cannot escape properly, causing the drying time to lengthen. This not only wastes energy but also puts unnecessary strain on the dryer components, leading to potential breakdowns and costly repairs.
Additionally, a buildup of lint in the dryer vent can impact air quality within your home. If the vent is obstructed, the moisture from the wet clothes cannot escape efficiently, creating a damp environment. This can contribute to the growth of mold and mildew, which can negatively affect the air you breathe and trigger respiratory issues, especially for those with allergies or asthma.
By regularly cleaning your dryer vents, you not only ensure the safety of your family and home but also save on energy costs and extend the lifespan of your dryer.
Now that we understand the importance of cleaning dryer vents, let’s delve into the signs that indicate your dryer vent may be clogged.
Signs of a Clogged Dryer Vent
Identifying the signs of a clogged dryer vent is crucial in preventing potential hazards and maintaining the efficiency of your dryer. Here are some common indicators that your dryer vent may be clogged:
- Longer Drying Times: If your clothes are taking significantly longer to dry than usual, it could be a sign of a clogged dryer vent. When the airflow is restricted, the hot, moist air cannot escape properly, causing the drying process to become inefficient.
- Excessive Heat: Does your dryer feel unusually hot to the touch? Excessive heat emanating from the appliance can indicate that the vent is blocked. The trapped hot air has nowhere to go, leading to heightened temperatures that can damage the dryer or even spark a fire.
- Burning Smell: A distinct burning smell during or after the drying cycle is a red flag that your dryer vent needs cleaning. When lint builds up in the vent, it can become overheated and emit a burning odor.
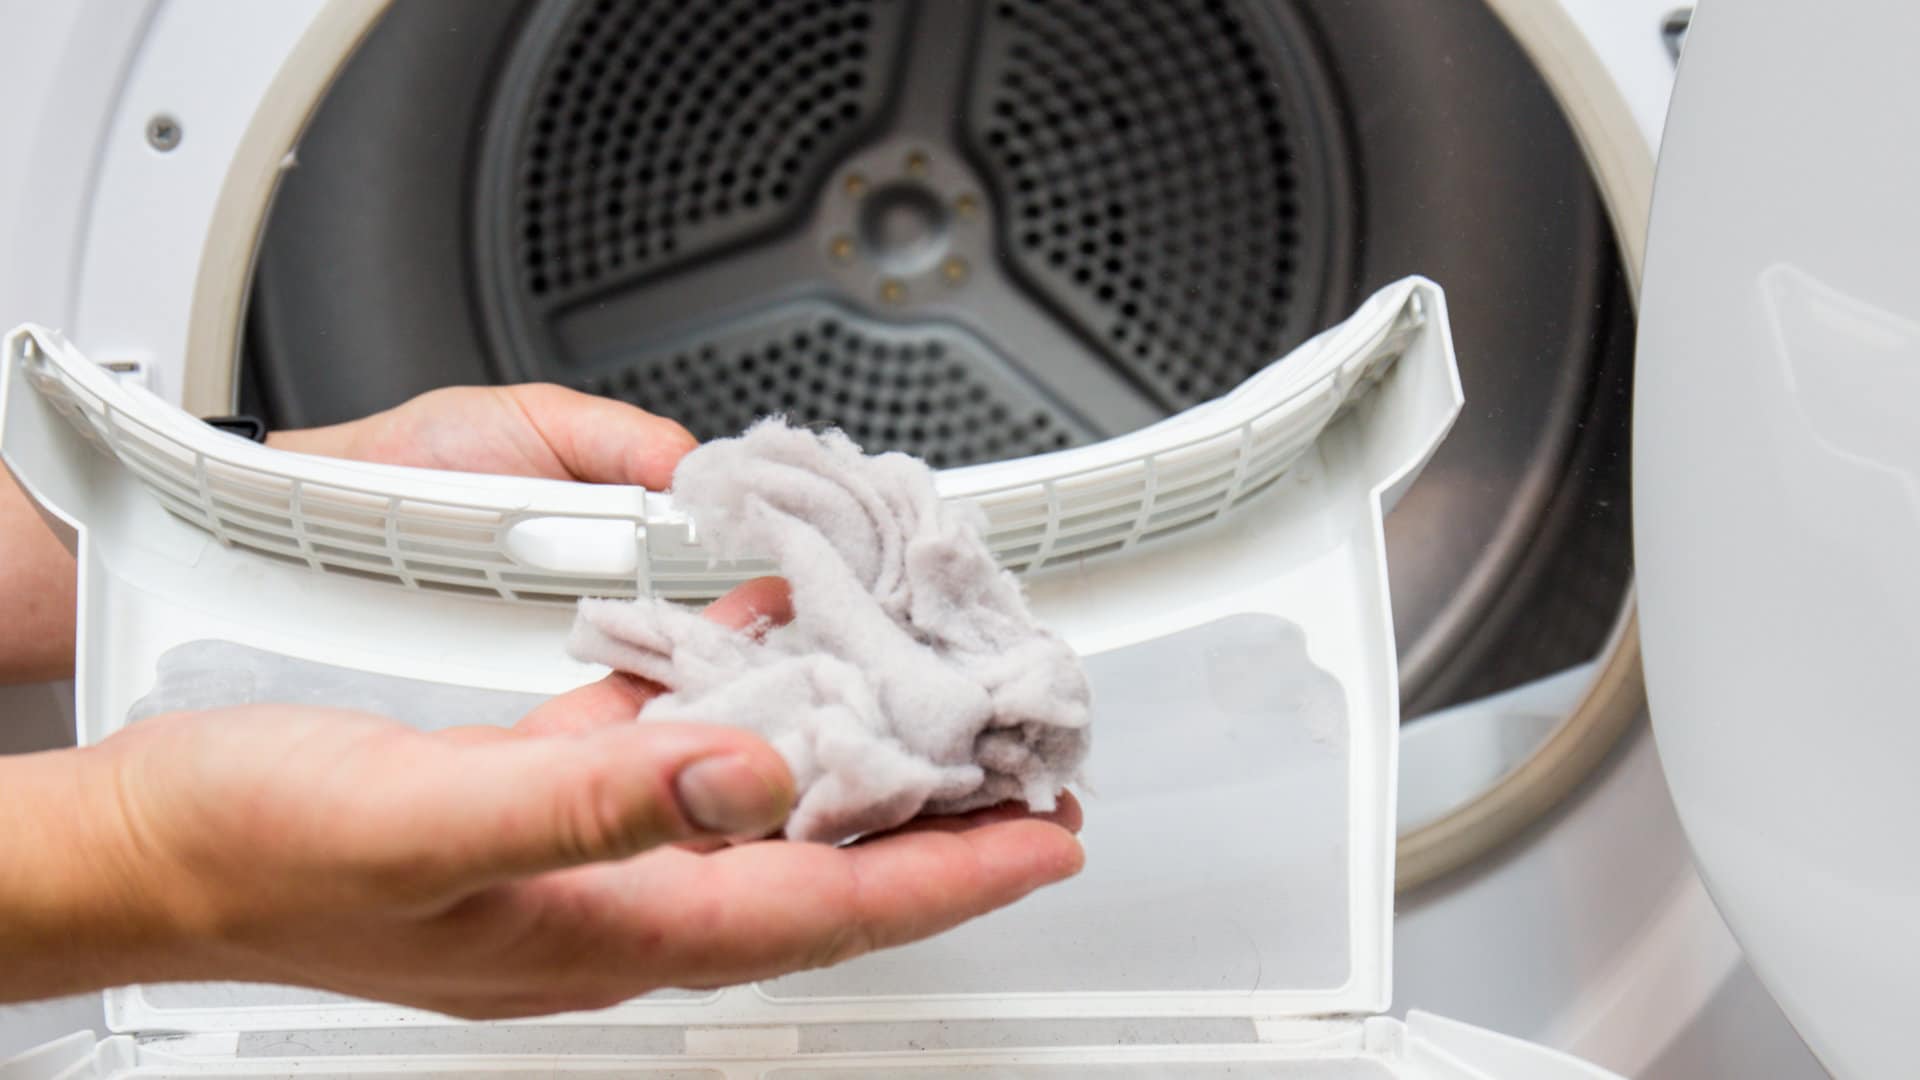
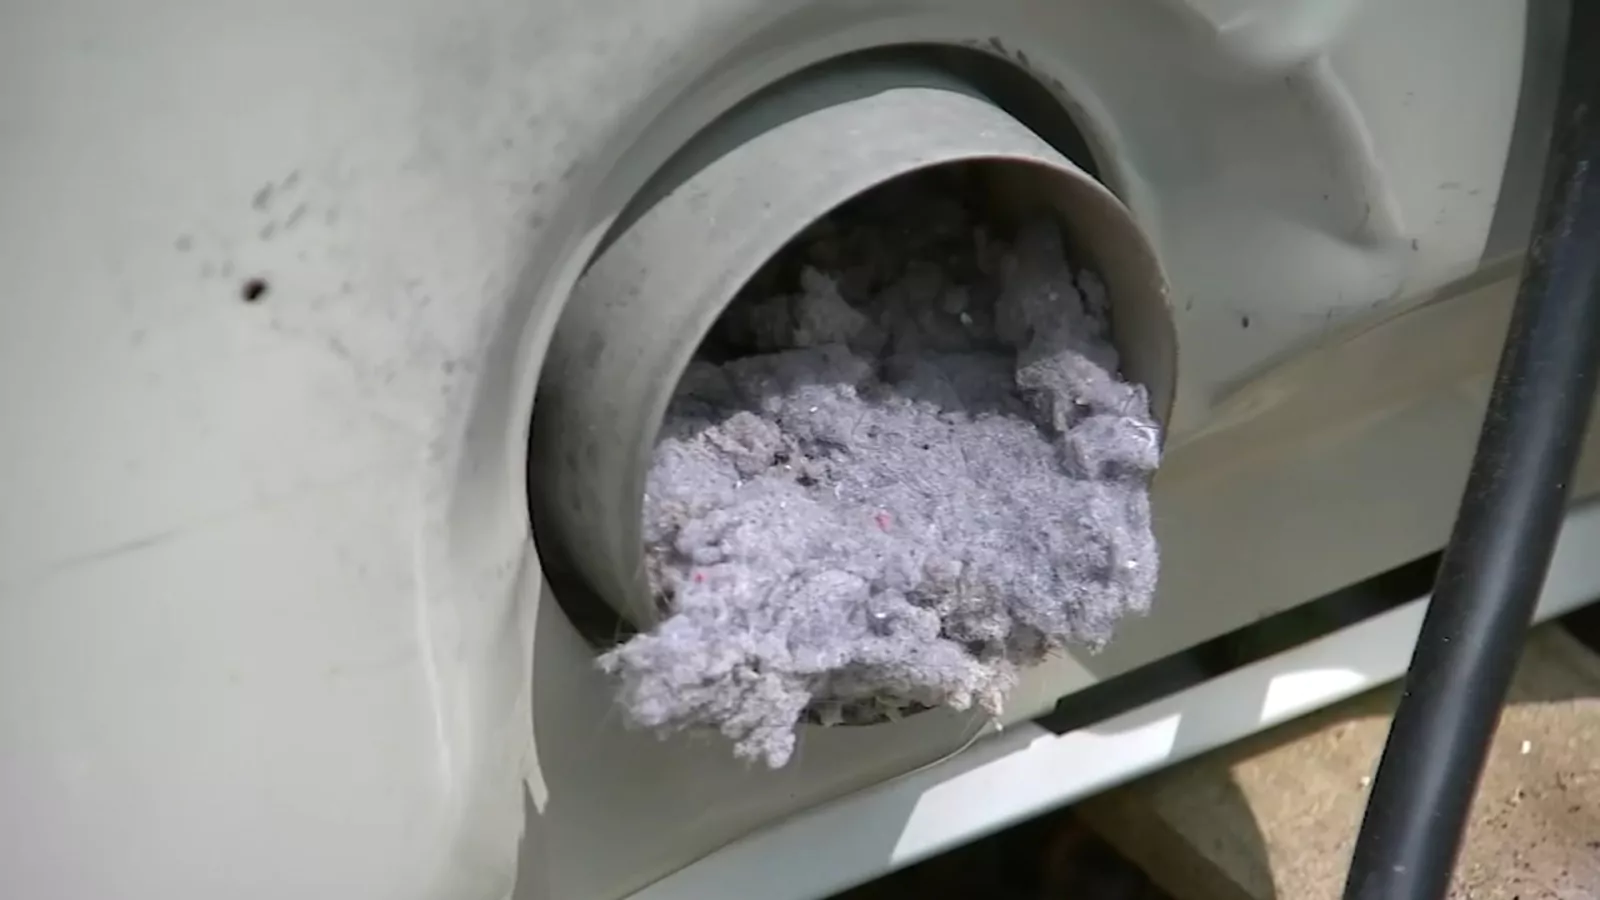
- Lint Accumulation: Check the area around your dryer for lint buildup. If you notice excessive lint on the floor, walls, or near the exterior vent, it is a clear indication that the vent is clogged and needs immediate attention.
- Poor Ventilation: Another sign of a clogged vent is poor air circulation. If you notice that the air doesn’t flow properly from the exhaust vent, or if you feel little to no airflow outside when the dryer is running, it could be due to a blockage.
- Excessive Moisture: A damp or humid laundry room, even after running the dryer, can indicate a clogged vent. When moisture cannot escape effectively, it lingers in the room, creating a breeding ground for mold and mildew.
If you notice any of these signs, it’s crucial to take action and clean your dryer vent promptly. Neglecting to do so can result in safety hazards, increased energy consumption, and potential damage to your dryer.
Now that you recognize the signs of a clogged dryer vent, let’s move on to the tools you’ll need for effective cleaning.
Tools Needed for Cleaning a Dryer Vent
Before you begin cleaning your dryer vent, it’s important to gather the necessary tools to ensure a thorough and effective job. Here are the tools you’ll need:
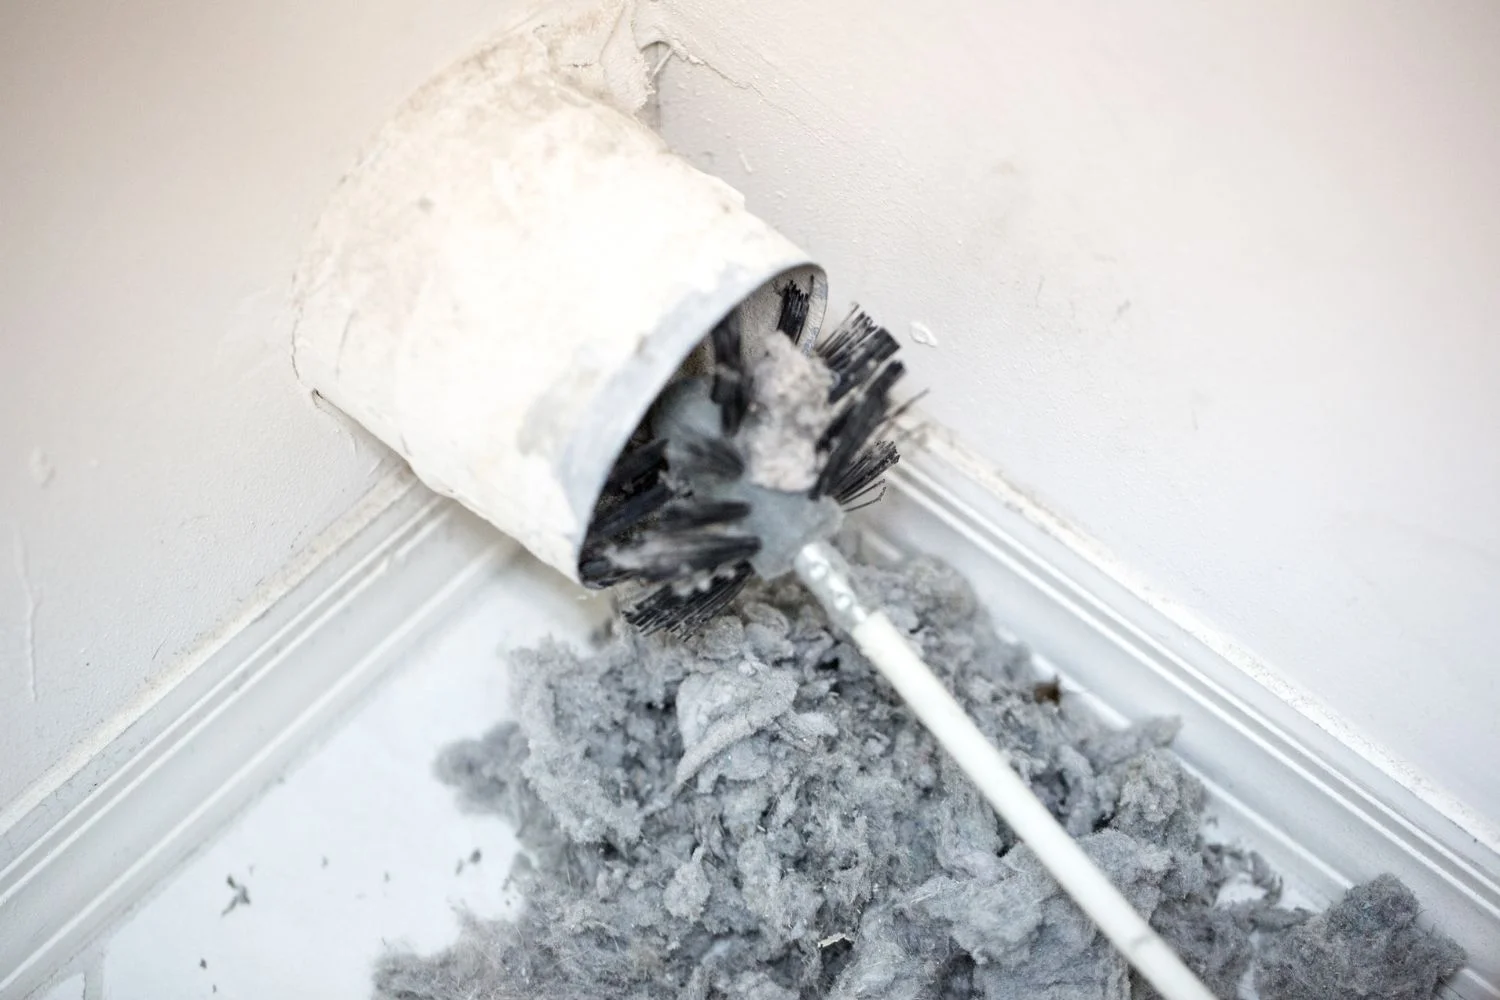
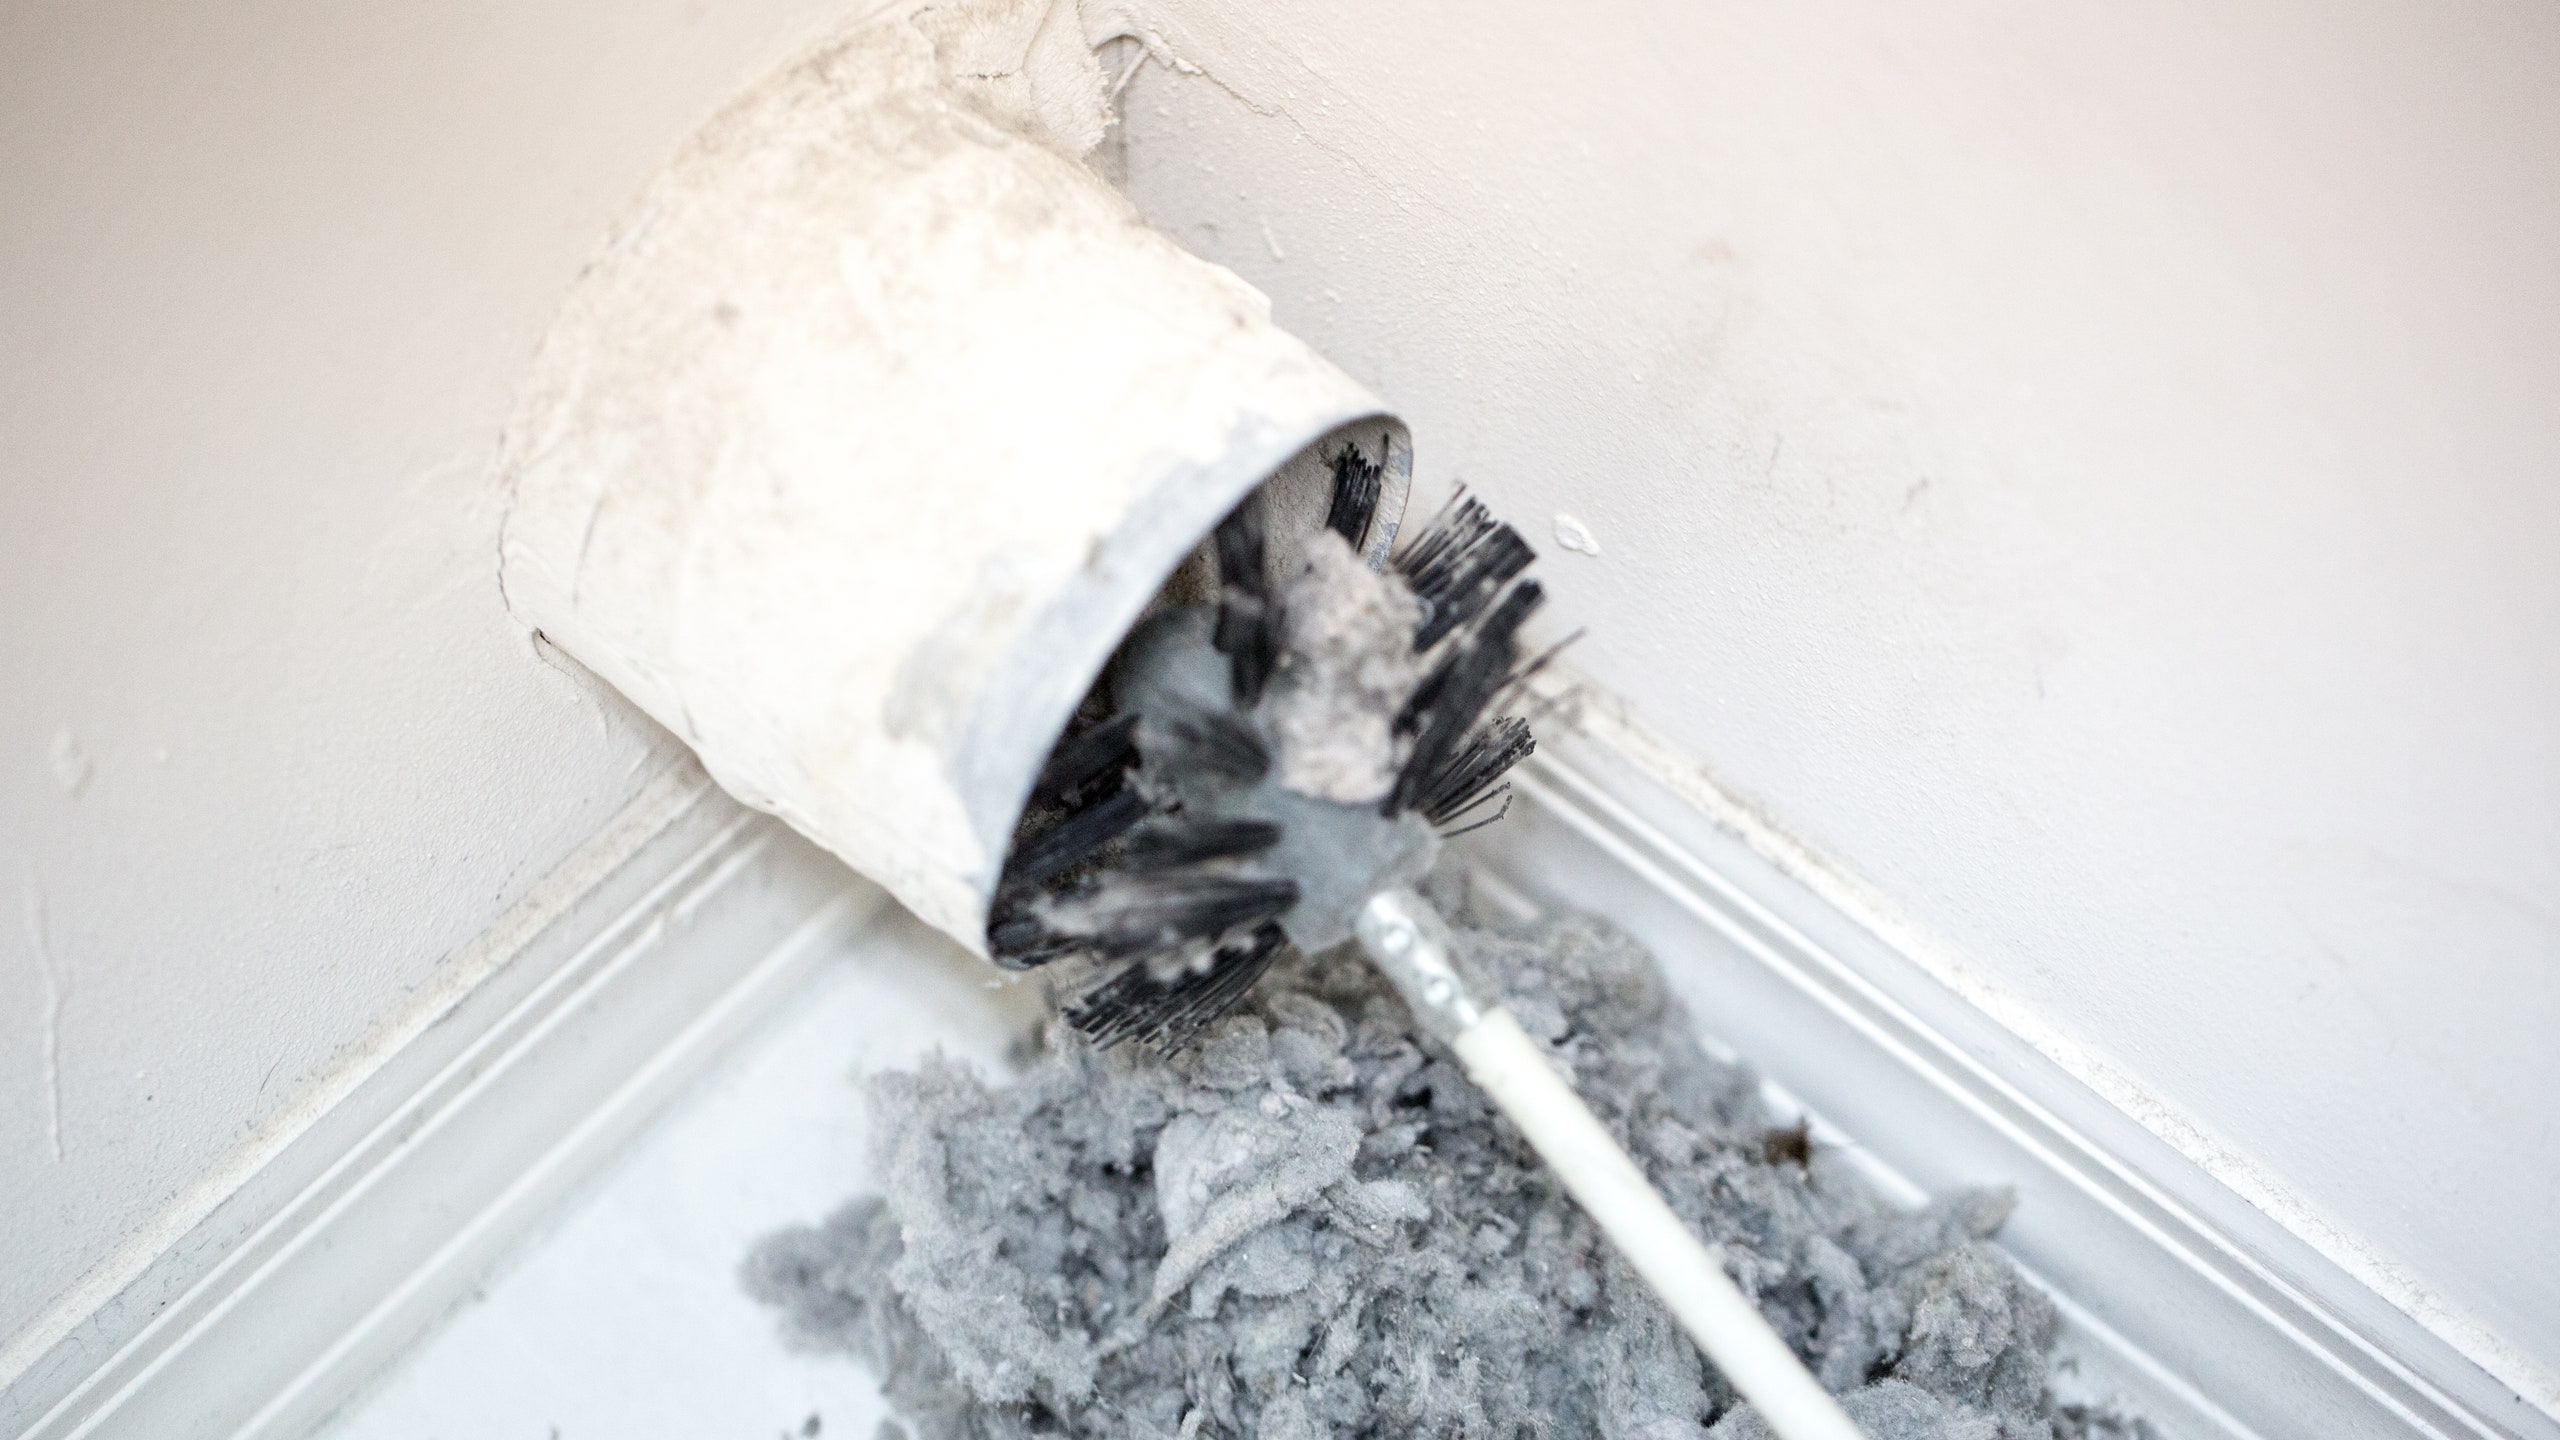
- Vent Brush: A vent brush with long, flexible bristles is essential for dislodging and removing lint and debris from the vent. Look for a brush specifically designed for dryer vents, as it will have the right length and flexibility to navigate through the twists and turns of the venting system.
- Vacuum Cleaner: A vacuum cleaner with a narrow attachment or crevice tool is handy for suctioning out loosened debris from the vent. Ensure that the vacuum has enough power to effectively remove the lint.
- Screwdriver or Nut Driver: Depending on the type of dryer vent system you have, you may need a screwdriver or nut driver to loosen any fasteners or clamps that secure the vent in place. This will enable you to access and clean the vent more effectively.
- Dryer Vent Cleaning Kit: A dryer vent cleaning kit can be a worthwhile investment, as it typically includes specialized brushes, rods, and attachments designed specifically for cleaning dryer vents. These kits often come with extension rods that can reach further into the venting system, ensuring a more thorough cleaning.
- Gloves and Safety Glasses: It’s important to protect yourself during the cleaning process. Wear sturdy gloves to shield your hands from sharp edges and debris, and safety glasses to protect your eyes from any dust or particles that may be dislodged.
- Drop Cloth or Tarp: To minimize the mess and collect any debris or lint that may fall during the cleaning process, place a drop cloth or tarp beneath the dryer vent area.
By having these tools at your disposal, you’ll be equipped to effectively clean your dryer vent and maintain its optimal performance.
Now that you have the necessary tools, let’s move on to a step-by-step guide on cleaning your dryer vent to ensure its efficient operation.
Step-by-Step Guide to Cleaning a Dryer Vent
Cleaning your dryer vent may seem like a daunting task, but with the right approach, it can be straightforward and effective. Follow this step-by-step guide to ensure a thorough cleaning:
- Turn off the Dryer: Start by unplugging your dryer or turning off its power source. This is crucial for safety and to prevent any accidents during the cleaning process.
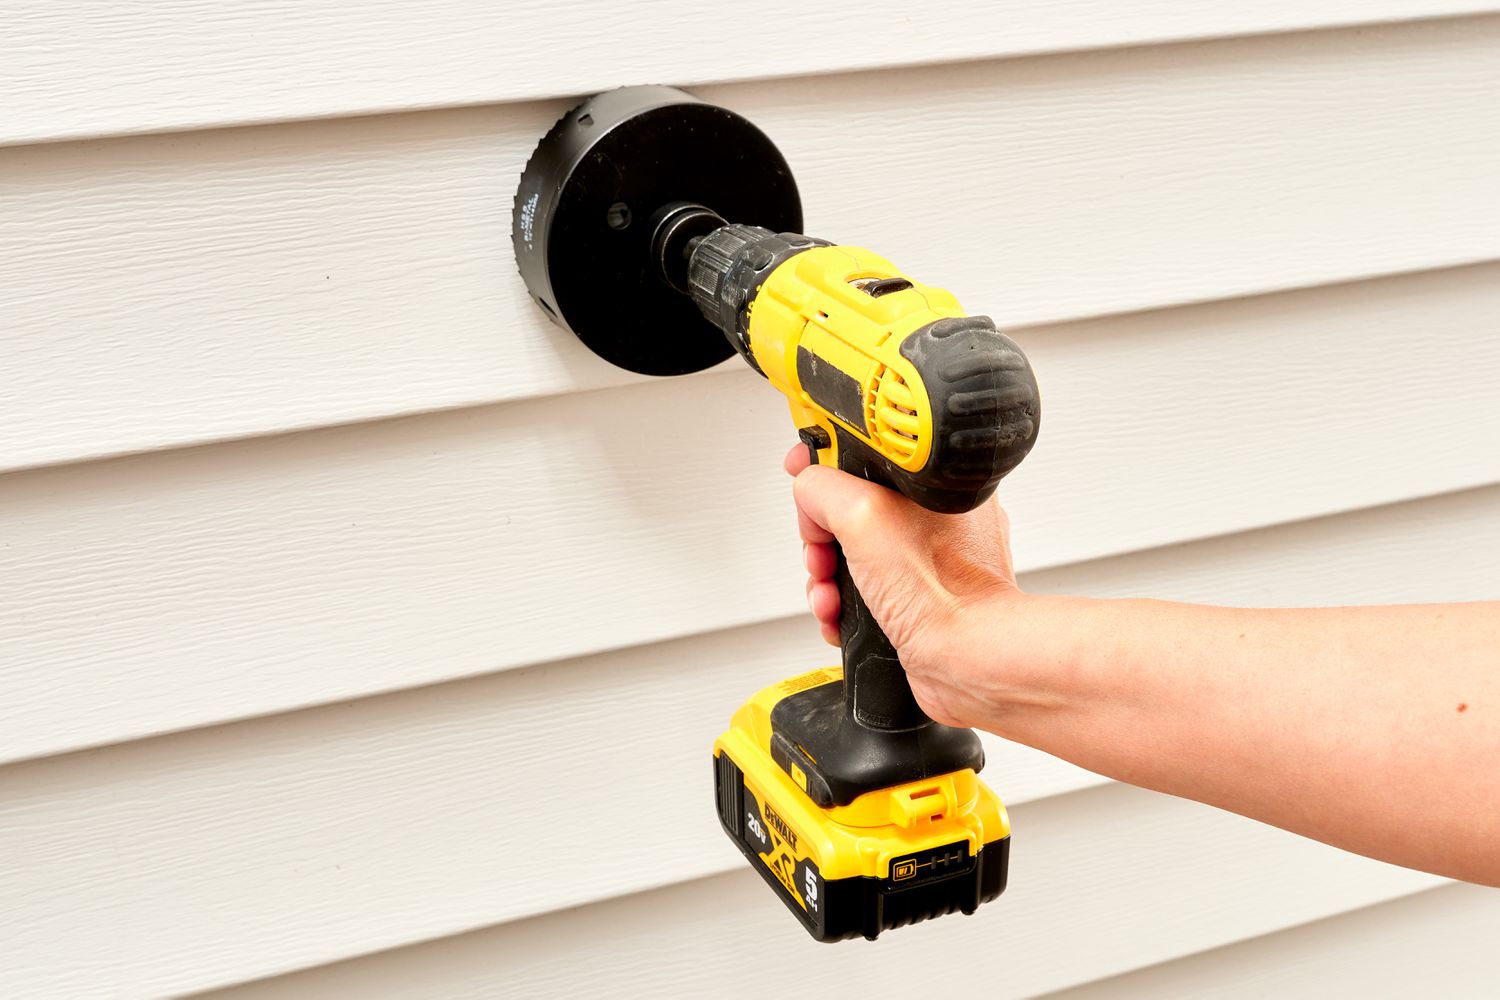
- Move the Dryer Away from the Wall: Carefully pull the dryer away from the wall to gain access to the venting system at the back of the appliance. Be cautious not to damage the vent or the floor.
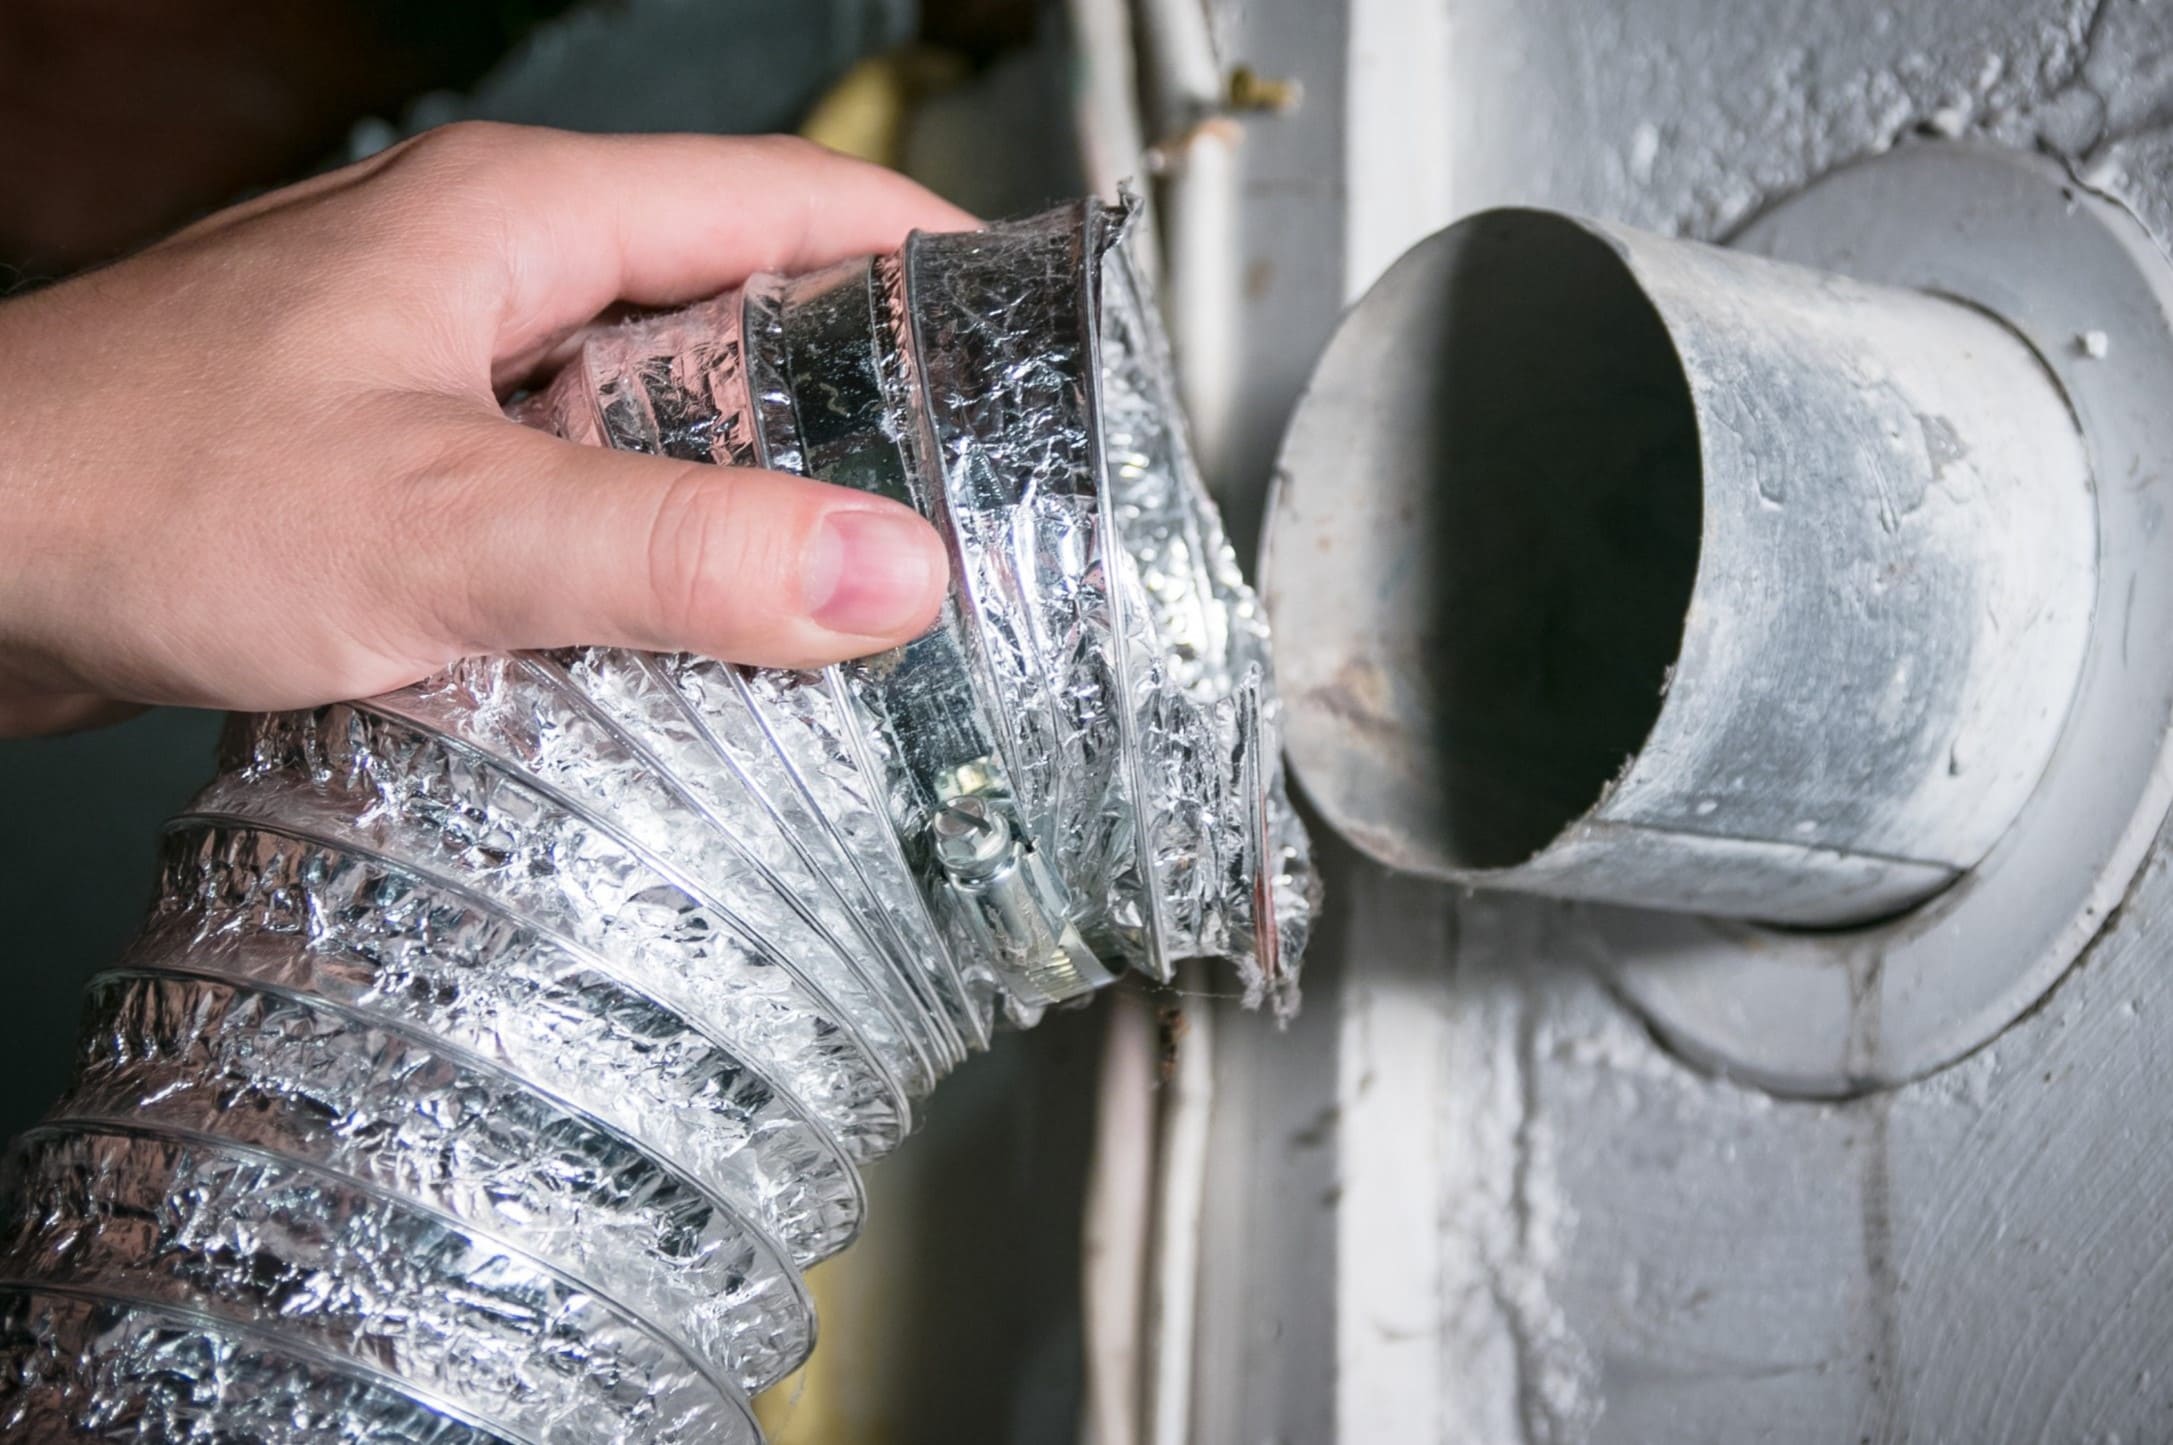
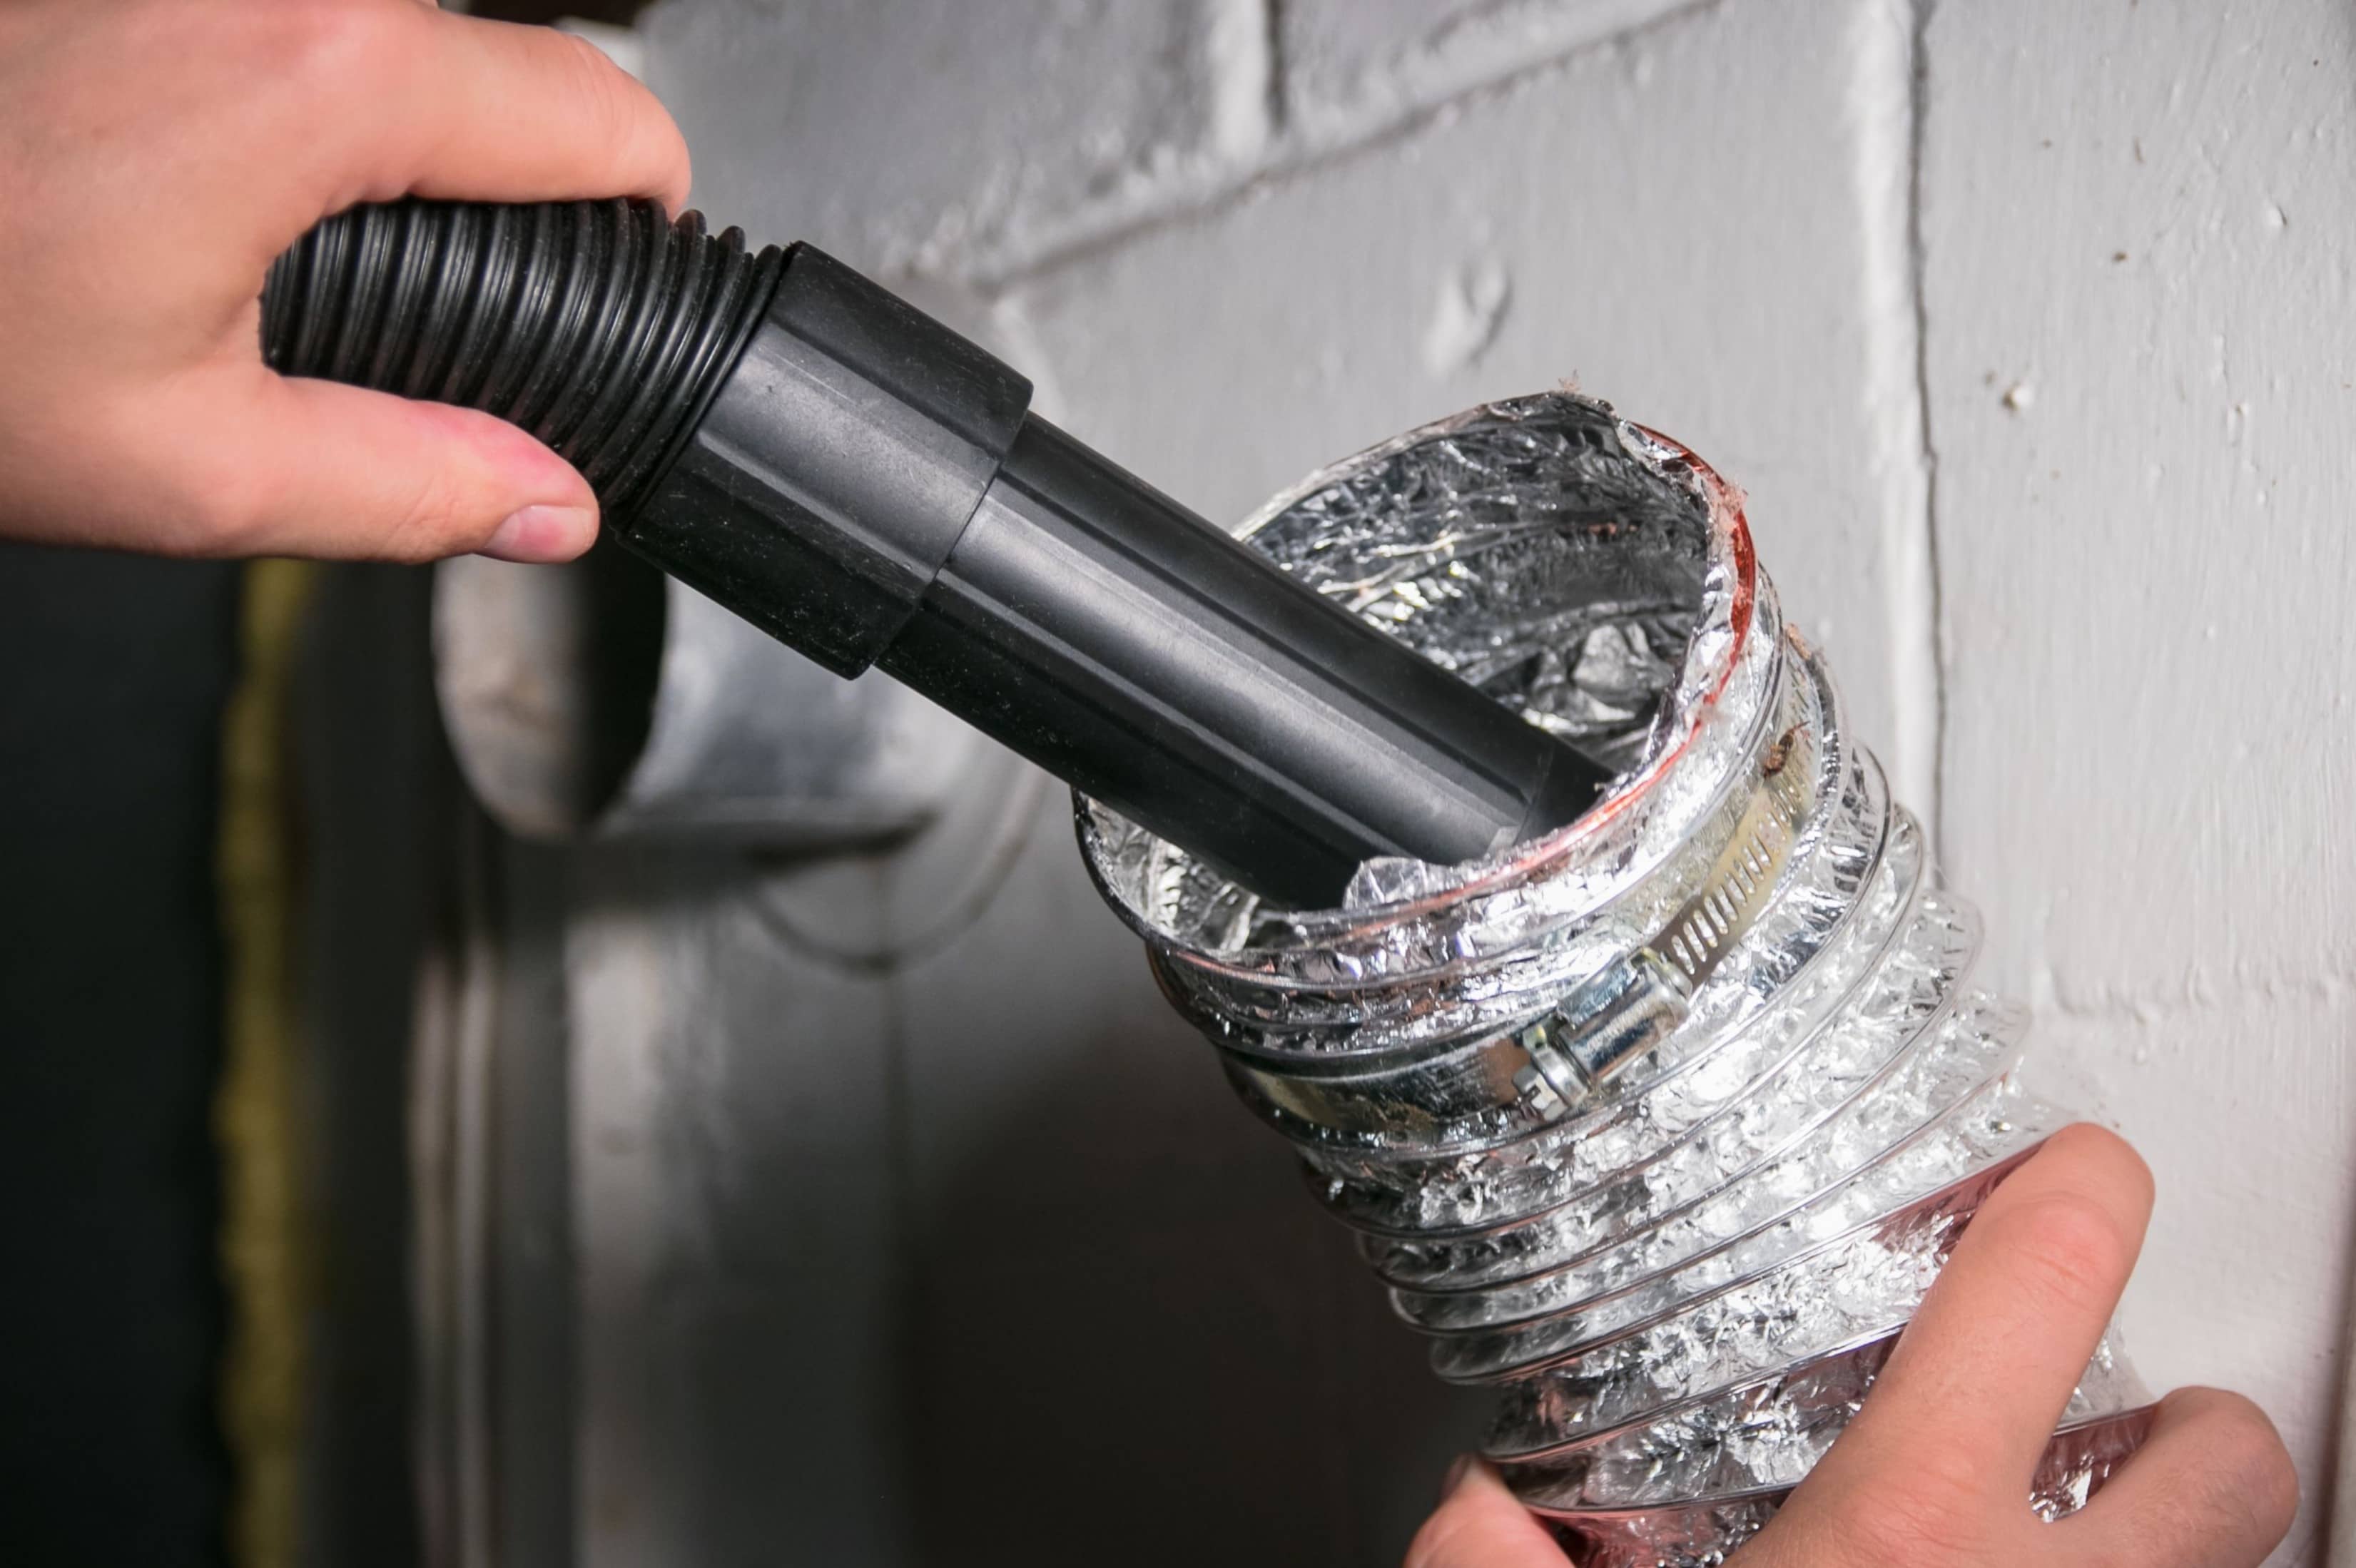
- Disconnect the Dryer Vent: Loosen any clamps or fasteners that secure the dryer vent to the appliance. Gently disconnect the vent from both the dryer and the exterior vent opening, providing you with better access for cleaning.
- Remove Lint from the Exterior Vent Opening: Go outside and locate the exterior vent opening. Use your brush or vacuum cleaner to remove any visible lint or debris from the opening. This will help prevent the lint from being pushed back into the vent during the cleaning process.
- Attach the Brush to Extension Rod: If using a dryer vent cleaning kit, attach the brush to an extension rod, ensuring a secure and tight connection. The length of the rod should be sufficient to reach through the entire venting system.
- Insert the Brush into the Vent: Carefully insert the brush along with the extension rod into the dryer vent opening. Gently push the brush through the vent, rotating it as you go to dislodge and loosen any built-up lint and debris. Continue this process until you reach the end of the vent.
- Remove the Brush and Clean the Vent: Once you have reached the end of the vent, carefully remove the brush and extension rod. Use your vacuum cleaner with the narrow attachment or crevice tool to suction out any loosened debris from the vent.
- Repeat the Process: If necessary, repeat the previous steps to thoroughly clean the dryer vent. This may be required if you notice excessive lint or if the vent hasn’t been cleaned in a long time.
- Reconnect the Dryer Vent: Once you are satisfied with the cleaning, reattach the dryer vent to both the dryer and the exterior vent opening. Tighten any clamps or fasteners to secure the vent in place.
- Move the Dryer Back into Place: Carefully push the dryer back against the wall, ensuring that the venting system is not pinched or restricted. Take caution not to damage the vent or any connections.
- Plug in the Dryer and Test: Plug in your dryer or turn on its power source. Run a test cycle to ensure that the dryer is functioning properly and that the airflow is unobstructed.
Following these steps will help you effectively clean your dryer vent, ensuring optimal performance and reducing the risk of fire hazard. Remember to prioritize safety throughout the process and take the necessary precautions.
Now that you know how to clean a dryer vent, let’s explore some additional tips and tricks that can make the cleaning process easier and more efficient.
Read more: How Long Does Chimney Cleaning Take
Tips and Tricks for Efficient Dryer Vent Cleaning
Cleaning your dryer vent can be a straightforward task if you implement some tips and tricks to make the process more efficient. Here are some handy tips to help you get the best results:
- Use a Vacuum with a HEPA Filter: To minimize the release of dust and allergens into the air, consider using a vacuum cleaner with a HEPA filter. This will help capture smaller particles and improve indoor air quality.
- Clean the Dryer Vent Regularly: Make it a habit to clean your dryer vent on a regular basis. Ideally, it is recommended to clean it at least once a year. However, if you notice any signs of a clogged vent or if you use your dryer frequently, more frequent cleaning may be necessary.
- Inspect the Vent Outside: Regularly check the outside vent opening to ensure that it is not obstructed by debris, plants, or other objects. This will help maintain proper airflow and prevent blockages.
- Consider Professional Cleaning: If you are unsure about cleaning the dryer vent yourself or if you don’t have the necessary tools, consider hiring a professional dryer vent cleaning service. They have the expertise and equipment to perform a thorough inspection and deep cleaning.
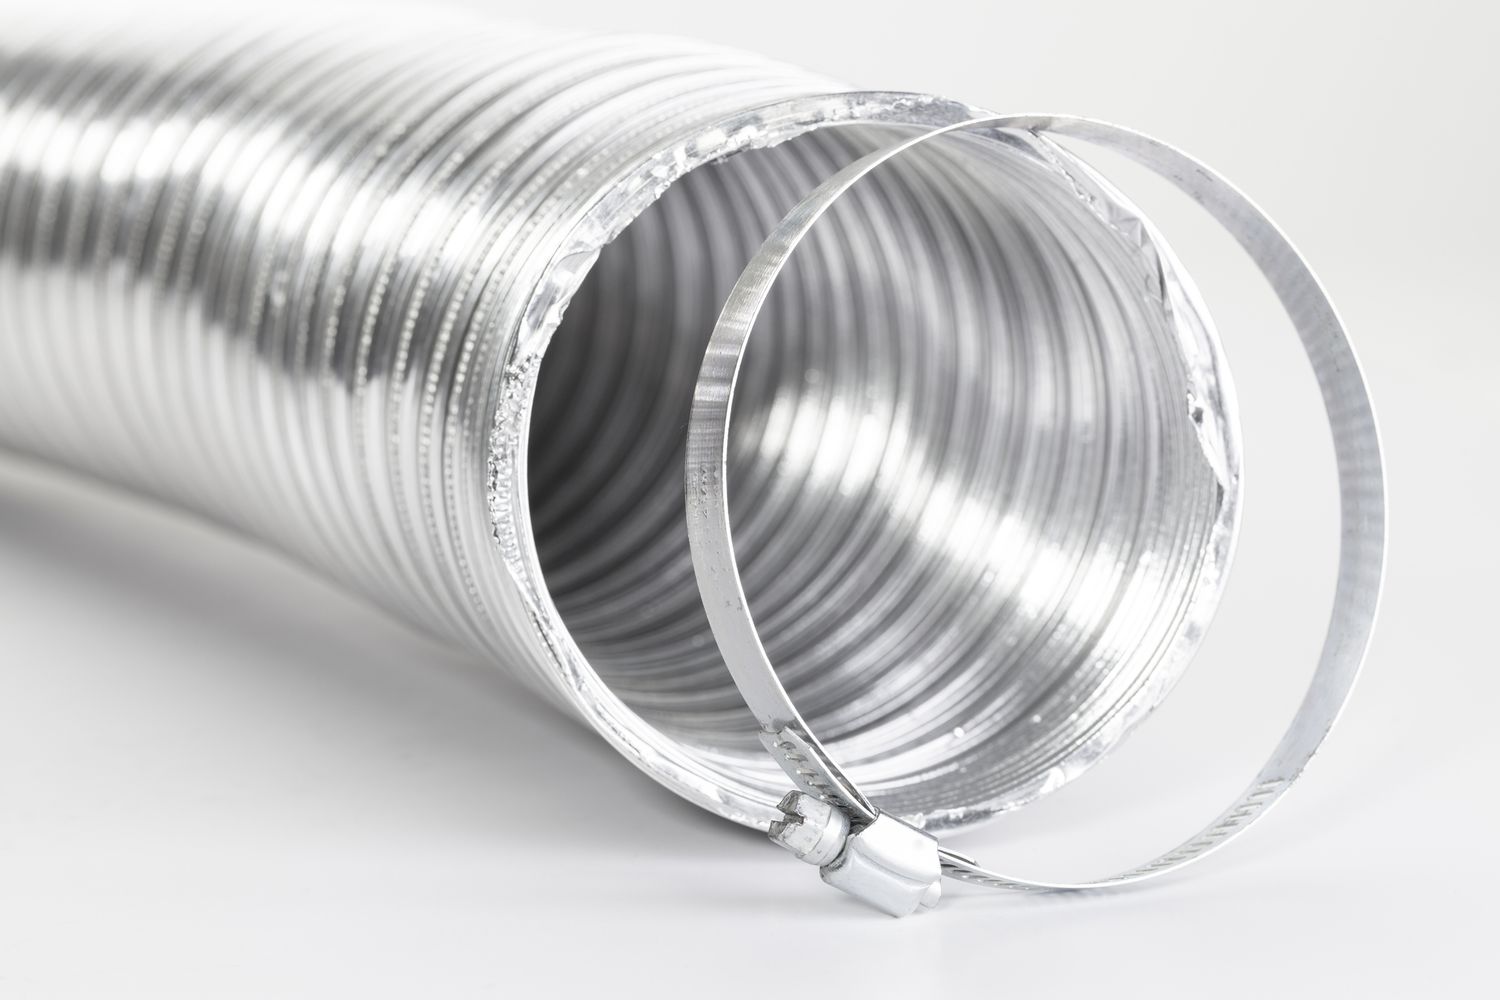
- Inspect the Dryer Vent Hose: While cleaning the dryer vent, take the opportunity to inspect the vent hose for any damage or leaks. Replace the hose if you notice any signs of wear and tear to ensure proper ventilation.
- Clear the Area Around the Dryer: Before starting the cleaning process, remove any items or debris that may obstruct your access to the dryer vent. This will make the cleaning process easier and safer.
- Consider Installing a Dryer Vent Cover: To prevent future accumulation of lint and debris in your dryer vent, consider installing a dryer vent cover. These covers act as barriers, preventing pests, birds, leaves, and other materials from entering the vent.
- Educate Your Household Members: Ensure that everyone in your household is aware of the importance of maintaining a clean dryer vent. Encourage them to empty the lint trap after each use and avoid overloading the dryer, as these practices can help minimize lint buildup.
- Keep Flammable Materials Away from the Dryer: To reduce the risk of fire, keep flammable materials such as cleaning supplies, cardboard, and rags away from the dryer. Store them in a separate location to minimize the chances of ignition.
By following these tips, you can ensure a more efficient and effective dryer vent cleaning process. Remember, regular maintenance is key to preventing potential hazards and extending the lifespan of your dryer.
Now that you have a better understanding of efficient dryer vent cleaning, let’s discuss how often you should clean your dryer vent.
Regularly clean your dryer vent at least once a year to prevent lint buildup and reduce the risk of fire. The cleaning process usually takes around 30-45 minutes.
Frequency of Dryer Vent Cleaning
Regularly cleaning your dryer vent is essential to ensure the safety and efficiency of your appliance. The frequency at which you should clean your dryer vent depends on various factors, including usage, vent length, and other environmental factors. Here are some guidelines to help you determine how often you should clean your dryer vent:
- Annual Cleaning: It is generally recommended to clean your dryer vent at least once a year. This is a good baseline to prevent lint buildup and maintain optimal airflow. If you have a larger household or use your dryer frequently, you may want to consider more frequent cleanings.
- Heavy Usage: If you use your dryer on a daily basis or have a large family, it is advisable to clean your dryer vent more frequently. The increased usage can result in a quicker buildup of lint and debris, necessitating more regular cleanings to maintain proper ventilation.
- Long Vent Hose: If your dryer vent hose is longer than the standard length, it may require more frequent cleaning. Longer vents tend to accumulate lint and debris more quickly, leading to reduced airflow and increased drying times.
- Environmental Factors: Consider the environmental conditions surrounding your dryer, such as dusty or humid environments. These factors can contribute to faster lint accumulation in the vent and may require more frequent cleaning.
- Signs of Clogging: Pay attention to the signs of a clogged dryer vent mentioned earlier in this article. If you notice any of these signs, it indicates that your vent needs immediate cleaning, regardless of when it was last cleaned.
- Professional Inspection: It is recommended to have a professional inspection of your dryer vent system at least once every two to three years. They can assess the condition of your vent, identify potential issues, and recommend if a cleaning or any repairs are necessary.
Remember, these guidelines serve as a general recommendation, and the frequency of cleaning your dryer vent may vary depending on your specific circumstances. It’s crucial to be vigilant and proactive in maintaining a clean and safe dryer vent.
Now that we have discussed the frequency of dryer vent cleaning, let’s weigh the pros and cons of professional cleaning versus a DIY approach.
Professional Dryer Vent Cleaning vs. DIY Cleaning
When it comes to cleaning your dryer vent, you have the option to either tackle the task yourself or enlist the help of professional dryer vent cleaning services. Both approaches have their advantages and considerations. Let’s explore the pros and cons of each:
DIY Cleaning
Pros:
- Cost Savings: Cleaning your dryer vent yourself can save you money, as you won’t have to pay for professional services.
- Familiarity with Your Dryer: Cleaning the vent yourself allows you to become familiar with the inner workings of your dryer, understanding its maintenance needs.
- Convenience: DIY cleaning gives you the flexibility to clean your dryer vent whenever it is most convenient for you.
Cons:
- Lack of Expertise: Unless you have experience in dryer vent cleaning, there is a chance of not achieving a thorough and effective cleaning.
- Not Having the Right Tools: DIY cleaning may be challenging if you don’t have the appropriate tools, potentially compromising the quality of the cleaning.
- Risk of Accidents: Cleaning the dryer vent yourself requires working in tight spaces and potentially on ladders, increasing the risk of accidents or injury.
Read more: How Long Does A Carpet Cleaning Take
Professional Cleaning
Pros:
- Expert Knowledge: Professional dryer vent cleaners have the experience and expertise to perform a comprehensive and effective cleaning, reducing the risk of potential issues.
- Specialized Equipment: Professionals have access to specialized tools and equipment specifically designed for dryer vent cleaning, ensuring a thorough cleaning job.
- Time-Saving: Hiring professionals saves you time and effort, as they will efficiently clean your dryer vent while you can focus on other tasks or chores.
Cons:
- Cost: Professional dryer vent cleaning services come at a cost, which may vary depending on your location and the complexity of the job.
- Scheduling Constraints: You may need to work around the availability of professional cleaners, which might not align with your preferred timing.
- Lack of DIY Knowledge: Relying on professionals might mean missing out on the opportunity to learn about maintaining and cleaning your dryer vent yourself.
Ultimately, the decision between professional dryer vent cleaning and DIY cleaning depends on your comfort level, availability of resources, and budget. If you feel confident in your abilities and have the necessary tools, DIY cleaning can be a cost-effective option. However, if you prefer peace of mind and want to ensure a thorough cleaning, professional services are worth considering.
Regardless of the approach you choose, the key is to prioritize regular dryer vent cleaning to maintain safety, efficiency, and the longevity of your dryer.
Now that we have discussed professional versus DIY cleaning, let’s highlight some common mistakes to avoid during the dryer vent cleaning process.
Avoiding Common Mistakes While Cleaning a Dryer Vent
While cleaning your dryer vent is an essential task, it’s important to approach it with caution and avoid common mistakes that can compromise the effectiveness and safety of the cleaning process. Here are some key mistakes to avoid:
- Not Disconnecting the Power: Before cleaning your dryer vent, always unplug the dryer or turn off its power source. Failure to do so can result in electric shock or damage to the appliance.
- Skipping Vent Inspection: Prior to cleaning, inspect the dryer vent carefully for any signs of damage or disconnections. Repair or replace any damaged components before proceeding with the cleaning.
- Not Using the Right Tools: Ensure you have the proper tools for the job, including a vent brush, vacuum cleaner, and necessary attachments. Using makeshift tools or inappropriate equipment may lead to an ineffective cleaning.
- Rushing the Cleaning Process: Take your time during the cleaning process to ensure a thorough job. Rushing can result in missing lint deposits or leaving blockages that can impede airflow.
- Not Cleaning the Entire Vent: Make sure to clean the entire vent from both ends, starting from the dryer and working your way to the exterior vent. Neglecting any section of the vent can lead to incomplete cleaning and reduced efficiency.
- Using Excessive Force: While it’s important to dislodge and remove lint, apply gentle and controlled force when using the brush or other tools. Using excessive force can damage the vent or dislodge important connections.
- Not Cleaning the Lint Trap: Cleaning the dryer vent goes hand in hand with regular cleaning of the lint trap. Before and after cleaning the vent, remove any lint or debris from the lint trap to maintain optimal airflow.
- Neglecting Exterior Vent Maintenance: Ensure that the exterior vent opening is free from obstructions, such as leaves or debris. Regularly check and clean the exterior vent to maintain proper ventilation.
- Disregarding Safety Measures: Always prioritize safety during the cleaning process. Wear protective gloves and safety glasses to prevent injuries, and avoid leaning on or putting excessive pressure on the vent or dryer.
- Forgetting Regular Maintenance: Cleaning the dryer vent is not a one-time task. Establish a regular maintenance schedule to prevent lint buildup and ensure long-term efficiency and safety.
By avoiding these common mistakes, you can ensure a successful and effective dryer vent cleaning process, promoting optimal performance and reducing the risk of fire hazards.
Now that we’ve covered the importance of avoiding common mistakes, let’s summarize what we’ve learned about dryer vent cleaning.
Conclusion
Regularly cleaning your dryer vent is a crucial aspect of home maintenance that should not be overlooked. Not only does it help prevent potential fire hazards, but it also improves the efficiency and longevity of your dryer. By following the tips and guidelines provided in this article, you can effectively clean your dryer vent and ensure optimal performance.
We discussed the importance of cleaning dryer vents to reduce the risk of fire and improve efficiency. We explored the signs of a clogged vent, such as longer drying times and excessive heat, and highlighted the tools needed for a thorough cleaning, including a vent brush, vacuum cleaner, and other basic tools.
A step-by-step guide was provided to help you through the cleaning process, emphasizing the need for safety precautions and attention to detail. We also shared tips and tricks to make the cleaning process more efficient, such as using a vacuum cleaner with a HEPA filter or considering the installation of a dryer vent cover.
Furthermore, we discussed the frequency of dryer vent cleaning, acknowledging that it can vary depending on factors such as usage, vent length, and environmental conditions. We also compared the pros and cons of professional cleaning versus a DIY approach, allowing you to make an informed decision based on your circumstances and preferences.
Lastly, we highlighted common mistakes to avoid during the dryer vent cleaning process, such as rushing the process, neglecting certain sections of the vent, or using excessive force. By avoiding these pitfalls, you can ensure a thorough cleaning and maintain the safety and efficiency of your dryer vent.
In conclusion, taking the time to clean your dryer vent regularly is a small investment that yields significant benefits. Not only does it enhance the performance and lifespan of your dryer, but it also promotes safety for you and your home. So, prioritize regular dryer vent cleaning and enjoy the peace of mind that comes with a well-maintained appliance.
Frequently Asked Questions about How Long Does It Take To Clean A Dryer Vent
Was this page helpful?
At Storables.com, we guarantee accurate and reliable information. Our content, validated by Expert Board Contributors, is crafted following stringent Editorial Policies. We're committed to providing you with well-researched, expert-backed insights for all your informational needs.