Home>Home Maintenance>How To Make Dryer Vent Pumpkins
Home Maintenance
How To Make Dryer Vent Pumpkins
Modified: March 6, 2024
Learn how to make adorable fall decorations with dryer vents in this step-by-step guide. Perfect for home-maintenance enthusiasts!
(Many of the links in this article redirect to a specific reviewed product. Your purchase of these products through affiliate links helps to generate commission for Storables.com, at no extra cost. Learn more)
Introduction
As the fall season approaches, many homeowners are eager to decorate their homes with festive and creative items. One unique and cost-effective way to add a touch of autumn charm is by making dryer vent pumpkins. These adorable decorations are made using common household items and can be customized to match any home decor style.
In this article, we will guide you through the step-by-step process of creating your own dryer vent pumpkins. From gathering the materials to putting on the finishing touches, you’ll learn everything you need to know to bring these charming pumpkins to life.
Not only are dryer vent pumpkins a fun and creative DIY project, but they also serve as a sustainable option for repurposing items that might otherwise go to waste. So let’s roll up our sleeves and get ready to embark on this exciting autumn craft adventure!
Key Takeaways:
- Transform humble dryer vents into charming pumpkins for a festive fall decor. Repurpose household items and get creative for a sustainable and budget-friendly DIY project.
- Gather materials, shape, paint, decorate, and display your unique pumpkins. Embrace the joy of crafting and let your creativity shine in your autumn decor.
Read more: How To Vent A Dryer
Materials Needed
Before you begin making your dryer vent pumpkins, it’s important to gather all the necessary materials. Here’s a list of what you’ll need:
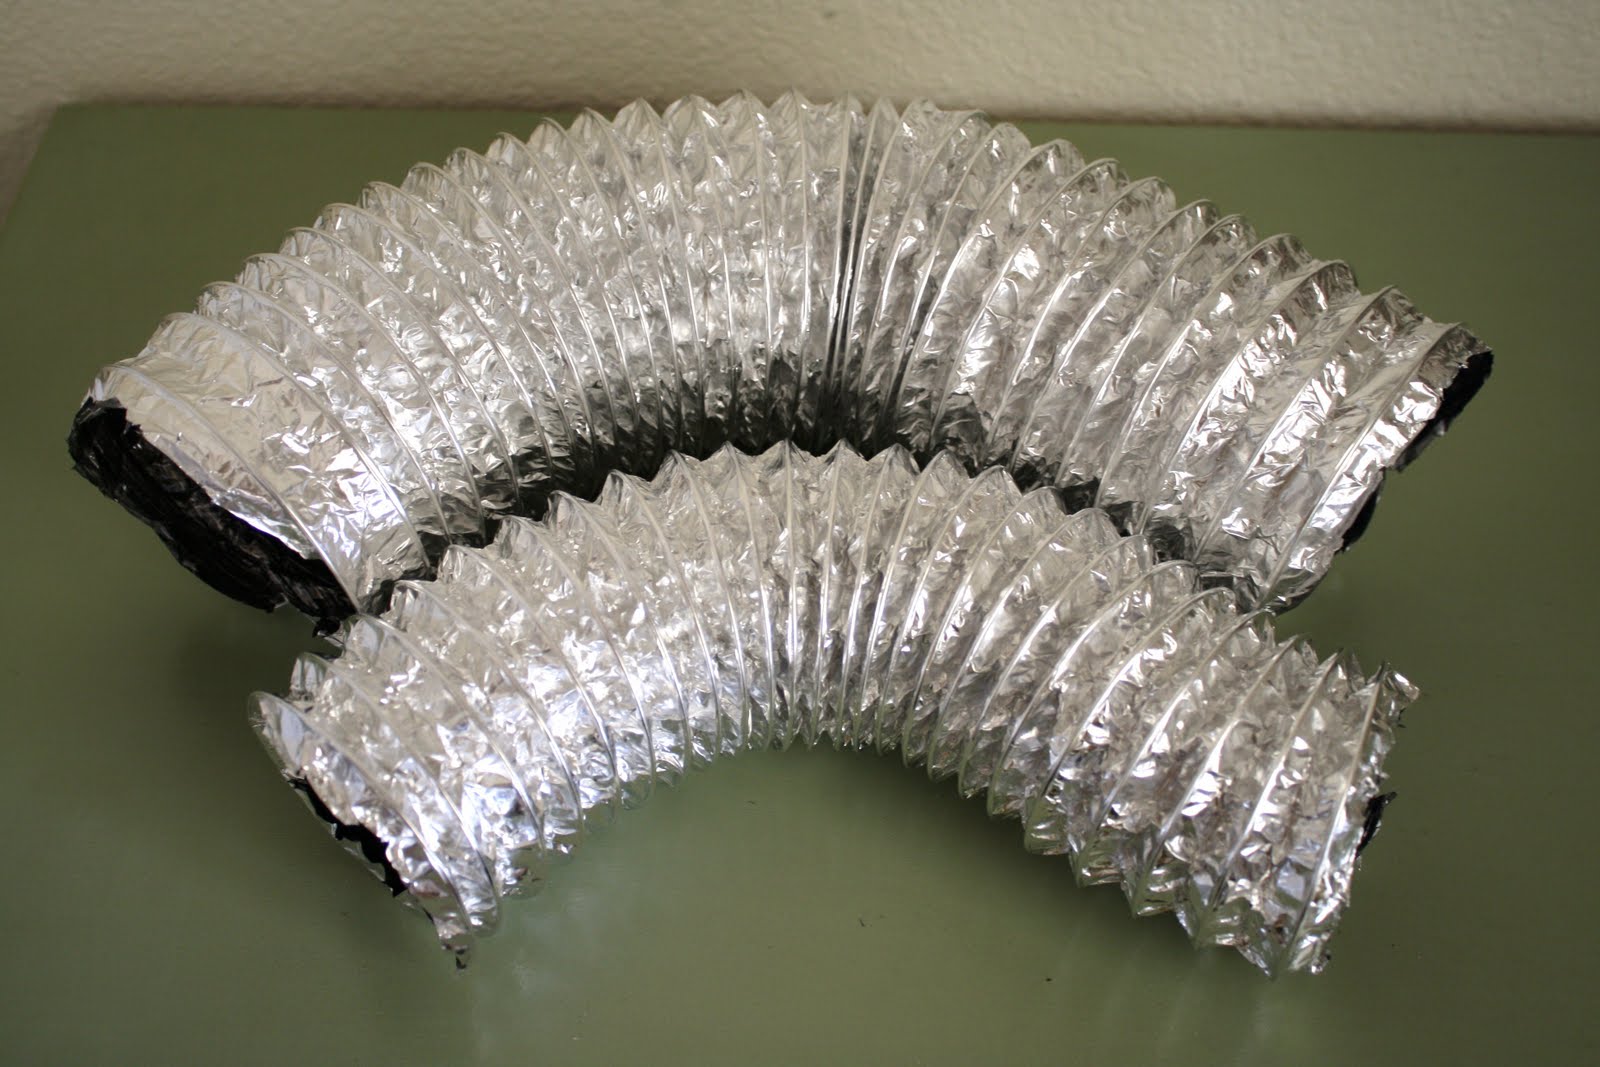
- Dryer vent hose: Look for a flexible dryer vent hose that is easily bendable and can be cut into sections.
- Scissors: Make sure you have a good pair of scissors that can easily cut through the dryer vent hose.
- Wire cutters: These will come in handy for cutting and shaping the wire used as the pumpkin’s stem.
- Cardboard or newspaper: This will protect your work surface from any potential paint spills or messes.
- Orange spray paint: Choose a high-quality spray paint specifically designed for use on various surfaces, including metal and plastic.
- Paintbrushes: You’ll need a variety of paintbrushes for painting and adding details to your pumpkins.
- Acrylic craft paint: Select a few different shades of green, brown, and black for adding depth and dimension to your pumpkins.
- Hot glue gun and glue sticks: These will be used to attach the wire stem and any additional decorations to the pumpkins.
- Additional decorations: Get creative! Consider using faux leaves, ribbons, twine, or any other festive embellishments you desire.
Once you have gathered all of these materials, you’ll be well-prepared to start crafting your very own dryer vent pumpkins.
Step 1: Gather materials
Before you dive into the creative process of making dryer vent pumpkins, it’s important to make sure you have all the necessary materials on hand. Here’s a simple step-by-step guide to help you gather everything you need:
- Check your inventory: Take note of the materials you already have, such as scissors, wire cutters, paintbrushes, and a hot glue gun. This will help you determine which items you still need to acquire.
- Make a shopping list: Based on the materials list provided in the previous section, create a shopping list of the items you still need to purchase. This will ensure that you have everything you need before you begin your project.
- Visit a craft or hardware store: Head to your local craft or hardware store and gather all the items on your shopping list. Look for a flexible dryer vent hose that is easy to manipulate and cut into sections. Don’t forget to pick up a can of high-quality orange spray paint and a few shades of acrylic craft paint for the finishing touches.
- Organize your materials: Once you have obtained all the necessary items, organize them in a designated workspace. Clear off a table or countertop and lay down a protective layer of cardboard or newspaper to prevent any spills or messes.
By taking the time to gather and organize your materials, you’ll ensure a smooth and hassle-free crafting experience. With everything you need at your fingertips, you’ll be ready to move on to the exciting next step in creating your dryer vent pumpkins.
Step 2: Prepare the dryer vent
Now that you have all your materials ready, it’s time to prepare the dryer vent hose for transforming it into charming pumpkins. Follow these steps to get started:
- Measure and cut: Begin by measuring and cutting the dryer vent hose into sections of your desired pumpkin size. Keep in mind that each section will form an individual pumpkin, so adjust the length based on your preference.
- Shape the hose: Once you have the sections cut, manipulate the dryer vent hose to create a round, pumpkin-like shape. Gently squeeze and mold the hose until it forms a pleasing shape. Don’t worry about making it perfect – the imperfect shape adds to the charm of these pumpkins.
- Secure the ends: To ensure that the hose maintains its shape, use hot glue or duct tape to secure the ends together. Apply the adhesive sparingly, as you want to be able to remove it later without damaging the hose.
By preparing the dryer vent hose in these simple steps, you’ll have the foundation ready to transform it into adorable pumpkins. With the hose shaped and secured, you’re now ready to move on to the next phase of creating your dryer vent pumpkins.
Step 3: Create the pumpkin shape
With the prepared dryer vent hose in hand, it’s time to give it the characteristic shape of a pumpkin. Follow these steps to create the perfect pumpkin shape:
- Flatten the bottom: Start by flattening the bottom of the dryer vent section gently. This will give your pumpkin stability and ensure it sits upright when displayed.
- Create creases: Use your hands to make creases along the sides of the hose. These creases will mimic the natural curves and ridges of a pumpkin.
- Add indentations: Take your fingers and press into the hose gently to create indentations. These indentations will give your pumpkin a more realistic and textured appearance.
- Adjust the shape: Play around with the hose, bending and twisting it slightly to further refine the pumpkin shape. Don’t be afraid to experiment and make adjustments until you’re satisfied with the overall look.
Remember, the goal is to create a pumpkin-like shape that is unique and visually appealing. Embrace the imperfections and embrace the process of transforming a simple dryer vent into a charming autumn decoration. Once you’re happy with the shape, you can move on to the next exciting step: painting your pumpkins!
After cleaning out the dryer vent, spray paint it orange and let it dry. Then, use black paint to add a face. Finally, stuff with newspaper and add a stem for a festive pumpkin decoration!
Read more: How To Replace Dryer Vent
Step 4: Paint the pumpkin
Now that you have the perfect pumpkin shape, it’s time to bring your dryer vent pumpkins to life with a vibrant coat of paint. Follow these steps to paint your pumpkins:
- Prepare your workspace: Lay down a drop cloth or old newspapers to protect the surface you’ll be working on. This will catch any paint drips and make cleanup easier.
- Choose your paint colors: Select a can of orange spray paint specifically designed for use on metal or plastic surfaces. Shake the can well before starting to ensure proper mixing.
- Apply a base coat: Hold the spray paint can a few inches away from the pumpkin and apply a light, even coat of orange paint. Allow the paint to dry, following the manufacturer’s instructions, before applying additional coats if needed.
- Add depth and dimension: Once the base coat is dry, use acrylic craft paint in shades of green, brown, and black to add depth and dimension to your pumpkins. Use a dry brush or sponge to lightly dab on these colors to create a realistic pumpkin texture.
- Blend the colors: Take a clean and dry brush to gently blend the different paint colors together. This will give your pumpkins a more natural and organic look.
Feel free to get creative and experiment with different color combinations and techniques to achieve the desired look. Remember, no pumpkin is the same, so embrace the opportunity to add your personal touch to each pumpkin.
Allow the paint to dry completely before moving on to the next step. Once your pumpkins are dry and the paint is fully cured, it’s time for the fun part – decorating!
Step 5: Decorate the pumpkin
After painting your dryer vent pumpkins, it’s time to unleash your creativity and decorate them to reflect your personal style and the spirit of the season. Follow these steps to bring your pumpkins to life with embellishments:
- Choose your decorations: Gather an assortment of decorations to add that extra festive touch to your pumpkins. Consider using faux leaves, ribbons, twine, or any other decorative elements that complement your overall design.
- Attach decorations with hot glue: Use a hot glue gun to attach the decorations securely. Apply a drop or two of hot glue to the back of each decoration and press it onto the pumpkin. Be cautious not to burn yourself when using the hot glue gun.
- Get creative with placement: Experiment with different arrangements and placements for your decorations. You can attach leaves around the stem, wrap twine or ribbon around the pumpkin, or even create unique patterns using various materials.
- Add a stem: Cut a piece of wire to the desired length for the stem of your pumpkin. Use wire cutters to shape and bend the wire into a curved stem. Attach the wire stem to the top of the pumpkin using hot glue, ensuring it is securely in place.
Have fun with the decorating process and let your imagination run wild! There are no limits to how you can customize your dryer vent pumpkins. Feel free to personalize them to match your home’s decor or create a whimsical display that captures the essence of the autumn season.
Once you are satisfied with the decorations, it’s time to consider adding some finishing touches to make your pumpkins truly stand out.
Step 6: Optional steps for finishing touches
With your dryer vent pumpkins decorated and looking adorable, you can take them to the next level with some optional finishing touches. These extra steps will add that special touch and make your pumpkins even more unique. Here are a few ideas to consider:
- Add a distressed look: Use sandpaper or a dry brush to lightly distress the surface of the pumpkins. This will give them a weathered and vintage appearance, adding depth and character.
- Create facial features: Use black acrylic craft paint or permanent markers to draw eyes, noses, and mouths onto your pumpkins. Get creative with different facial expressions to give each pumpkin its own personality.
- Apply a protective sealant: To ensure that your pumpkins last for years to come, consider applying a protective clear sealant over the painted surface. This will add a layer of protection against fading and chipping.
- Create a pumpkin patch display: Arrange your dryer vent pumpkins in a grouping, along with some real or faux autumn leaves, hay bales, or other seasonal decorations. This will create a charming pumpkin patch display that will bring the beauty of fall into your home.
These optional finishing touches will add extra flair and make your dryer vent pumpkins truly unique. Feel free to explore other creative ideas and techniques to make your pumpkins stand out and reflect your personal style.
Now that you’ve completed all the steps, it’s time to find the perfect spot to display your homemade dryer vent pumpkins.
Step 7: Display your dryer vent pumpkins
Now that your dryer vent pumpkins are complete, it’s time to find the perfect spot to display your autumn creations. Here are some tips to showcase your dryer vent pumpkins:
- Choose a prominent location: Select a place in your home where the pumpkins will catch the eye of your family and guests. Consider mantels, entryway tables, or shelves as ideal spots for displaying your pumpkins.
- Create a focal point: Arrange your dryer vent pumpkins in a visually appealing way. Create a centerpiece by grouping them together or place them strategically among other fall decor items.
- Play with height and composition: Vary the heights of your pumpkins by using different sizes and placing them on pedestals or stacked books. This will add visual interest and depth to your display.
- Enhance with lighting: Illuminate your pumpkins by using battery-operated tea lights or string lights. The warm glow emitted by the lights will create a cozy and magical ambiance.
- Rotate and refresh: Don’t be afraid to switch up the display throughout the season. Move your pumpkins to different areas of your home or swap out the decorations and accessories to keep your decor fresh and exciting.
Remember, displaying your homemade dryer vent pumpkins is not only a way to celebrate the beauty of autumn but also a way to showcase your creativity and talent. Have fun with it, and let your unique style shine through in your display.
With these simple steps, you’ve learned how to turn a humble dryer vent into charming and festive pumpkins for your home. Your DIY project is not only environmentally friendly but also a creative and budget-friendly way to add a touch of fall to your decor.
Enjoy the process of crafting your dryer vent pumpkins and the joy they bring to your home throughout the autumn season. Happy decorating!
Read more: How To Reroute A Dryer Vent
Conclusion
Congratulations! You’ve successfully learned how to make charming dryer vent pumpkins to decorate your home for the autumn season. By repurposing a common household item and adding your own creative touch, you’ve created unique and eye-catching decorations that will impress your family and friends.
Throughout this article, we guided you through the step-by-step process of creating dryer vent pumpkins. From gathering the materials to shaping and painting the pumpkins, and finally adding personalized decorations and finishing touches, you’ve learned the art of transforming a simple dryer vent into a beautiful and festive fall decoration.
Not only are these DIY dryer vent pumpkins a fun and sustainable project, but they also provide a cost-effective way to elevate your home decor. By using readily available materials and incorporating your own creativity, you’ve achieved stunning results.
Now that you have a set of uniquely decorated pumpkins, take pride in displaying them in a prime location in your home. Showcase your handmade creations and let them contribute to the warm and cozy atmosphere of the season.
Remember, the steps shared in this article are just a starting point. Feel free to experiment with different colors, patterns, decorations, and display arrangements to make the pumpkins truly your own. Each pumpkin can be a reflection of your personal style and creativity.
So, gather your materials, set up a workspace, and let your imagination run wild. Embrace the joy of crafting and immerse yourself in the festive spirit of fall. Enjoy the process of making these unique decorations and the joy they bring to your home throughout the autumn season.
Now go ahead, get started, and turn simple dryer vents into stunning pumpkins that will become the centerpiece of your autumn decor!
Frequently Asked Questions about How To Make Dryer Vent Pumpkins
Was this page helpful?
At Storables.com, we guarantee accurate and reliable information. Our content, validated by Expert Board Contributors, is crafted following stringent Editorial Policies. We're committed to providing you with well-researched, expert-backed insights for all your informational needs.