Home>Home Security and Surveillance>How To Wire A Motion Detector With Blue, Brown, And Red Wires

Home Security and Surveillance
How To Wire A Motion Detector With Blue, Brown, And Red Wires
Modified: May 6, 2024
Enhance your home security and surveillance with our step-by-step guide on wiring a motion detector using blue, brown, and red wires.
(Many of the links in this article redirect to a specific reviewed product. Your purchase of these products through affiliate links helps to generate commission for Storables.com, at no extra cost. Learn more)
Introduction
Welcome to our comprehensive guide on how to wire a motion detector with blue, brown, and red wires. Motion detectors are an integral part of any home security system, providing an added layer of protection by alerting homeowners to potential intruders or suspicious activity. Wiring a motion detector may seem like a daunting task, especially if you are not familiar with electrical work. However, with the right tools and a clear understanding of the wiring process, you can easily install a motion detector in your home.
In this article, we will walk you through the step-by-step process of wiring a motion detector with blue, brown, and red wires. We will explain how to identify these wires and guide you through the proper connections to ensure the motion detector functions correctly. So, let’s get started!
Key Takeaways:
- Wiring a motion detector with blue, brown, and red wires is manageable with the right tools and knowledge. Identifying and connecting each wire correctly is crucial for the detector to function effectively.
- Testing the motion detector after wiring is essential to ensure it works properly. Regular maintenance and testing will help keep your home security system in top condition.
Step 1: Gather the necessary tools and materials
Before you begin wiring your motion detector, it is important to gather all the required tools and materials. Having everything at hand will make the process smoother and more efficient. Here is a list of the tools and materials you will need:
- Wire cutter/stripper: This tool will help you cut and strip the wires to the correct length.
- Screwdriver: Depending on the type of motion detector, you may need a Phillips or flathead screwdriver to secure the wires.
- Electrical tape: This is used to insulate the wires, providing protection against electrical shocks and preventing any short circuits.
- Wire nuts: These are small caps that you will use to securely connect the wires together.
- Motion detector: Make sure you have the appropriate motion detector for your specific needs. There are various models available, so choose one that suits your requirements.
- Wiring diagram: This will serve as a guide to ensure you make the correct connections.
Once you have gathered all the necessary tools and materials, you can proceed to the next step of identifying the blue, brown, and red wires.
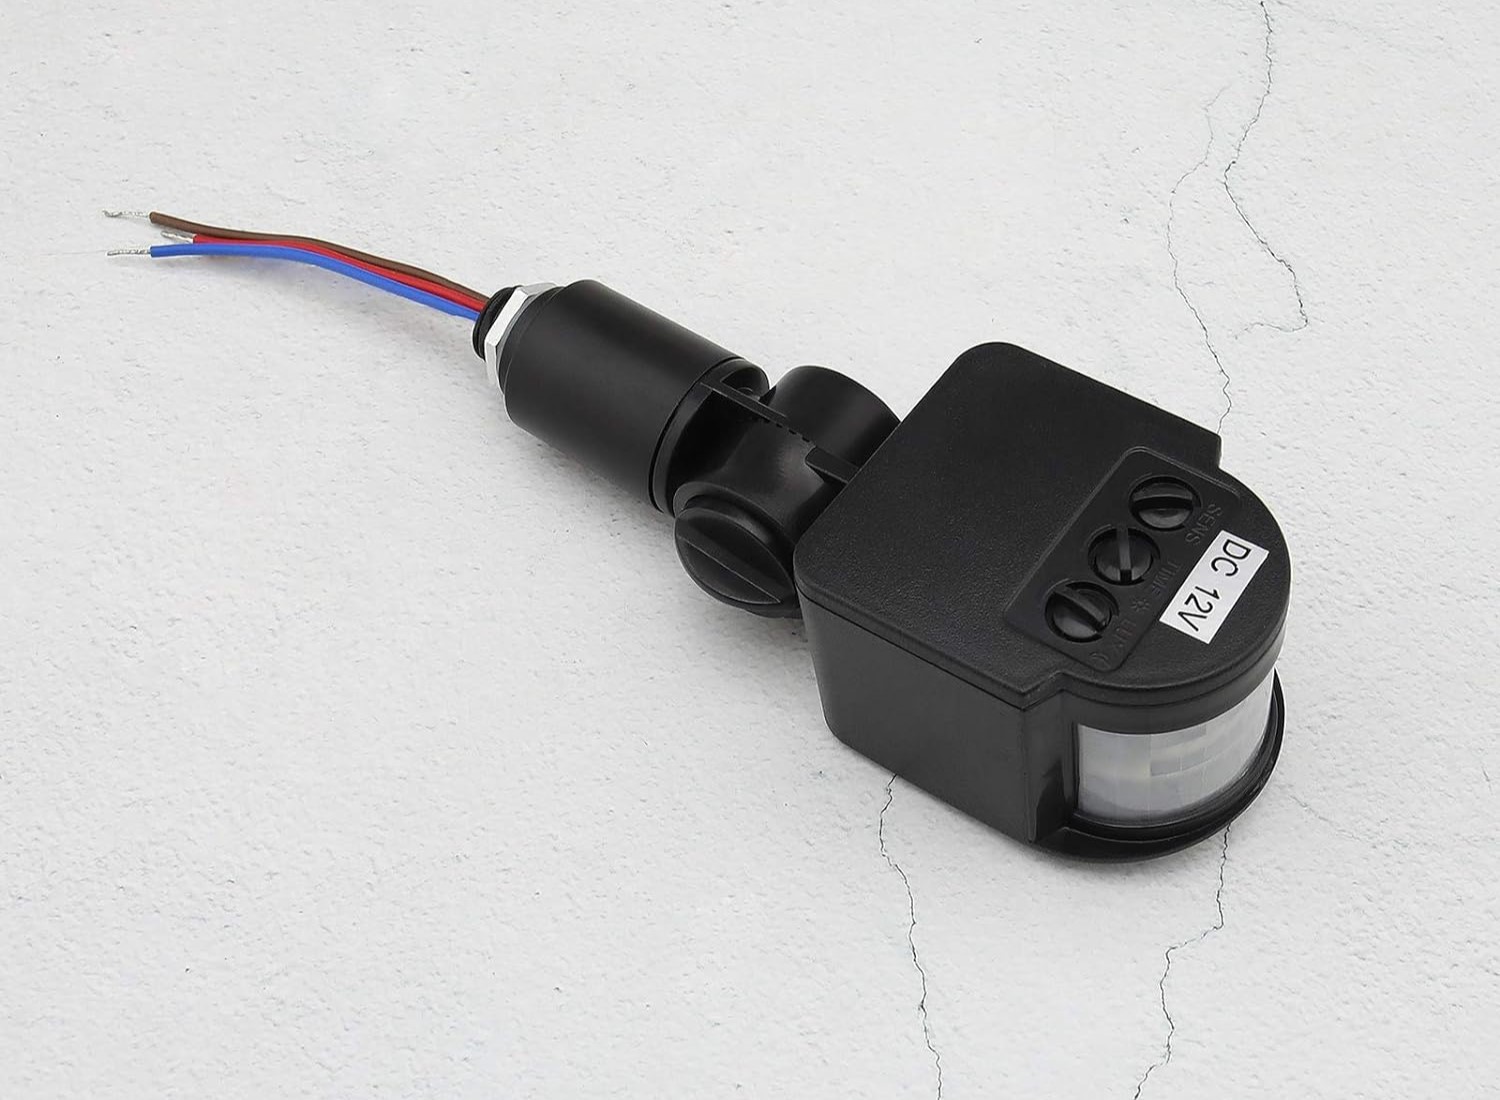
Step 2: Identify the blue, brown, and red wires
Identifying the blue, brown, and red wires is crucial before you can proceed with the wiring process. These wires are commonly used in motion detectors and have specific functions. Here’s how you can identify each wire:
- Blue wire: The blue wire is typically the neutral wire. It carries the current back to the electrical panel and provides a path for the electricity to return.
- Brown wire: The brown wire is the live wire. It carries the current from the electrical panel to the motion detector, supplying power to the device.
- Red wire: The red wire is usually the switched wire. It carries the signal from the motion detector to other devices, such as an alarm system or light fixture, triggering them to activate when motion is detected.
It is essential to identify these wires correctly to ensure proper connectivity and functionality of your motion detector. Refer to the wiring diagram provided by the manufacturer to identify the specific color coding for your motion detector model. Take note of any additional wires or color variations that may be present in your particular device.
Once you have successfully identified the blue, brown, and red wires, you can move on to the next step of preparing the motion detector for wiring.
Step 3: Prepare the motion detector
Now that you have identified the blue, brown, and red wires, it’s time to prepare the motion detector for wiring. Here are the steps to follow:
- Read the manufacturer’s instructions: Before starting any installation, carefully read the instructions provided with your motion detector. Familiarize yourself with the device’s specific requirements and any special considerations.
- Turn off the power: Safety is paramount when working with electrical wiring. Before handling the motion detector, make sure to turn off the power at the breaker box to avoid any accidents or electrical shocks.
- Remove the cover: Depending on the model, you may need to remove the cover of the motion detector. This will provide access to the internal wiring terminals.
- Inspect the terminals: Take a close look at the wiring terminals inside the motion detector. Ensure that they are clean and free of any debris that may interfere with the wiring connections.
By preparing the motion detector in advance, you are setting yourself up for a smoother installation process. Once you have completed these steps, you can proceed to the next step: connecting the blue wire.
Step 4: Connect the blue wire
With the motion detector prepared, it’s time to start connecting the wires. Begin with the blue wire, which is typically the neutral wire. Here’s how to connect it:
- Locate the blue wire terminal: Inside the motion detector, you will find a terminal labeled “N” or “Neutral.” This is where the blue wire will be connected.
- Strip the blue wire: Use a wire stripper to carefully remove about half an inch of insulation from the end of the blue wire. This will expose the bare copper wire.
- Insert the blue wire: Insert the stripped end of the blue wire into the blue wire terminal. Make sure it is securely inserted and tightly fastened.
- Tighten the terminal: Using a screwdriver, tighten the terminal screw to ensure a secure connection. Be careful not to over-tighten, as this can damage the wire or terminal.
Connecting the blue wire is essential as it establishes the neutral connection for the motion detector. This wire allows the electrical current to safely return to the electrical panel. Once you have successfully connected the blue wire, you can move on to the next step: connecting the brown wire.
When wiring a motion detector with blue, brown, and red wires, remember to connect the blue wire to the neutral (usually white) wire, the brown wire to the live (usually black) wire, and the red wire to the switched live (usually red) wire. Always turn off the power before working with electrical wiring.
Read more: How To Wire Bosch Tritech Motion Detector
Step 5: Connect the brown wire
After successfully connecting the blue wire, it’s time to move on to the brown wire. The brown wire is typically the live wire, responsible for supplying power to the motion detector. Follow these steps to connect the brown wire:
- Locate the brown wire terminal: Inside the motion detector, look for a terminal labeled “L” or “Live.” This is where the brown wire will be connected.
- Strip the brown wire: Use a wire stripper to carefully remove about half an inch of insulation from the end of the brown wire, exposing the bare copper wire.
- Insert the brown wire: Insert the stripped end of the brown wire into the brown wire terminal. Ensure that it is securely inserted and tightly fastened.
- Tighten the terminal: Using a screwdriver, tighten the terminal screw to create a secure connection. Avoid over-tightening, as it can damage the wire or terminal.
By connecting the brown wire, you are providing the necessary power to your motion detector. This wire supplies the current from the electrical panel, allowing the device to operate. Once the brown wire is successfully connected, you can proceed to the next step: connecting the red wire.
Step 6: Connect the red wire
Now that you’ve connected the blue and brown wires, it’s time to move on to the red wire. The red wire is typically the switched wire, responsible for sending a signal from the motion detector to other devices, such as an alarm system or light fixture. Here’s how to connect the red wire:
- Locate the red wire terminal: Inside the motion detector, look for a terminal labeled “S” or “Switched.” This is where the red wire will be connected.
- Strip the red wire: Use a wire stripper to carefully remove about half an inch of insulation from the end of the red wire, exposing the bare copper wire.
- Insert the red wire: Insert the stripped end of the red wire into the red wire terminal. Ensure that it is securely inserted and tightly fastened.
- Tighten the terminal: Using a screwdriver, tighten the terminal screw to create a secure connection. Avoid over-tightening, as it can damage the wire or terminal.
By connecting the red wire, you are enabling the motion detector to communicate with other devices, allowing them to activate when motion is detected. This wire provides the essential signal to trigger external actions, such as sounding an alarm or turning on a light. Once the red wire is securely connected, you can proceed to the next step: testing the motion detector.
Step 7: Test the motion detector
After successfully connecting all the required wires, it’s time to test the motion detector to ensure proper functionality. Follow these steps to test your motion detector:
- Turn on the power: Head to the breaker box and turn on the power to the motion detector circuit.
- Set the motion detector mode: Depending on your specific motion detector model, adjust the settings to the desired mode. This may include selecting the sensitivity level, range, and duration of the motion detection.
- Move within the motion detection range: Step into the detection range of the motion detector and observe its response. The device should detect your movement and activate any connected devices or trigger an alarm if applicable.
- Test additional features: If your motion detector has additional features, such as integrated cameras or audio notifications, test them to ensure they are functioning correctly.
During the testing phase, be sure to carefully observe the motion detector’s performance and make any necessary adjustments to the settings. If you encounter any issues, consult the manufacturer’s instructions or seek professional assistance.
Remember, regular testing and maintenance of your motion detector is essential to ensure continued functionality and effectiveness in securing your home. Make it a habit to check the device periodically and replace batteries if necessary.
With the successful testing of your motion detector complete, you can now enjoy the added security and peace of mind it provides.
Conclusion
Wiring a motion detector with blue, brown, and red wires may seem intimidating at first, but with the right tools, knowledge, and patience, it can be a manageable task. By following the step-by-step process outlined in this guide, you can confidently install a motion detector in your home and enhance your security system.
Throughout this guide, we discussed the importance of gathering the necessary tools and materials, identifying the blue, brown, and red wires, and preparing the motion detector for wiring. We also explained how to connect each wire properly, from the neutral blue wire to the live brown wire and the switched red wire. Finally, we emphasized the crucial step of testing the motion detector to ensure its proper functionality.
Remember, safety should always be a priority when working with electrical wiring. Always turn off the power at the breaker box before handling any electrical components and consult the instructions provided by the manufacturer for your specific motion detector model.
By installing a motion detector, you are taking an important step towards enhancing the security and surveillance capabilities of your home. It can help deter intruders, alert you to potential threats, and provide peace of mind knowing that your property is protected.
We hope this guide has provided you with the necessary information and guidance to wire a motion detector effectively. Remember to regularly test your motion detector and perform any required maintenance to ensure its continued functionality. Stay vigilant and enjoy the added security and peace of mind that comes with a properly installed motion detector.
Ready to take your home tech to the next level? Check out our detailed guide on home automation, where you'll find the latest trends and must-have gadgets for 2024. If you're more of a hands-on person, our tutorial on electrical wiring to your garage might just spark your interest. For those who love rolling up their sleeves and getting involved, don't miss our comprehensive tips on DIY home improvement. Each guide is packed with useful, practical information to help you upgrade your living space efficiently and safely.
Frequently Asked Questions about How To Wire A Motion Detector With Blue, Brown, And Red Wires
Was this page helpful?
At Storables.com, we guarantee accurate and reliable information. Our content, validated by Expert Board Contributors, is crafted following stringent Editorial Policies. We're committed to providing you with well-researched, expert-backed insights for all your informational needs.