Home>Home Security and Surveillance>How To Wire A PoE Outdoor Camera
Home Security and Surveillance
How To Wire A PoE Outdoor Camera
Modified: March 6, 2024
Learn how to wire a PoE outdoor camera for home security and surveillance with our comprehensive guide. Ensure the safety of your property with this easy-to-follow DIY tutorial.
(Many of the links in this article redirect to a specific reviewed product. Your purchase of these products through affiliate links helps to generate commission for Storables.com, at no extra cost. Learn more)
Introduction
Welcome to our comprehensive guide on how to wire a PoE outdoor camera! If you’re looking to enhance the security and surveillance capabilities of your home, PoE (Power over Ethernet) outdoor cameras are an excellent choice. In this article, we will provide you with step-by-step instructions on how to wire a PoE outdoor camera system, ensuring that you can enjoy reliable and high-quality surveillance.
Key Takeaways:
- PoE outdoor cameras simplify installation by combining power and data transmission in a single Ethernet cable. This reduces cable clutter and provides flexibility in camera placement for effective home security.
- Proper planning, secure mounting, and thorough testing are essential for successfully wiring a PoE outdoor camera. This ensures reliable surveillance coverage and peace of mind for homeowners.
Read more: How Is The Geeni Outdoor Camera Wired In
What is PoE?
Before we dive into the installation process, let’s first understand what PoE is. PoE stands for Power over Ethernet, which allows both power and data to be transmitted over a single Ethernet cable. With a PoE system, you no longer need to run separate power cables to each of your outdoor cameras. Instead, the power is delivered directly through the Ethernet cable, simplifying the installation process and reducing the clutter of cables.
There are two components of a PoE system: the PoE injector (or PoE switch) and the PoE device (in this case, the outdoor camera). The injector or switch is responsible for transmitting power and data to the device, while the device receives and utilizes the power to operate. This integrated power and data transmission make PoE a practical and efficient solution for outdoor camera installations.
Benefits of PoE Outdoor Cameras
Now that we understand what PoE is, let’s explore some of the benefits of using PoE outdoor cameras for your home security and surveillance needs.
- Easy Installation: As mentioned earlier, PoE cameras simplify the installation process by eliminating the need for separate power cables. This means less time spent on running cables and fewer cables to manage.
- Flexibility: PoE outdoor cameras can be installed in various locations without the limitation of power outlet availability. This flexibility allows you to strategically place cameras to cover the vulnerable areas around your property.
- Reliability: With PoE, the power supply to the camera is centralized, resulting in a more stable and reliable power source compared to traditional camera setups.
- Scalability: PoE systems are scalable, meaning you can easily add or remove cameras as your surveillance needs change. Additionally, PoE switches typically provide multiple ports, allowing you to connect multiple cameras to a single switch.
- Remote Access: PoE outdoor cameras can be connected to your home network, enabling you to access live video feeds and recordings remotely from your smartphone, tablet, or computer.
Now that you have a clear understanding of the benefits of PoE outdoor cameras, let’s move on to the tools and materials required for the installation process.
Key Takeaways:
- PoE outdoor cameras simplify installation by combining power and data transmission in a single Ethernet cable. This reduces cable clutter and provides flexibility in camera placement for effective home security.
- Proper planning, secure mounting, and thorough testing are essential for successfully wiring a PoE outdoor camera. This ensures reliable surveillance coverage and peace of mind for homeowners.
Read more: How Is The Geeni Outdoor Camera Wired In
What is PoE?
Power over Ethernet (PoE) is a technology that allows the transmission of power and data over a single Ethernet cable. It eliminates the need for additional power cables, making the installation of network devices much easier and more flexible.
In a traditional setup, devices such as IP cameras, wireless access points, and VoIP phones require a separate power source. This often involves running additional electrical cables or using power adapters. However, with PoE technology, the Ethernet cable itself can deliver both power and data to these devices, simplifying the installation process and reducing clutter.
PoE operates by using two pairs of wires in the Ethernet cable for data transmission and the remaining two pairs for power delivery. The power is injected into the Ethernet cable through a PoE-enabled network switch or an injector. The receiving device, such as an IP camera, has a built-in PoE receiver that extracts the power and uses it to operate.
One of the main advantages of PoE is its compatibility with standard Ethernet cables, particularly Cat5e or Cat6 cables. These cables can transmit data at high speeds and support Ethernet distances of up to 100 meters (328 feet), which is typically more than sufficient for most home security and surveillance needs.
There are two types of PoE standards commonly used:
- 802.3af (PoE): This is the original PoE standard and provides up to 15.4 watts of power. It is suitable for low-power devices such as IP cameras, wireless access points, and VoIP phones.
- 802.3at (PoE+): Also known as PoE Plus, this standard delivers up to 30 watts of power. It is designed for devices that require higher power, such as PTZ (pan-tilt-zoom) cameras, outdoor Wi-Fi access points, and video phones.
PoE technology offers several advantages for outdoor camera installations. It eliminates the need for power outlets in remote outdoor areas, making it easier to position cameras for optimal surveillance coverage. It also reduces the risk of power outages due to disconnected power adapters or faulty electrical connections.
With PoE outdoor cameras, you can ensure a streamlined and efficient security system that is both reliable and scalable. Whether you are setting up a new surveillance system or upgrading your existing one, PoE technology provides a convenient and cost-effective solution.
In the next section, we will discuss the benefits of using PoE outdoor cameras for your home security needs.
Benefits of PoE Outdoor Cameras
When it comes to home security and surveillance, PoE (Power over Ethernet) outdoor cameras offer numerous advantages. Let’s explore some of the key benefits:
- Easy Installation: One of the main advantages of PoE outdoor cameras is their easy installation process. With PoE, you only need to run a single Ethernet cable for both power and data transmission, eliminating the need for separate power cables. This simplifies the setup and reduces the time and effort required for installation.
- Flexibility: PoE outdoor cameras provide flexibility in terms of camera placement. Since they don’t rely on power outlets, you can install them in various locations, including areas where power sources are not readily available. This gives you greater flexibility in positioning the cameras to cover the vulnerable areas around your property.
- Reliability: Power over Ethernet offers a more reliable power source compared to traditional setups. The centralized power supply from a PoE switch provides a stable and uninterrupted power feed to all connected cameras. This reduces the risk of power outages caused by connection issues or power adapter failures.
- Scalability: PoE systems are highly scalable, making it easy to expand your surveillance system as needed. PoE switches often come with multiple ports, allowing you to connect multiple cameras to a single switch. Adding or removing cameras to the system is as simple as connecting or disconnecting an Ethernet cable.
- Cost-effective: PoE outdoor cameras can be a cost-effective solution in the long run. Since you don’t need to invest in additional power supply infrastructure, you can save on the cost of power cables, power outlets, and power adapters. Additionally, PoE systems consume less power overall, resulting in reduced energy costs.
- Remote Accessibility: PoE outdoor cameras can be connected to your home network, allowing you to access the live video feeds and recordings remotely. With the right software or app, you can monitor your property from anywhere using your smartphone, tablet, or computer. This remote accessibility provides peace of mind and enables you to stay connected to your home’s security at all times.
Overall, PoE outdoor cameras offer convenience, flexibility, and reliability for your home security needs. They simplify the installation process, provide flexibility in camera placement, and ensure a reliable power source. Additionally, PoE systems are scalable and cost-effective in the long run. With remote accessibility, you can stay connected to your home’s security no matter where you are.
Now that we’ve explored the benefits of PoE outdoor cameras, let’s move on to the tools and materials you will need for the installation process.
Read more: How To Wire Outdoor Security Cameras
Tools and Materials Required
Before you begin the installation of your PoE outdoor camera system, it’s important to gather all the necessary tools and materials. Having everything ready beforehand will help streamline the installation process. Here’s a list of the tools and materials you’ll need:
Tools:
- Power over Ethernet (PoE) Network Switch: A PoE switch is essential for delivering power and data to your outdoor cameras. Make sure to choose a switch with sufficient PoE ports to accommodate the number of cameras you plan to install.
- Router: A router is necessary for connecting your PoE switch to your home network and the internet.
- Drill and Drill Bits: You’ll need a drill to create holes for mounting the cameras and running cables.
- Screwdriver: A screwdriver is necessary for attaching the camera mounts and tightening screws.
- Crimping Tool: This tool is required for crimping RJ45 connectors onto the Ethernet cables.
- Cable Tester: A cable tester is useful for verifying the continuity and connectivity of your Ethernet cables.
- Network Cable Stripper: This tool will help you strip the outer jacket and separate the wires of the Ethernet cable.
- Stud Finder: A stud finder will assist you in locating studs or solid mounting surfaces for securing the camera mounts.
- Measuring Tape: You’ll need a measuring tape to ensure accurate positioning of the cameras and determining cable lengths.
- Ladder or Step Stool: Depending on the height at which you plan to mount the cameras, you might need a ladder or step stool for access.
Materials:
- PoE Outdoor Cameras: Choose outdoor cameras that are compatible with PoE and meet your specific surveillance needs.
- Ethernet Cables: Use quality Ethernet cables, preferably Cat5e or Cat6, to ensure reliable data and power transmission. Be sure to measure and cut the cables according to your installation requirements.
- RJ45 Connectors: You’ll need RJ45 connectors to terminate the Ethernet cables. Opt for high-quality connectors to ensure proper connections.
- Mounting Hardware: Depending on the type of camera and mounting surface, you might need screws, wall anchors, brackets, or other hardware for securely mounting the cameras.
- Weatherproofing Materials: Outdoor cameras require protection from the elements. Consider using weatherproof boxes, conduit, or tape to protect the connectors and cable connections.
- Labels and Cable Ties: Organize your cables and ensure easy identification by using labels and cable ties to secure and label the cables.
- Power Source: Although PoE eliminates the need for separate power cables, you’ll still need a power source for your PoE switch and router if they don’t have built-in power supplies.
Having these tools and materials ready will ensure a smooth and efficient installation process for your PoE outdoor camera system. Once you have everything prepared, you can proceed to the first step: planning the camera installation.
Step 1: Planning the Camera Installation
Before diving into the installation process, it’s crucial to plan your camera placement and determine the areas you want to monitor. Proper planning will help ensure that you achieve optimal coverage and maximum effectiveness from your PoE outdoor cameras. Here are some key considerations for planning the camera installation:
Read more: How To Wire A Nest Outdoor Camera
Identify Vulnerable Areas:
Start by identifying the vulnerable areas around your property that require monitoring. This could include entry points, driveways, backyards, or any other areas where unauthorized access or suspicious activity may occur. Take note of any blind spots that need to be covered by the cameras.
Determine Camera Coverage:
Based on the identified areas, determine the desired camera coverage. Consider the field of view (FOV) and the angle of coverage required to capture the necessary details. This will help you determine the number of cameras needed and their placement to achieve comprehensive coverage.
Camera Mounting Height and Angle:
Consider the optimal height and angle for mounting the cameras to capture the desired view. Mount the cameras at a height that provides a clear and unobstructed view of the target area. Avoid mounting them too high, as it might affect the clarity of the captured footage. Ensure that the cameras are placed at an angle that covers the intended area effectively.
Review Wiring Requirements:
Examine the installation site and determine the wiring requirements. Consider the distance between the cameras and the PoE switch or injector. Measure and cut the Ethernet cables accordingly, taking into account any obstacles that may require additional cable length. It’s also important to plan the route for running the cables, minimizing any exposed or vulnerable sections.
Read more: How To Hide Outdoor Security Camera Wires
Account for Lighting Conditions:
Take into consideration the lighting conditions in the target areas. If monitoring areas with low light, consider cameras with built-in infrared (IR) or low-light capabilities. Ensure that the cameras are positioned to minimize potential issues such as glare from direct sunlight or streetlights.
Consider Weatherproofing:
Since the cameras will be installed outdoors, it’s crucial to consider weatherproofing measures. Choose cameras that are designed to withstand various weather conditions and ensure the cable connections are adequately protected. Consider using weatherproof boxes, conduit, or tape to shield the connectors and cables from moisture and other elements.
By carefully planning the camera installation, you can ensure that your PoE outdoor cameras are strategically placed for optimal coverage and performance. Once you have finalized the camera placement and wiring requirements, you can proceed to the next step: mounting the cameras.
Step 2: Mounting the Camera
Now that you have planned the camera installation, it’s time to proceed with mounting the PoE outdoor camera in the desired locations. Proper mounting is essential to ensure a stable and secure camera placement. Follow these steps to mount your camera:
1. Gather the Necessary Tools:
Before starting, gather the tools required for mounting the camera, including a drill, drill bits, screwdriver, stud finder, and any specific mounting hardware provided with the camera.
Read more: How To Hide Wires On Nest Outdoor Camera
2. Locate the Mounting Surface:
Using a stud finder or by visually inspecting the area, locate a suitable mounting surface for your camera. Ensure the surface is strong enough to support the weight of the camera and can provide a stable mount.
3. Position the Camera Mount:
Hold the camera mount against the chosen surface and align it vertically or horizontally as desired. Use a level to ensure the mount is straight. Mark the screw hole positions on the surface using a pencil or marker.
4. Drill Pilot Holes:
Using an appropriately sized drill bit, drill pilot holes at the marked positions on the mounting surface. The pilot holes will help guide the screws and prevent the surface from splitting or cracking during installation.
5. Attach the Camera Mount:
Align the camera mount with the pilot holes and insert screws through the mount and into the holes. Tighten the screws using a screwdriver, ensuring that the mount is securely attached to the surface. Double-check that the mount is level and adjust if necessary.
Read also: 11 Amazing Poe Security Cameras For 2025
6. Attach the Camera to the Mount:
Most PoE outdoor cameras come with a separate camera body that attaches to the mount. Align the camera body with the mount and secure it in place following the manufacturer’s instructions. Use a screwdriver to tighten any screws or locking mechanisms provided.
7. Adjust the Camera Position:
Once the camera is attached to the mount, adjust its position as needed to achieve the desired camera angle and coverage. Consider the camera’s field of view and ensure it covers the target area effectively.
8. Test the Camera Position:
Before finalizing the mounting process, test the camera position by connecting it temporarily to the PoE switch or injector and viewing the live footage. Make any necessary adjustments to the camera angle or positioning based on the test results.
By following these steps, you can successfully mount your PoE outdoor camera in the desired location. Remember to ensure a secure and stable mount, as well as proper positioning for optimal surveillance coverage. With the camera securely mounted, it’s time to move on to the next step: running the Ethernet cable.
Step 3: Running Ethernet Cable
Now that the camera is securely mounted, the next step in installing your PoE outdoor camera system is running the Ethernet cable. This cable will carry both power and data to the camera, so it’s essential to properly route and secure the cable for reliable and efficient performance. Follow these steps to run the Ethernet cable:
1. Measure and Cut the Cable:
Measure the distance between the camera and the PoE switch or injector. Add a few extra feet to account for any necessary slack. Using a cable cutter or sharp scissors, cut the Ethernet cable to the desired length.
2. Plan the Cable Route:
Consider the best route for running the cable from the camera to the PoE switch or injector. Take into account potential obstacles such as walls, ceilings, or other structures. Ideally, route the cable through walls, crawl spaces, or conduit to protect and hide it from view.
3. Create Cable Entry Points:
If necessary, use a drill to create entry points in walls or other structures to pass the cable through. Ensure the entry points are large enough to accommodate the connector on the end of the cable.
4. Secure the Cable:
Using cable clips or other appropriate fasteners, secure the cable along the planned route. Ensure the cable is straight and properly aligned. Avoid sharp bends or kinks that may affect the cable’s performance. Use additional clips or fasteners as needed to maintain a clean and organized cable run.
5. Avoid Interference:
When routing the cable, be mindful of potential sources of interference such as electrical conduits, fluorescent lighting, or other cables. Keep the Ethernet cable separated from these sources to minimize the risk of signal degradation or interference.
6. Use Conduit (if necessary):
If running the cable outdoors or in areas prone to moisture or physical damage, consider using conduit to protect the cable. Conduit provides an extra layer of protection against harsh weather conditions and accidental damage.
7. Test the Cable:
Before making the final connections, use a cable tester to check the continuity and connectivity of the Ethernet cable. This will help ensure there are no breaks or issues with the cable.
8. Leave Extra Slack:
When reaching the camera and the PoE switch or injector, leave some extra slack in the cable. This will allow for adjustments and future maintenance if needed.
By following these steps, you can successfully run the Ethernet cable from the camera to the PoE switch or injector. Proper cable routing and secure fastening will help ensure reliable power and data transmission to the camera. Once the cable is in place, you can proceed to the next step: crimping RJ45 connectors onto the Ethernet cables.
Read more: What Is A Poe Adapter
Step 4: Crimping RJ45 Connectors
With the Ethernet cable in place, the next step in the installation process of your PoE outdoor camera system is crimping RJ45 connectors onto the cable ends. RJ45 connectors are essential for establishing a secure and reliable connection between the camera and the PoE switch or injector. Follow these steps to crimp RJ45 connectors:
1. Strip the Cable:
Using a network cable stripper or a sharp utility knife, carefully strip approximately two inches of the outer jacket from the end of the Ethernet cable. Be cautious not to cut the inner wires during this process.
2. Untwist and Arrange the Wires:
After stripping the outer jacket, untwist the pairs of wires and arrange them according to the TIA/EIA 568B or TIA/EIA 568A wiring standard. Choose the standard that matches the wiring scheme used in your network setup.
3. Trim the Wires:
Using a wire cutter or a sharp pair of scissors, trim the excess wire ends so that they are even and aligned. This will facilitate easier insertion into the RJ45 connector.
Read more: How To Hack Into A Wired Security Camera
4. Insert the Wires into the Connector:
Carefully insert the wires into the RJ45 connector, ensuring that each wire goes into the appropriate slot according to the standard you are following. Be sure to push the wires fully into the connector, ensuring a secure connection.
5. Check the Wire Alignment:
Verify that the wires are properly aligned within the connector and that they are in the correct order. This will help ensure that the connector will make proper contact with the contacts inside the PoE switch or injector.
6. Crimp the Connector:
Using a quality RJ45 crimping tool, firmly and evenly crimp the connector onto the cable. Apply enough pressure to securely fasten the connector without damaging the wires. The crimping tool will typically have two blades that engage the connector and firmly secure it in place.
7. Repeat for the Other End:
If necessary, repeat the same process on the other end of the Ethernet cable, ensuring that the wiring is consistent with the chosen wiring standard. This will allow you to connect the other end of the cable to the PoE switch or injector.
8. Test the Connection:
Once both ends of the Ethernet cable have RJ45 connectors crimped, use a cable tester to verify the continuity and connectivity of the cable. This will help ensure that the connectors are properly crimped and that there are no breaks or issues with the connection.
By following these steps, you can successfully crimp RJ45 connectors onto the Ethernet cable, establishing a secure and reliable connection for your PoE outdoor camera system. Properly crimped connectors will ensure smooth data and power transmission between the camera and the PoE switch or injector. With the connectors in place, you’re ready to move on to the next step: connecting the camera to the network switch.
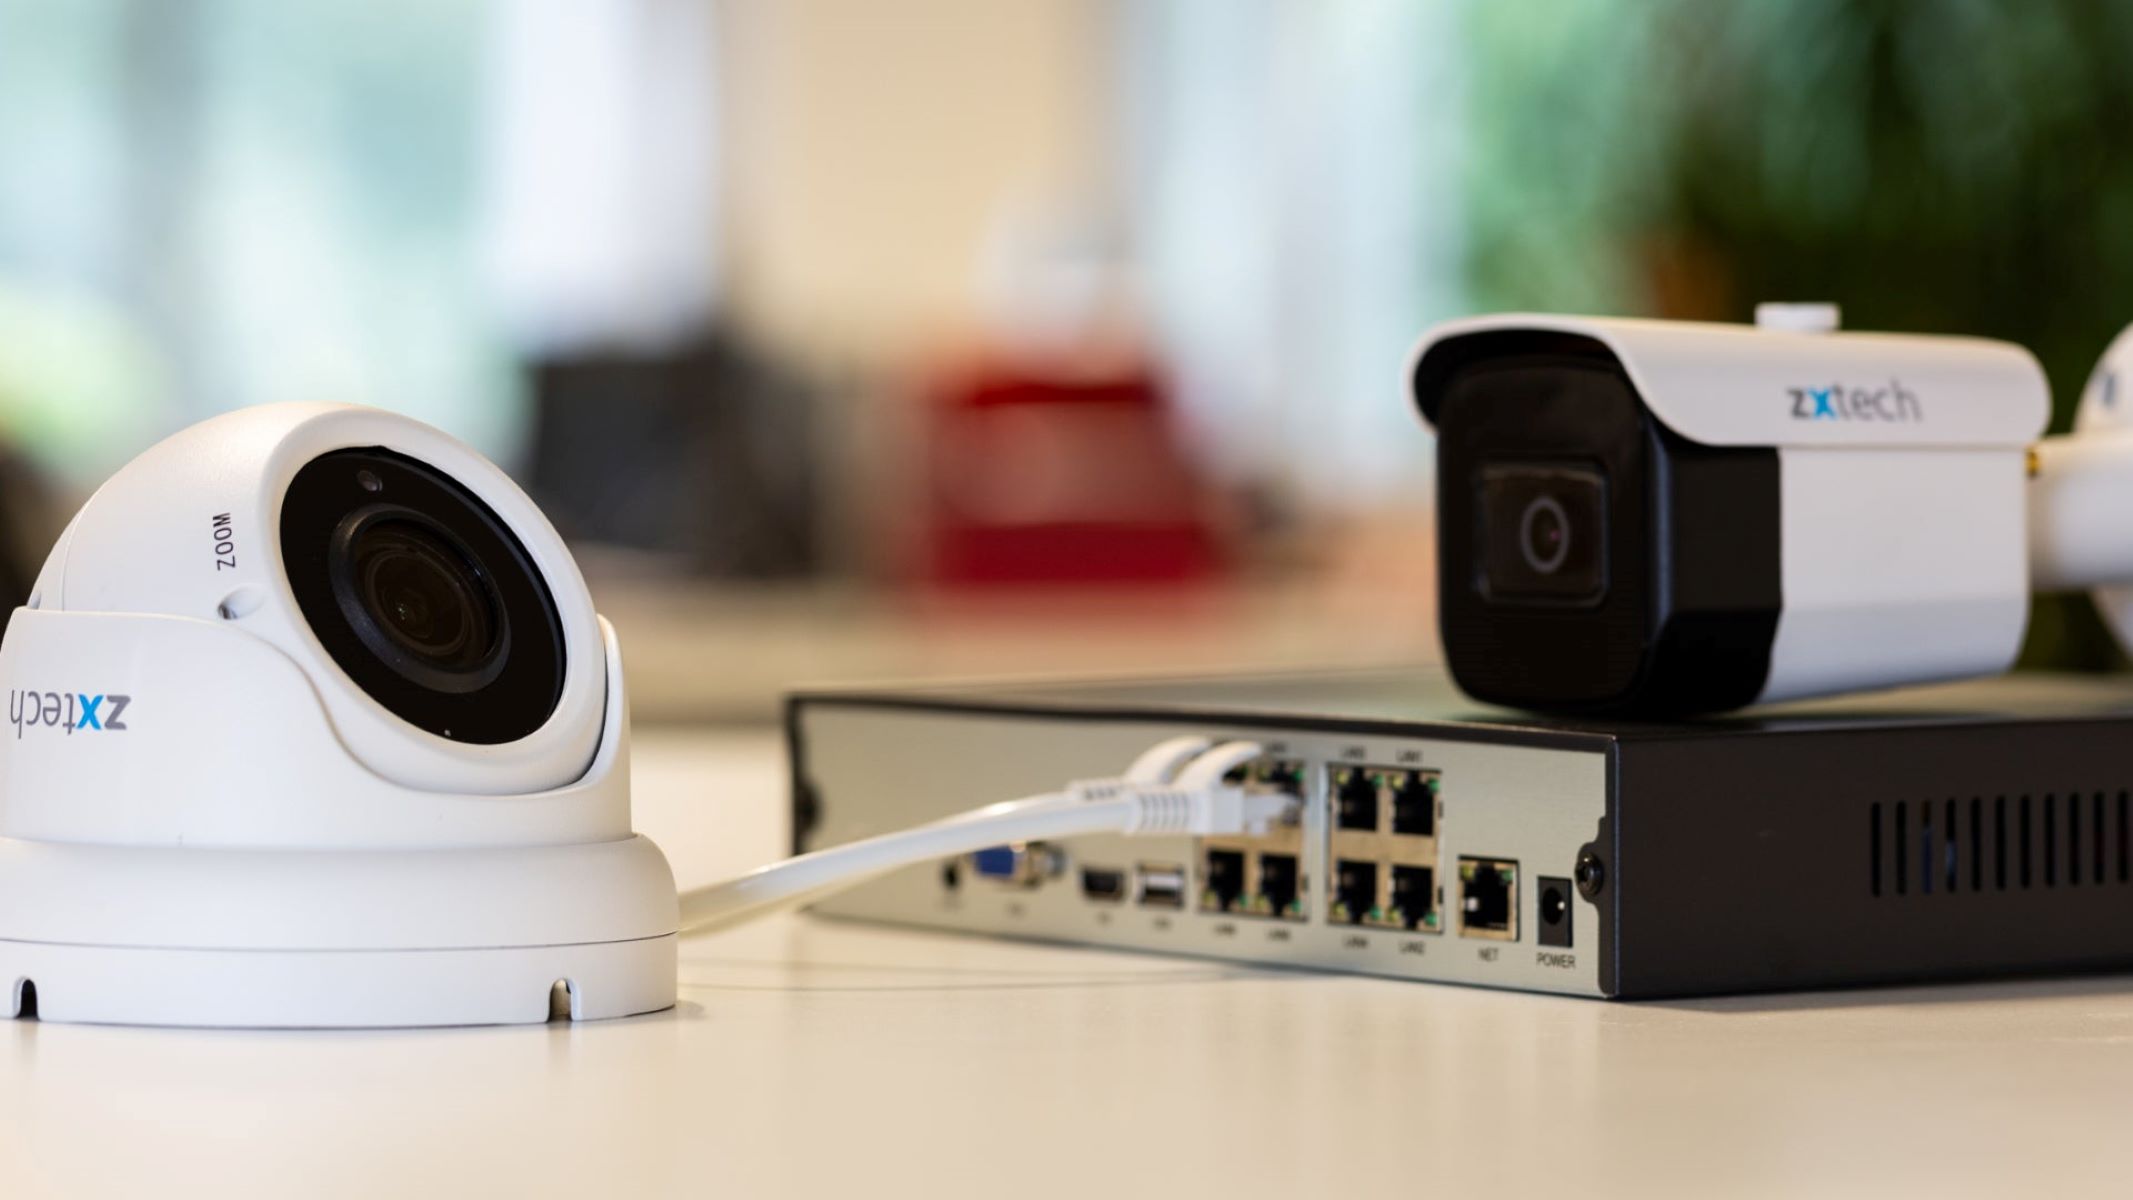
Step 5: Connecting the Camera to the Network Switch
After crimping the RJ45 connectors onto the Ethernet cable, the next step in installing your PoE outdoor camera system is connecting the camera to the network switch. This step ensures that the camera is properly powered and can communicate with your network. Follow these steps to connect the camera to the network switch:
1. Locate the PoE Port:
Identify the PoE port on the network switch or PoE injector. This port is specifically designed to deliver both power and data to the connected devices.
2. Insert the RJ45 Connector:
Carefully insert the RJ45 connector from the camera’s Ethernet cable into an available PoE port on the network switch or injector. Ensure it is fully inserted and properly seated in the port.
3. Verify the Connection:
Once the camera is connected to the PoE port, verify that the connection is secure. Ensure that there is no looseness or movement in the RJ45 connector, as this could lead to intermittent connection issues.
4. Power on the Network Switch:
If the network switch or PoE injector has a power switch, turn it on to supply power to the camera. Alternatively, if the switch or injector has a built-in power supply, ensure that it is properly connected to a power outlet.
5. Wait for the Camera to Power On:
Once the power is supplied to the camera, allow it a few moments to power on and initialize. The camera’s status LED indicators should indicate that it is receiving power and establishing a network connection.
6. Check Network Connectivity:
Using network monitoring software or your network router’s administration interface, verify that the camera is successfully connected to the network. Check the assigned IP address to ensure it is within your network’s range and compatible with your network setup.
Read more: How To Repair A Security Camera Wire
7. Configure Camera Settings (if necessary):
If the camera requires any specific settings or configurations, such as assigning a static IP address or adjusting video quality parameters, access the camera’s administration interface using the provided software or web interface. Follow the manufacturer’s instructions to configure the camera according to your preferences.
8. Test the Camera Operation:
Once the camera is connected and configured, perform a test of its operation. Ensure that you can access the camera’s live video feed and that it is capturing the desired surveillance area. Test any additional features or functionalities of the camera, such as motion detection or remote viewing capabilities.
By following these steps, you can successfully connect your PoE outdoor camera to the network switch or injector. The connection ensures that the camera receives power and can effectively communicate with your network. With the camera connected and operational, you’re ready to move on to the next step: configuring the camera settings.
Step 6: Configuring the Camera
After connecting your PoE outdoor camera to the network switch, the next step in the installation process is configuring the camera. Proper configuration ensures that the camera functions optimally and meets your specific security and surveillance needs. Follow these steps to configure your PoE outdoor camera:
1. Access the Camera’s Administration Interface:
Identify the IP address assigned to the camera by checking your network router’s administration interface or using network scanning software. Enter this IP address into a web browser to access the camera’s administration interface.
Read more: How To Wire A Home Security Camera
2. Log in to the Camera:
Enter the username and password provided by the camera manufacturer to log in to the camera’s administration interface. If this is your first time accessing the camera, the default login credentials should be provided in the camera’s documentation.
3. Set Up Basic Network Settings:
Configure the camera’s basic network settings, such as assigning a static IP address or enabling DHCP (Dynamic Host Configuration Protocol) if your network uses it. Ensure that the settings align with your network’s configuration and do not conflict with existing IP addresses.
4. Adjust Video and Image Settings:
Adjust the camera’s video and image settings to meet your specific requirements. This may include configuring resolution, frame rate, brightness, contrast, and other parameters. Experiment with different settings to achieve the desired video quality and ensure optimal surveillance coverage.
5. Configure Recording and Storage Settings:
If your camera supports local or cloud storage, configure the recording and storage settings. Determine the preferred recording mode (continuous, scheduled, or motion-triggered) and specify the destination for storing recorded footage. Configure any additional storage-related settings, such as retention period and overwrite options.
Read more: How To Hide An Outdoor Camera
6. Set Up Motion Detection and Alerts:
Enable and configure the camera’s motion detection feature to receive alerts when motion is detected in the surveillance area. Adjust sensitivity settings to avoid false alarms while ensuring that all relevant motion events are captured. Specify the preferred method of receiving alerts, such as email notifications or push notifications to a mobile device.
7. Enable Remote Viewing:
If you want to access the camera’s live video feed remotely, enable and configure the remote viewing feature. This may involve setting up port forwarding on your router, configuring DDNS (Dynamic Domain Name System), or utilizing a manufacturer-provided cloud service. Follow the camera’s documentation or manufacturer’s instructions for the specific steps required.
8. Save and Apply the Configuration:
After configuring the camera settings, save the changes and apply the configuration. This ensures that the camera operates according to your preferred settings. Reboot the camera if prompted to ensure that all settings take effect.
By following these steps, you can successfully configure your PoE outdoor camera to meet your specific security and surveillance needs. Proper configuration allows you to maximize the camera’s functionality and ensure optimal performance. With the camera configured, you are ready to move on to the final step: testing the camera.
Step 7: Testing the Camera
After configuring your PoE outdoor camera, the final step in the installation process is testing the camera to ensure that it is functioning as intended. A thorough test will confirm the camera’s connectivity, video quality, and performance, allowing you to make any necessary adjustments before finalizing your surveillance system. Follow these steps to test your PoE outdoor camera:
Read more: How To Cover Outdoor Electrical Wire
1. Confirm Network Connectivity:
Ensure that the camera is properly connected to the network by accessing its administration interface or using network scanning software. Verify the camera’s IP address and network status, ensuring that it is connected to the correct network and assigned the desired IP address.
2. Access Live Video Feed:
Using a web browser or dedicated camera management software, access the camera’s live video feed. Verify that the camera is capturing a clear and reliable video feed of the surveillance area. Test different camera views and angles to ensure comprehensive coverage.
3. Check Video Quality:
Assess the video quality of the camera by analyzing the clarity, color accuracy, and resolution of the captured footage. Ensure that the camera’s video settings meet your requirements and provide the level of detail needed for effective surveillance.
4. Test Camera Features:
Experiment with the camera’s additional features, such as digital zoom, pan-tilt-zoom (PTZ) functionality, and audio capabilities. Verify that these features are working correctly and producing the desired output. Test any integrated motion detection or tampering detection features to ensure accurate and reliable triggers.
Read more: How To Cover Outdoor Electrical Wire
5. Verify Recording and Storage:
If your camera supports local or cloud storage, verify that recordings are being captured and stored properly. Test different recording modes (continuous, scheduled, motion-triggered) to ensure that the camera is recording as expected. Access and review the recorded footage to confirm its quality and accessibility.
6. Test Remote Viewing:
If you have enabled remote viewing, verify that you can access the camera’s live video feed from a remote location. Use a smartphone, tablet, or computer to connect to the camera remotely and ensure that the connection is stable. Check the performance of the remote viewing feature, including any associated mobile apps or browser interfaces.
7. Evaluate Alerts and Notifications:
If you have set up motion detection alerts or notifications, trigger a motion event in the camera’s surveillance area to verify that you receive the alerts as intended. Check the accuracy, timeliness, and reliability of the notifications to ensure that you are promptly informed of any potential security events.
8. Make Adjustments if Necessary:
Based on your testing, identify any areas for improvement or adjustments. This may include optimizing camera placement, fine-tuning video settings, or adjusting motion detection sensitivity. Make the necessary modifications to ensure optimal camera performance and comply with your specific surveillance requirements.
By following these steps and conducting a comprehensive camera test, you can ensure that your PoE outdoor camera is functioning correctly and meeting your expectations. Regularly perform routine checks and maintenance to keep your camera system in optimal condition. With the camera successfully tested, you can now confidently rely on your PoE outdoor camera for enhanced security and surveillance.
Read more: How To Cover Outdoor Electrical Wire
Conclusion
Congratulations! You have successfully installed and configured your PoE outdoor camera system, enhancing the security and surveillance capabilities of your home. By following the steps outlined in this comprehensive guide, you have gained the knowledge and skills needed to wire a PoE outdoor camera with ease and efficiency.
Throughout the installation process, you learned about the benefits of PoE technology and how it simplifies the wiring of outdoor cameras. The easy installation, flexible placement options, and reliable power supply provided by PoE systems make them an ideal choice for home security and surveillance.
By carefully planning the camera installation, mounting the cameras securely, running the Ethernet cable strategically, crimping RJ45 connectors properly, connecting the camera to the network switch, configuring the camera settings, and thoroughly testing the camera’s functionality, you have created a reliable and effective surveillance system.
Your PoE outdoor camera system allows you to monitor and protect your property with ease. The cameras provide high-resolution video quality, remote viewing capabilities, and motion detection alerts to keep you informed of any suspicious activities in real-time.
Remember to conduct regular maintenance and checkups on your camera system to ensure its continued performance. This includes periodically reviewing camera positions, adjusting settings as needed, and staying up to date with firmware updates provided by the camera manufacturer.
Enhancing your home security through the installation of PoE outdoor cameras not only provides peace of mind but also acts as a deterrent against potential security threats. With a reliable and efficient surveillance system in place, you can enjoy the added comfort and confidence that comes with knowing your property is protected.
Thank you for following this guide, and we hope it has been informative and helpful in your journey to achieve a secure and well-protected home.
Frequently Asked Questions about How To Wire A PoE Outdoor Camera
Was this page helpful?
At Storables.com, we guarantee accurate and reliable information. Our content, validated by Expert Board Contributors, is crafted following stringent Editorial Policies. We're committed to providing you with well-researched, expert-backed insights for all your informational needs.