Home>Storage Ideas>Bathroom Storage>How To Install A Bathroom Vent Fan For A Mildew-Free Space
Bathroom Storage
How To Install A Bathroom Vent Fan For A Mildew-Free Space
Modified: October 20, 2024
Learn how to install a bathroom vent fan to keep your space mildew-free and maximize bathroom storage.
(Many of the links in this article redirect to a specific reviewed product. Your purchase of these products through affiliate links helps to generate commission for Storables.com, at no extra cost. Learn more)
Introduction
Welcome to your comprehensive guide on how to install a bathroom vent fan for a mildew-free space. If you have ever entered a bathroom after a steamy shower, only to find it filled with moisture and that all-too-familiar smell, you know how essential proper ventilation is. A bathroom vent fan is designed to remove excess moisture, prevent the growth of mold and mildew, and improve air quality.
Installing a bathroom vent fan may seem like a daunting task, but with the right tools, materials, and guidance, you can easily tackle this project. By following a few simple steps and taking the necessary precautions, you will be well on your way to a fresh and dry bathroom.
In this guide, we will walk you through each step, from gathering the necessary tools and materials to testing the fan once it is installed. We will also provide some tips along the way to ensure a successful installation.
So, if you are ready to bid farewell to damp bathrooms and hello to a well-ventilated and mildew-free space, let’s get started on installing your bathroom vent fan!
Key Takeaways:
- Say goodbye to damp bathrooms and hello to a well-ventilated, mildew-free space by following our comprehensive guide on installing a bathroom vent fan. Enjoy improved air quality and comfort for years to come!
- Ensure a healthy and pleasant bathroom environment by choosing the right size and type of vent fan, securely installing the fan housing, and testing its functionality. Bid farewell to excess moisture and hello to a fresh, mildew-free space!
Read more: How To Install Roof Vent For Bathroom Fan
Importance of a Bathroom Vent Fan
A bathroom vent fan plays a crucial role in maintaining a healthy and comfortable bathroom environment. It provides a range of benefits, making it an essential addition to any bathroom. Here are some key reasons why a bathroom vent fan is important:
- Removes excess moisture: One of the primary functions of a bathroom vent fan is to remove excess moisture from the air. When you take a hot shower or bath, the steam produced increases the humidity in the bathroom. Without proper ventilation, this excess moisture can lead to the growth of mold, mildew, and bacteria. By installing a vent fan, you can effectively reduce humidity levels and prevent these issues.
- Prevents mold and mildew: The damp environment created by high moisture levels in the bathroom is the perfect breeding ground for mold and mildew. These fungi not only cause unpleasant odors but can also pose health risks, especially for individuals with allergies or respiratory conditions. A bathroom vent fan helps to eliminate excess moisture, reducing the chances of mold and mildew growth.
- Improves air quality: Along with moisture, bathrooms can also accumulate unpleasant odors from toiletries, cleaning products, and waste. Without proper ventilation, these odors can linger, making the bathroom uncomfortable for users. A vent fan helps to remove these odors and refresh the air, ensuring a more pleasant and inviting environment.
- Prevents damage to surfaces: Excessive moisture in the bathroom can also lead to damage to surfaces such as walls, ceilings, and fixtures. Over time, prolonged exposure to moisture can cause paint to peel, wallpaper to bubble, and even structural issues like rot and decay. By effectively ventilating the bathroom, a vent fan helps to protect these surfaces and prolong their lifespan.
- Enhances overall comfort: A well-ventilated bathroom is undoubtedly more comfortable for users. Whether you’re getting ready for the day, enjoying a relaxing bath, or simply using the facilities, proper air circulation and a dry environment can make the experience more enjoyable. With a bathroom vent fan, you can create a space that is not only functional but also comfortable and inviting.
Given these benefits, it is clear that a bathroom vent fan is an essential component in maintaining a clean, healthy, and pleasant bathroom. Now that we understand the importance, let’s move on to the step-by-step process of installing a bathroom vent fan.
Step 1: Gather the Necessary Tools and Materials
Before you begin the process of installing a bathroom vent fan, it’s important to gather all the necessary tools and materials. Having everything ready and within reach will help streamline the installation process and minimize any delays. Here are the essential tools and materials you’ll need:
Tools:
- Screwdriver (Phillips and flathead)
- Power drill
- Hole saw or reciprocating saw
- Tape measure
- Pencil or marker
- Wire cutters/strippers
- Adjustable wrench
- Utility knife
- Stud finder (if necessary)
- Ladder or step stool
Materials:
- Bathroom vent fan kit (including fan housing, cover, and ductwork)
- Mounting brackets and screws
- Electrical wire
- Wire connectors
- Cable staples
- Duct tape
- Vent cap or roof vent (if venting through the roof)
- Caulking or sealant
It’s important to select a bathroom vent fan kit that is suitable for your specific bathroom size and ventilation requirements. Consider factors such as the square footage of the bathroom, the ceiling height, and the level of moisture generated by activities in the room. Consult with a professional or refer to the manufacturer’s guidelines to ensure you choose the appropriate fan size and capacity.
Additionally, familiarize yourself with the specific installation instructions provided by the manufacturer of the vent fan kit. This will ensure you have a clear understanding of the process and any additional tools or materials that may be required.
By gathering all the necessary tools and materials beforehand, you’ll be well-prepared to begin the installation process smoothly and efficiently. In the next step, we’ll discuss selecting the appropriate location for your bathroom vent fan.
Step 2: Select the Appropriate Location for the Vent Fan
Choosing the right location for your bathroom vent fan is crucial for its effectiveness and efficiency. The ideal placement will ensure that the fan effectively removes moisture and odors from the air while providing adequate ventilation. Here are some factors to consider when selecting the location:
Bathroom size and layout:
Take note of the size and layout of your bathroom. Larger bathrooms may require multiple vent fans or a larger fan with higher airflow capacity. Consider the configuration of fixtures, such as the shower, bathtub, and toilet, as well as any obstructions that may affect the airflow.
Proximity to moisture sources:
Place the vent fan as close to moisture sources as possible. Typically, this means positioning it near the shower or bathtub area. This allows the fan to quickly and efficiently remove the steam and moisture generated during showers or baths, reducing the risk of mold and mildew growth.
Access to an exterior wall or roof:
Bathroom vent fans are designed to vent air to the outside, either through an exterior wall or a roof. Ensure that there is a suitable location that allows for the installation of ductwork to direct the moist air outdoors. If venting through a wall, position the fan near an exterior wall to minimize the length of the ductwork needed. If venting through the roof, ensure there is a clear path for the duct to exit.
Structural considerations:
Before finalizing the location, check for any structural components, such as wall studs, ceiling joists, or plumbing lines, that may impact the installation. You’ll need sufficient space to accommodate the fan housing and ductwork.
Noise considerations:
Consider the noise level of the vent fan when selecting the location, especially if the bathroom is adjacent to bedrooms or living spaces. Look for fan models with low noise ratings or choose a location where the noise will be least disruptive.
Once you’ve considered these factors, identify the optimal location for your vent fan. Use a stud finder and a pencil or marker to mark the area where you’ll cut the hole for the fan housing. Aim for a spot where the fan will cover the hole and still have enough clearance for efficient airflow.
In the next step, we’ll explore how to determine the size and type of vent fan that best suits your bathroom’s needs.
Step 3: Determine the Size and Type of Vent Fan Needed
Choosing the right size and type of vent fan is crucial to ensure effective ventilation in your bathroom. The size of the fan is determined by the volume of air it can move, measured in cubic feet per minute (CFM). Here’s how to determine the appropriate size and type for your bathroom:
Calculate the required CFM:
To determine the CFM rating needed for your bathroom, calculate the volume of the room. Measure the length, width, and height of the bathroom in feet, and multiply these measurements together. Then, multiply the result by the recommended air changes per hour (ACH) for bathrooms, typically around 8-10. Divide this number by 60 to convert it to CFM.
For example, if your bathroom measures 8 feet long, 6 feet wide, and 8 feet high, the volume is 384 cubic feet (8 x 6 x 8). Multiplying this by a recommended ACH of 8 gives you 3,072. Dividing by 60 yields a required CFM of 51.2.
Consider additional factors:
Keep in mind that certain factors may require adjustments to the recommended CFM rating. If your bathroom has a jetted tub or a separate enclosed toilet area, these features may require additional ventilation. Consider adding 50 CFM for a jetted tub and 50-100 CFM for a separate toilet area.
Choose the appropriate type of fan:
There are various types of bathroom vent fans available, including ceiling-mounted fans, wall-mounted fans, and inline fans. Ceiling-mounted fans are the most common and are suitable for most bathroom sizes and layouts. Wall-mounted fans are ideal for bathrooms with limited ceiling space. Inline fans are used when the fan needs to be installed in a remote location, such as the attic or crawl space, with the ductwork connecting to the bathroom.
Consider noise levels:
Pay attention to the noise level rating of the fan. Look for units with low sone ratings for quieter operation. Consider features like built-in sound dampeners or low noise models if noise is a concern.
Once you have determined the required CFM rating and which type of fan suits your bathroom, you can proceed with purchasing the appropriate fan kit. Make sure to double-check the specifications provided by the manufacturer to ensure it meets your specific ventilation needs.
In the next step, we will cover how to cut the hole for the vent fan in your bathroom.
Step 4: Cut the Hole for the Vent Fan
Now that you have gathered the necessary tools and determined the appropriate location and size of your vent fan, it’s time to cut the hole in your bathroom for the fan housing. Follow these steps to ensure a precise and clean cut:
1. Prepare the area:
Clear the space around the marked location to provide easy access for cutting. Remove any fixtures, such as lighting fixtures or ceiling tiles, that may obstruct the cutting process.
2. Measure and mark the hole:
Using a tape measure, double-check the dimensions provided in the vent fan kit’s installation instructions. Measure the dimensions carefully to ensure accuracy. Mark the outline of the hole on the ceiling with a pencil or marker.
3. Cut the hole:
Using a hole saw or reciprocating saw, carefully cut along the marked outline. Start by making a pilot hole in the center, then guide the saw along the line. Take your time and use steady, controlled movements to ensure a smooth and clean cut.
4. Check for obstructions:
Once the hole is cut, inspect the area to ensure there are no hidden obstructions, such as electrical wires or plumbing pipes. If you encounter any obstructions, it’s important to consult a professional or reroute them before proceeding with the installation.
5. Trim the hole if necessary:
If the opening is slightly larger than the fan housing, you may need to trim the hole accordingly. Use a utility knife to carefully shave off any excess drywall or ceiling material to create a snug fit for the fan housing.
6. Clean up the area:
After cutting the hole, clean up any debris or dust from the surrounding area. This will ensure a clean workspace for the next steps of the installation process.
Cutting the hole for the vent fan may require some precision and caution, especially if you are not experienced with carpentry or DIY projects. If you are unsure about cutting the hole yourself, it is recommended to seek assistance from a professional to ensure a safe and accurate installation.
In the next step, we will discuss how to install the vent fan housing.
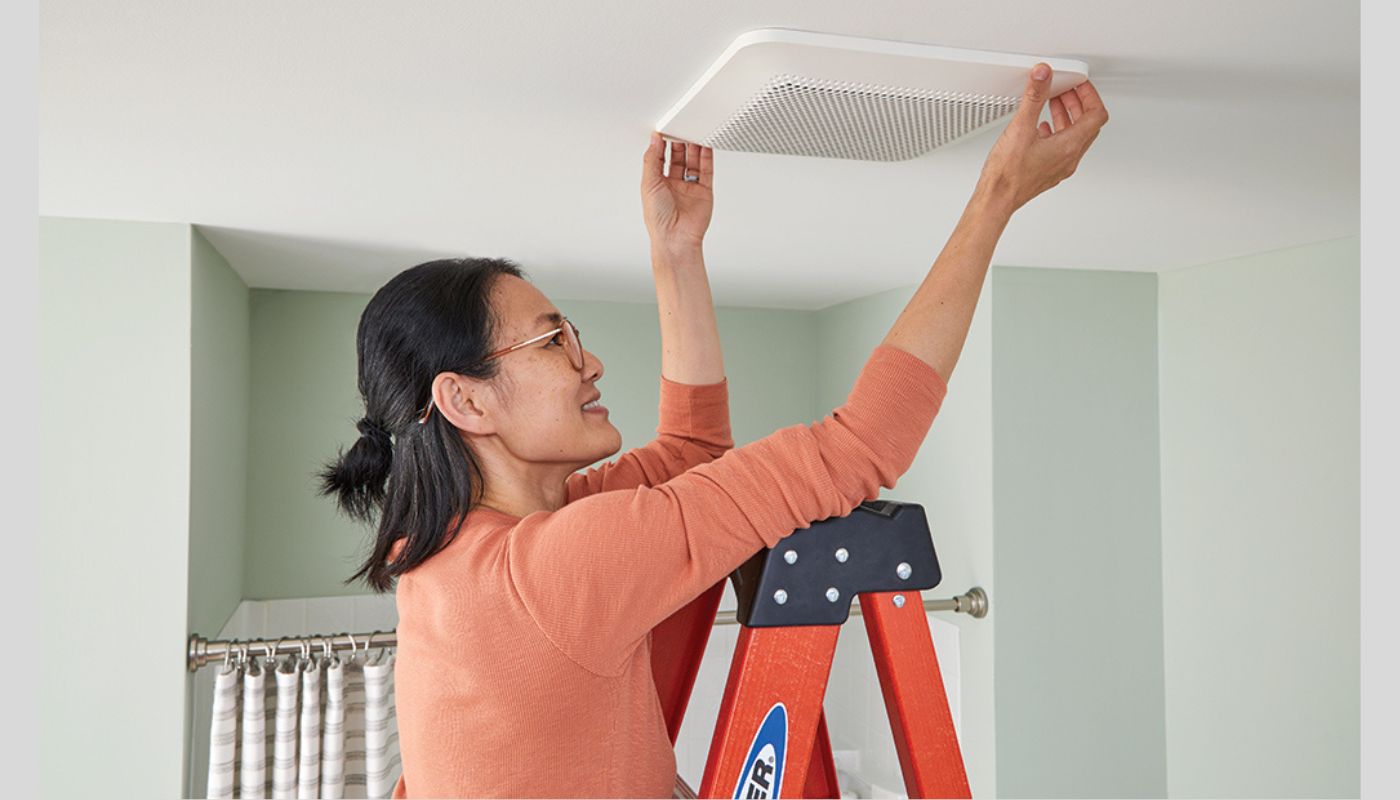
Step 5: Install the Vent Fan Housing
Now that you have successfully cut the hole for the vent fan, it’s time to install the fan housing. Follow these steps to properly install the housing in your bathroom:
1. Position the fan housing:
Carefully position the fan housing in the cut hole, ensuring that it fits securely and snugly. Align any mounting holes in the housing with the corresponding holes in the ceiling or the provided brackets.
2. Secure the housing:
If your fan housing has mounting brackets, attach them securely to the ceiling using screws or the designated hardware provided in the vent fan kit. Ensure that the housing is level and flush with the ceiling.
3. Connect the ductwork:
If your vent fan requires ductwork to vent the air outside, connect the ductwork to the fan housing according to the manufacturer’s instructions. Use duct tape or clamps to securely fasten the ductwork to the housing.
4. Check for leaks:
Once the ductwork is connected, inspect the connections for any air leaks. Ensure that all seams are tightly sealed using duct tape or an appropriate sealant. This will prevent air leakage and ensure efficient airflow.
5. Secure any electrical connections:
If the fan housing requires electrical connections, carefully follow the manufacturer’s instructions to connect the wiring. This typically involves connecting the fan wires to the corresponding wires in the electrical box using wire connectors.
6. Secure the fan cover:
Attach the fan cover to the housing using the provided screws or clips. Ensure that it is securely fastened to prevent the entry of debris or objects into the fan.
7. Test the fan:
Once the fan housing is securely installed, turn on the power to the fan and test its functionality. Verify that the fan is operating smoothly and effectively, and check for any unusual noises or vibrations. If the fan is not working properly, troubleshoot the issue or consult a professional electrician.
Properly installing the vent fan housing is crucial for efficient and effective ventilation in your bathroom. Take your time to ensure that the housing is securely mounted and connected to the necessary electrical and ductwork components.
In the next step, we will cover how to connect the wiring for the vent fan.
Step 6: Connect the Wiring
Connecting the wiring for your bathroom vent fan is an important step in the installation process. Follow these steps to ensure a safe and proper wiring connection:
1. Turn off the power:
Prior to working with any electrical connections, it is essential to turn off the power supply to the area. Locate the breaker in your electrical panel that controls the bathroom circuits and switch it off. Use a voltage tester to confirm that the power is indeed off before proceeding.
Read more: How To Install An Exhaust Fan
2. Remove the electrical box cover:
Remove the cover of the electrical box that will house the wiring connections. Use a screwdriver to unscrew and detach the cover.
3. Prepare the wiring:
If necessary, trim the electrical wires connected to the vent fan to the appropriate length. Strip approximately 3/4 inch of insulation from the end of each wire to expose the bare copper.
4. Make the connections:
Following the manufacturer’s instructions, connect the wires from the vent fan to the corresponding wires in the electrical box. Typically, this involves matching the black (hot) wires, white (neutral) wires, and green or copper (ground) wires together. Twist the wires tightly together, and secure them with wire connectors. Ensure that there are no exposed wires or loose connections.
5. Secure the wiring:
Neatly tuck the connected wires into the electrical box, making sure they are not pinched or stretched. Use cable staples or clamps to secure any excess wiring and prevent it from interfering with the fan or other components.
6. Replace the electrical box cover:
Once the wiring is securely connected and organized, replace the electrical box cover and screw it back into place. Ensure that the cover is snug and properly aligned with the box.
7. Restore the power:
With the wiring connections complete and secure, restore the power to the bathroom circuits by turning the breaker back on. Test the fan to ensure that it is functioning correctly.
Always exercise caution and follow proper safety procedures when working with electrical wiring. If you are uncomfortable or unsure about connecting the wiring for your bathroom vent fan, it is recommended to seek the assistance of a qualified electrician.
In the next step, we will discuss how to attach the vent fan cover.
Step 7: Attach the Vent Fan Cover
Attaching the vent fan cover is the final step in the installation process. Follow these steps to securely attach the cover to your bathroom vent fan:
1. Locate the attachment points:
Refer to the manufacturer’s instructions to identify the specific attachment points for the vent fan cover. These may be in the form of screws, clips, or other fastening mechanisms.
Read more: How To Vent A Bathroom Plumbing
2. Position the cover:
Hold the vent fan cover in the appropriate position over the fan housing. Ensure that it is aligned correctly and fits securely on the housing. Take note of any alignment markers or guides provided by the manufacturer.
3. Attach the cover:
Using the designated attachment points, secure the vent fan cover to the fan housing. This may involve inserting screws through the cover into the housing, snapping clips into place, or any other specified method.
4. Tighten the fasteners:
If using screws or other fasteners, make sure to tighten them fully but be careful not to overtighten, as this could damage the cover or housing.
5. Test the cover:
Gently press or give a slight tug on the attached cover to ensure that it is securely fastened. It should not shift or come loose with minimal pressure.
Read more: How To Install A Roof Vent
6. Inspect for any gaps:
After attaching the cover, inspect the perimeter for any gaps or spaces between the cover and the housing. These gaps could allow air or debris to enter the fan. If any gaps are present, adjust the positioning or tighten the attachments to eliminate them.
7. Clean the cover:
Before finishing the installation, wipe down the vent fan cover to remove any dust or debris accumulated during the installation process. A clean cover will enhance the overall appearance of your bathroom and ensure optimal airflow.
By securely attaching the vent fan cover, you ensure that the fan operates effectively and efficiently while also preventing unwanted objects from entering the fan housing.
With the vent fan cover securely in place, you have successfully completed the installation process. In the final step, we will cover how to test the vent fan to ensure it is functioning correctly.
Step 8: Test the Vent Fan
After completing the installation of your bathroom vent fan, it’s important to test its functionality to ensure it is working properly. Follow these steps to perform a thorough test:
1. Turn on the power:
Ensure that the power to the bathroom circuits is turned on. This allows the vent fan to receive electrical power and operate.
Read more: Who Can Install Bathroom Exhaust Fan
2. Operate the fan:
Activate the vent fan by either flipping the switch or pulling the cord, depending on the fan’s design. Observe the fan blades to ensure they are spinning freely and without any obstructions. Listen for any unusual noises or vibrations that may indicate a problem.
3. Check for proper airflow:
Place your hand near the vent fan cover to feel the air being drawn in and expelled. There should be a noticeable flow of air. If you have a piece of paper or a tissue, hold it near the vent to see if the airflow causes it to move. This confirms that the fan is effectively removing moist air from the bathroom.
4. Monitor for humidity reduction:
Over the next few days, pay attention to the moisture levels in your bathroom. Check for any condensation or dampness on surfaces such as mirrors, windows, or walls. If the vent fan is functioning correctly, you should notice a reduction in moisture accumulation and a decrease in mold or mildew growth.
5. Adjust settings if necessary:
If you have a vent fan with adjustable speed settings or a timer, test these features to ensure they are functioning properly. Adjust the settings to meet your needs and preferences.
Read more: How To Install A Plumbing Vent
6. Regularly maintain the vent fan:
To ensure optimal performance, it’s important to keep your vent fan well-maintained. Clean the fan blades periodically to remove any dust or debris buildup. Additionally, inspect the ductwork and vent cap regularly to ensure there are no blockages or obstructions that may impede airflow.
By testing the vent fan after installation and conducting regular maintenance, you can ensure its continued effectiveness in removing moisture and odors from your bathroom.
Congratulations! You have successfully installed and tested your bathroom vent fan. With proper ventilation in place, you can enjoy a fresh, mildew-free bathroom environment for years to come.
Should you ever need to make adjustments or require the assistance of a professional, be sure to consult the manufacturer’s guidelines or contact a qualified electrician or HVAC specialist.
Conclusion
Installing a bathroom vent fan is a crucial step in maintaining a clean, healthy, and comfortable bathroom environment. With proper ventilation, you can effectively remove excess moisture, prevent the growth of mold and mildew, and improve air quality. Throughout this comprehensive guide, we have covered the step-by-step process of installing a bathroom vent fan, from gathering the necessary tools and materials to testing the fan’s functionality.
By following these steps and taking the time to ensure proper installation, you can enjoy the benefits of a well-ventilated bathroom. From preventing damage to surfaces and reducing odors to enhancing overall comfort and air quality, a bathroom vent fan plays a vital role in creating a pleasant and mildew-free space.
Remember to choose the appropriate size and type of vent fan based on your bathroom’s specific needs, considering factors like room size, humidity levels, and noise tolerance. Take care when cutting the hole for the fan housing, making sure to check for any potential obstructions and trimming the opening if necessary. Securely install the fan housing, connect the wiring following safety precautions, and attach the vent fan cover firmly to complete the installation.
Once the installation is complete, test the fan’s functionality, ensuring proper airflow and humidity reduction. Regularly maintain the vent fan by cleaning the blades and inspecting the ductwork to ensure optimal performance over time.
By following this guide and maintaining your bathroom vent fan, you can enjoy a fresh and mildew-free bathroom for years to come. Breathe easier and create a comfortable space for yourself and your family. Say goodbye to excessive moisture and hello to improved air circulation and quality.
Thank you for using this comprehensive guide. Happy vent fan installation!
Frequently Asked Questions about How To Install A Bathroom Vent Fan For A Mildew-Free Space
Was this page helpful?
At Storables.com, we guarantee accurate and reliable information. Our content, validated by Expert Board Contributors, is crafted following stringent Editorial Policies. We're committed to providing you with well-researched, expert-backed insights for all your informational needs.

0 thoughts on “How To Install A Bathroom Vent Fan For A Mildew-Free Space”