Home>Technology>Smart Home Devices>How To Scan To My Computer From HP Printer
Smart Home Devices
How To Scan To My Computer From HP Printer
Modified: August 17, 2024
Learn how to easily scan to your computer from your HP printer and streamline your smart home devices setup with our simple guide. Discover the best methods for seamless scanning.
(Many of the links in this article redirect to a specific reviewed product. Your purchase of these products through affiliate links helps to generate commission for Storables.com, at no extra cost. Learn more)
**
Introduction
**
Smart home devices have revolutionized the way we interact with our living spaces, offering convenience, efficiency, and enhanced functionality. Among these innovative devices, HP printers stand out as indispensable tools for modern households and offices. With the ability to seamlessly scan documents to your computer, HP printers provide a valuable bridge between physical and digital storage, streamlining your workflow and enhancing accessibility.
In this comprehensive guide, we will explore the process of scanning documents to your computer from an HP printer. Whether you are a seasoned user or a newcomer to the world of smart home devices, this article will equip you with the knowledge and skills to optimize your printing and scanning experience. We will delve into the essential steps for setting up your HP printer, installing the necessary software, and executing the scanning process with ease. Additionally, we will address common troubleshooting issues, ensuring that you are well-prepared to overcome any potential obstacles.
By the end of this guide, you will have a thorough understanding of how to harness the full potential of your HP printer, transforming it into a versatile and efficient tool for digitizing your documents. Let's embark on this journey to unlock the seamless integration of physical and digital realms with your HP printer.
Smart home devices have revolutionized the way we interact with our living spaces, offering convenience, efficiency, and enhanced functionality. Among these innovative devices, HP printers stand out as indispensable tools for modern households and offices. With the ability to seamlessly scan documents to your computer, HP printers provide a valuable bridge between physical and digital storage, streamlining your workflow and enhancing accessibility.
In this comprehensive guide, we will explore the process of scanning documents to your computer from an HP printer. Whether you are a seasoned user or a newcomer to the world of smart home devices, this article will equip you with the knowledge and skills to optimize your printing and scanning experience. We will delve into the essential steps for setting up your HP printer, installing the necessary software, and executing the scanning process with ease. Additionally, we will address common troubleshooting issues, ensuring that you are well-prepared to overcome any potential obstacles.
By the end of this guide, you will have a thorough understanding of how to harness the full potential of your HP printer, transforming it into a versatile and efficient tool for digitizing your documents. Let’s embark on this journey to unlock the seamless integration of physical and digital realms with your HP printer.
**
Key Takeaways:
- Setting up your HP printer and installing the necessary software are crucial steps to enable seamless scanning to your computer. This foundation ensures efficient communication and functionality between your printer and computer.
- Scanning documents to your computer from an HP printer empowers you to transition seamlessly between physical and digital document management. By following simple steps and troubleshooting common issues, you can harness the full potential of your smart home device.
Read more: How To Scan From A HP Printer
Setting Up Your HP Printer
**
Before delving into the intricacies of scanning documents to your computer, it is crucial to ensure that your HP printer is properly set up and connected to your network. This foundational step is essential for seamless communication between the printer and your computer, paving the way for efficient scanning and printing processes.
Here are the key steps to set up your HP printer:
1. Unboxing and Physical Setup:
Upon receiving your HP printer, carefully unbox it and remove all packaging materials. Place the printer on a stable surface, ensuring that it is within reach of a power outlet and in close proximity to your computer and wireless router, if applicable. Follow the manufacturer's instructions to install any included ink cartridges and load paper into the input tray.
2. Power and Network Connection:
Connect the power cord to the printer and plug it into a power outlet. If your HP printer supports wireless connectivity, navigate to the printer's control panel to access the wireless setup wizard. Follow the on-screen prompts to connect the printer to your Wi-Fi network. For printers with Ethernet ports, you can establish a wired connection to your network by connecting an Ethernet cable from the printer to your router or switch.
3. Software Installation:
Once the physical setup is complete, it's time to install the necessary software for your HP printer. Visit the official HP website or use the installation CD included with the printer to download and install the appropriate printer drivers and software for your operating system. Follow the on-screen instructions to complete the installation process.
4. Test Print:
After installing the printer software, perform a test print to verify that the printer is successfully connected to your computer. This step ensures that the basic printing functionality is operational before proceeding to scanning tasks.
By following these steps, you will establish a solid foundation for utilizing your HP printer's scanning capabilities. With the physical setup and network connection in place, you are now ready to install the printer software and embark on the scanning process.
**
Installing the Printer Software
**
With your HP printer set up and connected to your network, the next crucial step is to install the printer software on your computer. The software serves as the interface between your computer and the printer, enabling seamless communication and providing access to advanced features, including scanning functionality.
Here’s a comprehensive guide to installing the printer software for your HP printer:
1. Download from Official Website:
Navigate to the official HP website and locate the support section. Enter your printer model number or select it from the list of available products. Choose the appropriate operating system running on your computer, and then proceed to download the recommended printer drivers and software. Ensure that you download the full feature software, as it includes the necessary components for scanning.
2. Installation Process:
Once the software is downloaded, locate the installation file and double-click to initiate the installation process. Follow the on-screen prompts to select your preferred installation options, such as the installation location and additional software components. It is advisable to opt for the full installation to access all the features offered by your HP printer, including scanning to your computer.
3. Network Connection:
During the installation, you may be prompted to select the connection type for your printer. If your printer is connected to your network wirelessly, choose the wireless connection option and follow the instructions to complete the setup. For printers connected via USB or Ethernet, select the appropriate connection type to establish the link between your computer and the printer.
4. Test Scanning:
After the software installation is complete, launch the HP scanning software on your computer and perform a test scan. Place a document or photo on the scanner glass or in the automatic document feeder, depending on your printer model, and initiate the scanning process from your computer. Verify that the scanned image is successfully transferred to your computer and accessible through the scanning software.
By successfully installing the printer software, you have unlocked the full potential of your HP printer, enabling seamless scanning to your computer. With the software in place, you are now equipped to initiate scanning tasks with ease, digitizing your documents and enhancing your workflow.
**
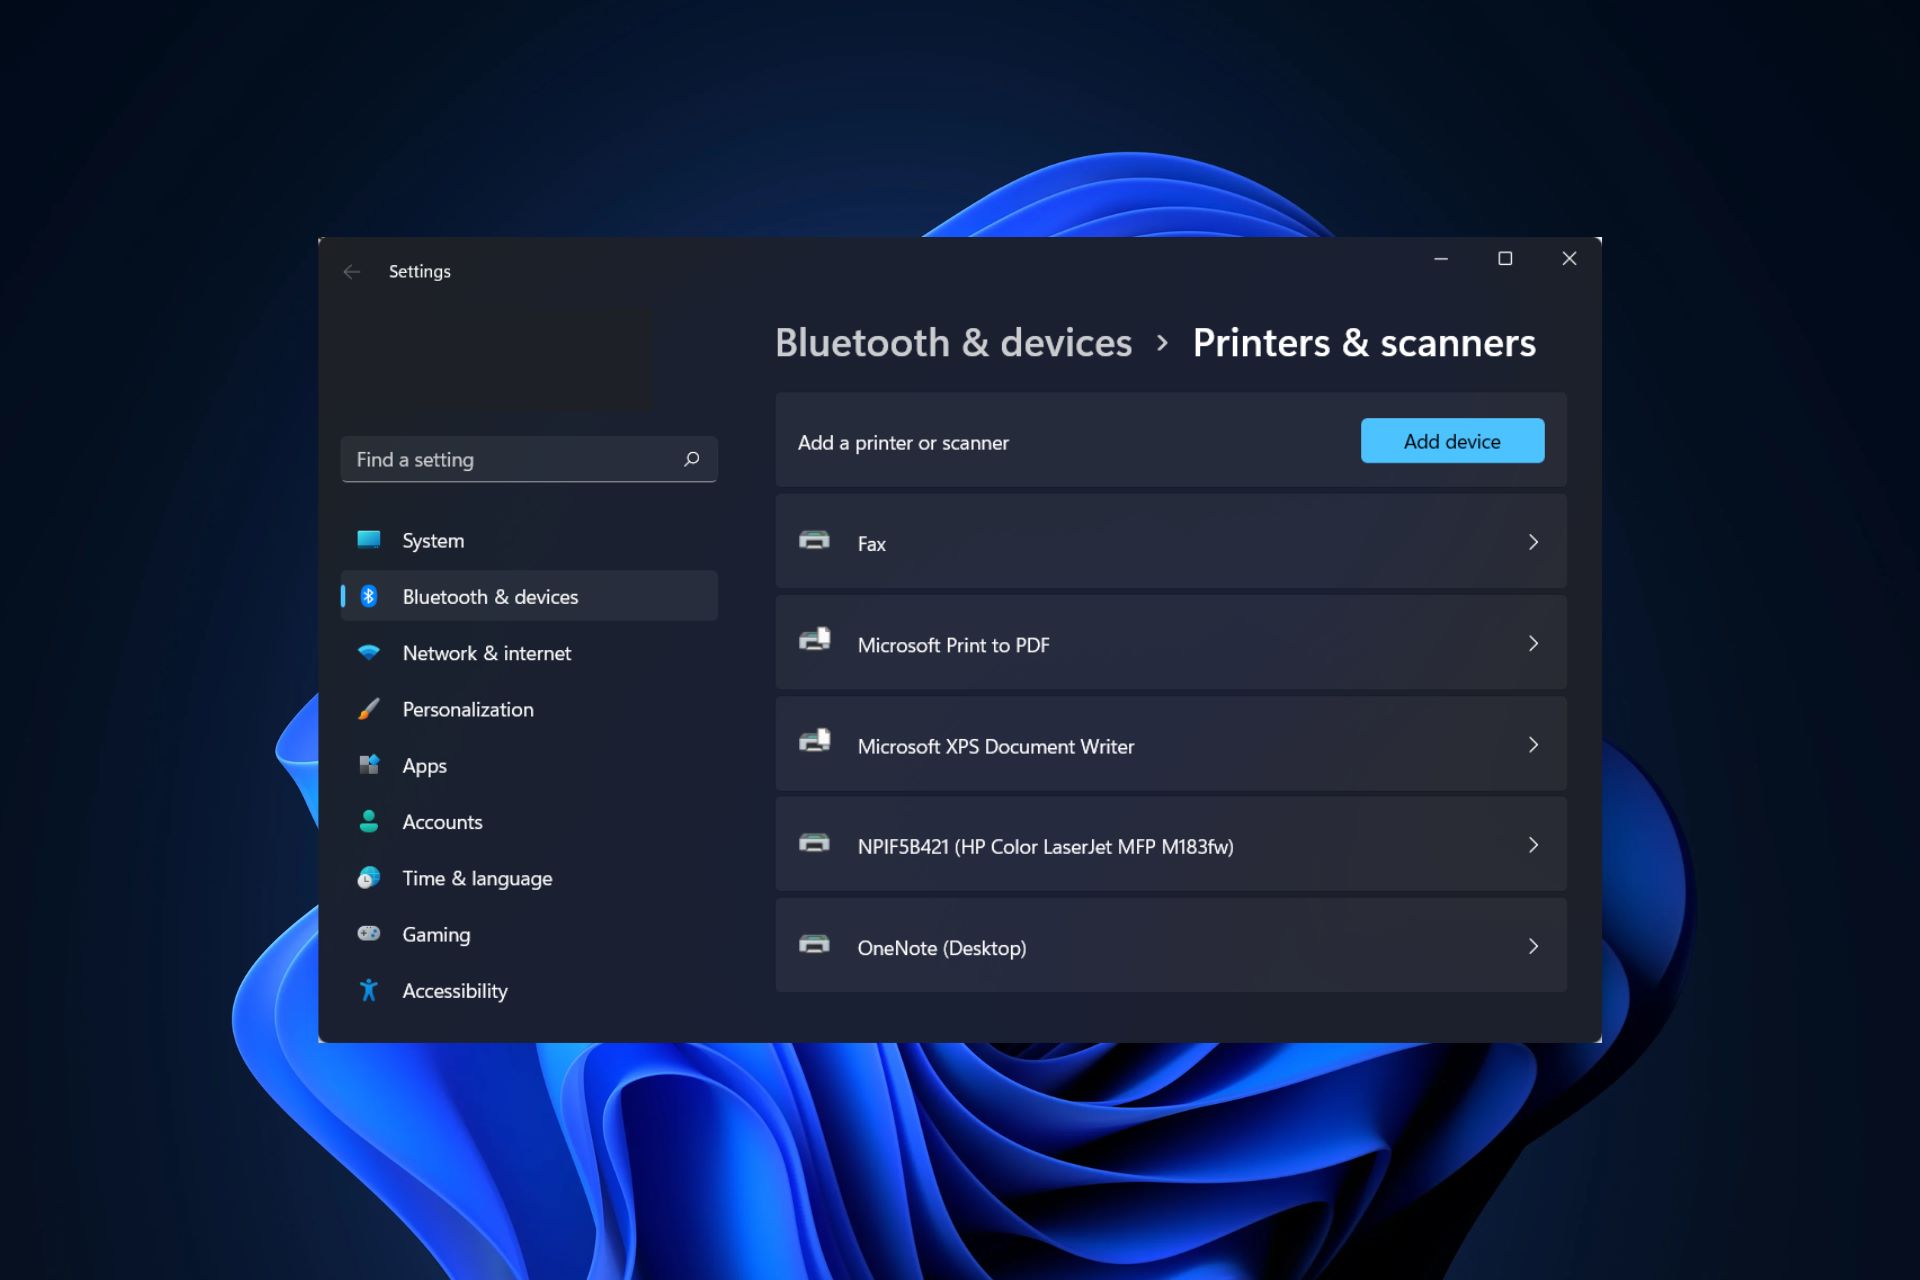
Make sure your HP printer is connected to the same Wi-Fi network as your computer. Place the document on the scanner bed and open the HP printer software on your computer. Select “Scan” and choose the scan settings. Click “Scan” to start the process and save the scanned document to your computer.
Scanning to Your Computer
**
Now that your HP printer is set up and the software is installed on your computer, you are ready to embark on the process of scanning documents to your computer with ease and efficiency. Whether you need to digitize important paperwork, capture memorable photos, or create digital backups of physical documents, your HP printer’s scanning capabilities provide a seamless solution.
Follow these steps to scan documents to your computer from your HP printer:
1. Position the Document:
Place the document or photo you wish to scan on the scanner glass or in the automatic document feeder, depending on your printer model. Ensure that the document is aligned according to the guides or markers on the scanner bed to avoid cropping or misalignment during the scanning process.
2. Initiate the Scan:
On your computer, launch the HP scanning software that was installed as part of the printer software package. Select the option to initiate a new scan and choose the desired scan settings, such as the scan type (color, grayscale, or black and white), resolution, and file format. These settings can be adjusted based on the specific requirements of your scanning task.
3. Preview and Adjust:
Once the scan settings are configured, initiate a preview scan to assess the positioning and quality of the scanned document. If necessary, make adjustments to the settings or reposition the document to ensure an optimal scan. The preview function allows you to fine-tune the scanning parameters before executing the final scan.
4. Execute the Scan:
After confirming the settings and document positioning, proceed to execute the scan. Depending on the complexity of the document and the selected settings, the scanning process may take a few moments to complete. Once the scan is finished, the digital representation of the document will be transferred to your computer and accessible through the scanning software.
5. Save and Organize:
Upon completing the scan, save the digital document to your preferred location on your computer. Organize the scanned files into relevant folders or categories to facilitate easy access and retrieval in the future. Consider naming the files descriptively to enhance searchability and categorization.
By following these straightforward steps, you can harness the scanning capabilities of your HP printer to seamlessly digitize documents and photos, creating a digital archive that enhances accessibility and organization. Whether for personal or professional purposes, the ability to scan to your computer empowers you to transition seamlessly between physical and digital document management.
**
Troubleshooting Common Issues
**
While scanning documents to your computer from an HP printer is generally a straightforward process, occasional issues may arise that hinder the seamless execution of scanning tasks. By familiarizing yourself with common troubleshooting techniques, you can swiftly address these issues and restore the optimal functionality of your scanning setup.
Here are some common issues and their troubleshooting steps:
1. Connectivity Problems:
If your HP printer is experiencing connectivity issues with your computer, ensure that the printer is connected to the same network as your computer. Verify the wireless or wired connection and restart both the printer and the computer to reestablish the connection. Additionally, check for any firmware updates for your printer that may address connectivity issues.
2. Scanner Not Detected:
In the event that your computer fails to detect the scanner functionality of your HP printer, reinstall the printer software on your computer. Ensure that the scanning components are selected during the installation process. If the issue persists, consult the HP support resources for updated drivers and troubleshooting guidance specific to your printer model.
3. Quality and Resolution Issues:
If the scanned documents exhibit poor quality or incorrect resolution, review the scan settings in the HP scanning software. Adjust the settings to ensure the appropriate resolution and image quality for your specific scanning task. Additionally, clean the scanner glass and ensure that the document is positioned correctly to avoid artifacts or blurriness in the scanned images.
4. Paper Jams and Feeding Problems:
In cases where the automatic document feeder or paper input tray encounters jams or feeding issues during scanning, carefully clear any obstructions and ensure that the paper is loaded correctly. Refer to the printer’s user manual for guidance on addressing paper jams and maintaining smooth paper feeding during scanning tasks.
5. Software Compatibility:
If you encounter compatibility issues with the HP scanning software and your operating system, visit the HP support website to check for software updates and compatibility enhancements. Ensure that your operating system is supported by the latest version of the HP scanning software to mitigate compatibility-related obstacles.
By addressing these common issues through targeted troubleshooting steps, you can maintain the seamless functionality of your HP printer’s scanning capabilities, ensuring that you can efficiently digitize documents and photos without unnecessary interruptions.
**
Conclusion
**
As we conclude our exploration of scanning documents to your computer from an HP printer, it’s evident that the seamless integration of physical and digital document management is within reach, thanks to the advanced capabilities of HP printers. By following the comprehensive steps outlined in this guide, you have gained the knowledge and skills to optimize your scanning experience and leverage your HP printer to its full potential.
From the initial setup of your HP printer to the installation of the essential printer software, you have laid the groundwork for efficient scanning to your computer. The ability to effortlessly transition from physical documents to digital files empowers you to streamline your workflow, enhance accessibility, and create a well-organized digital archive of important materials.
Furthermore, by familiarizing yourself with common troubleshooting techniques, you are well-prepared to address any potential obstacles that may arise during the scanning process. This proactive approach ensures that you can maintain the optimal functionality of your HP printer’s scanning capabilities, preserving a seamless and reliable scanning experience.
As you continue to harness the power of your HP printer for scanning documents to your computer, consider exploring additional features and advanced settings offered by the HP scanning software. Delving into these capabilities can further enhance your scanning experience, allowing you to tailor the scanning process to suit your specific requirements and preferences.
Ultimately, the ability to seamlessly scan to your computer from your HP printer represents a valuable convergence of traditional and modern document management, offering a bridge between physical and digital realms. Whether for personal, educational, or professional purposes, the digitization of documents and photos through your HP printer empowers you to embrace a more efficient and organized approach to document management.
With this comprehensive guide as your companion, you are well-equipped to embark on a seamless and rewarding journey of scanning documents to your computer from your HP printer, unlocking the full potential of this versatile smart home device.
Frequently Asked Questions about How To Scan To My Computer From HP Printer
Was this page helpful?
At Storables.com, we guarantee accurate and reliable information. Our content, validated by Expert Board Contributors, is crafted following stringent Editorial Policies. We're committed to providing you with well-researched, expert-backed insights for all your informational needs.


0 thoughts on “How To Scan To My Computer From HP Printer”