Articles
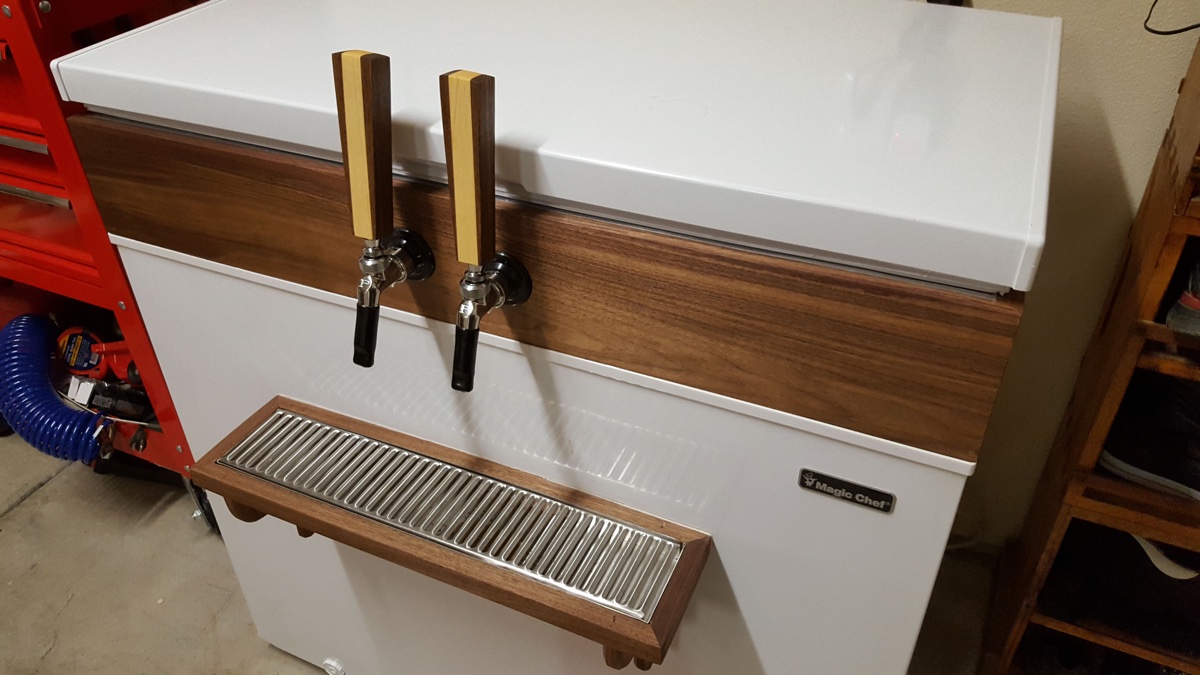
How To Build A Freezer Kegerator
Modified: October 19, 2024
Learn how to build a freezer kegerator with our informative articles. Gain insight and step-by-step instructions to create your own at no cost.
(Many of the links in this article redirect to a specific reviewed product. Your purchase of these products through affiliate links helps to generate commission for Storables.com, at no extra cost. Learn more)
Introduction
Welcome to the world of homebrewing! If you’re an avid beer lover and want to take your love for craft beer to the next level, building a freezer kegerator is a fantastic way to do it. Not only will it allow you to have a constant supply of delicious, cold beer on tap, but it will also give you the opportunity to experiment with different beer styles and flavors.
A freezer kegerator is essentially a modified freezer that has been converted into a keg storage and dispensing system. While there are commercially available kegerators on the market, building your own can be a rewarding and cost-effective project. Plus, you’ll have the freedom to customize it according to your specific needs and preferences.
In this article, we will guide you through the process of building your very own freezer kegerator. We’ll cover everything from choosing the right freezer and keg to installing the necessary components and troubleshooting any issues that may arise. So, grab a beer (or your preferred beverage) and let’s get started!
Key Takeaways:
- Building a freezer kegerator allows beer enthusiasts to customize their setup, experiment with different beer styles, and enjoy fresh, cold beer straight from the keg, all while impressing friends and family.
- Regular maintenance and cleaning are crucial for keeping a kegerator running smoothly and ensuring the quality of beer, allowing enthusiasts to enjoy fresh, delicious beer from their kegerator for years to come.
Choosing the Right Freezer
The first step in building a freezer kegerator is selecting the right freezer to convert. When choosing a freezer, there are a few key factors to consider:
- Size: Determine how many kegs you plan to store and dispense at a time. Freezers come in various sizes, so choose one that can accommodate your keg(s) comfortably.
- Temperature Range: Look for a freezer that has a temperature range suitable for storing and serving beer. Ideally, it should have a range of around 32-40 degrees Fahrenheit (0-4 degrees Celsius) to keep your beer properly chilled.
- Energy Efficiency: Consider the energy efficiency of the freezer. Look for models with an Energy Star rating that consume less electricity and help you save on energy costs in the long run.
- Door Configuration: Decide whether you prefer a top-opening or front-opening freezer. Top-opening freezers are more common and often more spacious, while front-opening freezers provide easier access to the kegs.
- Availability: Check the availability of the freezer model you are interested in. It’s always a good idea to visit local appliance stores or search online to compare prices and read customer reviews before making a purchase.
Once you have considered these factors, it’s time to go out and find the perfect freezer for your kegerator project. Remember to measure the dimensions of the freezer and ensure it fits well in the designated space. Additionally, ensure there is enough clearance for the beer lines and CO2 tank, which will be installed later in the process.
Keep in mind that building a kegerator involves modifying the freezer, so it’s advisable to choose a freezer that is affordable and easily replaceable in case any irreversible changes need to be made. With the right freezer selected, you’re now ready to move on to the next step in building your freezer kegerator: selecting the keg.
Selecting the Keg
Now that you have chosen the right freezer for your kegerator project, it’s time to move on to selecting the keg. The keg you choose will depend on your personal preferences and the type of beer you plan to dispense. Here are a few things to consider when selecting your keg:
- Type of Keg: There are different types of kegs available in the market, including Cornelius (Corny) kegs, commercial sankey kegs, and sixth-barrel kegs. Consider the pros and cons of each type and choose the one that suits your needs best.
- Size: Keg sizes vary, and the most common sizes include 5-gallon (19-liter) and 1/2 barrel (15.5-gallon or 58.7-liter) kegs. The size of your freezer and the amount of beer you plan to dispense will dictate the keg size you should choose.
- New or Used: Decide whether you want to purchase a new or used keg. New kegs are more expensive but typically come sanitized and ready to use. Used kegs can be more affordable, but it’s important to inspect them for any damage or signs of wear before purchasing.
- Ball Lock or Pin Lock: If you choose a Cornelius keg, you will need to decide between a ball lock or pin lock style. Ball lock kegs are more common and often easier to find replacement parts for, while pin lock kegs have a different type of disconnect mechanism.
- Maintenance and Cleaning: Consider how easy it will be to clean and maintain the keg. Look for kegs with removable lids and access to all parts for thorough cleaning and sanitization.
It’s worth noting that some keg suppliers may also offer kegging kits that include additional accessories such as connectors, hoses, and taps. These kits can be a convenient option if you’re starting from scratch and want everything you need in one package.
Once you have selected the appropriate keg for your kegerator, you’re one step closer to enjoying fresh, on-tap beer in the comfort of your own home. In the next section, we will discuss the tools and materials you will need to gather before starting the conversion process.
Gathering the Necessary Tools and Materials
Before you can start the conversion process for your freezer kegerator, you’ll need to gather the necessary tools and materials. Here’s a comprehensive list to help you get started:
- Drill: You’ll need a power drill to create holes in the freezer for the beer lines and other components.
- Hole Saw: A hole saw attachment for your drill will be necessary to create clean, precise holes for the faucet and shank.
- Screwdriver: A screwdriver will come in handy for removing panels and attaching various components.
- Wrenches: Depending on the type of fittings and connections you use, you may need adjustable wrenches or open-ended wrenches.
- Teflon Tape: Teflon tape is essential for creating a watertight seal on threaded connections.
- Cutting Tools: You may need a utility knife or tubing cutter to trim the beer lines and hoses to the desired length.
- Marker: A marker will be useful for marking the locations where holes need to be drilled.
- Level: Use a level to ensure that the components are straight and properly aligned during installation.
- Insulation: Insulation material such as foam tape or weatherstripping can be used to seal gaps and prevent temperature leaks.
- Kegging Components: Along with the keg, you’ll need a CO2 tank, pressure regulator, gas and liquid disconnects, beer lines, clamps, and taps. These components can usually be purchased as part of a kegerator conversion kit or separately.
In addition to these tools and materials, it’s important to ensure that you have a clear workspace to carry out the conversion process. Have a clean, flat surface available to place the freezer and organize the tools and components.
It’s always a good idea to double-check your list and ensure you have all the necessary tools and materials before starting the conversion. This will help you avoid any unnecessary delays or frustration during the process.
Now that you have everything prepared, it’s time to move on to the next step: preparing the freezer for the kegerator conversion.
Preparing the Freezer
Before you can begin the actual conversion process for your freezer kegerator, it’s important to properly prepare the freezer. This involves cleaning, defrosting, and making any necessary modifications to ensure optimal functionality. Here’s how to get started:
- Clean the Freezer: Empty the freezer and clean it thoroughly using mild soap and water. Remove any racks, shelves, or drawers, and clean them separately. Make sure there are no residues or odors that could potentially affect the taste of your beer.
- Defrost the Freezer: If your freezer has a built-in defrost function, follow the manufacturer’s instructions to defrost it completely. Alternatively, you can manually defrost it by unplugging it and leaving the door open until all the ice has melted.
- Modify the Freezer: Depending on the design of your freezer, you may need to remove or modify certain internal components to make space for the kegs and associated equipment. This could involve removing plastic dividers, shelves, or freezer baskets. Always refer to the manufacturer’s instructions or consult a professional if you are unsure about making modifications.
- Create a Drip Tray: To catch any spills or drips, consider placing a drip tray in front of the freezer. This will help protect your floor from any excess liquid and make cleaning easier in case of any spills.
- Insulate the Freezer: Insulating the freezer can help maintain a consistent temperature and improve energy efficiency. Use foam tape or weatherstripping to seal any gaps or exposed areas. This will prevent cold air from escaping and warm air from entering the freezer.
By taking these steps to properly prepare the freezer, you’ll create a clean and functional space for your kegerator conversion. With the freezer ready, it’s time to move on to the exciting part: installing the kegerator conversion kit. Stay tuned for the next section, where we’ll cover the step-by-step process for installing the kit.
Installing the Kegerator Conversion Kit
Now that you have prepared your freezer, it’s time to install the kegerator conversion kit. This kit will include all the necessary components to transform your freezer into a fully functioning kegerator. Follow these step-by-step instructions:
- Position the CO2 Tank: Decide on the location of the CO2 tank inside or outside the freezer. If placing it inside, ensure it is secure and won’t interfere with keg storage. If placing it outside, drill a hole in the freezer to feed the CO2 line.
- Attach the Regulator: Connect the CO2 tank to the pressure regulator using a wrench. Wrap the threads with Teflon tape to ensure a tight, leak-free connection. Install the regulator on the outside of the freezer or inside near the CO2 tank.
- Install the Beer Faucet: Use a hole saw attachment to create a hole in the front of the freezer for the beer faucet. Insert the shank through the hole, securing it with a nut on the inside of the freezer. Connect the faucet to the shank and tighten the coupling with a wrench.
- Connect the Beer Line: Attach one end of the beer line to the beer faucet and the other end to the liquid disconnect on the keg. Ensure that the connections are secure and use clamps if necessary.
- Connect the Gas Line: Connect one end of the gas line to the gas disconnect on the keg and the other end to the gas port on the pressure regulator. Double-check that all connections are tight and secure.
- Attach Drip Tray and Drain Line: Install the drip tray underneath the beer faucet to catch any spills or drips. Connect a drain line to the drip tray to direct any liquid into a container or directly outside the freezer.
- Test for Leaks: Before loading the keg, turn on the CO2 tank and check for any leaks in the system. Apply a mixture of soapy water to the connections and look for any bubbles, indicating a leak. Tighten any loose connections as needed.
- Load the Keg: Place the keg inside the freezer and secure it in place using straps or bungee cords. Make sure it is stable and won’t shift during operation.
- Power on the Freezer: Plug in the freezer and set the temperature control to the desired cooling level. Allow the freezer to run for a few hours to reach the desired temperature before tapping into the keg.
With the kegerator conversion kit successfully installed, you’re just a few steps away from enjoying your favorite beers on tap. In the next section, we’ll cover the process of setting up the CO2 system to ensure proper carbonation and dispensing of your beer.
When building a freezer kegerator, make sure to measure the interior dimensions of the freezer to ensure it can accommodate the keg and CO2 tank. This will help you avoid any fitting issues later on.
Setting Up the CO2 System
Setting up the CO2 system is an essential step in ensuring proper carbonation and dispensing of your beer in the kegerator. Follow these steps to set up the CO2 system:
- Check CO2 Tank Pressure: Ensure that the CO2 tank is filled and has adequate pressure for dispensing beer. The ideal pressure will depend on the beer style and carbonation level desired. Consult a carbonation chart or the brewery’s recommendations for proper CO2 pressure.
- Attach Gas Line to Regulator: Connect the gas line from the keg to the gas port on the pressure regulator if not already done during the installation of the kegerator conversion kit.
- Adjust CO2 Pressure: Using the adjustment knob on the pressure regulator, set the CO2 pressure to the recommended level for your beer. It is important to find the right balance between carbonation level and dispensing pressure to avoid over-carbonation or excessive foaming.
- Purge Oxygen from Keg: Before dispensing, it’s crucial to purge any oxygen from the keg to prevent oxidation and off-flavors in your beer. Slowly release the pressure valve on the keg until you no longer hear hissing sounds, indicating that the oxygen has been purged.
- Set Carbonation Level: Depending on the style of beer and personal preference, you may want to adjust the carbonation level. This can be done by adjusting the CO2 pressure and dispensing beer into a glass to evaluate and adjust the carbonation level as needed.
- Monitor CO2 Consumption: Keep track of the CO2 levels in your tank and refill or replace it as needed. It’s a good idea to have a spare CO2 tank on hand to ensure uninterrupted beer dispensing.
- Regularly Check for Leaks: Periodically check the connections for any leaks in the CO2 system. Apply a soapy water solution to the connections and look for bubbles, indicating a leak. Tighten any loose connections or replace faulty components if necessary.
Remember that each beer style may have different carbonation requirements, so it may take some trial and error to find the perfect carbonation level for your brew. Be sure to consult brewing resources or guidelines specific to the beer style you are dispensing.
With the CO2 system properly set up, you are now ready to connect the keg and tap system to your kegerator. In the next section, we will cover that process in detail.
Connecting the Keg and Tap System
Now that you have set up the CO2 system, it’s time to connect the keg and tap system to your kegerator. Follow these steps to ensure proper connection and dispensing:
- Verify Keg Condition: Before connecting the keg, ensure that it is clean, properly sealed, and at the desired temperature for serving.
- Connect the Liquid Line: Connect one end of the liquid line to the liquid disconnect on the keg. The other end will connect to the faucet shank inside the kegerator. Ensure a secure connection and use clamps if necessary.
- Purge Air from the Line: To purge any air from the line, open the faucet briefly until beer flows consistently and all air bubbles are expelled.
- Adjust Faucet Angle: Position the faucet so that it is at a slight angle, allowing for a smooth and controlled pour. This will help minimize foaming and waste.
- Open the Faucet and Start Dispensing: Open the faucet tap and allow the beer to flow slowly into a clean glass. Tilt the glass at a 45-degree angle to reduce foaming, gradually straightening it as you pour. Be mindful of the pressure and adjust as needed to achieve a balanced flow.
- Monitor Temperature and Pressure: Keep an eye on the temperature inside the kegerator and make adjustments as necessary to maintain the desired serving temperature. Also, periodically check the CO2 pressure and adjust if needed to prevent over or under carbonation.
- Close the Faucet Properly: After pouring, close the faucet tightly to prevent any leaks or contamination. This ensures that your beer stays fresh and carbonated until the next pour.
It’s important to note that each beer style may require different considerations for pouring, such as specific glassware or pouring techniques. Educate yourself about the specific style you are dispensing to enhance the overall beer-drinking experience.
With the keg and tap system properly connected, you are now ready to enjoy your homebrew or favorite craft beers on tap. In the next section, we will discuss maintenance and cleaning tips to keep your kegerator in top condition.
Testing and Troubleshooting
After completing the installation and connection of your kegerator, it’s important to perform thorough testing to ensure everything is working properly. Here are some testing steps to follow and potential troubleshooting tips:
- Check for Leaks: Inspect all connections, hoses, and fittings for any signs of leakage. Apply a mixture of soapy water to the connections and look for bubbles indicating a leak. Tighten any loose connections or replace faulty components as needed.
- Verify Carbonation Level: Pour a sample glass of beer and evaluate the carbonation level. Adjust the CO2 pressure if necessary to achieve the desired level of carbonation. Remember, carbonation can be a subjective preference, so make adjustments based on your taste preferences.
- Monitor Temperature: Keep an eye on the temperature inside the kegerator. Ensure that it remains within the recommended range for serving beer (around 35-40 degrees Fahrenheit or 2-4 degrees Celsius). Adjust the temperature setting on your freezer if needed.
- Check for Proper Dispensing: Pour a full glass of beer and assess the flow rate and any excessive foam. Adjust the CO2 pressure, faucet angle, or temperature as needed to achieve a smooth and controlled pour.
- Troubleshooting Foam Issues: If you encounter excessive foam, check for possible causes such as improper CO2 pressure, warm beer lines, poor balancing, or dirty faucet. Adjustments and cleaning may be necessary to resolve foam-related issues.
- Double-check Equipment: Ensure that all equipment, including regulators, faucets, lines, and couplers, is in proper working condition. Replace any damaged or worn-out components to avoid future issues.
Remember that troubleshooting is a normal part of the kegerator ownership experience, especially when first setting up or making adjustments. Don’t be discouraged if you encounter any issues—it’s all part of the learning process. Patience and persistence will help you achieve the perfect pour.
If you encounter persistent problems or difficulties in troubleshooting, consider reaching out to experienced homebrewers or kegerator forums for advice and assistance. Many beer enthusiasts are eager to help and share their knowledge to ensure your kegerator runs smoothly.
With proper testing and troubleshooting, you can confidently enjoy your favorite beers on tap without any issues. In the next section, we will discuss essential maintenance and cleaning tips to keep your kegerator in optimal condition.
Maintenance and Cleaning
Regular maintenance and cleaning are crucial for keeping your kegerator running smoothly and ensuring the quality of your beer. Here are some maintenance and cleaning tips to follow:
- Clean Beer Lines Regularly: To prevent bacterial growth and maintain the taste of your beer, it’s important to clean the beer lines regularly. Flush the lines with a cleaning solution recommended for draft systems and follow the manufacturer’s instructions for proper cleaning.
- Clean Faucet and Tap Components: Remove the faucet and disassemble it for cleaning. Soak the components in warm water and a cleaning solution, then scrub gently to remove any residue. Rinse thoroughly and reassemble the faucet before reattaching it to the kegerator.
- Sanitize Keg Before each Use: Before filling a keg with new beer, ensure it is thoroughly cleaned and sanitized. Use a sanitizing solution specifically made for brewing equipment to eliminate any potential contaminants.
- Check CO2 Tank: Regularly monitor the pressure gauge on the CO2 tank to ensure it has an adequate supply. If the pressure drops significantly, it may be time to refill or replace the CO2 tank.
- Inspect and Replace Seals: Periodically inspect the seals on your kegerator, including those on the keg, connections, and faucets. Replace any worn-out or damaged seals to maintain a proper seal and prevent leaks.
- Regularly Clean Drip Tray: Clean the drip tray regularly to prevent buildup of spilled beer and other residues. Remove the tray, wash it with warm soapy water, and dry thoroughly before reattaching.
- Check for Mold or Mildew: Monitor the interior of the kegerator for any signs of mold or mildew. Clean the interior with a mild disinfectant solution if necessary, and ensure that the kegerator is properly sealed and ventilated to prevent moisture buildup.
- Rotate and Rotate Kegs: Rotate kegs periodically to ensure even dispensing and to prevent sediment buildup in unused kegs. This will help maintain the quality and consistency of your beer.
Regular maintenance and cleaning will not only improve the taste of your beer but also extend the lifespan of your kegerator. Following these guidelines will help ensure that you enjoy fresh, delicious beer from your kegerator for years to come.
With the maintenance and cleaning tips covered, you now have a comprehensive understanding of how to maintain your kegerator. In the final section, we will wrap up the article with a few concluding thoughts.
Conclusion
Congratulations! You’ve successfully learned how to build a freezer kegerator, transforming a simple freezer into a convenient and enjoyable way to serve your favorite beers on tap. Building your own kegerator allows you to customize your setup, experiment with different beer styles, and impress your friends and family with fresh, cold beer straight from the keg.
Throughout this guide, we provided step-by-step instructions on choosing the right freezer, selecting the appropriate keg, gathering the necessary tools and materials, preparing the freezer, installing the kegerator conversion kit, setting up the CO2 system, connecting the keg and tap system, testing and troubleshooting, and maintaining and cleaning your kegerator.
By following these instructions and guidelines, you can confidently create a kegerator that suits your needs and preferences, and enjoy the benefits of having a constant supply of cold, delicious beer on tap.
Remember, building and maintaining a freezer kegerator requires attention to detail and regular upkeep, such as cleaning beer lines, sanitizing equipment, and checking CO2 levels. This will ensure the longevity of your equipment and the quality of your beer.
Now that you have the knowledge and skills to build and maintain your own kegerator, it’s time to start your brewing journey. Gather your favorite keg, set up the CO2 system, and start pouring fresh pints of beer straight from your kegerator.
Whether you’re a passionate homebrewer or a beer enthusiast looking to elevate your drinking experience, a freezer kegerator is a fantastic addition to your home. Cheers to delicious, cold beer on tap!
Frequently Asked Questions about How To Build A Freezer Kegerator
Was this page helpful?
At Storables.com, we guarantee accurate and reliable information. Our content, validated by Expert Board Contributors, is crafted following stringent Editorial Policies. We're committed to providing you with well-researched, expert-backed insights for all your informational needs.


0 thoughts on “How To Build A Freezer Kegerator”