Articles
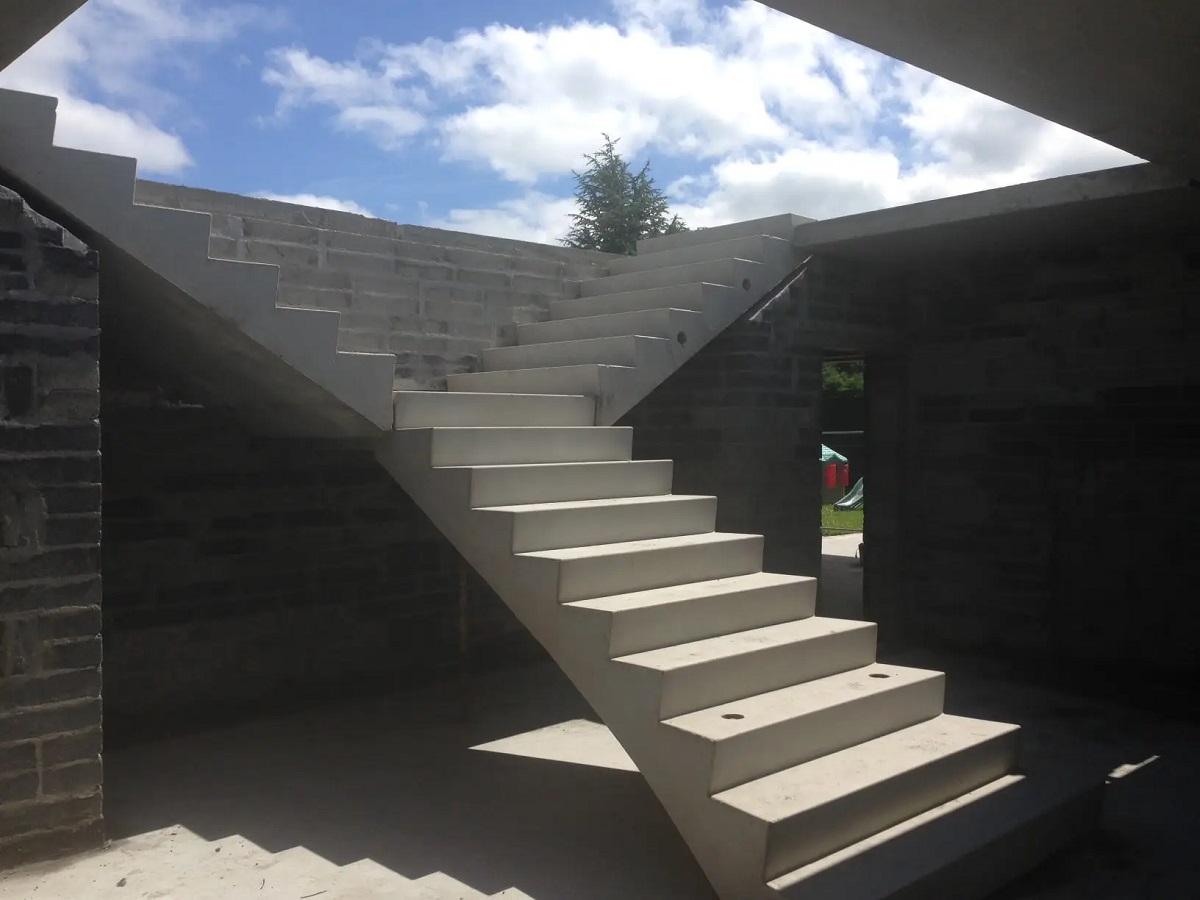
How To Build Cement Stairs
Modified: August 21, 2024
Learn how to build durable and sturdy cement stairs with step-by-step instructions and expert articles. Enhance your DIY skills and create a safe and functional staircase.
(Many of the links in this article redirect to a specific reviewed product. Your purchase of these products through affiliate links helps to generate commission for Storables.com, at no extra cost. Learn more)
Introduction
Building cement stairs can be a valuable addition to any home or property, providing both functionality and aesthetic appeal. Whether you’re planning to add a set of stairs to your garden or patio, or you’re looking to replace your old, worn-out stairs, this comprehensive guide will walk you through the steps of building cement stairs from start to finish.
Before diving into the construction process, it’s important to note that building cement stairs is not a project to rush through. It requires careful planning, precise measurements, the right materials, and proper execution. But with the right guidance and a can-do attitude, you can successfully construct sturdy and durable stairs that will withstand the test of time.
In this article, we will cover everything you need to know to build cement stairs: from planning and preparation to pouring and finishing the concrete. So, let’s get started on this exciting journey towards creating a stunning set of stairs that will elevate the aesthetics and functionality of your space.
But first things first: proper planning and preparation are paramount to ensure a successful project. Let’s take a look at what you need to do before you start the construction process.
Key Takeaways:
- Proper planning, precise measurements, and attention to detail are crucial for building sturdy and durable cement stairs. From obtaining permits to gathering materials, thorough preparation sets the stage for a successful construction project.
- The construction of cement stairs involves a series of meticulous steps, from excavating the foundation to pouring and finishing the concrete. Attention to mixing, pouring, and curing ensures a polished and professional finish, enhancing the longevity and aesthetics of the stairs.
Read more: How To Build Basement Stairs
Planning and Preparation
Before you start building cement stairs, it’s essential to plan out the project and gather all the necessary materials and tools. Proper planning ensures that you have a clear understanding of the steps involved, the time and budget needed, and any permits or permissions required.
The first step in the planning process is to assess your needs and determine the purpose of the stairs. Are you building them for functional purposes, like accessing a raised patio or garden, or are they purely decorative? Understanding the purpose will help you determine the design, size, and location of the stairs.
Next, you’ll need to obtain any required permits or permissions from your local municipality or homeowners’ association. Building codes and regulations vary from place to place, so it’s crucial to research and adhere to the specific requirements in your area. Ensuring compliance will prevent any issues down the line and ensure the safety and longevity of your stairs.
Once you have a clear idea of your needs and have obtained the necessary permits, it’s time to gather the materials and tools you’ll need for the project. Here’s a list of essential items:
- Cement
- Sand
- Gravel
- Wood or metal for formwork
- Rebar or wire mesh (for added strength)
- Concrete mixer or a wheelbarrow and shovel for mixing
- Trowel for finishing the concrete
- Level
- Measuring tape
- Hammer
- Nails or screws
- Safety goggles and gloves
Once you have all the necessary materials and tools, it’s essential to plan out the exact measurements and dimensions of the stairs. Measure the height, width, and depth of the area where the stairs will be located. Consider factors such as the number of steps, the riser height, and the tread depth. Remember to adhere to the local building codes and regulations for these measurements.
With thorough planning and preparation, you’ll be well-equipped to begin the construction process. In the next section, we’ll dive into the detailed steps required to build cement stairs.
Materials and Tools Needed
Building cement stairs requires specific materials and tools to ensure a successful construction project. Here’s a list of what you’ll need:
Materials:
- Cement: Choose a high-quality cement that is suitable for construction projects. The type of cement you need may vary based on your location and climate.
- Sand: Use clean, coarse sand that is free of impurities for the best results.
- Gravel: Coarse gravel or crushed stone is essential for creating a solid and well-drained base for your stairs.
- Wood or metal for formwork: You’ll need either treated lumber boards or metal sheets to create the formwork, which holds the wet concrete in place until it hardens.
- Rebar or wire mesh (optional): Adding reinforcement to your concrete stairs can provide extra strength and durability. Either rebar (steel reinforcement bars) or wire mesh can be used for this purpose.
- Concrete sealer: To protect your stairs from moisture, stains, and damage, consider applying a concrete sealer after the surface has cured.
Tools:
- Concrete mixer or wheelbarrow and shovel: If you’re handling a large volume of concrete, a concrete mixer can help you achieve a more consistent mix. However, a wheelbarrow and shovel can also be used for smaller projects.
- Trowel: A trowel is necessary for spreading and smoothing the concrete surface.
- Level: Use a level to ensure that your stairs are even and properly sloped.
- Measuring tape: Accurate measurements are crucial for building precise and balanced stairs.
- Hammer, nails, or screws: These tools will be needed for securing the formwork and other construction components.
- Safety goggles and gloves: Protect your eyes and hands during the construction process by wearing safety goggles and gloves.
Having the right materials and tools on hand will make the construction process smoother and more efficient. Take the time to gather everything you need before you start building your cement stairs.
In the next sections, we will guide you through each step of the construction process, from measuring and marking to pouring and finishing the concrete. Let’s get started!
Read more: How To Build Spiral Stairs
Step 1: Measure and Mark
The first step in building cement stairs is to accurately measure and mark the area where the stairs will be located. This step is crucial to ensure that your stairs fit properly and are safe to use. Here’s how to proceed:
1. Measure the Height:
Start by measuring the total height from the ground to the top of the landing or upper-level surface where the stairs will end. Use a measuring tape to get an accurate measurement. This height will determine the number of steps and the riser height for each step.
2. Determine the Number of Steps:
Next, divide the total height by the desired riser height (typically between 6 and 8 inches) to determine the number of steps you’ll need. Round the result up or down to get a whole number of steps. Keep in mind that the riser height should be consistent for each step to ensure safety and ease of use.
3. Calculate the Tread Depth:
The tread depth is the horizontal distance between the front and back of each step. The tread depth should be consistent to provide a comfortable and stable surface to walk on. A typical tread depth ranges from 10 to 12 inches. To calculate this, divide the total run (the length of the stairs) by the number of steps.
Read more: How To Build Stairs To Attic
4. Mark the Starting Point:
Start at the bottom of the stairs and use a measuring tape to mark the starting point of the first step. Measure from the ground up by the height of one step, and mark the spot on the wall or landing where the bottom step will begin. This mark will serve as a reference point for building the formwork.
5. Mark the Positions of the Steps:
Using the measurements from steps 2 and 3, mark the positions of each step on the wall or landing. Measure and mark the front and back of each step to indicate the boundaries for pouring the concrete. Double-check your measurements to ensure accuracy before proceeding to the next step.
Properly measuring and marking the area will set the foundation for building your cement stairs. Take your time to ensure accuracy and double-check your measurements to avoid any potential mistakes. In the next step, we will discuss preparing the foundation for your stairs.
Step 2: Dig the Foundation
Once you have measured and marked the area for your cement stairs, the next step is to dig the foundation. This foundation will provide a stable base for your stairs and ensure that they remain secure and level over time. Here’s how to proceed:
1. Gather the Required Tools:
Before you start digging, gather the necessary tools for the job. You’ll need a shovel, a pickaxe, a wheelbarrow or buckets for removing soil, and a level for checking the excavation depth.
Read more: How To Build Stone Stairs
2. Start Excavating:
Begin digging at the marked starting point of the first step. Use the shovel to remove the top layer of soil and create a trench for the foundation. Dig to a depth that allows for a stable foundation and accounts for the thickness of the concrete. Typically, a depth of around 6 to 8 inches is sufficient.
3. Check the Excavation Depth:
Periodically use the level to check the depth of the excavation. Ensure that it remains consistent throughout the entire foundation area. Adjust the depth as needed by removing or adding soil. It’s essential to maintain a level foundation to ensure the stability and durability of your stairs.
4. Compact the Soil:
Once you have reached the desired depth, use the back of the shovel or a hand tamper to compact the soil at the bottom of the excavation. This will help ensure a solid base for the concrete. Compacting the soil will prevent settling and movement of the stairs over time.
5. Clear the Excavated Soil:
As you dig, transfer the excavated soil into a wheelbarrow or buckets to remove it from the work area. This will create space for placing the formwork and pouring the concrete. Dispose of the soil properly, following local regulations and guidelines.
By excavating the foundation properly, you are setting the stage for a strong and stable set of cement stairs. Take your time to dig to the correct depth and ensure a level surface. In the next step, we will discuss how to level the base for your stairs.
Read more: How To Build Drawers In Stairs
Step 3: Level the Base
After excavating the foundation for your cement stairs, it’s crucial to level the base. A level base ensures that your stairs are stable and balanced, providing a safe and reliable structure. Here’s how to level the base:
1. Prepare the Base:
Before leveling the base, remove any debris or loose soil from the excavation area. Use a shovel or a rake to even out the surface and create a smooth base for the stairs. Remove any large rocks or obstructions that might interfere with the placement of the formwork.
2. Add a Layer of Gravel:
To improve drainage and provide additional stability, add a layer of coarse gravel or crushed stone to the bottom of the excavation. Spread the gravel evenly across the base and use a tamper or the back of a shovel to compact it. This layer acts as a solid base for the concrete and helps prevent settling.
3. Check for Level:
Using a long straightedge, such as a level or a straight board, place it across the width of the excavation area. Check for any high or low spots by placing the level vertically on the straightedge. Adjust the gravel base by adding or removing material until you achieve a level surface.
Read more: How To Build Freestanding Stairs
4. Create a Slope:
If your stairs will be exposed to rain or watering, it’s essential to create a slight slope in the base. This slope ensures that water drains away from the stairs and prevents pooling or water damage. Aim for a slope of approximately 1/4 inch per foot towards the desired drainage direction.
5. Double Check the Level and Slope:
After leveling the base and creating the slope, double-check the levelness using the straightedge and level. Ensure that the base is uniform and consistent across the entire staircase area. Adjust as necessary to achieve a level and sloped surface.
By properly leveling the base, you are setting the foundation for a sturdy and well-built set of cement stairs. Take your time to ensure accuracy and double-check your work. In the next step, we will discuss how to build the formwork for your stairs.
Step 4: Build the Formwork
Building the formwork for your cement stairs is an important step that creates the shape and structure of the stairs. The formwork holds the wet concrete in place until it hardens, ensuring that the stairs maintain their desired shape. Here’s how to build the formwork:
1. Gather the Materials:
Before constructing the formwork, gather the necessary materials. You will need treated lumber boards or metal sheets for the sides and risers of the stairs, as well as additional boards for support and bracing.
Read more: How To Build Stairs With A Landing
2. Measure and Cut the Boards:
Using your measurements from earlier, measure and cut the lumber boards or metal sheets to the proper lengths for the sides (stringers) and risers (kickboards) of the stairs. Make sure to account for the number of steps and the height and width of each step.
3. Construct the Side and Riser Forms:
Start by attaching the side forms to the edges of the excavation area. Use nails or screws to secure them in place, making sure they are level and plumb. Then, attach the riser forms to the front of each tread, ensuring they are aligned and securely fastened.
4. Add Support and Bracing:
To provide stability and prevent the forms from shifting during the concrete pouring process, add additional pieces of lumber to act as support and bracing. These pieces should run diagonally or horizontally, connecting the side forms and risers.
5. Check for Level:
Use a level to check that the forms are level and plumb. Make any necessary adjustments by adding shims or repositioning the forms. The accuracy of the formwork will determine the overall quality and appearance of your stairs.
Read more: How To Build Stairs Into A Hill
6. Secure the Forms:
Once the forms are level and properly aligned, secure them in place by driving stakes into the ground outside the formwork. Position the stakes at regular intervals and hammer them into the ground until they are firmly anchored. This will prevent the forms from shifting or moving during the concrete pouring process.
By building sturdy and properly aligned formwork, you are ensuring that your cement stairs take shape accurately and securely. Take your time during this step to ensure the forms are level and properly secured. In the next step, we will discuss how to mix the concrete for your stairs.
Step 5: Mix the Concrete
Mixing the concrete is a critical step in building cement stairs. A well-mixed concrete mixture ensures that your stairs are strong, durable, and capable of withstanding daily use. Here’s how to mix the concrete:
1. Gather the Materials:
Before you begin mixing the concrete, gather all the necessary materials, including cement, sand, gravel, and water. Make sure you have enough of each ingredient to complete the project.
2. Calculate the Concrete Ratio:
To achieve the right consistency and strength, it’s important to follow the correct concrete ratio. The typical ratio for stairs is 1 part cement, 2 parts sand, and 3 parts gravel. Adjust the amounts based on the volume of concrete you need.
Read more: How To Build Metal Stairs
3. Prepare the Mixing Area:
Clear a designated area for mixing the concrete. Use a sturdy wheelbarrow or a concrete mixer if available. Ensure the mixing area is clean and free from any debris that could contaminate the concrete mixture.
4. Add the Dry Ingredients:
Start by adding the dry ingredients, including the cement, sand, and gravel, into the mixing container. Use a shovel or a scoop to measure and pour each component according to the calculated ratios. Mix the dry ingredients thoroughly to ensure they are evenly distributed.
5. Gradually Add Water:
Slowly add water to the dry mixture while continuously mixing. Gradually incorporate the water until the mixture reaches a workable consistency. Avoid adding too much water, as this can weaken the concrete. Aim for a mixture that is moist but not overly wet or runny.
6. Mix Thoroughly:
Continue mixing the concrete until all the ingredients are well combined. Use a shovel or a mixer to ensure the mixture is homogeneous and free of any lumps or dry pockets. Keep mixing until the concrete has a consistent texture and is ready for pouring.
Read more: How To Build Stairs Outside
7. Check for the Right Consistency:
To ensure the concrete is properly mixed, perform a slump test. Take a handful of the mixture and squeeze it tightly in your hand. Open your hand and observe the shape of the concrete. If it retains its shape with minimal slumping, the mixture is ready.
By properly mixing the concrete, you are ensuring the strength and durability of your cement stairs. Take the time to follow the correct ratios and achieve the right consistency. In the next step, we will discuss how to pour the concrete into the formwork.
Step 6: Pour the Concrete
Pouring the concrete is an exciting step in building cement stairs, as it brings your project one step closer to completion. It’s crucial to pour the concrete carefully and evenly to ensure a solid and level staircase. Here’s how to pour the concrete:
1. Prepare the Formwork:
Before pouring the concrete, double-check that the formwork is secure and properly aligned. Make sure all support and bracing elements are in place to prevent any movement or shifting during the pouring process.
2. Start at the Bottom:
Begin pouring the concrete at the bottom step, working your way up towards the top. This allows for a more controlled pour and helps avoid stepping on or disturbing freshly poured concrete. Use a shovel or a concrete chute to transfer the concrete into the formwork.
Read more: How To Build Stairs In A Retaining Wall
3. Fill the Formwork:
Add the concrete mixture to the formwork, starting at the back and working your way towards the front. Fill each step’s formwork completely, ensuring there are no gaps or air pockets. Use a trowel or a shovel to level and smooth the surface as you go.
4. Consolidate the Concrete:
To remove any air bubbles and ensure a solid structure, consolidate the concrete as you pour. Use a concrete vibrator or tap the sides of the formwork with a mallet to help the concrete settle and eliminate air pockets. This will enhance the strength and durability of your stairs.
5. Continue Pouring and Smoothing:
Continue pouring the concrete and filling each step’s formwork until you reach the top. Work methodically, ensuring a consistent and even pour throughout. Use a trowel or a float to smooth the surface, removing any excess concrete and creating a level and finished appearance.
6. Check for Level:
As you pour and smooth the concrete, frequently check for levelness using a level or a straightedge. Adjust the concrete as necessary to achieve a level surface for each step. Proper leveling is essential to ensure the safety and functionality of the stairs.
Read more: How To Build Outdoor Railing For Stairs
7. Cure the Concrete:
After pouring, cover the freshly poured concrete with plastic or damp burlap to prevent rapid drying and promote proper curing. Allow the concrete to cure for at least 24 to 48 hours, or as recommended by the manufacturer, before removing the formwork or applying any loads.
By pouring the concrete correctly, you are on your way to creating solid and durable cement stairs. Take your time to ensure an even pour and a level surface. In the next step, we will discuss how to smooth and finish the surface of the stairs.
Step 7: Smooth and Finish the Surface
Smoothing and finishing the surface of your cement stairs is an essential step to achieve a polished and professional look. It also ensures that the stairs are safe and comfortable to walk on. Here’s how to smooth and finish the surface:
1. Wait for the Concrete to Set:
Allow the poured concrete to set and firm up before attempting to smooth and finish the surface. The exact time will depend on the concrete mix and ambient conditions. Typically, you’ll need to wait for the concrete to become firm but still workable.
2. Use a Concrete Float:
A concrete float is a tool with a flat, rectangular base that is used to smooth and level the surface of the concrete. Start at the bottom step and work your way up, using the float in a back-and-forth motion to remove any imperfections and create an even and smooth surface. This will help achieve a visually appealing finish.
Read more: How To Build Loft Bed Stairs
3. Apply a Trowel Finish:
After using the float, switch to a trowel to further refine the surface of the stairs. A trowel provides more control and allows for finer adjustments. Move the trowel in a circular or sweeping motion to remove any remaining ridges or marks, creating a sleek and finished appearance.
4. Add Surface Texture (Optional):
If desired, you can add texture to the surface of the stairs to improve traction and prevent slippage. There are various techniques to achieve texture, such as broom finishing, stippling, or using specialized trowels. Choose a method that suits your aesthetic preferences and the functionality of the stairs.
5. Cure the Surface:
Once you are satisfied with the smoothness and texture of the surface, allow the stairs to cure. Curing is an essential step to ensure the strength and durability of the concrete. Cover the stairs with plastic or damp burlap and let them cure for a minimum of 7 days, following the manufacturer’s recommendations.
6. Clean and Seal (Optional):
If desired, you can clean the surface of the stairs once they are fully cured. Use a broom or a brush to remove any loose debris or dirt. If you wish to enhance the appearance and protect the concrete, consider applying a concrete sealer according to the manufacturer’s instructions.
By smoothing and finishing the surface of your cement stairs, you are adding the final touches to your project. Take your time to achieve a polished and professional finish. In the next step, we will discuss installing handrails as an optional addition to your stairs.
Read more: How To Build A Porch Stair Railing
Step 8: Install Handrails (Optional)
Installing handrails on your cement stairs is an optional step but highly recommended to enhance safety and accessibility. Handrails provide support and stability while navigating the stairs, especially for individuals with mobility challenges or for young children. Here’s how to install handrails:
1. Determine the Handrail Design:
Before starting the installation process, decide on the design and materials for your handrails. Handrails can be made of various materials, including wood, metal, or composite materials. Consider the aesthetics of your space and choose a design that complements the overall style of your stairs and surroundings.
2. Measure and Cut the Handrail:
Measure the length and height of the stairs where you plan to install the handrail. Use these measurements to cut the handrail to the appropriate size. Ensure the handrail is long enough to extend beyond the top and bottom steps for added stability and usability.
3. Mark the Bracket Positions:
Hold the handrail in place along the stairway and mark the positions for the handrail brackets. The brackets should be evenly spaced and provide secure support for the handrail. Use a level to ensure the handrail is straight and properly aligned.
Read more: How To Build Storage Under Stairs
4. Install the Brackets:
Pre-drill holes at the marked positions for the handrail brackets. Secure the brackets in place using screws or bolts, depending on the type of bracket and the material of the stairs. Make sure the brackets are firmly attached to the stairs to ensure stability.
5. Attach the Handrail:
Place the handrail onto the installed brackets. Depending on the design, you may need to secure the handrail to the brackets using screws or other fasteners. Ensure the handrail is level and securely attached to provide proper support and stability.
6. Test the Handrail:
Once the handrail is installed, give it a thorough test to ensure it can withstand pressure and provide the necessary support. Apply firm pressure to the handrail and shake it slightly to ensure it is stable and doesn’t move or come loose.
By installing handrails, you are enhancing the safety and usability of your cement stairs. Take the time to choose a design that suits your needs and properly install the handrails to ensure their effectiveness. In the next step, we will discuss curing and sealing the stairs.
Step 9: Cure and Seal the Stairs
The final step in building cement stairs is to properly cure and seal them. Curing and sealing is essential for maintaining the longevity and appearance of your stairs. Here’s how to cure and seal the stairs:
Read more: How To Build Stairs For A Mobile Home
1. Allow Sufficient Curing Time:
After the concrete is poured and finished, it’s crucial to allow sufficient time for it to cure. Curing is the process of maintaining the moisture content in the concrete, which helps it gain strength and durability. Follow the manufacturer’s recommendations for curing time, typically around 7 days.
2. Protect the Stairs:
During the curing period, it’s important to protect the stairs from excessive moisture loss and potential damage. Cover the stairs with plastic sheeting or damp burlap to retain moisture. This will prevent rapid drying, cracking, and enhance the curing process.
3. Monitor and Maintain Moisture Levels:
Regularly check the moisture levels of the stairs during the curing period. If the concrete appears to be drying too quickly, mist it with water or apply a light layer of wet burlap to retain moisture. This helps ensure the concrete cures uniformly and minimizes the risk of cracking or shrinkage.
4. Clean the Surface:
Once the curing period is complete, remove any covering and clean the surface of the stairs. Remove any loose debris or dirt using a broom or a brush. This will prepare the surface for sealing and enhance the appearance of the stairs.
Read more: How To Build Stairs For A Mobile Home
5. Apply a Concrete Sealer:
Applying a concrete sealer is an optional but beneficial step for protecting and enhancing the appearance of your cement stairs. A sealer serves as a protective barrier against moisture, staining, and damage. Choose a sealer suitable for exterior concrete surfaces and follow the manufacturer’s instructions for application.
6. Allow the Sealer to Dry:
After applying the sealer, allow sufficient drying time before allowing foot traffic on the stairs. The drying time may vary depending on the type of sealer used. Follow the manufacturer’s recommended drying time to ensure maximum effectiveness.
By properly curing and sealing your cement stairs, you are maintaining their strength, durability, and aesthetic appeal. Take the time to follow the curing process and consider applying a sealer for added protection. With these final steps completed, your cement stairs are ready to be enjoyed for years to come.
Conclusion
Congratulations! You have successfully completed the construction of your cement stairs. By following the comprehensive steps outlined in this guide, you have created a sturdy, durable, and visually appealing staircase that will enhance the functionality and aesthetics of your space. Let’s recap the key points we’ve covered:
First, we emphasized the importance of proper planning and preparation. By understanding your needs, obtaining necessary permits, gathering materials, and taking accurate measurements, you set the foundation for a successful project.
Next, we discussed the construction process step by step. From excavating the foundation and leveling the base to building the formwork, pouring and smoothing the concrete, and optionally installing handrails, each stage contributes to the structural integrity and aesthetic quality of your stairs.
We highlighted the significance of mixing the concrete correctly, ensuring the right ratios and consistency. Paying close attention to pouring techniques, smoothing the surface, and adding appropriate texture contribute to a polished and professional finish.
Lastly, we stressed the importance of curing the concrete to allow it to gain strength and durability, followed by optional sealing to protect and enhance the appearance of your stairs.
Building cement stairs is a rewarding project that requires time, effort, and attention to detail. By following proper construction techniques and utilizing the necessary materials and tools, you have created a long-lasting and functional staircase that will serve you and your visitors for years to come.
Remember, safety should always be a priority when using stairs. Encourage caution and awareness when navigating the stairs, especially for children and those with limited mobility. Regular maintenance, such as cleaning and inspecting the stairs, will help ensure their ongoing performance and safety.
Thank you for taking this journey with us, and we hope you enjoy your newly constructed cement stairs. May they bring convenience, beauty, and a greater sense of comfort to your space.
Frequently Asked Questions about How To Build Cement Stairs
Was this page helpful?
At Storables.com, we guarantee accurate and reliable information. Our content, validated by Expert Board Contributors, is crafted following stringent Editorial Policies. We're committed to providing you with well-researched, expert-backed insights for all your informational needs.
0 thoughts on “How To Build Cement Stairs”