Articles
How To Do Moss Wall Art
Modified: October 18, 2024
Learn how to create stunning moss wall art with our articles. Get step-by-step guides and expert tips to bring nature into your home.
(Many of the links in this article redirect to a specific reviewed product. Your purchase of these products through affiliate links helps to generate commission for Storables.com, at no extra cost. Learn more)
Introduction
If you’re looking to add a touch of nature and beauty to your home or office, moss wall art is the perfect solution. Moss wall art is an innovative and eco-friendly way to bring the outdoors inside. Not only does it create a stunning visual display, but it also provides many health benefits, including improved air quality and reduced stress levels.
Creating your own moss wall art may seem like a daunting task, but with the right materials and a little bit of creativity, it can be a rewarding DIY project. Whether you’re a seasoned crafter or a beginner, this article will guide you through the process of creating your own moss wall art.
In this article, we’ll cover the materials you’ll need, step-by-step instructions on how to create the moss wall art, and tips on how to design and mount it. So, let’s get started on bringing a piece of nature into your living space!
Key Takeaways:
- Bring nature indoors with stunning moss wall art. Choose the right moss, design creatively, and mount securely for a unique and calming addition to your space.
- Embrace creativity and eco-friendliness by crafting your own moss wall art. Experiment with textures, colors, and patterns to create a visually captivating masterpiece.
Read more: How Do I Apply Vinyl Wall Art
Materials Needed
Before you begin creating your moss wall art, gather the following materials:
- Frame: Choose a frame that suits the size and style of your desired moss wall art. You can use a wooden frame, a shadow box, or even repurpose an old picture frame.
- Moss: Select a variety of moss types to add texture and depth to your moss wall art. You can choose from sheet moss, pillow moss, reindeer moss, or any other species of moss that you prefer.
- Adhesive: Look for a suitable adhesive that won’t harm the moss or the frame. Eco-friendly adhesives such as hot glue, craft glue, or a moss-friendly adhesive spray are recommended.
- Background material: Consider using a suitable backing material to provide a contrasting backdrop for the moss. Options include burlap, cork board, or plywood.
- Scissors: Have a pair of sharp scissors on hand to help you trim the moss and the backing material.
- Protective gloves: Moss can be delicate and sensitive to oils and contaminants on your hands, so wearing gloves will help maintain its quality.
- Paint or stain (optional): If you desire a specific color for your frame or background material, you can use paint or stain to customize the look.
Once you have gathered all the necessary materials, you’re ready to dive into the creative process of crafting your moss wall art. Keep in mind that these materials can be adjusted based on your personal preferences and the availability of resources.
Step 1: Choosing the right moss
The type of moss you choose will greatly impact the overall aesthetic of your moss wall art. Here are a few options to consider:
- Sheet Moss: This type of moss has a flat and dense appearance, making it ideal for covering larger areas. It provides a lush and green backdrop for your moss wall art.
- Pillow Moss: Pillow moss has a soft and cushion-like appearance. It adds depth and texture to your moss wall art, creating an interesting visual appeal.
- Reindeer Moss: Reindeer moss is a popular choice due to its vibrant colors. It comes in various shades of green, as well as other shades like gray, red, and yellow. Reindeer moss adds a pop of color and dimension to your moss wall art.
- Forest Moss: Forest moss is a versatile choice that can give your moss wall art a natural and woodland feel. It has a feathery texture and works well for creating a mossy landscape effect.
Consider using a combination of moss types to create visual interest and variety in your moss wall art. Play around with different textures, colors, and shapes to achieve the desired look.
When choosing moss, make sure it is fresh and vibrant. Look for moss that is free from browning or dryness, as this can affect its appearance and lifespan. You can find moss at garden centers, floral supply stores, or even gather it from outdoor spaces like forests or parks.
Take into account the maintenance required for each type of moss. Some moss species may need more frequent misting or watering to keep them looking healthy and vibrant. Choose moss that aligns with your lifestyle and the amount of care you can provide.
Now that you have chosen the right moss for your moss wall art, it’s time to move on to the next step of selecting a suitable background.
Step 2: Selecting a background
The background of your moss wall art serves as a canvas for your moss to shine. Here are a few options to consider when selecting a background:
- Burlap: Burlap provides a rustic and organic backdrop for your moss wall art. Its coarse texture complements the natural look of the moss, creating a visually pleasing contrast.
- Cork Board: Cork board is another popular choice as it is lightweight and easy to work with. It provides a neutral and textured surface that enhances the visual appeal of the moss.
- Plywood: Plywood is a versatile option that can be cut to any size or shape. It can be stained or painted to match your desired aesthetic, allowing for more customization.
- Canvas: If you prefer a more traditional and artistic look, canvas can be a great choice. It offers a smooth surface that can be primed and painted to create a unique background for your moss wall art.
Consider the overall style and theme of your space when selecting a background. Choose a material that complements the existing décor and ambiance. Keep in mind that lighter backgrounds tend to showcase the vibrant colors of the moss, while darker backgrounds create a more dramatic and moody effect.
Ensure that the background material is sturdy enough to support the weight of the moss and the frame. It should also be easily attachable to the frame or backing board.
Once you have decided on the background material, you’re ready to move on to the next step of preparing the frame.
Step 3: Preparing the frame
Preparing the frame is an important step in creating your moss wall art. Here’s what you need to do:
- Clean the frame: If you’re using a pre-existing frame, clean it thoroughly to remove any dirt, dust, or debris. This will ensure a clean and polished finish for your moss wall art.
- Paint or stain (optional): If you want to change the color of your frame, now is the time to paint or stain it. Choose a color that complements the overall aesthetic of your space or matches the background material.
- Measure and cut the backing material: Measure the dimensions of your frame and cut the background material accordingly. Make sure it fits snugly inside the frame without any gaps.
- Secure the backing material: Use adhesive or small nails to secure the backing material to the frame. Ensure that it is firmly attached and won’t come loose.
- Trim any excess material: Once the backing material is securely attached, trim any excess material around the edges for a clean and finished look.
Preparing the frame sets the foundation for your moss wall art. Taking the time to clean, paint, and secure the frame will ensure a professional and polished result for your finished piece.
With the frame ready, you can now move on to the next step of cleaning the moss before attaching it to the frame.
When creating moss wall art, be sure to choose the right type of moss for your project. Some moss varieties are better suited for indoor environments, while others thrive outdoors. Research the specific needs of the moss you plan to use to ensure its long-term health and beauty.
Read more: How To Arrange Wall Art
Step 4: Cleaning the moss
Before attaching the moss to the frame, it’s important to clean it to ensure its longevity and maintain its vibrant appearance. Here’s how to clean the moss:
- Gently remove any debris: Inspect the moss and gently remove any visible debris such as dirt, leaves, or twigs. Be careful not to pull or damage the delicate moss strands.
- Wash the moss: Fill a basin or sink with lukewarm water and place the moss inside. Gently agitate the moss by swirling it around to dislodge any remaining dirt or particles.
- Drain and rinse: After washing, carefully drain the water and rinse the moss under running water. Use your fingers to gently massage the moss, ensuring that all dirt is removed.
- Blot excess water: Once rinsed, gently press the moss between layers of absorbent paper towels or a clean cloth to remove excess water. Avoid squeezing or wringing the moss, as this can damage its delicate structure.
- Air-dry: Place the moss in a well-ventilated area to air dry naturally. Avoid direct sunlight as it can cause the moss to fade or dry out. Ensure that the moss is completely dry before proceeding to the next step.
Cleaning the moss not only removes dirt and debris, but it also rehydrates the moss, making it more pliable and easier to work with during the attachment process. Taking the time to properly clean the moss will result in a visually appealing and healthy moss wall art.
Now that the moss is clean and ready, it’s time to move on to the exciting step of attaching the moss to the frame!
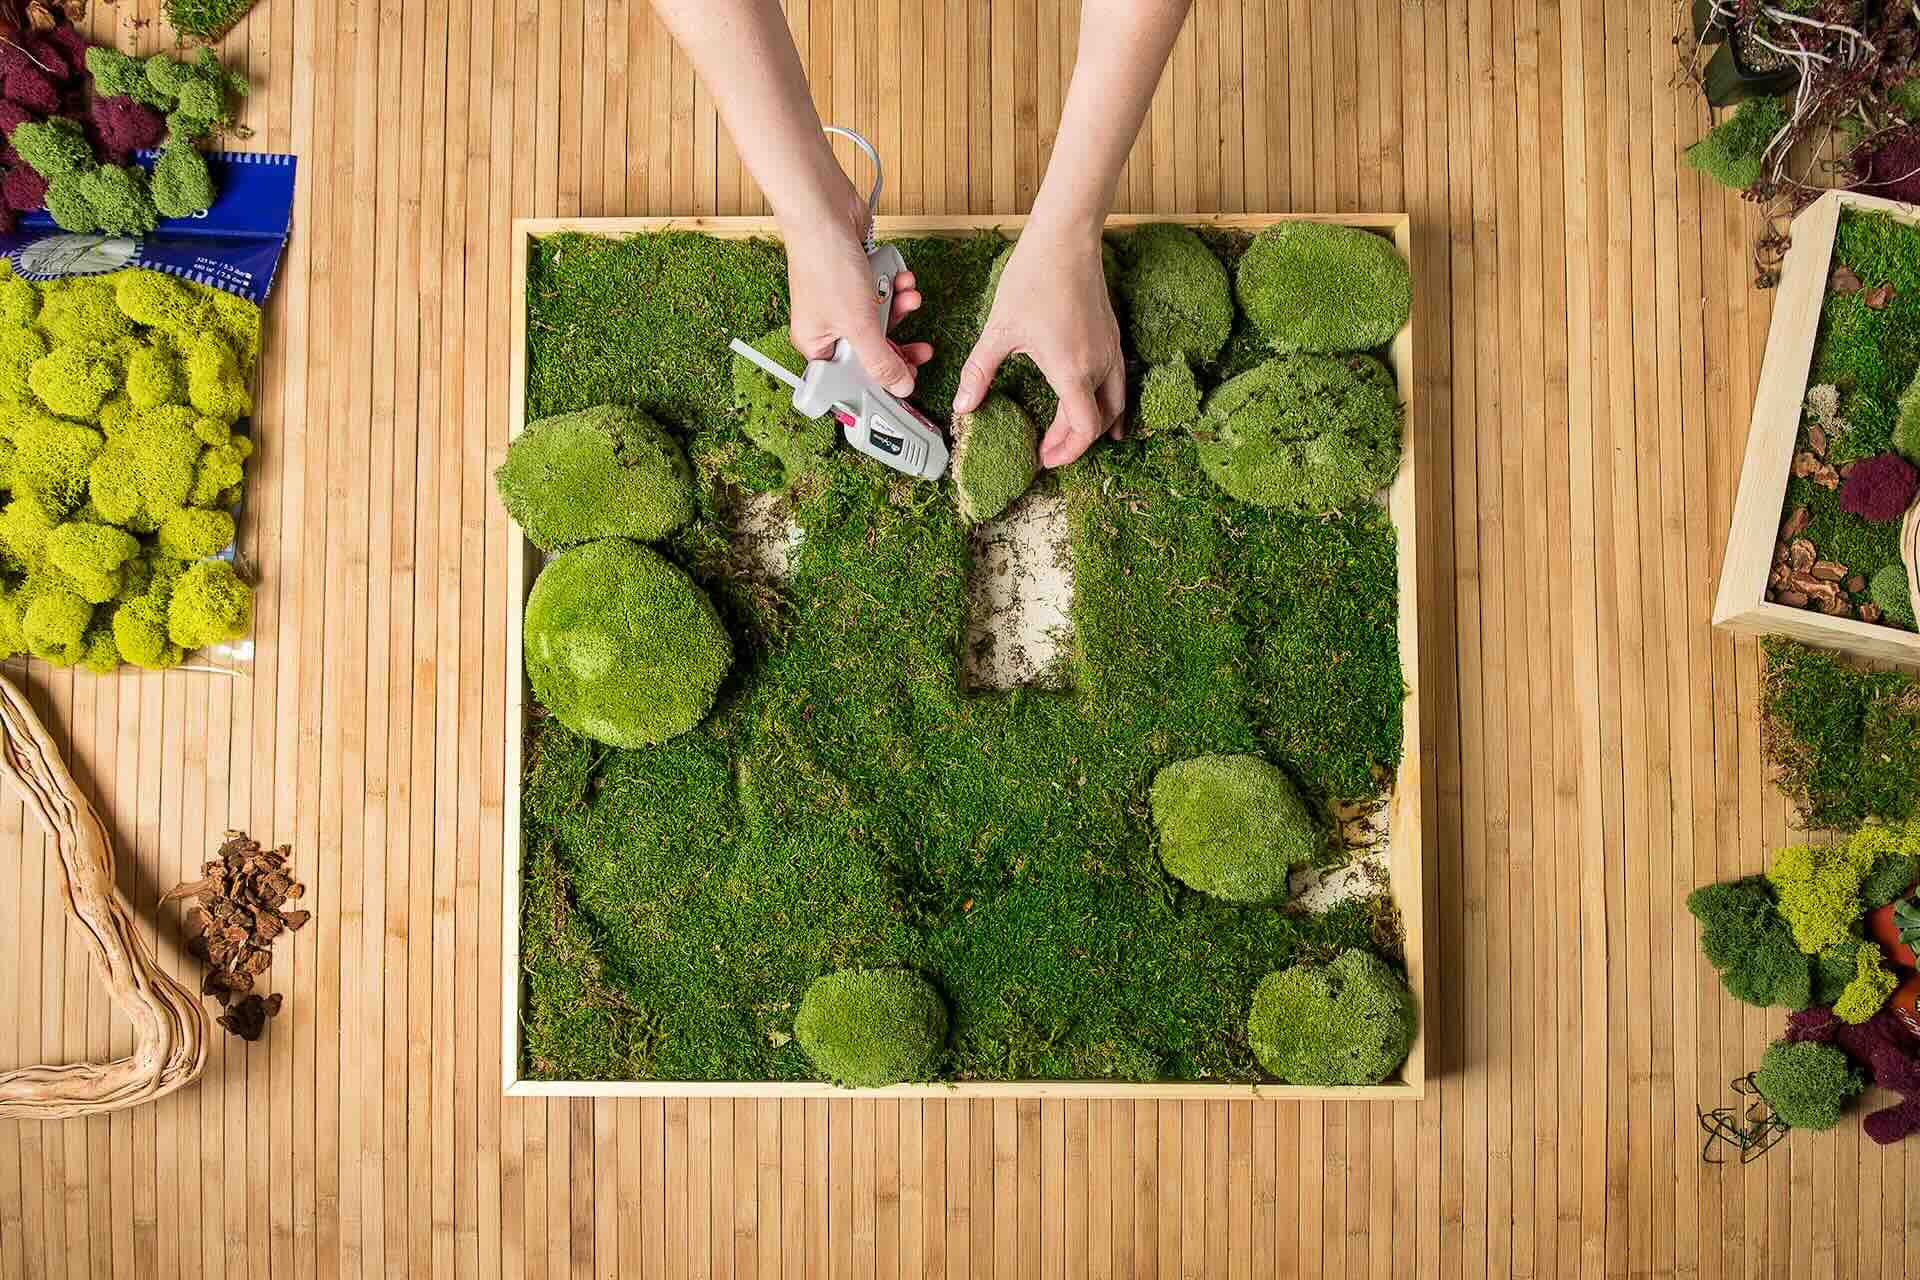
Step 5: Attaching the moss to the frame
Attaching the moss to the frame is where your moss wall art starts to come to life. Follow these steps to securely attach the moss:
- Apply adhesive to the frame: Start by applying adhesive evenly along the inner surface of the frame. Use a brush or a small spatula to ensure an even distribution of the adhesive.
- Place the moss: Carefully place the moss onto the adhesive, gently pressing it onto the frame. Begin with the larger moss pieces and layer smaller pieces on top to create dimension and texture.
- Press and shape: Press the moss firmly onto the frame, making sure it adheres well. Shape the moss as desired, bending or folding it to fit the contours of the frame or adding depth to certain areas.
- Allow it to dry: Let the moss and adhesive dry completely according to the adhesive manufacturer’s instructions. This is important to ensure that the moss remains securely attached.
Take your time during this step to ensure that the moss is attached securely and evenly. Pay attention to any gaps or loose areas, and adjust the moss as needed. The goal is to create a smooth and uniform covering of moss on the frame.
Remember to be mindful of the moss’s delicate nature while handling and attaching it. Take care not to damage or crush the moss strands during the attachment process.
With the moss securely attached to the frame, it’s time to move on to the next step of designing your moss wall art.
Step 6: Designing the moss wall art
Designing your moss wall art is where you can let your creativity shine. Consider the following tips to create a visually appealing and unique design:
- Layering: Experiment with layering different types and shades of moss to add depth and dimension. Arrange the moss in a way that creates visual interest and showcases the various textures and colors.
- Creating patterns: Play around with different patterns or shapes using the moss. You can arrange the moss in a geometric pattern, create a gradient effect, or even mold it into specific shapes like hearts or letters.
- Adding accents: Consider adding additional elements to enhance the design. You can incorporate small decorative objects like pebbles, twigs, or mini figurines to create a whimsical or natural theme.
- Color combinations: Choose a color scheme that complements the overall aesthetic of your space. You can opt for monochromatic tones for a minimalist look, or use contrasting colors to create a vibrant and eye-catching display.
- Balance: Achieve a balanced composition by distributing the moss and accents evenly throughout the frame. Avoid overcrowding certain areas and ensure that the design flows smoothly from one area to another.
- Experiment and adjust: Don’t be afraid to move and adjust the moss as you design. Step back and evaluate the overall look from different angles to make sure you’re satisfied with the arrangement.
Designing your moss wall art is a creative process that allows you to express your personal style and bring your vision to life. Embrace the freedom to experiment and create a design that resonates with you.
Once you’re happy with the design, it’s time to move on to the final step of mounting your moss wall art.
Step 7: Mounting the moss wall art
Mounting your moss wall art is the final step in completing your project. Follow these steps to securely mount your moss wall art:
- Check the weight: Consider the weight of your moss wall art and choose appropriate mounting hardware. Ensure that the hardware can support the weight of the frame and the moss.
- Mark the wall: Decide where you want to hang your moss wall art and mark the desired location on the wall. Use a level to ensure the frame will be straight.
- Install wall anchors (if needed): If your wall is made of drywall or a similar material, install wall anchors to provide extra support. Follow the instructions provided with the wall anchors to properly install them.
- Secure the frame to the wall: Use screws or nails to secure the frame to the wall. Make sure to position them in a way that provides stability and prevents the frame from wobbling or falling.
- Double-check the alignment: Step back and double-check that the frame is level and properly aligned. Make any necessary adjustments to ensure the moss wall art is positioned exactly as desired.
Take your time during the mounting process to ensure that the moss wall art is securely attached to the wall. You may want to have someone assist you to hold the frame steady while you attach it to the wall.
With the moss wall art successfully mounted, step back and admire your creation. Take a moment to appreciate the natural beauty that you have brought into your living space.
Remember to periodically check the moss wall art for any signs of damage or drying. Mist the moss lightly with water if necessary to maintain its freshness and vibrant appearance.
Congratulations! You have now completed the process of creating and mounting your own moss wall art. Enjoy the calming and captivating presence it brings to your home or office.
Read more: How To Make Plaster Wall Art
Conclusion
Creating your own moss wall art is a rewarding and eco-friendly way to bring a touch of nature into your living or working space. By following the steps outlined in this guide, you can successfully craft a stunning moss wall art piece. Let’s recap the key points:
Start by choosing the right type of moss, considering factors such as texture, color, and maintenance requirements. Then, select a suitable background material that complements the moss and your space’s aesthetic. Prepare the frame by cleaning it and applying any desired paint or stain.
Next, clean the moss thoroughly to remove any debris and give it a fresh look. Take care to handle the delicate moss strands gently and avoid damaging them during the cleaning process. Once the moss is clean and dry, it’s time to attach it to the frame using an appropriate adhesive.
Design your moss wall art by experimenting with different textures, colors, and arrangements. Create patterns, layer the moss, and consider adding accent pieces to enhance the overall design. Take your time to achieve a balanced and visually appealing composition.
Finally, mount your moss wall art securely on the wall using the appropriate hardware. Ensure that the frame is level and properly aligned before securely attaching it. Step back and admire the unique and natural beauty you have created.
By following these steps and allowing your creativity to shine, you can enjoy the benefits of a stunning moss wall art piece. Not only will it bring a sense of tranquility and natural beauty to your space, but it will also serve as a conversation starter and a unique focal point.
Remember to care for your moss wall art by periodically checking for any signs of damage, offering gentle misting if needed, and enjoying the calming presence it adds to your environment.
Now, go ahead and embark on your moss wall art journey. Get creative, embrace the beauty of nature, and proudly display your handmade masterpiece!
Frequently Asked Questions about How To Do Moss Wall Art
Was this page helpful?
At Storables.com, we guarantee accurate and reliable information. Our content, validated by Expert Board Contributors, is crafted following stringent Editorial Policies. We're committed to providing you with well-researched, expert-backed insights for all your informational needs.


0 thoughts on “How To Do Moss Wall Art”