Articles
How To Make A Selvage Quilt
Modified: August 28, 2024
Learn how to create a stunning selvage quilt with step-by-step instructions and helpful articles. Make your quilting project a success!
(Many of the links in this article redirect to a specific reviewed product. Your purchase of these products through affiliate links helps to generate commission for Storables.com, at no extra cost. Learn more)
Introduction
Quilting is a timeless craft that allows us to transform fabric scraps into beautiful and functional works of art. While traditional quilts often involve intricate patchwork designs using various fabric prints, there is another technique that is gaining popularity – the selvage quilt.
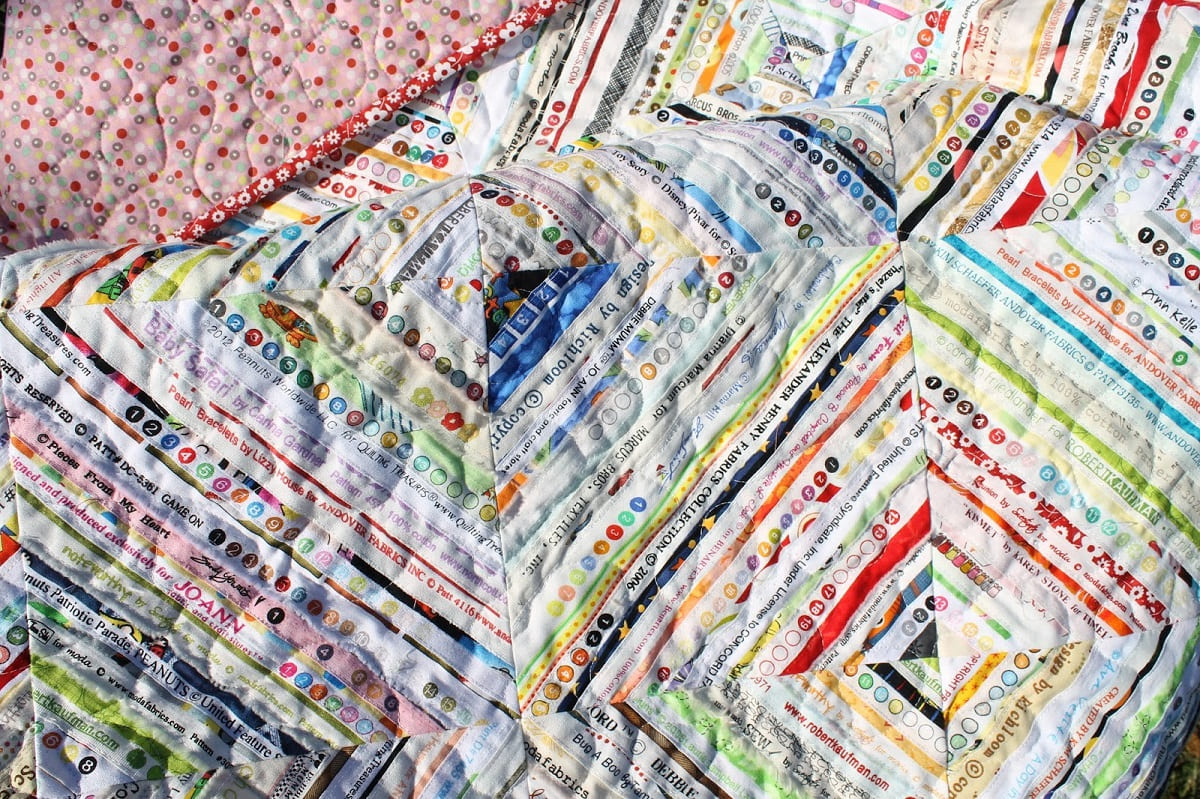
A selvage quilt is a type of quilt made primarily from the selvage edges of fabric. The selvage is the tightly woven edge of the fabric that prevents it from unraveling. Typically, selvages are cut off and discarded before sewing projects, but they can actually be repurposed to create unique and visually appealing quilts.
Creating a selvage quilt is a fun and creative way to upcycle fabric scraps and give them a new lease on life. Not only does it reduce fabric waste, but it also results in a one-of-a-kind quilt that showcases the various prints, colors, and even designer logos found on selvages.
In this article, we’ll provide a step-by-step guide on how to make a selvage quilt. From gathering and preparing the selvages to assembling and finishing the quilt, we’ll cover all the necessary steps to create your very own masterpiece.
Whether you’re an experienced quilter looking for a new project or a beginner eager to try your hand at quilting, making a selvage quilt is an excellent choice. So, let’s gather our materials and get started on this exciting quilting adventure!
Key Takeaways:
- Transform fabric selvages into a unique and visually captivating quilt that showcases your creativity and passion for quilting. Reduce waste and repurpose scraps to create a one-of-a-kind work of art.
- From gathering and organizing selvages to quilting and adding finishing touches, the process of making a selvage quilt is a fulfilling and creative journey. Embrace the opportunity to express your personal style and craftsmanship.
Read more: How To Make A Quilt
Materials Needed
Before we dive into the process of making a selvage quilt, let’s gather all the materials you’ll need to complete this project:
- Fabric Selvages: Collect a variety of fabric selvages from your sewing projects or ask friends and family to save them for you. Aim to gather selvages in different colors, patterns, and widths to add visual interest to your quilt.
- Fabric Strips: You’ll need additional fabric strips to complement the selvages and create the quilt top. Choose coordinating fabrics, solid colors, or patterns that will enhance the overall design of your quilt. The length and width of the strips will depend on the desired size of your quilt.
- Scissors or Rotary Cutter: To trim the selvages and fabric strips accurately, you’ll need a sharp pair of fabric scissors or a rotary cutter.
- Ruler and Cutting Mat: A clear ruler and a self-healing cutting mat are essential for measuring and cutting the fabric strips to the desired size.
- Sewing Machine and Thread: A sewing machine is necessary for sewing the selvages and fabric strips together. Make sure it is in good working condition and threaded with coordinating thread.
- Iron and Ironing Board: An iron and ironing board are essential for pressing the fabric strips and seams during the quilting process.
- Quilt Batting: Choose a suitable quilt batting to provide warmth and softness to the finished quilt. Opt for batting that is appropriate for the desired level of thickness and warmth.
- Quilt Backing Fabric: Select a fabric for the quilt backing that complements the colors and patterns used in the quilt top. Ensure that the fabric is wide enough to accommodate the size of your quilt.
- Pins or Quilting Clips: These are used to secure the layers of the quilt sandwich during the quilting process.
- Quilting Ruler and Marker: A quilting ruler and disappearing fabric marker are helpful when planning and marking the quilting designs on the quilt top.
- Binding Fabric: Choose a fabric for the quilt binding that complements the overall design. The binding will enclose the raw edges of the quilt for a clean and finished look.
- Needle and Thread: A hand sewing needle and coordinating thread will be needed to attach the binding to the quilt.
- Quilting Gloves (optional): Quilting gloves with grippy palms can provide better control and help prevent slippage when quilting the layers together.
Now that you have all the necessary materials ready, we can move on to the first step in making a selvage quilt – gathering the selvage fabric.
Step 1: Gathering Selvage Fabric
The first step in making a selvage quilt is to gather the selvage fabric. Selvages are the tightly woven edges of fabric that prevent it from fraying, and they often have unique designs, logos, or information printed on them.
To collect selvages, you can save them from your sewing projects or ask friends, family, or fellow quilters to contribute theirs. You can also find selvages at fabric stores or online, but keep in mind that collecting your own selvages adds a personal touch to your quilt.
When gathering selvages, try to collect a variety of colors, patterns, and widths. This will create visual interest in your quilt and allow you to play with different combinations when assembling the quilt top.
It’s important to note that not all fabric selvages are suitable for quilting. Some may be too narrow or have excessive fraying. Select selvages that are at least 1 inch wide and in good condition.
As you collect your selvages, store them in a safe place, such as a ziplock bag or a clear plastic container, to keep them organized and protected from damage. You can even sort them by color or pattern for easier selection during the quilt assembly process.
Now that you have gathered your selvages, it’s time to move on to step 2: washing and ironing the selvages to prepare them for quilting.
Step 2: Washing and Ironing Selvages
After gathering your selvages, it’s important to prepare them for quilting by washing and ironing them. This step ensures that the selvages are clean and free from any residue or shrinkage that may occur during the washing process.
Begin by separating your selvages into color groups or fabric types, if desired. This will prevent any color bleeding or fabric transfer during the washing process.
Before washing, check each selvage for any stains or spots. Treat them with a gentle stain remover or detergent accordingly. Follow the care instructions on the selvages or use a delicate wash cycle with cold water if you are unsure.
After the wash cycle, remove the selvages promptly to prevent them from wrinkling too much. Shake them gently to remove any excess water and lay them flat on a clean towel or hang them to air dry. Avoid using a dryer, as the heat can cause the selvages to shrink or wrinkle.
Once the selvages are completely dry, it’s time to iron them. Set your iron to the appropriate temperature for the fabric and gently press each selvage to smooth out any wrinkles or creases. Be careful not to stretch or distort the selvages as you iron them.
Ironing the selvages not only makes them easier to work with but also ensures they lay flat and align properly when sewing them together in later steps.
After ironing, it’s a good idea to trim any excess threads or frayed edges from the selvages. This will give your quilt a neater and more polished appearance.
Once you have washed, dried, and ironed all your selvages, they are now ready to be cut into strips and incorporated into your quilt top design.
Now that your selvages are clean and pressed, let’s move on to step 3: cutting the selvages into strips.
Step 3: Cutting Selvages into Strips
Now that you have washed and ironed your selvages, it’s time to cut them into strips. These strips will be the building blocks of your selvage quilt and will be sewn together to create the quilt top.
Start by sorting your selvages according to color or pattern preference. This will help you create a visually appealing design for your quilt top.
To cut the selvages into strips, grab a ruler and a rotary cutter or fabric scissors. Measure the desired width for your strips. A common width is 1.5 inches, but you can adjust it according to your personal preference.
Place the ruler along the selvage edge, and carefully cut through the fabric using the rotary cutter or scissors. Repeat this process for each selvage, creating a stack of strips in your desired width.
It’s important to note that selvages can vary in width, so you may need to trim them to achieve consistent strip sizes. Additionally, some selvages might have a selvage edge on one side and a regular straight edge on the other. In this case, you can cut the selvage along the straight edge to create strips without the selvage.
As you cut your strips, keep in mind the overall size and design of your quilt. Estimate the number of strips you’ll need for the width and length of your quilt top. It’s always better to cut a few extra strips to ensure you have enough for your desired design.
Once you have all your selvage strips cut, you can sort them further by color, pattern, or any other criteria that will help you plan your quilt layout. This will make the assembly process smoother and more organized.
With your selvage strips ready, you’re now prepared to move on to step 4: organizing the selvage strips by color or pattern to create an eye-catching quilt top design.
Read more: How To Make A Quilt Larger
Step 4: Organizing Selvage Strips by Color or Pattern
Now that you have your selvage strips cut, it’s time to start planning and organizing them to create a visually appealing quilt top design. Sorting and arranging the strips by color or pattern will help you achieve an eye-catching and cohesive look for your selvage quilt.
Start by spreading out your selvage strips on a large, flat surface such as a design wall or a table. Take a step back and observe the colors, patterns, and textures of the strips.
One approach to organizing the selvage strips is to group them by color. You can create sections or columns of strips in similar or complementary colors. This will add visual interest and create a sense of balance in your quilt top.
Another approach is to organize the strips by pattern or design. Group together strips with the same or similar patterns, such as floral prints, geometric designs, or stripes. This will create a cohesive and unified look within your quilt top.
Feel free to explore different arrangements and layouts for your selvage strips. You can experiment with alternating colors, creating gradients or ombre effects, or even creating specific patterns or shapes with the strips.
For added variety and visual interest, you can intersperse the selvage strips with other fabric strips or blocks. This can be done with solid-colored fabric strips, contrasting prints, or even pieced quilt blocks. The choice is yours, and it’s an opportunity to let your creativity shine.
As you organize the selvage strips, consider the size of your quilt and the desired layout. You may need to trim some strips to fit the width or length of your quilt top. Remember to leave some extra selvage strips for adding borders or other design elements later on, if desired.
Once you are satisfied with the arrangement of your selvage strips, it’s time to move on to the exciting step of sewing them together to create the quilt top. In step 5, we’ll cover how to sew the selvage strips together accurately and securely.
Step 5: Sewing Selvage Strips Together
With your selvage strips organized and arranged, it’s time to start sewing them together to create the quilt top. This step is where you will begin to see your selvage quilt take shape.
Start by selecting two selvage strips that you want to sew together. Place them right sides together, aligning the raw edges evenly.
Next, pin or use quilting clips to secure the edges together along the length of the strips. This will help prevent shifting or misalignment during sewing.
Using a 1/4 inch seam allowance, sew the selvage strips together, starting at one end and stitching all the way to the other end. Backstitch at the beginning and end to secure the seam.
Once the first seam is sewn, press the seam open with an iron. This will help the quilt top lie flat and reduce bulkiness. If desired, you can also trim any excess fabric or threads from the seam to keep it neat and tidy.
Continue sewing the selvage strips together, one strip at a time, following the same process of aligning the raw edges, pinning or clipping, and sewing with a 1/4 inch seam allowance. Take your time and enjoy the process of seeing your selvage quilt top come together.
After each seam is sewn, remember to press the seam open before moving on to the next strip. This will ensure a smooth and professional-looking finish to your quilt top.
If you have selvage strips of varying widths, you can alternate between narrower and wider strips as you sew them together. This will add visual interest and create a dynamic and unique pattern in your quilt top.
Continue sewing the selvage strips together until you have completed the desired width or length for your quilt top. You can adjust the layout or add extra strips as needed to achieve your desired design.
Once the final selvage strip is sewn, give your quilt top a final press to smooth out any wrinkles or folds. Step back and admire your handiwork – you’ve successfully sewn the selvage strips together to create a stunning quilt top!
With the quilt top complete, we can now move on to step 6: pressing the seams open to ensure a professional finish to your selvage quilt.
Step 6: Pressing Seams Open
Pressing the seams open is an essential step in creating a professional-looking selvage quilt. This process helps to flatten the seams and allows the quilt top to lay flat, resulting in a smoother and more polished finish.
After sewing each seam in step 5, take a moment to press the seam open. Here’s how:
- Place the sewn seam flat on your ironing board, with the selvage strips on both sides.
- Gently press the iron onto the seam, avoiding sliding or pushing the iron back and forth. Instead, use an up-and-down motion to press the seam open.
- Continue pressing along the entire length of the seam, flipping the quilt top if necessary to reach both sides of the seam.
- Repeat this process for all the seams you have sewn, ensuring that each seam is pressed open.
Pressing the seams open not only flattens them but also reduces bulkiness, making it easier for you to quilt the layers together later on. It also helps the quilt top appear more even, with a consistent seam allowance throughout.
Remember to adjust the heat setting on your iron based on the fabric type you’re working with. If you’re using fabrics that are heat-sensitive or delicate, use a lower heat setting or place a pressing cloth between the iron and the fabric to protect it.
Take your time during this step and ensure all the seams are pressed open properly. This attention to detail will contribute to the overall quality and appearance of your selvage quilt. If needed, go back and re-press any seams that may not have been fully opened during the initial pressing.
With the seams pressed open, your quilt top is now ready for the next steps in the quilting process. In step 7, we’ll cover how to trim and square up the quilt top to prepare it for adding borders or continuing with the quilting process.
When making a selvage quilt, be sure to trim the selvage edges off the fabric before sewing to prevent puckering and ensure a smooth finish.
Step 7: Trimming and Squaring Up the Quilt Top
Trimming and squaring up the quilt top is an important step in preparing it for the next stages of the quilting process, such as adding borders or layering the quilt sandwich. This step ensures that the edges of the quilt top are straight and even, resulting in a well-finished quilt.
To trim and square up the quilt top, follow these steps:
- Place the selvage quilt top on a clean, flat surface, such as a cutting mat or a large table.
- Use a square quilting ruler or a right-angle ruler to align one edge of the ruler with a selvage strip along one side of the quilt top. Ensure that the ruler is straight and parallel to the selvage strips.
- Carefully trim off the excess fabric along the edge of the ruler using a rotary cutter or fabric scissors. This will create a straight and even edge for your quilt top.
- Repeat the trimming process on the remaining three sides of the quilt top, ensuring that all edges are straight and parallel to each other.
- Measure the width and length of the trimmed quilt top to ensure it matches your desired dimensions. Make any necessary adjustments by trimming additional strips if needed.
It’s important to take your time during this step and make precise cuts to achieve a clean and well-squared quilt top. Double-check your measurements and ensure that the edges are straight and even.
Trimming and squaring up the quilt top not only improves its aesthetics but also helps ensure that the subsequent steps of the quilting process, such as adding borders or layering the quilt sandwich, are easier and more accurate.
Once you have trimmed and squared up the quilt top, take a moment to admire your work. Your selvage quilt is now ready for the next steps in the quilting journey!
In step 8, we will explore the optional step of adding borders to your quilt top, which can enhance its design and provide additional visual interest.
Read more: How Much Is It To Make A Quilt
Step 8: Adding Borders (Optional)
Adding borders to your selvage quilt can be an optional step but can greatly enhance the overall design and visual impact of your quilt. Borders not only frame the quilt and give it a finished look, but they can also add an extra element of interest and color.
If you decide to add borders to your selvage quilt, follow these steps:
- Measure the width and length of your trimmed quilt top. These measurements will help you determine the size and length of the borders you’ll need to cut.
- Choose a fabric or fabrics that complement the colors and patterns in your selvage quilt. Consider using a solid color that coordinates with the selvages or select a fabric with a pattern that complements the overall design.
- Cut strips of fabric for the borders, making sure they are the desired width for your quilt. The width can vary depending on your preference, but common border widths range from 2 to 6 inches.
- Starting with one side of the quilt top, align a strip of border fabric with the edge, right sides together. Pin or clip the border strip to the quilt top, ensuring that the ends are flush with the edges of the quilt top.
- Using a 1/4 inch seam allowance, sew the border strip to the quilt top, being careful to sew straight and maintain an even seam allowance. Backstitch at the beginning and end to secure the border strip.
- Continue adding the border strips to the remaining three sides of the quilt top using the same method.
- Once all the border strips are sewn on, press the seams toward the border fabric, away from the selvage quilt top. This will help the borders lay flat and create a crisp edge.
- Measure the width and length of your quilt top including the borders to ensure they are consistent. Trim or adjust the borders if needed to achieve a well-proportioned quilt.
When selecting fabrics for your borders, consider how they will complement the colors and patterns in your selvage quilt. You can choose a fabric that matches one of the colors in the selvages or opt for a contrasting color to make a statement.
Adding borders to your quilt can enhance its overall appearance and create a visually pleasing frame. Just make sure to measure carefully and align the borders correctly to maintain the squareness of your quilt top.
With the borders added, your selvage quilt is now one step closer to being completed. In step 9, we will cover how to prepare the quilt backing and batting, getting ready to layer the quilt sandwich.
Step 9: Preparing the Quilt Backing and Batting
As you progress in the creation of your selvage quilt, it’s time to focus on preparing the quilt backing and batting. These layers, along with the quilt top, will form the quilt sandwich and provide the foundation for quilting.
To prepare the quilt backing and batting, follow these steps:
- Choose a fabric for the quilt backing that complements the colors and style of your selvage quilt top. The fabric should be wide enough to cover the entire quilt top with a few inches of extra on each side for trimming and allowance.
- Measure and cut the backing fabric according to the dimensions of your quilt top, adding extra inches for seam allowance and any desired overhang.
- Once the backing fabric is cut, press it to remove any wrinkles or folds. Lay it flat on a large clean surface, wrong side facing up.
- Inspect your quilt batting and ensure it is clean, flat, and free from wrinkles or creases. If needed, give it a gentle press to remove any folds.
- Lay the quilt batting on top of the backing fabric, aligning the edges and smoothing out any wrinkles or bumps. Trim the batting to match the size of the backing fabric if it exceeds the dimensions.
- Once the batting is aligned and trimmed, carefully place the selvage quilt top on top of the batting, right side facing up. Take care to center it properly and ensure that all edges align with the backing fabric.
- Smooth out any wrinkles or bubbles in the layers and adjust the positioning, if necessary.
Take the time to ensure that your quilt backing, batting, and quilt top are aligned properly and lie flat. This step is crucial for achieving a professional finish and making the quilting process easier.
When selecting a quilt batting, consider the type and loft that best suits your desired level of warmth and thickness. Common options include cotton, polyester, or a blend of both.
It’s a good idea to baste or secure the layers of the quilt sandwich together before proceeding to the quilting stage. You can use safety pins, basting spray, or temporary adhesive products to keep the layers in place.
With the quilt backing and batting prepared, you’re now ready to move on to step 10: layering the quilt sandwich and getting closer to the quilting process.
Step 10: Layering the Quilt Sandwich
Layering the quilt sandwich is an essential step in the quilting process, where you assemble the quilt top, batting, and backing together to create a cohesive and sturdy foundation for quilting. This step ensures that the layers stay in place during the quilting process and that they are ready for the next stage of creating your selvage quilt.
Follow these steps to layer the quilt sandwich:
- Clear a large, flat surface such as a table or the floor to lay out your quilt sandwich.
- Place the prepared quilt backing fabric right side down on the surface, ensuring it is smooth and free from any wrinkles or folds.
- Smooth out the quilt batting on top of the backing fabric, ensuring it matches the dimensions and lies flat.
- Finally, carefully place your selvage quilt top on top of the batting, right side up. Adjust the positioning so that it is centered on the batting and aligns with the edges of the backing fabric. Smooth out any wrinkles or bumps in the layers as you go.
- Once all the layers are in place, you may opt to secure them together using one of several methods. Some common options are pinning, using safety pins to baste the layers in place, or using temporary fabric spray adhesive for a temporary hold.
During the layering process, it’s important to ensure that all the layers lie smooth and flat, without any creases or tucks. This will make the quilting process easier and result in a more polished finish.
Take your time aligning the layers properly and securing them together. The better the layers are aligned and basted, the less chance there is of shifting or wrinkling that can affect the final quilting outcome.
With the quilt sandwich layered and secured, you’re ready to move on to the exciting part – quilting your selvage quilt. In step 11, we’ll explore various quilting techniques and how you can apply them to enhance your quilt.
Step 11: Quilting the Selvage Quilt
Quilting is where the magic happens! It’s the process of stitching through the layers of the quilt sandwich to create decorative patterns, secure the layers together, and add texture and dimension to your selvage quilt. There are several quilting techniques to choose from, each offering a unique look and style.
Here are some popular quilting techniques you can use for your selvage quilt:
- 1. Stitch in the Ditch: This technique involves stitching along the seams of your quilt top, following the same path as the seam lines. It creates a subtle quilting effect and reinforces the seam lines.
- 2. Free-Motion Quilting: With free-motion quilting, you are in control of the stitching. Use a darning foot or free-motion quilting foot on your sewing machine to move the quilt sandwich in any direction and create your own unique designs and patterns.
- 3. Straight-Line Quilting: Simple yet striking, straight-line quilting involves stitching parallel lines across the quilt top. You can vary the distance between the lines to create different effects, such as wide-spaced or close-spaced quilting.
- 4. Echo Quilting: In echo quilting, you stitch lines that echo the shape of the design or pattern in your quilt top. This technique adds dimension and texture, accentuating the selvage strips and other elements of your quilt.
- 5. Decorative Stitching: Another option is to use decorative machine stitches to quilt your selvage quilt. Choose stitches that complement the design and enhance the overall aesthetic of your quilt.
Before starting to quilt, it’s helpful to make a quilting plan. Consider the size and spacing of your quilting lines, the areas you want to highlight, and the designs you want to incorporate.
As you quilt, be mindful of maintaining even stitching and a consistent quilting tension. Practice on scrap fabric or make a test quilt sandwich to familiarize yourself with the chosen quilting technique before working on your selvage quilt.
Remember, quilting is a personal expression of creativity, so feel free to experiment and explore different quilting styles. Don’t be afraid to make mistakes; they can often lead to unexpected and beautiful results.
Once you have finished quilting, trim any excess batting and backing fabric, making sure the edges are even and straight. Step back and admire your quilt, as you’ve completed the quilting process and taken a significant step towards finishing your selvage quilt.
In step 12, we will cover the important task of binding the quilt, giving it a polished and professional finish.
Read more: How To Make A Quilt With Photos
Step 12: Binding the Quilt
Binding is the final step in completing your selvage quilt, providing a finished edge and holding all the layers securely together. It not only enhances the overall appearance of the quilt but also adds durability.
Follow these steps to bind your quilt:
- Measure the perimeter of your quilt to determine the length of binding you’ll need. Add a few extra inches to account for corners and seams.
- Prepare the fabric for binding by cutting strips of fabric on the bias or on the straight grain. The width of the strips can vary, but a common width is 2.5 inches.
- Join the strips together, end to end, at a 45-degree angle, using diagonal seams. Press the seams open or to one side for a flatter finish.
- Fold the binding strip in half lengthwise, wrong sides together, and press it to create a crease along the entire length.
- Starting in the middle of one side of your quilt, align the raw edges of the binding strip with the raw edge of the quilt’s front side. Leave a tail of binding strip, approximately 6-8 inches long, unpinned or unsewn.
- Using a 1/4 inch seam allowance, sew the binding to the quilt, stopping approximately 1/4 inch away from the corner. Backstitch or secure the stitches.
- Remove the quilt from the sewing machine, fold the binding strip up at a 45-degree angle, and then fold it back down, aligning it with the edge of the next side of the quilt.
- Continue sewing the binding, repeating the folding process at each corner, until you reach the starting point. Leave another tail of binding strip, similar to the initial tail.
- Trim the excess binding, leaving a tail long enough to overlap the starting tail. Open up the ends of the binding, and align and trim them at a 45-degree angle.
- Join the ends of the binding by placing the starting tail inside the ending tail, right sides together, and sew across the diagonal line.
- Press the binding away from the quilt, wrapping it around the raw edges to the quilt’s backside. Use binding clips or pins to hold it in place.
- Hand stitch the folded binding to the quilt’s backside, creating an invisible stitch or using a decorative stitch.
Take your time while binding the quilt, ensuring that the binding is secure, the corners are mitered neatly, and the stitches on the backside are invisible or blend well with the fabric.
Binding serves both a functional and aesthetic purpose, so choose a fabric that complements your quilt and highlights the selvage strips or overall theme of your project.
Once the binding is complete, give your quilt a final press to remove any wrinkles or creases from the binding process.
Congratulations! You have successfully bound your quilt, bringing it one step closer to being a finished and cherished piece of art.
In Step 13, the final step, we will cover some finishing touches to make your selvage quilt truly shine.
Step 13: Finishing Touches
Now that your selvage quilt is bound, you’re almost done! It’s time to add those final finishing touches that will make your quilt truly shine and ready to be enjoyed and cherished.
Here are some ideas for adding those special finishing touches:
- Label Your Quilt: Add a personalized touch by including a quilt label. Use fabric markers or embroidery to write your name, the date, and any other meaningful details about your quilt. This adds a personal and sentimental touch.
- Add a Sleeve for Hanging (Optional): If you plan to hang your quilt, you can create a fabric sleeve on the back. Fold a wide strip of fabric in half, align it with the top edge of the quilt back, and stitch it securely. Insert a dowel or rod through the sleeve to hang the quilt.
- Embellish with Embroidery or Appliqué: If you want to add extra decorative elements to your quilt, consider hand embroidery or appliqué. This can be done on specific blocks, corners, or along the border. It adds a unique and artistic flair to your quilt.
- Quilt Label or Patches: Sew a pre-made quilt label or embroidered patches on the back of your quilt. This not only adds a decorative element but also provides additional information about the quilt’s history or the story behind it.
- Wash and Block the Quilt: Give your finished quilt a gentle wash to remove any marking pens or dirt accumulated during the quilting process. After washing, block the quilt by laying it flat and gently smoothing it to ensure a professional and even appearance.
- Share Your Quilt: Finally, share your hard work with family and friends. Display it on a bed, couch, or quilt rack for everyone to admire. You can also participate in quilt shows or donate it to a charity or a loved one as a heartfelt gift.
Remember, the finishing touches are an opportunity to express your creativity and make your selvage quilt uniquely yours. Have fun adding those final details and enjoy the satisfaction of completing your quilting project.
Congratulations on creating a beautiful selvage quilt that showcases your creativity and craftsmanship! You’ve completed all the steps, from gathering the selvages to binding the quilt and adding those special finishing touches. Your quilt is now a cherished piece of art that can be appreciated for years to come.
Thank you for joining us on this quilting journey. Happy quilting!
Conclusion
Congratulations on completing your selvage quilt! Through each step of gathering, washing, cutting, organizing, sewing, and quilting, you have transformed fabric selvages into a beautiful and unique quilt that reflects your creativity and passion for quilting.
Making a selvage quilt is not only a great way to repurpose fabric scraps and reduce waste but also an opportunity to showcase the intricate designs and details found on selvage edges. From the gathering of selvages to the final stitches, you have created a quilt that tells a story and captures your personal style.
As you handcrafted your selvage quilt, you developed and honed your quilting skills, from accurate cutting and sewing to precise pressing and quilting. The care and attention you put into each step have resulted in a quilt that is not only visually captivating but also well-made and durable.
Remember, quilting is an art form that allows for self-expression and creativity. While we’ve provided a step-by-step guide, feel free to customize and experiment with techniques that inspire you. Whether it’s through decorative stitching, unique quilt designs, or contrasting fabric choices, your selvage quilt is an opportunity to let your imagination soar.
Now that your selvage quilt is complete, you have a beautiful and functional piece that can be cherished for years to come. Share it with loved ones, display it proudly, or even gift it to someone who appreciates the artistry and effort that went into its creation. Your selvage quilt is a testament to your skills as a quilter and a work of art that holds sentimental value.
We hope this guide has helped you navigate the process of making a selvage quilt and inspired you on your quilting journey. Whether you’re a beginner or an experienced quilter, the joy of creating something beautiful with fabric and thread is a lifelong pursuit.
Thank you for joining us on this quilter’s adventure. May your selvage quilt bring warmth, beauty, and joy to your life as you continue to explore the art of quilting.
Frequently Asked Questions about How To Make A Selvage Quilt
Was this page helpful?
At Storables.com, we guarantee accurate and reliable information. Our content, validated by Expert Board Contributors, is crafted following stringent Editorial Policies. We're committed to providing you with well-researched, expert-backed insights for all your informational needs.


0 thoughts on “How To Make A Selvage Quilt”