Articles
How To Make A String Quilt
Modified: August 22, 2024
Learn how to make a stunning string quilt with our informative articles. Discover tips, techniques, and step-by-step guides to create your own beautiful patchwork masterpiece.
(Many of the links in this article redirect to a specific reviewed product. Your purchase of these products through affiliate links helps to generate commission for Storables.com, at no extra cost. Learn more)
Introduction
Are you looking for a fun and creative way to use up your fabric scraps? Look no further! The string quilt technique is a fantastic way to turn those leftover pieces of fabric into a beautiful and unique quilt. Whether you’re a beginner or an experienced quilter, this project is perfect for you.
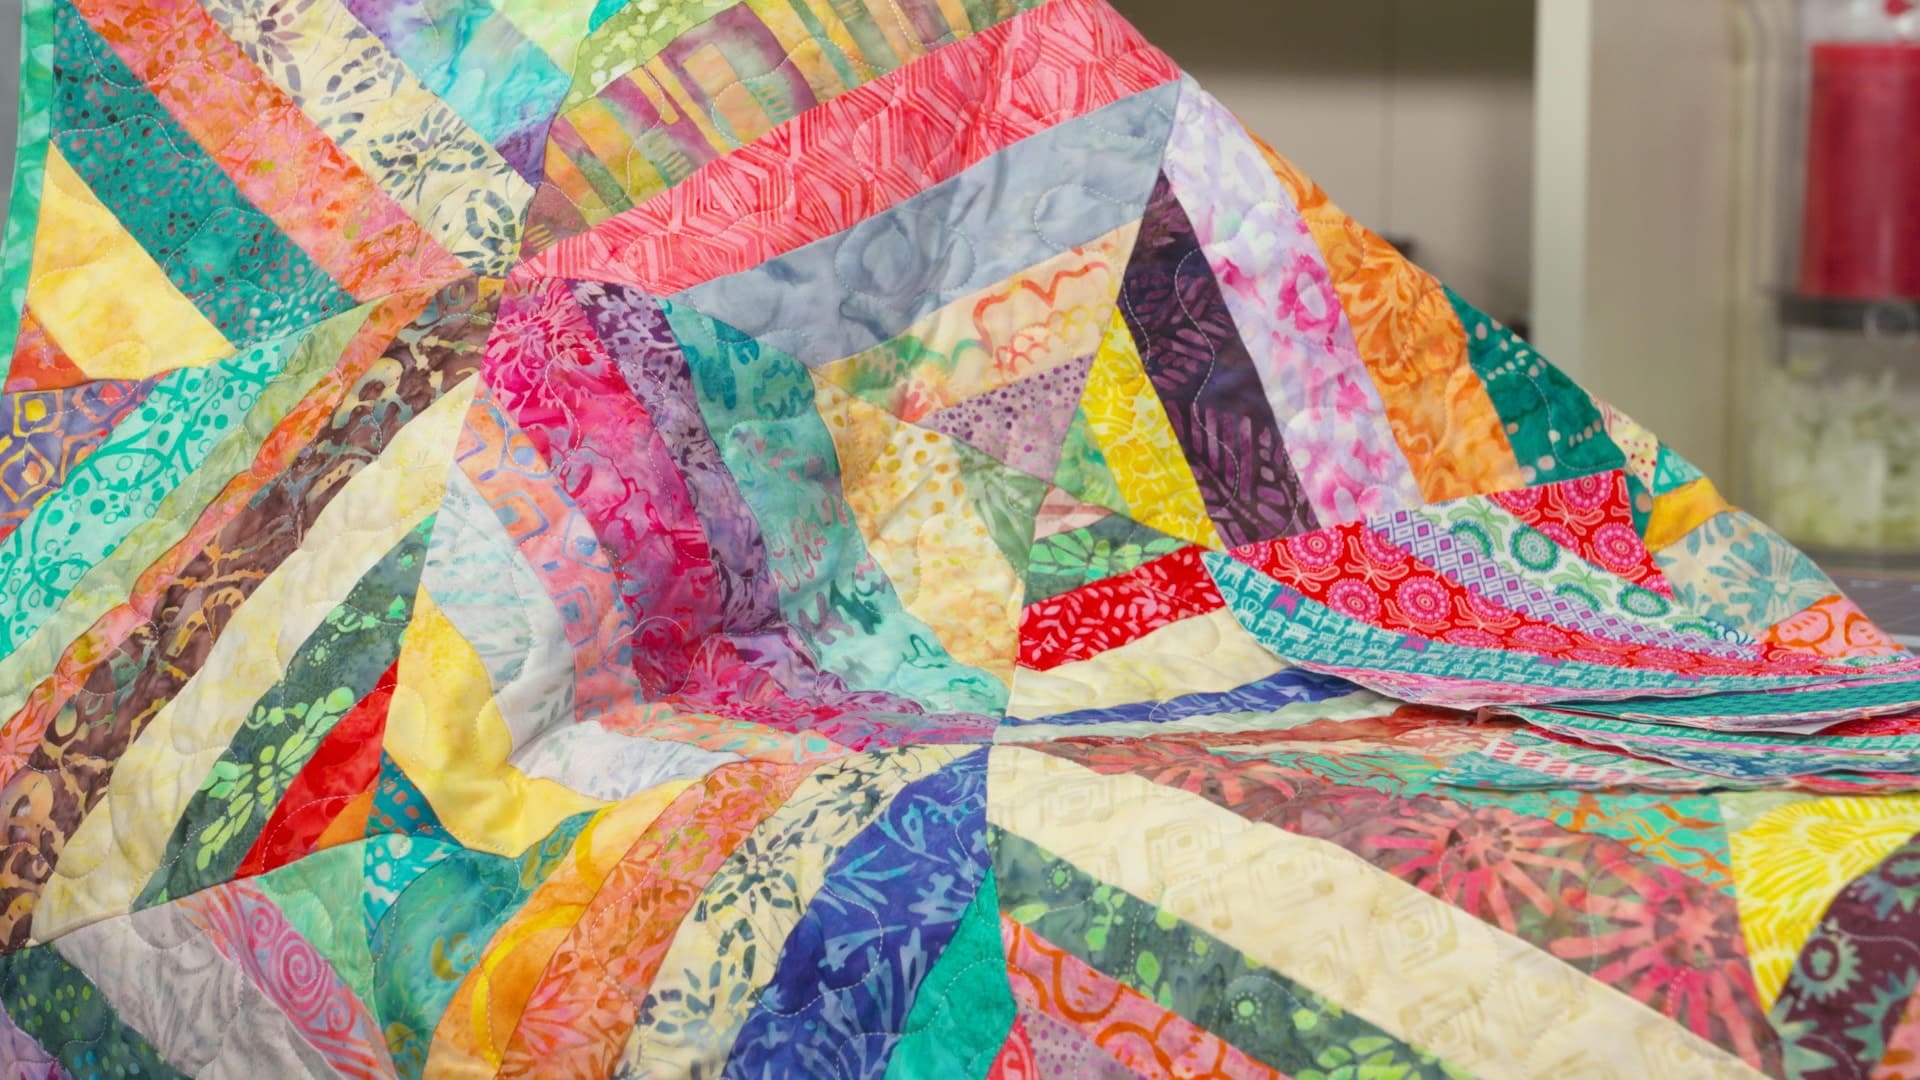
A string quilt is made by sewing fabric strips onto a foundation fabric, creating a visually stunning design. The best part about this technique is that it allows for endless creativity and improvisation. You can choose any color scheme, mix and match fabrics, and play with different strip widths. The result is a one-of-a-kind quilt that reflects your personal style.
In this article, we will guide you through the step-by-step process of making a string quilt. We’ll cover everything from gathering fabric scraps to adding the final touches. So, grab your sewing machine and let’s get started on this exciting quilting adventure!
Key Takeaways:
- Unleash Your Creativity: Transform fabric scraps into a stunning string quilt, expressing your unique style through color, pattern, and design. Enjoy the freedom to experiment and create one-of-a-kind quilts.
- Craftsmanship and Joy: Experience the satisfaction of creating a beautiful string quilt, from gathering fabric scraps to adding the finishing touches. Embrace the journey of quilting and celebrate your creativity.
Read more: How To Make A Quilt
Materials Needed
Before diving into the string quilt project, make sure you have all the necessary materials. Here’s a list of what you’ll need:
- Fabric scraps: Gather a variety of fabric scraps in different colors and patterns. These can be any size, shape, or fabric type. The more variety, the more interesting your quilt will look.
- Foundation fabric: Choose a solid-colored or neutral fabric to serve as the foundation for your quilt. This fabric should be sturdy and easy to sew on.
- Rotary cutter and cutting mat: These tools will make it easier to cut fabric strips. Make sure to have a sharp blade for accurate cutting.
- Quilting ruler: A transparent ruler with measurement markings will help you cut precise fabric strips.
- Sewing machine: A reliable sewing machine with a straight stitch function is essential for this project. Ensure that it is in good working condition.
- Thread: Select a thread color that complements or blends well with your fabric scraps. Using a high-quality thread will ensure sturdy seams.
- Pins or clips: These will be used to hold fabric pieces together as you sew.
- Iron and ironing board: Pressing fabric strips is crucial for achieving neat and professional-looking results.
- Batting and backing fabric: Depending on your preference, choose either cotton or polyester batting for the quilt’s insulation. For the backing fabric, select a complementary fabric that will be visible on the quilt’s back.
- Quilting needles: Use needles specifically designed for quilting to ensure smooth stitching through multiple layers.
- Binding fabric: If you plan to add a border to your quilt, you’ll need binding fabric. This can be made from coordinating fabric scraps or purchased separately.
Once you have gathered all the materials, you’re ready to start creating your string quilt masterpiece. Let’s move on to the next step: gathering fabric scraps.
Step 1: Gathering Fabric Scraps
The first step in making a string quilt is to gather an assortment of fabric scraps. This is where you can unleash your creativity and mix and match different colors, patterns, and textures. Here’s how to gather fabric scraps:
- Sort and organize your fabric scraps: Start by sorting your fabric scraps into color groups or themes. This will make it easier to select and arrange them later on.
- Utilize your scrap stash: If you have a collection of fabric scraps from previous projects, now is the perfect time to put them to use. Take a look through your scrap stash and select pieces that catch your eye.
- Ask friends and family: Reach out to your quilting buddies or friends who sew and ask if they have any fabric scraps they’d be willing to part with. This can be a great way to add some variety to your quilt.
- Visit your local fabric store: If you’re looking to add a specific color or print to your quilt, consider a trip to the fabric store. You can browse their scrap bins or ask if they have any scrap bundles available.
- Consider repurposing clothing: Don’t limit yourself to just traditional quilting fabric. Old shirts, dresses, or other clothing items can provide unique patterns and textures to incorporate into your quilt.
Remember, the goal is to collect fabric scraps that you find visually appealing and that inspire your creativity. Don’t worry too much about the size or shape of the scraps at this stage, as they can be cut into strips later on.
Once you have gathered your fabric scraps, it’s time to move on to the next step: cutting fabric strips.
Step 2: Cutting Fabric Strips
Now that you’ve gathered your fabric scraps, it’s time to cut them into strips. These strips will be sewn onto the foundation fabric to create your string quilt design. Follow these steps to cut fabric strips:
- Prepare your fabric scraps: Start by trimming any uneven edges or loose threads from your fabric scraps. This will ensure clean and precise cuts.
- Choose the width of your strips: Decide on the desired width of your fabric strips. This can vary depending on your personal preference and the overall design you want to achieve. Common strip widths range between 1 inch and 2.5 inches.
- Use a rotary cutter and cutting mat: Place your fabric scraps on a cutting mat and use a rotary cutter to cut strips along the grain of the fabric. For accuracy, use a quilting ruler as a guide to cut straight lines.
- Repeat the process: Continue cutting fabric strips from each of your fabric scraps until you have a sufficient quantity to cover your foundation fabric.
As you cut the fabric strips, you can play with different color combinations and patterns. Remember that variety is key to creating an eye-catching string quilt design.
It’s important to note that strip length can vary as well. Some quilters prefer longer strips that overlap the edges of the foundation fabric, while others opt for shorter strips that are contained within the quilt’s borders. Experiment with different lengths to achieve the desired look.
Once you have a pile of fabric strips, you’re ready to move on to the next step: assembling the foundation.
Step 3: Assembling the Foundation
Now that you have your fabric strips ready, it’s time to assemble the foundation for your string quilt. The foundation fabric serves as the base onto which you will sew the fabric strips. Follow these steps to assemble the foundation:
- Choose a foundation fabric: Select a solid-colored or neutral fabric as the foundation for your quilt. This fabric should be sturdy and easy to sew on.
- Measure and cut the foundation fabric: Determine the desired size for your quilt and cut the foundation fabric accordingly. Make sure to leave some extra fabric around the edges for trimmings.
- Prepare the foundation fabric: If desired, you can press the foundation fabric to remove any creases or wrinkles. This will ensure a smooth surface for attaching the fabric strips.
- Secure the foundation fabric: Place the foundation fabric on a flat surface, such as a cutting mat or a large table. You can secure it in place with pins or clips to prevent it from shifting as you sew.
Remember to leave some space around the edges of the foundation fabric for potential borders or binding. This will give your quilt a finished look.
Once you have the foundation fabric ready, you’re one step closer to creating your string quilt masterpiece. The next step is sewing the fabric strips onto the foundation fabric.
Read more: How To Make A Quilt Larger
Step 4: Sewing the Fabric Strips
With the foundation fabric prepared, it’s time to start sewing the fabric strips onto the foundation to create your string quilt design. Follow these steps to sew the fabric strips:
- Select your first fabric strip: Choose a fabric strip to start with. You can either follow a specific color scheme or randomly select strips for a more improvisational look.
- Place the fabric strip right side up: Lay the fabric strip on top of the foundation fabric, aligning one edge of the strip with an edge of the foundation fabric.
- Secure the fabric strip: Pin or clip the fabric strip in place to prevent it from shifting as you sew.
- Sew along the edge: Start sewing along the edge of the fabric strip, using a straight stitch. Use a ¼-inch seam allowance unless specified otherwise.
- Continue sewing strips: Repeat the process with additional fabric strips, aligning them next to each other on the foundation fabric. As you go, trim any excess fabric from the previous strips so that they align neatly.
- Press the seams: After sewing each fabric strip, press the seam using an iron. This will help set the seam and create a smooth surface for the next strip.
- Repeat the process: Keep sewing fabric strips and pressing the seams until the foundation fabric is fully covered or until you achieve the desired size and design for your quilt.
As you sew the fabric strips, you can experiment with different layouts and orientations to create interesting patterns. Don’t be afraid to mix and match fabric colors and patterns to achieve a visually appealing result.
Once you have sewn all the fabric strips onto the foundation fabric, you’re ready to move on to the next step: adding more strips to enhance the design.
Step 5: Adding More Strips
Now that you have sewn the initial fabric strips onto the foundation fabric, it’s time to add more strips to enhance the design of your string quilt. This step allows you to continue building upon the visual interest and complexity of your quilt. Follow these steps to add more strips:
- Assess the quilt design: Take a step back and evaluate the current layout of your quilt. Identify areas that you feel could benefit from additional fabric strips to enhance the visual appeal.
- Select fabric strips: Choose fabric strips that complement and work well with the existing ones. Consider using different colors, patterns, or widths to add variety and interest to your quilt.
- Place and pin the fabric strips: Lay the additional fabric strips on top of the foundation fabric, aligning them with the desired location and orientation. Pin or clip them in place to secure.
- Sew the additional fabric strips: Sew along the edges of the new fabric strips, following the same process as before. Aim to create seamless transitions between the existing strips and the new ones.
- Press the seams: After sewing each additional fabric strip, press the seam with an iron to ensure a flat and professional finish.
- Continue adding more strips: Repeat the process of selecting, placing, and sewing additional fabric strips until you are satisfied with the overall design of your string quilt.
By strategically adding more fabric strips, you can create depth, movement, and visual interest in your quilt. Don’t be afraid to experiment and play with different combinations to achieve the desired effect.
Once you have added all the desired fabric strips, it’s time to move on to the next step: trimming the excess fabric.
When making a string quilt, be sure to use a consistent seam allowance to ensure all your blocks are the same size and will fit together neatly.
Step 6: Trimming Excess Fabric
After adding all the desired fabric strips to your string quilt, it’s time to trim the excess fabric and create clean edges. Trimming ensures that your quilt top is neat and ready for the next steps in the quilting process. Follow these steps to trim the excess fabric:
- Prepare your cutting tools: Get your rotary cutter, cutting mat, and quilting ruler ready. Ensure that your rotary cutter has a sharp blade to ensure clean cuts.
- Trim the sides: Start by trimming the excess fabric on the sides of your quilt top. Align the ruler along the edge of the foundation fabric and use the rotary cutter to cut off any overlapping or uneven fabric.
- Trim the top and bottom: Next, trim the excess fabric at the top and bottom edges of your quilt top using the same technique. This will give your quilt a neat and uniform appearance.
- Check for any uneven edges: Once you’ve trimmed the sides, top, and bottom, check for any remaining uneven edges. Trim off any stray fabric pieces or threads to achieve a clean and polished look.
Trimming the excess fabric is an important step to ensure that your quilt top is squared and ready for the next stages of the quilting process. Take your time and make sure to double-check the edges for any missed spots.
With the excess fabric trimmed, you’re one step closer to completing your string quilt. The next step is pressing the quilt top to set the seams and create a smooth surface.
Step 7: Pressing the Quilt Top
Now that you have trimmed the excess fabric and achieved a clean and polished quilt top, it’s time to press it. Pressing the quilt top helps to set the seams, flatten the fabric, and create a smooth surface for the next stages of the quilting process. Follow these steps to press the quilt top:
- Set up your ironing station: Place your ironing board in a spacious and well-ventilated area. Make sure your iron is clean and in good working condition.
- Preheat the iron: Turn on your iron to the appropriate temperature for your fabric. If you’re unsure, start with a low to medium heat setting and gradually increase if needed.
- Press the quilt top: Lay the quilt top on the ironing board, with the fabric strips facing up. Gently press the iron onto the fabric, moving it in an up and down motion. Avoid sliding or dragging the iron, as this can distort the fabric strips.
- Press the seams: Pay close attention to the seams between the fabric strips. Use the tip of the iron to press them open or to one side, depending on your preference.
- Continue pressing: Work your way across the entire quilt top, pressing each section thoroughly. Take your time to ensure that all the fabric strips are pressed flat and any wrinkles or creases are eliminated.
- Check for any missed spots: Once you’ve pressed the entire quilt top, inspect it for any missed spots or uneven areas. If needed, go back and give those areas an extra press for a smooth and professional finish.
Pressing the quilt top not only improves the appearance, but it also helps the subsequent layers of the quilt lay flat and adhere together more smoothly. Take your time with this step to achieve the best results.
With the quilt top pressed and ready, it’s time to move on to the next step: adding a border (optional) to further enhance your quilt design.
Read more: How Much Is It To Make A Quilt
Step 8: Adding a Border (optional)
Adding a border to your string quilt can be an optional step that further enhances the design and gives your quilt a finished look. A border can frame your quilt and provide a visual boundary, as well as an opportunity to incorporate additional fabric or design elements. Follow these steps to add a border to your string quilt:
- Select your border fabric: Choose a fabric that complements the colors and patterns in your quilt top. You can opt for a solid color that contrasts with the quilt top or a fabric that matches one of the colors in the quilt.
- Measure and cut the border fabric: Determine the desired width and length of your border. Measure and cut strips of fabric accordingly, adding extra length and width to account for seams and hem allowance.
- Attach the border strips: Lay one border strip alongside one side of the quilt top, right sides together. Align the raw edges and pin or clip in place. Sew along the length of the border strip, using a ¼-inch seam allowance. Repeat this step for the remaining sides of the quilt.
- Press the border seams: After sewing each border strip, press the seams away from the quilt top using an iron. This will create a flat and smooth border.
- Trim the excess fabric: If necessary, trim any excess fabric from the border strips to ensure an even and straight border that matches the dimensions of the quilt top.
Adding a border can provide a beautiful finishing touch to your string quilt. It can tie the overall design together and create a cohesive and balanced look. However, keep in mind that adding a border is optional, and you can choose to skip this step if you prefer a borderless quilt.
With the border added (or not), your string quilt is nearly complete. The next step is to prepare for layering by adding batting and backing fabric.
Step 9: Adding Batting and Backing
Now that your string quilt top is complete, it’s time to add the layers that will give your quilt warmth and stability – the batting and backing fabric. These layers are essential for creating a cozy and durable quilt. Follow these steps to add batting and backing:
- Choose your batting: Select a batting material that suits your preferences, such as cotton, polyester, or a blend. Consider the desired thickness and warmth of your quilt when making your choice.
- Prewash and prepare your batting: If your batting requires prewashing, follow the manufacturer’s instructions to ensure it is clean and ready for use. Trim the batting to match the size of your quilt top.
- Select your backing fabric: Choose a backing fabric that coordinates well with the colors and style of your string quilt top. Ensure that it is large enough to cover the entire quilt and allow for a little extra for trimming.
- Prepare the backing fabric: If needed, piece together multiple fabric panels to create a backing large enough to cover your quilt. Make sure the seams are secure and pressed flat.
- Lay out the layers: Start by placing the backing fabric on a large, flat surface, wrong side up. Smooth out any wrinkles or folds. Next, layer the batting on top of the backing fabric, followed by the string quilt top, right side up.
- Smooth and align the layers: Gently smooth out any wrinkles or creases in the layers, ensuring that they align properly. Use pins, safety pins, or fabric clips to hold the layers together and prevent shifting during the quilting process.
Adding the batting and backing provides structure and insulation to your string quilt. The batting adds warmth, while the backing fabric creates a neat and tidy finish. Remember to handle the layers with care to maintain their alignment.
In the next step, you’ll learn how to quilt the layers together to create beautiful and intricate stitching patterns.
Step 10: Quilting the Layers
Quilting is the process of stitching the layers of your string quilt together, creating intricate patterns and securing the batting and backing fabric. It not only adds visual interest but also ensures the longevity and durability of your quilt. Follow these steps to quilt the layers:
- Select your quilting design: Decide on a quilting design that complements your string quilt. This can be simple or intricate, depending on your skill level and personal preference.
- Prepare your sewing machine: Attach a quilting foot to your sewing machine. This foot allows for better visibility and maneuverability while stitching. Thread your machine with a coordinating thread color.
- Start quilting: Begin by securing the layers together with a few basting stitches or safety pins in the center of the quilt. This will prevent the layers from shifting during the quilting process.
- Follow your chosen quilting design: Carefully stitch along the lines of your quilting design, working systematically across the quilt. Take your time and maintain an even stitch length.
- Explore different quilting techniques: Depending on your design, you may choose to use straight lines, free-motion quilting, stippling, or other decorative stitches to quilt your string quilt. There is no right or wrong technique – let your creativity guide you!
- Secure loose threads: After quilting, make sure to secure any loose threads by backstitching or tying off the ends. Trim any excess threads for a tidy finish.
Quilting the layers is where your creativity can truly shine. Experiment with different stitching patterns and techniques to add depth and texture to your string quilt.
Once you have completed quilting, you’re almost finished! The next step involves adding the binding to give your quilt a polished and professional edge.
Step 11: Adding Binding
The final step in completing your string quilt is adding the binding. The binding not only gives your quilt a finished look but also provides strength and durability to the edges. Follow these steps to add the binding:
- Select your binding fabric: Choose a fabric that complements your quilt and adds a nice finishing touch. You can use a coordinating fabric from your string quilt or select a contrasting color or pattern to make a statement.
- Cut the binding strips: Determine the length of binding needed by measuring around the entire perimeter of your quilt. Cut fabric strips that are 2.5 inches wide and the total length needed for your quilt.
- Join the binding strips: If required, join the fabric strips together using a diagonal seam. This will create a continuous length of binding without bulky seams.
- Prepare the binding: Fold the binding strip in half lengthwise, wrong sides together, and press with an iron to create a clean fold.
- Attach the binding: Starting somewhere along one edge of your quilt, align the raw edges of the binding with the raw edges of the quilt. Pin or clip the binding in place, leaving a small tail of binding free.
- Sew the binding: Using a ¼-inch seam allowance, sew along the edge of the quilt, securing the binding in place. As you reach the corners, use mitering techniques to create neat and tidy corners in the binding.
- Finish the binding: Once you have sewn all the way around the quilt, leave a few inches of binding free. Fold the loose end of the binding to create a neat, finished edge and tuck it inside the binding strip. Then, sew to close the binding.
- Press the binding: Finally, press the binding away from the quilt with an iron, ensuring it lays flat and evenly around the entire edge of the quilt.
With the binding applied, your beautiful string quilt is now complete! Take a moment to appreciate your hard work and admire the finished product.
Now you can proudly display or gift your stunning string quilt. It’s a testament to your creativity, skill, and dedication. Well done!
Remember, the joy of making string quilts lies in the freedom to experiment with colors, patterns, and designs. So don’t be afraid to let your imagination run wild and create unique, one-of-a-kind quilts that reflect your personal style.
Happy quilting!
Read more: How To Make A Quilt With Photos
Conclusion
Congratulations on completing your string quilt! Through the process of gathering fabric scraps, cutting fabric strips, assembling the foundation, sewing the fabric strips, adding more strips, trimming excess fabric, pressing the quilt top, adding a border (if desired), and then adding batting, backing, quilting the layers, and finally adding binding, you have created a beautiful and unique quilt that showcases your creativity and skill.
String quilts offer endless possibilities for experimentation and personal expression. Each quilt tells its own story as it is composed of scraps of fabric brought together to form something greater than the sum of its parts.
As you worked through each step, you likely discovered the joy of combining different colors, patterns, and textures to create visually stunning designs. The process of selecting fabric scraps, sewing them onto the foundation, and adding more strips allowed you to express your individual style and artistic vision.
Remember, quilting is a journey, and each quilt you create is a testament to your growth and creativity as a quilter. Don’t be afraid to try new techniques, explore different designs, and continue honing your skills.
Whether you chose to make your string quilt as a cozy gift for a loved one or to add a touch of warmth and beauty to your own home, your finished quilt is a true work of art. It carries the memories of the fabric scraps you gathered, the time and patience you invested in creating it, and the joy you experienced throughout the process.
Now it’s time to wrap yourself or your loved one in the warmth and comfort of your string quilt, knowing that you have created something truly special. Take a moment to be proud of your accomplishment and embrace the creativity that comes with being a quilter.
Thank you for joining us on this quilting adventure. We hope you enjoyed the journey and that your string quilt brings you joy for years to come. Happy quilting!
Frequently Asked Questions about How To Make A String Quilt
Was this page helpful?
At Storables.com, we guarantee accurate and reliable information. Our content, validated by Expert Board Contributors, is crafted following stringent Editorial Policies. We're committed to providing you with well-researched, expert-backed insights for all your informational needs.


0 thoughts on “How To Make A String Quilt”