Articles
How To Make Hand Fan
Modified: August 28, 2024
Discover the art of creating beautiful hand fans with our informative articles. Learn step-by-step techniques and helpful tips to make your own unique hand fan designs.
(Many of the links in this article redirect to a specific reviewed product. Your purchase of these products through affiliate links helps to generate commission for Storables.com, at no extra cost. Learn more)
Introduction
Hand fans have been used for centuries to keep people cool and provide relief from the heat. They are not only functional but also stylish accessories that can add a touch of elegance to any outfit or event. Making your own hand fan is a fun and creative project that allows you to customize the design to suit your personal style.
In this article, we will guide you through the step-by-step process of making your own hand fan. Whether you need a fan for a special occasion or simply want to have one on hand for those hot summer days, this DIY project is perfect for beginners and can be completed using readily available materials.
Before we begin, let’s gather the materials needed to make your hand fan:
Key Takeaways:
- Stay cool and stylish with your own handmade hand fan, adding a touch of elegance to any outfit or event. Enjoy the creative process and personalize your fan to reflect your unique style and personality.
- Embrace the versatility of hand fans as both functional accessories and decorative art. Whether keeping cool, completing an outfit, or gifting to others, your handmade fan is a reflection of your creativity and craftsmanship.
Read also: 14 Best Hand Fan for 2025
Materials Needed
- A4 or letter-sized paper
- Scissors
- Glue stick or double-sided tape
- Cardstock or cardboard (optional)
- Decorative materials such as markers, paint, stickers, or ribbon (optional)
- Wooden dowel, popsicle stick, or chopstick for the handle
Now that we have everything we need, let’s get started on creating your very own hand fan!
Key Takeaways:
- Stay cool and stylish with your own handmade hand fan, adding a touch of elegance to any outfit or event. Enjoy the creative process and personalize your fan to reflect your unique style and personality.
- Embrace the versatility of hand fans as both functional accessories and decorative art. Whether keeping cool, completing an outfit, or gifting to others, your handmade fan is a reflection of your creativity and craftsmanship.
Read also: 14 Best Hand Fan for 2025
Materials Needed
Before you start making your own hand fan, it’s important to gather all the materials you’ll need for this project. Having everything on hand will make the process smoother and more enjoyable. Here’s a list of the materials you’ll need:
- A4 or Letter-Sized Paper: You can choose any color or pattern of paper you like. Thicker paper or cardstock will provide more durability, but regular printer paper can also work just fine.
- Scissors: A good pair of scissors is essential for cutting the paper to the desired size and shape. Make sure the blades are sharp for clean and precise cuts.
- Glue Stick or Double-Sided Tape: You’ll need some adhesive to secure the folds of the paper and hold the fan together. A glue stick or double-sided tape works well for this purpose.
- Cardstock or Cardboard (Optional): If you want to make your hand fan sturdier, you can use cardstock or cardboard as a backing for the paper. This will provide extra support and make the fan more durable.
- Decorative Materials: If you want to add a personal touch to your hand fan, consider using decorative materials such as markers, paint, stickers, or ribbon to decorate the paper. This will make your hand fan unique and more visually appealing.
- Wooden Dowel, Popsicle Stick, or Chopstick: Lastly, you’ll need a handle for your hand fan. You can use a wooden dowel, a popsicle stick, or a chopstick as a handle. Make sure it’s long enough to hold comfortably.
Once you have gathered all the materials, you’ll be ready to start creating your very own hand fan. Remember to be creative and have fun with the design and decoration!
Step 1: Choose Your Paper
The first step in making your own hand fan is to choose the paper you want to use. The type of paper you select will determine the overall look and durability of your fan. Here are a few things to consider when choosing your paper:
Color or Pattern: Decide if you want a solid-colored fan or one with a pattern. Consider the style or theme you’re going for, whether it’s a classic, elegant look or something more fun and whimsical.
Thickness: The thickness of the paper will affect the durability of your hand fan. Thicker paper or cardstock will provide more sturdiness, but keep in mind that it may be harder to fold and manipulate.
Size: Choose the size of paper you want for your hand fan. A4 or letter-sized paper is recommended for standard-sized fans. You can also experiment with larger or smaller sizes for unique designs.
Texture: Consider the texture of the paper, especially if you plan to decorate it. Smooth paper is easy to write or draw on, while textured paper can add a more interesting and tactile element to your fan.
Once you’ve decided on the type of paper you want for your hand fan, gather the necessary amount. It’s always a good idea to have some extra paper on hand in case you make a mistake or want to create more fans in the future.
Now that you’ve chosen your paper, you’re ready to move on to the next step: measuring and cutting the paper for your hand fan!
Step 2: Measure and Cut the Paper
Now that you have chosen your paper for the hand fan, it’s time to measure and cut it to the desired size. Follow these steps to ensure an accurate and clean-cut:
1. Determine the Size: Decide how wide and long you want your hand fan to be. A standard size for a hand fan is around 8 inches (20 cm) in length, but feel free to adjust the size according to your preference.
2. Mark the Measurements: Use a ruler and pencil to mark the measurements on the paper. Make sure the lines are straight and evenly spaced.
3. Cut the Paper: Carefully cut along the marked lines using a sharp pair of scissors. Take your time to ensure clean and precise cuts. If you are using a thicker paper or cardstock, you may need to apply more pressure or use stronger scissors.
4. Optional: Create a Template: If you plan to make multiple hand fans of the same size, you can create a template out of cardboard or cardstock. Trace the outline of the desired size onto the template, and then use it as a guide to cut out the rest of your hand fans. This will help maintain consistency in size.
Remember, it’s always a good idea to start with a slightly larger piece of paper than you think you’ll need. You can always trim it down to the desired size later if necessary. Taking the time to accurately measure and cut the paper will ensure that your hand fan looks clean and professional.
Now that you have your paper cut to the right size, we are ready to move on to the next step: folding the paper accordion-style!
Read more: How To Make Paper Fan
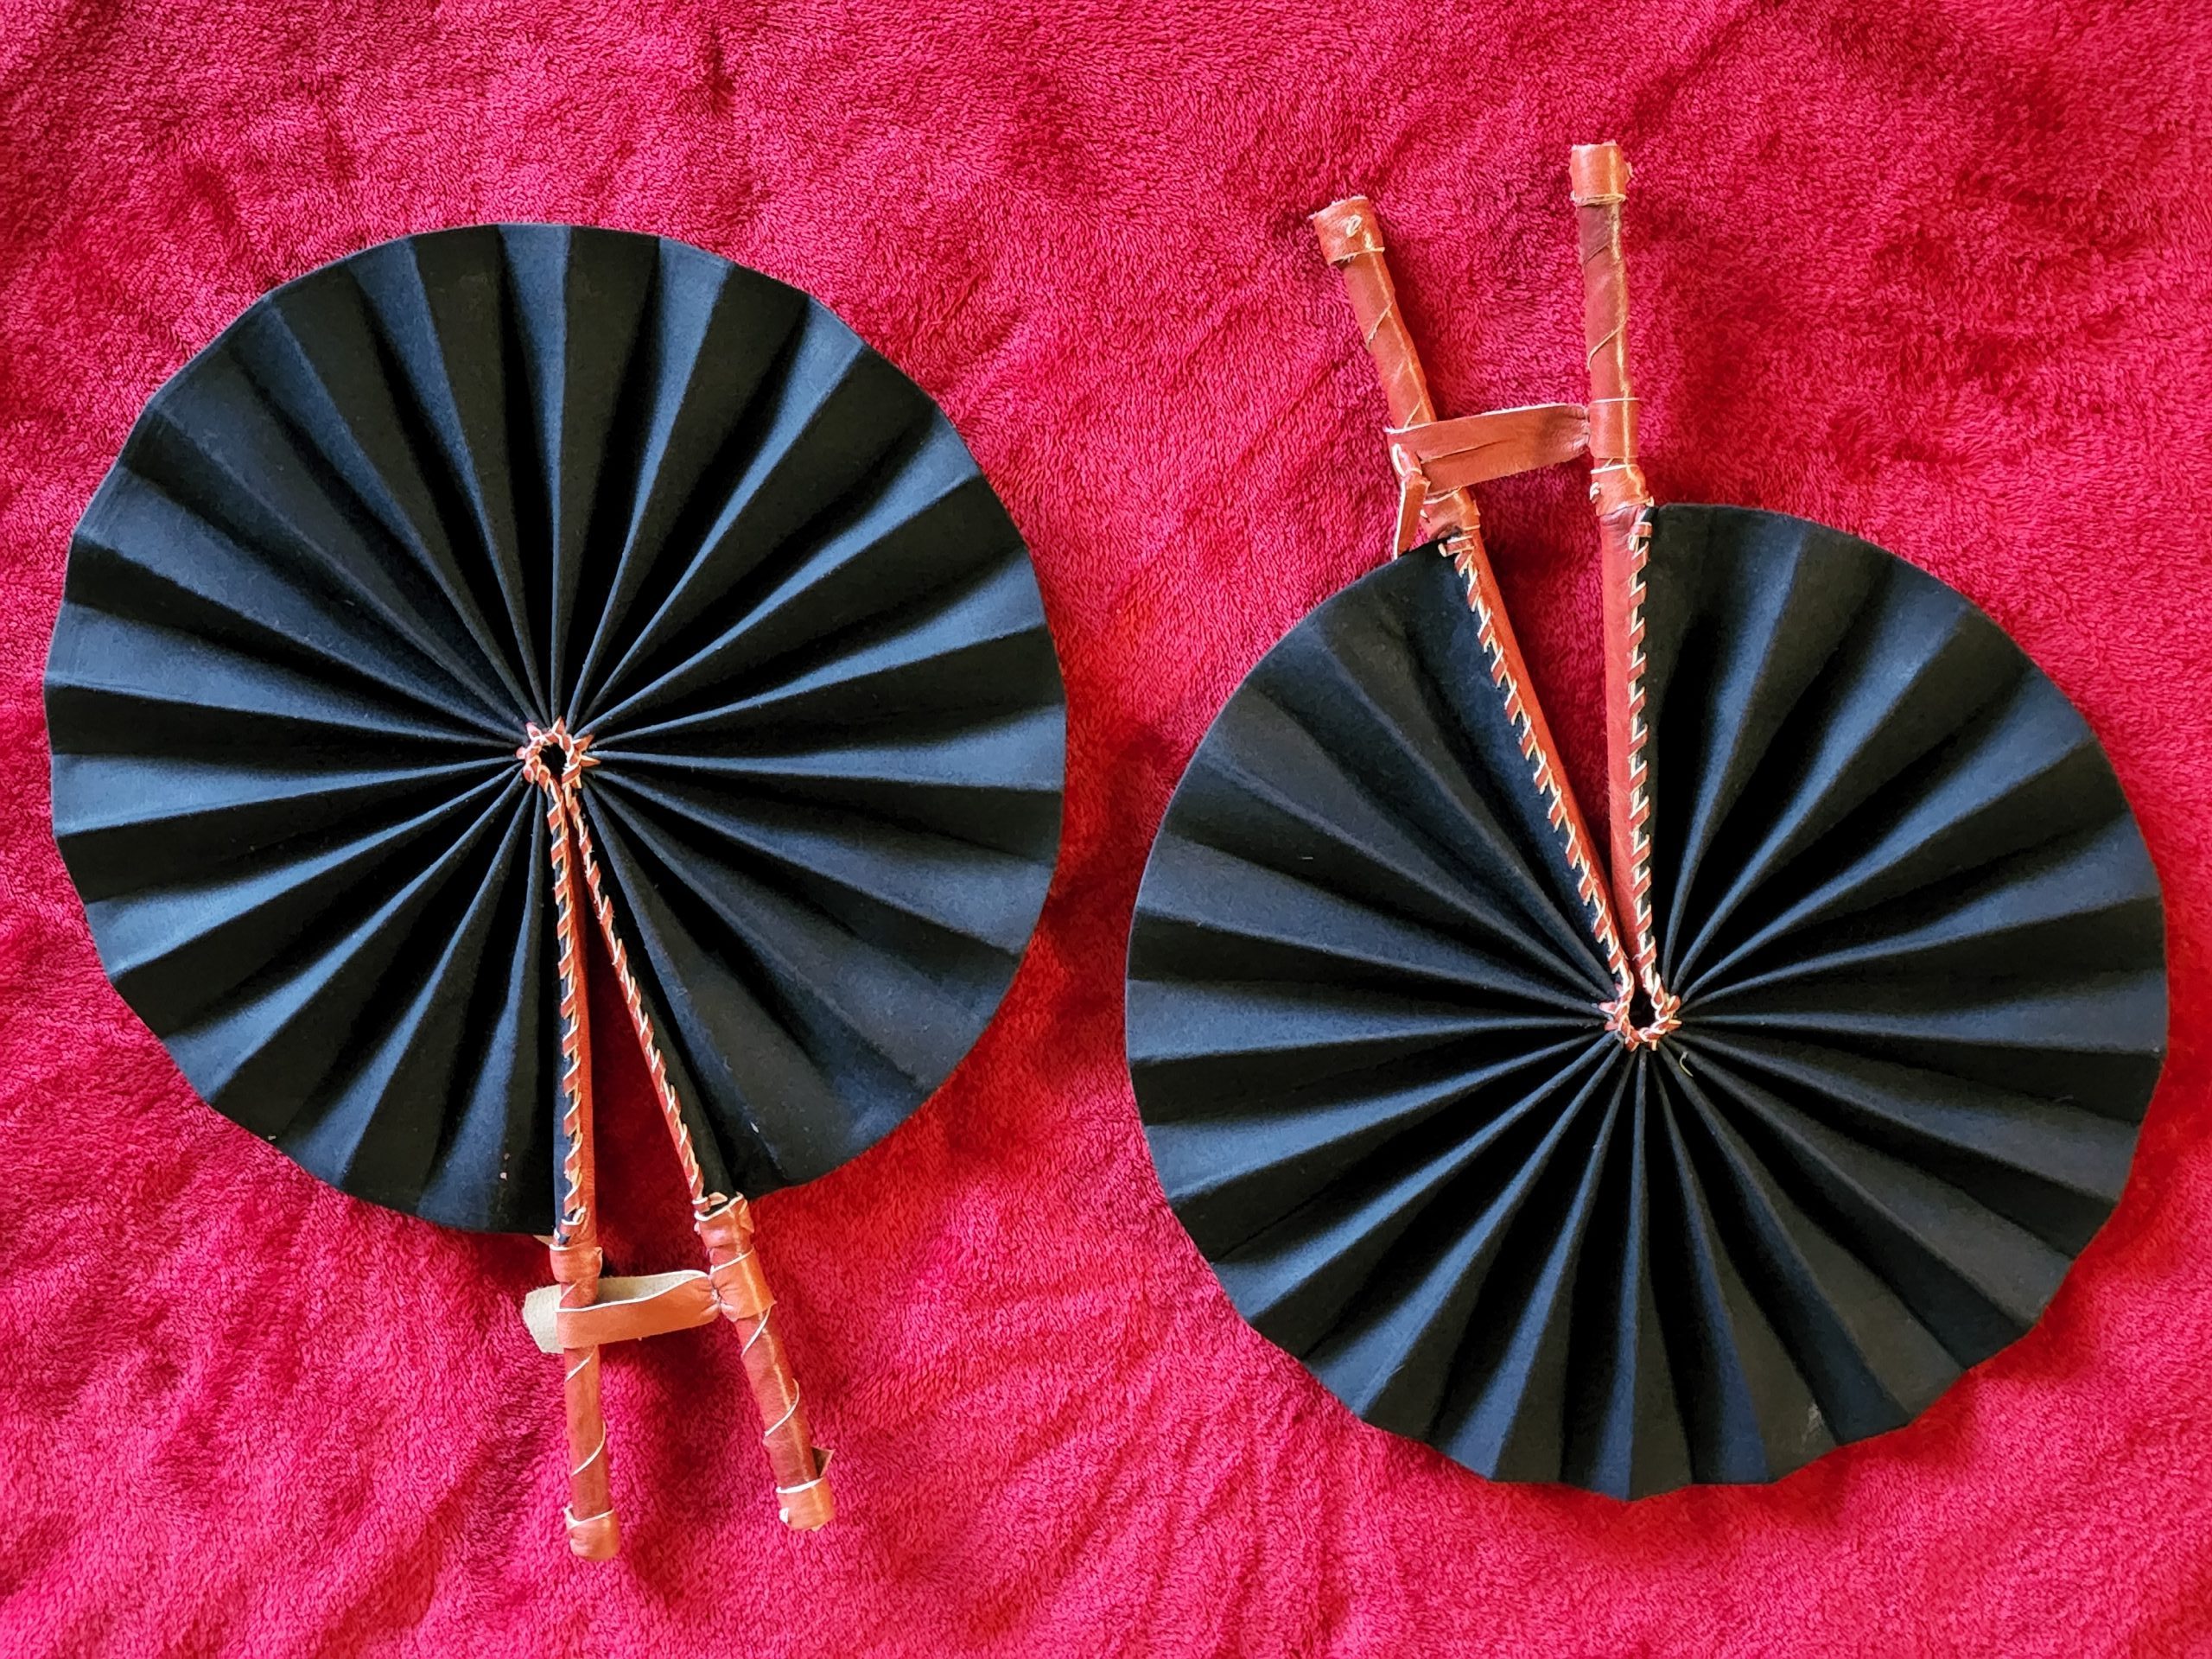
Step 3: Fold the Paper Accordion-style
With your paper cut to the desired size, it’s time to fold it accordion-style to create the pleats of your hand fan. Follow these steps to achieve a neat and uniform fold:
1. Orient the Paper: Place the paper in front of you vertically (portrait orientation) with the shorter edges at the top and bottom.
2. Make the First Fold: Starting from the bottom edge, fold the paper upward about 1 inch (2.5 cm) and crease it firmly. This will be the first pleat of your hand fan.
3. Flip the Paper: Flip the entire paper over so that the folded edge is now facing down, away from you. The folded edge should now be at the top.
4. Make the Second Fold: Starting from the new bottom edge, fold the paper upward about 1 inch (2.5 cm) again, parallel to the first fold. Crease it firmly. This is the second pleat of your hand fan.
5. Repeat the Folds: Continue folding the paper accordion-style, alternating between folding from the bottom and flipping the paper over until you reach the top edge. Make sure each fold is about the same width, resulting in uniform pleats.
Note: The width of each fold will determine the “closed” size of your hand fan, so adjust the width according to your preference. Smaller widths will result in a more compact fan, while wider widths will create larger fan dimensions.
6. Secure the Folds: Once all the folding is complete, hold the folded paper together tightly, ensuring that the bottom edge of the pleats align. Use a paper clip or a clothespin to hold the folds together temporarily.
Now that you have successfully folded the paper accordion-style, we can move on to the next step: securing the bottom of the fan!
When making a hand fan, use a sturdy material like cardstock or thin wood for the base. Decorate with colorful paper or fabric, and secure with a strong adhesive for durability.
Step 4: Secure the Bottom
Now that you have folded the paper accordion-style, it’s time to secure the bottom of the hand fan to keep the pleats in place. By securing the folds, you will prevent the fan from unfolding and maintain its shape. Follow these steps to securely fasten the bottom:
1. Align the Bottom Edges: Hold the folded paper vertically with the bottom edges aligned. Ensure that the pleats are evenly spread out and straight.
2. Apply Adhesive: Using a glue stick or double-sided tape, apply a thin line of adhesive along the bottom edge of the fan. Make sure to cover the entire width.
3. Press Firmly: Press the bottom edges together firmly, making sure the pleats are secure and aligned. Hold the folded paper in place for a few seconds to allow the adhesive to bond and hold the fan together.
Note: If you find that the adhesive is not strong enough to hold the pleats together, you can reinforce the bottom by applying a strip of cardstock or cardboard along the glued edge. This will provide extra stability and prevent the fan from unfolding.
4. Optional: Trim the Bottom: If you prefer a clean and neat finish, you can trim the bottom edge of the fan with scissors to create an even and straight line. This step is optional but can add a professional touch to your hand fan.
With the bottom of the fan securely fastened, you have successfully completed the fourth step in creating your hand fan. Now, let’s move on to the next step: fanning out the paper!
Step 5: Fan out the Paper
With the bottom of your hand fan securely fastened, it’s time to fan out the pleats to create the beautiful structure of the fan. Follow these steps to fan out the paper and create a graceful and functional hand fan:
1. Hold the Bottom: Hold the bottom of the hand fan securely with one hand. This will serve as the anchor point as you fan out the pleats.
2. Gently Separate the Pleats: Using your other hand, gently and carefully separate the pleats of the hand fan. Start at one end and work your way to the other end, ensuring that the pleats unfold smoothly and evenly.
Note: Take your time during this step to avoid tearing or creasing the paper. If the pleats are tightly folded, you may need to use your fingers to help separate them gradually, ensuring a smooth and graceful fan structure.
3. Adjust the Pleats: Once all the pleats have been fanned out, take a moment to adjust them. Ensure that they are evenly spaced and aligned. Make any necessary adjustments to create a symmetrical and visually pleasing fan structure.
4. Test the Fan: Gently open and close the hand fan to ensure that it retracts and expands smoothly. The pleats should fold and unfold easily without any obstruction or resistance. If there are any issues, check if any pleats are stuck or overlapping and make the necessary adjustments.
5. Optional: Press and Set the Pleats: If you want the pleats to hold their shape more firmly, you can place the fanned-out hand fan between two heavy books or objects for a short period. This will help set the pleats and ensure that they maintain their structure.
With the pleats fanned out and the structure of the hand fan complete, you’re almost done! Now, let’s move on to the next step: attaching a handle to your hand fan!
Step 6: Attach a Handle
Now that you have fanned out the pleats of your hand fan, it’s time to attach a handle to make it easier to hold and use. You have a few options for handles, such as a wooden dowel, a popsicle stick, or a chopstick. Here’s how you can attach the handle:
1. Choose Your Handle: Select the type of handle you want for your hand fan. Consider the length and material of the handle, ensuring that it is comfortable to hold and complements the style of your fan.
2. Position the Handle: Decide where you want to attach the handle on the bottom edge of the hand fan. Place it parallel to the pleats, ensuring that it is centered and balanced.
3. Apply Adhesive: Using a strong adhesive, such as glue or a hot glue gun, apply a generous amount of adhesive to the top end of the handle. Make sure to cover the area evenly and thoroughly.
4. Attach the Handle: Press the adhesive-coated end of the handle onto the bottom edge of the hand fan. Hold it in place for a few seconds to allow the adhesive to bond and secure the handle firmly.
5. Optional: Reinforce with Tape or Ribbon: If you want to add extra strength and durability to the attachment, you can wrap a piece of tape or ribbon around the joint where the handle meets the hand fan. This will provide additional support and ensure that the handle stays in place.
Once the handle is securely attached, give it a gentle tug to ensure it is firmly in place. You can also test the fan by opening and closing it a few times to see if the handle holds up. If everything looks good, congratulations! You have successfully attached a handle to your hand fan.
We’re almost at the end of the process. Now, let’s move on to the next step: decorating your hand fan!
Read more: How To Make A Fan Quiet
Step 7: Decorate Your Hand Fan
With your hand fan complete, it’s time to unleash your creativity and add your personal touch by decorating it. Whether you want to keep it simple or make it more ornate, here are some ideas to inspire you:
1. Color and Design: Use markers, colored pencils, or paint to add vibrant colors and patterns to your hand fan. Get creative and experiment with different designs, such as floral motifs, geometric patterns, or abstract art.
2. Stickers and Stencils: If you want an easy and quick way to decorate your hand fan, consider using stickers or stencils. They can add instant flair and can be easily applied to the paper surface.
3. Personalization: Add a touch of personalization by writing your name, initials, or a special message on the hand fan. You can use calligraphy pens or markers to create elegant and stylish lettering.
4. Embellishments: Embellish your hand fan by adding small decorative elements like rhinestones, sequins, or beads. Apply them using glue or create patterns and accents to make your hand fan shine and stand out.
5. Ribbons and Tassels: Attach ribbons or tassels to the bottom edge of your hand fan for an elegant and enchanting look. You can tie them in a bow or let them hang for a graceful touch.
6. Theme-based Decoration: If you’re creating a hand fan for a specific event or occasion, consider incorporating elements that fit the theme. For example, use seashells and sand for a beach-themed fan or feathers and glitter for a festive carnival-themed fan.
Remember, the goal is to express your creativity and make the hand fan uniquely yours. There are no limits to your imagination, so have fun and enjoy the process of decorating your hand fan!
Once you are satisfied with the decoration, let the adhesive or paint dry completely before using or displaying your hand fan.
We’re almost at the end of our hand fan-making journey. Now, let’s move on to the final step: enjoying your beautiful hand fan!
Step 8: Enjoy Your Hand Fan
Congratulations! You have completed all the steps to create your very own hand fan. Now it’s time to enjoy the fruits of your labor and make the most of your beautiful creation. Here are a few ways you can fully enjoy your hand fan:
1. Stay Cool: Use your hand fan to keep yourself cool on hot summer days or in crowded spaces. The gentle fanning motion will provide a refreshing breeze and help you beat the heat.
2. Complete Your Outfit: Pair your hand fan with your favorite outfit for a stylish and fashionable look. Whether it’s a casual ensemble or an elegant gown, your hand fan will add a touch of sophistication and charm.
3. Display it as Decor: Showcase your hand fan as a unique piece of decor in your home. You can hang it on the wall, place it on a decorative stand, or incorporate it into a gallery wall. It will not only serve as functional art but also spark conversation.
4. Gift it to Others: Share your creativity and craftsmanship by gifting your hand fan to friends or family members. They will appreciate the thoughtfulness and uniqueness of a handmade gift.
5. Use it for Special Occasions: Bring out your hand fan for special occasions such as weddings, parties, or outdoor events. It can serve as an elegant accessory or a practical tool to stay comfortable during the festivities.
6. Create a Collection: If you enjoy making hand fans, consider creating a collection of different styles, colors, and designs. It can be a fun hobby and a way to express your creativity while building a unique assortment of hand fans.
Remember, your hand fan is not only a functional accessory but also a reflection of your creativity and personal style. Embrace its versatility and enjoy the pleasure it brings.
With that, you have reached the end of our guide on how to make a hand fan. We hope you had a delightful time creating your own unique hand fan and that it brings joy and comfort to your life. Enjoy the cool breeze and the beauty of your hand fan!
Happy fanning!
Conclusion
Congratulations on successfully completing your hand fan-making adventure! We hope this step-by-step guide has inspired and guided you in creating a beautiful and functional hand fan that reflects your personal style and creativity.
Throughout this process, you’ve learned how to choose the right paper, measure and cut it to size, fold it accordion-style, secure the bottom, fan out the pleats, attach a handle, decorate the fan, and finally, enjoy the fruits of your labor. By following these steps, you have transformed simple materials into a unique and practical accessory.
Whether you use your hand fan to stay cool on hot days, complement your outfit, decorate your home, or even gift it to someone special, it will serve as a testament to your craftsmanship and creativity.
Remember, the joy of creating a hand fan doesn’t have to end with just one. Feel free to experiment with different paper types, patterns, and colors to create a diverse collection of hand fans. Use your imagination to come up with new designs and techniques, and make each hand fan a reflection of your unique style.
We hope this DIY project has sparked your creativity and provided you with a fun and satisfying experience. Hand fans have a rich history and are not only practical but also make a statement. By making your own hand fan, you’ve connected with this ancient tradition while adding your own personal touch.
Now it’s time to enjoy the beauty and functionality of your hand fan. Stay cool, be stylish, and cherish the moments where your creation adds a touch of elegance to your everyday life.
Thank you for joining us on this creative journey. Happy fanning!
Now that you've mastered crafting your own hand fan, why not dive into more creative projects? If you're eager for fresh ideas to celebrate the spring season, our guide on elegant DIY Easter crafts offers a host of imaginative and stylish projects. From charming decorations to festive gifts, these crafts will surely spruce up any Easter celebration. Don't miss out on this opportunity to enhance your crafting skills with seasonal flair!
Frequently Asked Questions about How To Make Hand Fan
Was this page helpful?
At Storables.com, we guarantee accurate and reliable information. Our content, validated by Expert Board Contributors, is crafted following stringent Editorial Policies. We're committed to providing you with well-researched, expert-backed insights for all your informational needs.


0 thoughts on “How To Make Hand Fan”